Chapter 3
Exploring Science with Toys

Even the most basic playthings like spinning tops, floating soap bubbles, and bouncing balls illustrate the principles of science in action—if you look carefully. You can observe and learn about physics, chemistry, electricity, hydrodynamics, pneumatics and hydraulics, magnetism, basic machines, optics, and on and on.

FREE! INSIDE!
Science in Your Cereal Bowl!
Cereal manufacturers learned early on that an inexpensive giveaway inside a box of cereal could inspire a purchase and create brand loyalty with moms and kids. From the 1950s on, the cereal aisle in the grocery store became a mini toyshop with an endless array of plastic baubles, punch-out character masks, and collectible trinkets. Amid the secret decoder rings and cowboy sheriff badges were some cleverly designed toys that ingeniously used scientific principles to amaze and entertain.
Hey Kids! Cereal Science Toys Build Inquisitive Minds 6 Ways!
#1. Frosted Flakes Diving Tony
This cereal science toy was a witty 1981 remake of a classic scientific toy, the Cartesian Diver. This miniature version of Tony the Tiger mysteriously obeys your commands as he dives and rises inside of a water-filled soda bottle. Grrreat!—but how did it work?

The scientific secret used the incompressibility of water along with the ideal gas law:
- PV = nRT
In short: The volume of a gas is inversely proportional to the pressure on it. The plastic Tony was molded to be neutrally buoyant and to float near the top of the bottle. When you squeeze the bottle, the pressure on the water compresses the air bubble inside Tony. The reduced bubble displaces less water, making Tony less buoyant, and he sinks to the bottom. When you release the pressure, the bubble expands and displaces more water. Tony becomes buoyant again and rises back up. Because you can’t see the bottle being squeezed, the up and down diving action seems magical! You could even subtly control your squeeze to make Tony pause and float at any depth. The side of the cereal box had a matching graphic of a deep-sea dive game complete with a wrecked ship, sunken treasure, and a menacing shark—also grrreat!

But one mystery remains: why is the Cartesian Diver named for the wrong Frenchman—René Descartes, instead of Blaise Pascal, the 17th-century father of hydraulics? Maybe Tony is trying to tell us: “I sink, therefore I am!”
Today toy collectors covet Diving Tony and he’s hard to find; but you can build your version at home!
#2. B’sun Whistle Phone Hacker
How did a simple cereal-prize whistle empower an early phone hacker and inspire the founders of Apple Computer? In 1971 Quaker Oats packed FREE “Bo’sun Whistles” inside boxes of Cap’n Crunch cereal. Molded in bright colors and embossed with the Cap’n and Seadog, this giveaway produced a piercing two-toned blast which, like a real bosun’s whistle, could be heard over the sounds of the sea or in bad weather.

Coincidentally, the whistle’s perfectly pitched 2600Hz tone could also be heard by AT&T’s analog telephone trunk-line switching circuits. Tricking the billing circuits resulted in FREE (well, stolen) long-distance phone calls for anyone who knew the illegal secret. Phone phreaker and computer programmer John Draper, nicknamed “Captain Crunch” for infamously demonstrating this slick whistle trick, went on to develop electronic tone-generating circuits to do the same thing. Draper’s technical skills impressed a young Steve Wozniak, who hired him to create circuits for Apple Computer. Unfortunately, publicity from a magazine article “blew the whistle” on Draper and he was convicted on toll fraud charges. He wrote the first word processing software for the Apple ][ while in “the brig.” Today, Captain John Draper is FREE, and modern digital phone circuits are unaffected by these nautical noisemakers.
#3. Balloon-Powered Rocket Cars
A less controversial air-powered cereal toy was the balloon-powered car. There were many versions of the toy, but they all obeyed Newton’s third law of motion, the mutual forces of action and reaction between two bodies. The force created by a jet of air escaping from a rubber balloon was powerful enough to propel a toy car in the opposite direction. As early as 1950, Kellogg’s offered a Jet-Drive Whistle Loco available by mail for 25 cents and a box top from Kellogg’s Corn Flakes. According to the promotional literature at the time, the four-inch-long injection molded plastic steam locomotive was “Accurately scaled—even the rivets show).” The corny sales pitch to grocers touted “All steamed up—and ready to go! Get aboard—here’s your ticket to biggest sales yet! Is there a kid in America who wouldn’t want one?” Only the mailman knew for sure.

This science-based gimmick was an irresistible force that kept coming back. In 1961, Nabisco’s Rice and Wheat Honeys cereals came with updated Racing Robot and Speeding Spaceman variations. By the 1970s, Quaker Oats included their own version: Balloon Racers, FREE inside boxes of cereal. The more compact 2½″ design kept plastic costs down, and, thanks to Newton’s second law of motion, Force = (mass) × (acceleration), kept car speeds up. With less mass, these smaller cars featuring the Cap’n, Jean LaFoote, and Smedley the Peanut Butter Crunch elephant went even faster on the same balloon power!
#4. Mighty Mini-Magnifiers
The science of optics has also proved to be a popular platform for premiums. Periscopes, spyglasses, and lenticular lens “wiggle pictures” have all been offered as fun freebies. You almost need a real magnifying glass just to see the real working mini-microscope, free in Wheaties! More of a miniature magnifying glass, the single plastic lens in an adjustable eye-piece tube afforded very limited magnification and plenty of optical distortion—but it really worked!


#5. Give-Away Gyroscope
The science behind even the simplest toy top or yo-yo could make your head spin. The kinetic energy of a flywheel is described by the formula:
- Ek = ½ Iω2
where E is the amount of kinetic energy, ω is the angular velocity (how fast it’s spinning), and I is the moment of inertia (resistance to change in spin). To find the moment of inertia for a disc shape with a large center hole, just use I = ½ m(r12 + r22). Got that?
Fortunately no math skills were required to have fun with Quisp cereal’s Gyro-Cycle or Flywheel Car premiums. One tug of the rack-and-pinion geared pull strip and the mini flywheel instantly revved up to high speed (plenty of ω!). The clever design also included a metal disc in the flywheel (much more mass than a plastic one) for increased I. All that ω and I resulted in enough kinetic energy to send Quisp, the spin-powered spaceman, quickly zipping across the floor.


#6. Bubble-Powered Sub
One classic cereal toy has stayed crunchy in the milk of time for over 50 years: the baking powder–powered diving sub. In 1955, boxes of Kellogg’s Rice Krispies promised “FREE INSIDE! An actual working ATOM SUB!”

In reality, a simple kitchen chemical reaction provided the fuel for millions of these miniature marvels. A pinch of baking powder from Mom’s pantry contained both an alkaline, sodium bicarbonate (NaHCO3), and an acid, cream of tartar (potassium bitartrate, KC4H5O6). When combined in water, the two react:
- NaHCO3 + KHC4H4O6→ KNaC4H4O6 + H2O + CO2
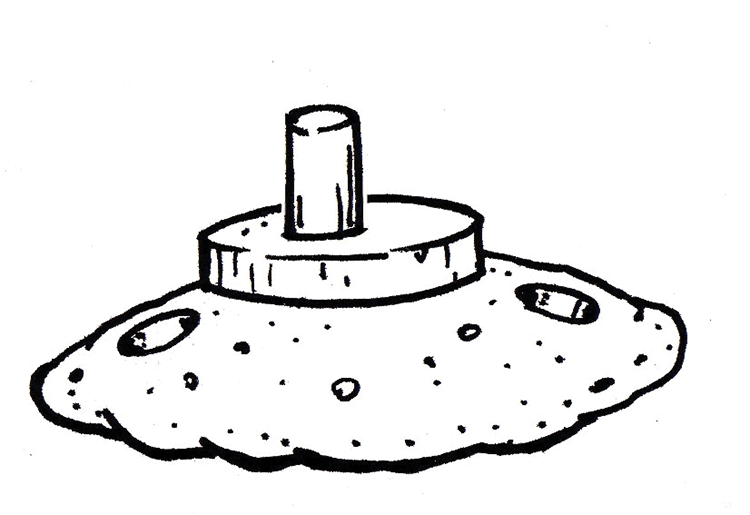
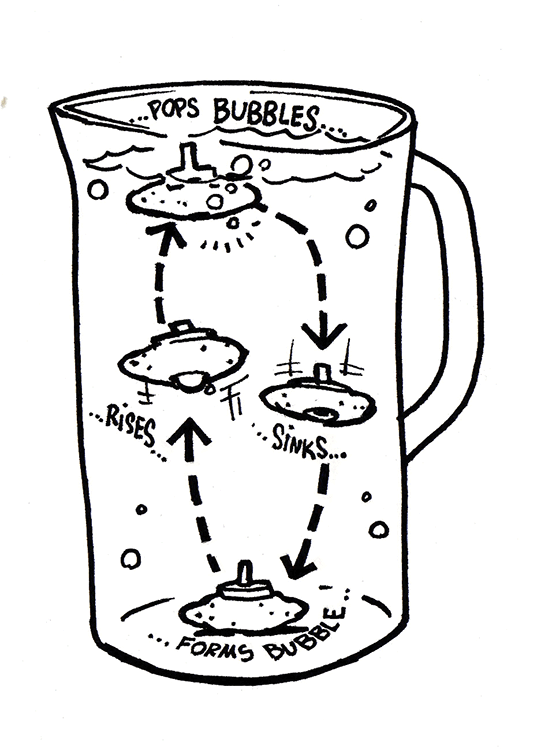
The reaction produces a salt, water, and carbon dioxide gas: CO2. In recipes, the CO2 makes quick breads and muffins rise. In this case, the CO2 makes toy submarines rise. The buoyant force of the bubbles formed is enough to lift the submerged sub. When it surfaces, the sub tips to one side, the bubbles are released, the sub sinks, and the cycle repeats.
Over the years, there were many versions of this buoyant bubbling toy: submarines, diving frogmen in assorted sizes, killer whales, sharks, and mechanical monsters. Although the most famous was the 1955 submarine design, created by the brothers Benjamin and Henry Hirsch, a patent search finds an even earlier design dating from 1920. Who knows how many other versions are floating around?


Hey, Kids! Now you can make your OWN version of the famous diving sub—no box tops needed! Just ask mom for a potato to make your own working version of the diving sub.
Cartesian Diver

I used a short piece of clear PETG tubing with a matching vinyl cap. I also cut a piece of solid styrene rod that fit snugly inside the tube. File or sand a small flat area along the length of the rod. This provides a channel for the water to compress the bubble of air up inside the cap. Cap the tube and insert the rod. Test the diver in a sink of water for neutral buoyancy. Place the diver in the water with the cap facing up so that a bubble of air is trapped up in the cap. Slide the rod in or out to adjust the size of the air bubble inside until the diver just barely floats to the top.
Fill a one-liter plastic bottle to the top with water, insert your diver, and cap tightly. When you squeeze the bottle, the water pressure compresses the air bubble, which then displaces less water, and the diver sinks. When you release, the bubble expands, and the diver rises. With a little practice you can make your Cartesian Diver obediently rise or dive on your command.


Scan the code to see the Cartesian Diver do its thing!
If you like, add a scuba diver or octopus graphic from the clip-and-use pages in the appendix.
Diving Spudmarine

First, cut a potato into a ¾″ diameter cylinder, about 3 inches long. Or, just use a small fingerling potato about that size. Use a piece of ¼″ brass tubing as a plug cutter. Press the tube all the way into the potato to make three through-holes along its length. This will reduce the mass of the potato for better diving.

Enlarge the bottom of the center hole to make a flared conical opening. This will create an air chamber for the bubbles.
Next, make a periscope. Cut a thin piece of wood about ½″ by 1″ and drill a ¼″ hole in the center. Cut a 1″-long piece of ¼″ wood dowel and insert it in the hole.

Place the periscope into the middle hole in the potato.
Time to test: place the Spudmarine into a tall pitcher or vase of water. If it floats, cut off some of the periscope and try again. If it sinks FAST, trim off some of the potato and try again. If it sinks very s..l..o..w..l..y, it’s ready! The sub should be just ever-so-slightly heavier than neutral buoyancy for best diving action.
Remove the sub and shake it dry. Pack some baking powder (not baking soda!) into the bottom of the center hole. Use some more wood dowel to tamp it in tightly.

Gently lower the sub back into the water and let it sink, then watch it bubble . . . rise . . . breach the surface and burp its bubbles . . . and then sink again! How many times will your sub rise and sink before you have to reload the powder?
Victorian Toy and Flatland Rockets
Here’s a Victorian-era plaything: a fish that swims by the power of surface tension—and a modern version of the toy that uses a special floating plastic.
1. Try a Quick Paper Version!
Find the fish images in the appendix and cut out on the dotted line. Fill a small pan or cookie sheet with clean water and carefully float a paper fish in the middle of the pan. With an eyedropper, drinking straw, or toothpick, place a single drop of olive oil in the fish’s cut-out circle. The oil quickly spreads out the slit and across the water. The fish “swims” in the opposite direction, like an exhaust-spewing rocket subject to Newton’s third law of motion. Sadly, a soggy paper fish is only good for a single use.

2. Plastics to the Rescue!
Now try this new, more durable version: find a flexible lid from a margarine or yogurt container. Look for the recycling symbol 2 or 4 for low- or high-density polyethylene (PE). Fun fact: PE is the one of the few non-foamed plastics that floats!
Use a paper punch to make a small circular hole in the lid, then cut out the “rocket” shape from the clip-and-use version in the appendix.

Float the rocket in a pan of clean water. Dip the tip of a toothpick in detergent and momentarily touch it inside the rocket’s round hole. As the detergent dissolves, it spreads down the slit and out along the surface of the water—the rocket shoots forward! Touch it again. Zoom!

Another force is also at work: the Marangoni effect, the difference in surface tensions created by the molecules of detergent as they make the water slipperier and “wetter.” The surface tension is reduced behind the rocket, causing the water in front to contract, pulling the rocket forward.
These tensions, forces, and actions all exist at the single-molecule-thick surface of the water—similar to the two-dimensional world in Edwin Abbott’s Victorian-era book, Flatland: A Romance of Many Dimensions! Your margarine-lid rocket only works in two-dimensional space. The waterproof plastic rocket lasts much longer than the soggy paper fish. After a few uses, though, you’ll have to change the water for the effect to work again.

Rocco and Violet Marino launching some Flatland Rockets. Photo courtesy Robert Marino.

Scan this QR code to see the Flatland rocket in action.
Good Vibrations:
Groovy Mechanical Sound Players
Long before iPods, mp3s, or even electricity, people recorded and listened to music and speech by all-mechanical, analog means. Thomas Edison’s first important invention after setting up shop in Menlo Park was the practical phonograph. His 1877 design featured a sharp stylus that pressed into a tinfoil cylinder. When he shouted into a horn as he turned a crank, the vibrations of his voice made a pattern of indentations in a corkscrew groove along the surface of the spinning cylinder. When the stylus retraced that up-and-down pattern, the vibrations reproduced the sound of his voice. Edison famously demonstrated the effect by reciting the nursery rhyme “Mary Had a Little Lamb” and then playing it back.

It’s telling that he chose so frivolous a passage. Although the original intent of the invention was not for entertainment (Edison was working on a way to record telegraph messages), the first application for the phonograph was in a talking doll. Unfortunately the fragile, bisque-headed dolls proved too expensive, unreliable, and difficult for children to operate (you had to turn a crank smoothly and continuously to make the doll talk). The doll was a commercial flop and Edison moved on to other projects.
By the early 1900s, others had made improvements on the phonograph by replacing the foil with wax, incising rather than impressing the grooves, and switching from individually recorded cylinders to discs that could easily be duplicated by stamping. Each of the two incompatible formats had their fans. Some argued that the constant stylus speed across a cylinder together with the “hill-and-dale” modulation (grooves that wiggled up and down) of Edison cylinders reproduced sound better than disc format with sideways modulation, varying stylus speed, and tone arm tracking error. No matter—like the Betamax/VHS showdown, the technically inferior but more popular gramophone disc format prevailed. Then with the advent of radio and electronically amplified phonographs, wind-up mechanical sound players died out . . . until 50 years later.
In 1960, Mattel introduced a new talking doll that was everything Edison’s doll wasn’t. Chatty Cathy was sturdy, great sounding, affordable, and most importantly, easy for a child to operate. Just pull the string and Cathy said one of 11 different phrases, like “Tell me a story!” or “Please take me with you!” Mattel gave her a soft vinyl head with rooted hair and accessories like strollers and a wardrobe of themed outfits, all “sold separately” of course. Thanks to her nationwide TV campaign, Chatty Cathy was a big success.
What made it all work was the cleverly designed voice unit, which was patented by ex-Raytheon missile engineer Jack Ryan, Mattel’s in-house toy wizard.

Instead of turning a crank, the child simply pulled out a string, which wound up a powerful metal spring. In the same motion the string (ingeniously threaded right through a hole in the tone arm) automatically lifted and pulled the tone arm back to the beginning of the record.
The miniature record had concentric annuli. Unlike a single continuous groove (like on an LP), the disc had multiple grooves that were interleaved and spiraled around each other. They were arranged so that the multiple lead-in grooves of the tracks were distributed around the rim, like numerals on a clock face. When the tone arm dropped on the spinning record it would land at random on any one of the tracks. “You never know what she will say next!”

Unlike in the gramophone, the styrene speaker cone in this voice unit was fixed in one position. A tiny spring-loaded piston pressed the needle into the hill-and-dale modulated groove. It also acoustically coupled the speaker cone to the curved ridge on top of the moving T-shaped tone arm. The record was molded out of tough, slippery nylon to be both durable and smooth running. This design produced loud, clear sounds with great fidelity. The constant pressure of the piston kept the needle in the groove so the voice unit didn’t rely on gravity like a gramophone—it would work upside down, or at any angle, perfect for a toy.

To keep the record spinning at a smooth and steady speed, it was connected via a rubber belt and pulley to a die-cast zinc centrifugal regulator. Like a spinning figure skater, the arms of the regulator would move in and out in response to any variation in speed. Too slow and the spring-loaded arms snapped inward, speeding it up. Too fast and the arms swung out, where their felted tips dragged against the housing, subtly and gently braking the speed.
Mattel continued to improve their voice unit by updating to a more elegant S-shaped negator spring, which provided constant force in a compact size. The powerful spring motor had extra torque, which was used to power additional mechanical gimmicks on various toys. Mickey Mouse Chatter Chum moved his head up and down as he talked. Talking Shrinkin’ Violette, a doll based on ABC TV’s The Funny Company fluttered her eyelashes and moved her lips.


The same basic mechanical sound player was used in dozens and dozens of other toys: Barbie dolls, talking books and games, puppets, and lots more. Because these miniature sound-makers reproduced recognizable voices and sounds, they were a natural for items that were based on well-known characters with famous catch phrases. Just pull the string to hear Robin Williams as Mork from Ork say, “Nanoo, Nanoo!,” Herschel Bernardi as Charlie the Tuna say, “Hey, Stahkist, I gaht good taste!” or Mel Blanc as Bugs Bunny say, “What’s up, doc?” The list of character voice toys was endless: Casper the Friendly Ghost, Beany and Cecil, Doctor Doolittle, The Monkees, Herman Munster, Woody Woodpecker, Flip Wilson, Fred Flintstone, and many more.
The pull-my-string action was so beloved that it was used to trigger the Toy Story Talking Woody doll, even though the toy’s sound player was entirely electronic.


The longest-lived pull-string product line was the preschool See ‘N Say. A pointer attached to the record’s shaft allowed a kid to select the particular sound they wanted to hear. Just point and pull to hear nursery rhymes, letters of the alphabet, numbers, or animal sounds. “The cow says mmmMMOOooooo!” Today, the iconic Farmer Says See ‘N Say talking toy lives on in a smaller, cost-reduced version. The string still pulls out and the pointer still spins, but all the sounds are produced electronically.
Even after the 1970s when all-electronic talking toys were introduced, these mechanical players offered an inexpensive way to reproduce natural voices and sound effects. One toy from 1982, Mattel’s Teach & Learn Computer, combined Victorian and Space Age technologies. A microprocessor was used to accurately drop the tone arm onto a spinning record, landing at the exact instant to play the desired single track out of 40 different lead-in grooves whirling by.

The TLC tone arm (in white) is released by the small motor (the gray cube to the right) controlled by the electronics.
A TLC interchangeable record with 40 different recordings, each track with its own lead-in groove.

Mechanical sound players continue on in novelty applications. Scan the QR codes to see some videos of a Japanese all-cardboard record player toy and thumbnail-activated talking strips. Hill-and-dale modulation lives on!


And coming full circle, you can currently buy plastic reproduction kits of all-mechanical phonographs. Gakken, the Japanese science kit maker, has cleverly updated Edison’s phonograph design to use plastic drinking cups instead of tinfoil cylinders and it’s powered by a small electric motor instead of a hand crank. There’s also a Berliner Gramophone Kit disc cutter with a wind-up motor. See the Maker Shed online for the latest offerings.
Groovy, baby!
Voice-Powered Pigs
You never know where the next new toy or game idea may come from. Years ago, I was sitting in a lecture hall listening to a boring speaker drone on and on. ZZzzzzz…. That droning sound was the inspiration for a new game idea. I wondered: could I use the vibrations from the sound of my voice to move tokens across a track? I couldn’t wait to get home and test it out using some pieces from an old electric football game on a thin, resonant surface—it worked!
So I made a four-player “pig race” prototype: each player yelled into a flexible tube that directed the sound to a stiff and lightweight styrene track. As the track vibrated, the pig tokens moved along on little bristles. Each player had his or her own track, which all ended in a center finish line. The players yelled “sooo-eeeey!” and their pigs skittered and jiggled along toward the finish. Yell the most to win the race!


Hog Holler was produced in 1990 and was featured on The Tonight Show. Johnny Carson and Ed McMahon hilariously hooted and sooo-eeeey-ed to demo the game on network TV—a long, long way from the boring lecture hall!
Scan the topmost QR code to see the commercial for Hog Holler.
Scan the lower QR code to see a clip of Hog Holler on The Tonight Show.
Cereal Box Sound Racers
Build your own version of this voice-powered race game. Hoot and holler through the tubes to send the tiny tokens skittering across the cereal box. First token to get to the edge and fall off wins!
1. Cut
Using the hobby knife, cut a thin disc from the cork. It should be about 1⁄8″ thick.

Use the tip of the knife to pierce through the cork disc to make three slots. Make the slits all at the same slight angle, about 15º degrees from perpendicular.

2. Assemble

Insert the pointed end of a pick through the slit until it sticks out about ¼″. Insert the other two picks in the remaining two slits. Adjust the picks to stick out the same length to make three little angled legs to support the disc. Gently spread the two rear legs apart as shown. Snip the other ends of the picks, leaving just the legs. Adjust the legs as needed so the disc stands level.


Side view with angled legs.
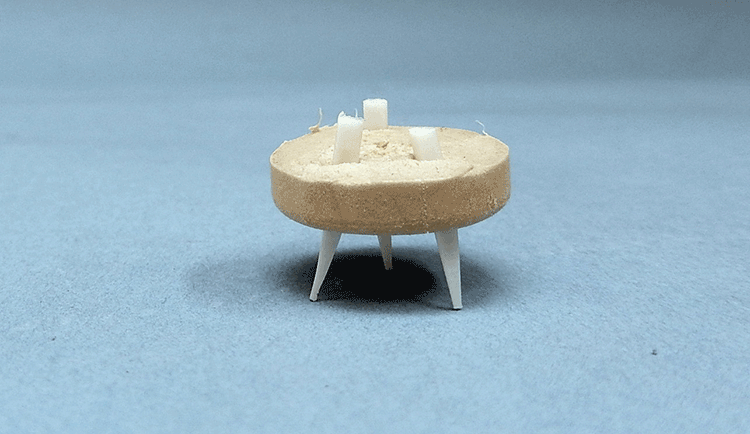
View from back with spread rear legs.
Make a few more tokens from the corks and picks. Mark the tokens with colored marker.
3. Race!
Place the cereal box flat on the tabletop. Each player chooses a token and puts it together with the others on the middle of the box. Gently touch a paper cardboard tube to the top surface of the box but away from the tokens. On the signal all players make a long “WHOOOOOooooo” sound into the tube. Try different pitches high or low, loud or LOUDER to find the best resonant frequency to make the tokens skitter along. Keep hooting until one token gets to the edge of the box and falls off—the winner!

Mastering 3D Views!
With ever more 3D movies and virtual reality viewers like Oculus Rift, three-dimensional entertainment is hot! Here’s a look back at a clever design for taking and viewing stereo photography long before digital cameras and smartphones.
Wouldn’t it be fun if you could take your own family pictures in thrilling 3D? That’s what William Gruber thought back in 1939. Although stereo photography had been around for years, creating your own 3D photos was more than a little complicated. It required special cameras and lots of technical know-how to take the two images that would “fuse” to create a deep 3D space. That was fine for hard-core hobbyists, but what about the average person? For them, Gruber elegantly combined several elements to create View-Master, a system for making and viewing 3D.

Gruber realized that the then-new Kodachrome 16mm film could be used for more than just movies. The long strip of film could be cut into tiny, individual frames—an economical way to make millions of vibrantly colored transparencies.
Gruber then laid out the frames as stereo pairs in a ring around the edge of a flat disc. The intraocular distance (the distance between your eyes) determined the disc’s diameter at 3 inches. A disc that size (called a “reel”) was just big enough to hold seven pairs of 16mm frames of film. Voilà!—the View-Master’s haiku-like sequence of seven images per reel was born.
The first View-Master viewer was made of brittle phenolic plastic with a split hinge that opened to change reels. As you pulled down on the lever, the reel would swivel on a center pin, swinging the next image into view with a snappy sound. That “tug, swirl, clack—Wow!” is the well-known and beloved View-Master 3D viewing experience. (To this day, View-Master reels are still made with that same punched center hole, even though it hasn’t been used in viewers in the last 60 years! How’s that for backward compatibility?)
Forget Grandma’s klunky black-and-white stereopticon cards. Now everyone could easily view colorful 3D pictures anywhere. View-Master went on to make and sell more than 1.5 billion reels with images from around the world, scenic wonders, coronations, animals, fairy tales, and more. Like the ad says, “the breath-taking beauty of View-Master pictures is a new and delightful experience.”

A parade of selected View-Master viewers (l to r): Model B 1940s; Model C with light attachment, 1950s; Model D with adjustable focus, 1960s; Model M with push button advance, 1980s; Model “Virtual Viewer” with large lenses; and at top, the classic Model L, still made today. As of this writing an all-new View-Master is being developed: Mattel has reenvisioned Google’s Cardboard smartphone holder into what promises to be an engaging, interactive, virtual-reality viewer.

But how do you take your own 3D View-Master pictures? The second part of Gruber’s system was the 1950 View-Master Personal Stereo Camera. It used Kodachrome slide film for brilliant color and smooth, grain-free results. But where other stereo cameras took full-frame 35mm images that required complicated mounting (more about that later), the View-Master Personal Stereo Camera created the same 16mm-size images to fit the standard View-Master reel. That meant only half of the width of the 35mm filmstrip was used.
Gruber’s aha moment came when he envisioned running the film through the camera twice: once as the film was pulled out of the canister, then again as the film was wound back into the canister. What made it possible was the film miser, an elegant solution with movable lenses.

With the dial set to “A” the camera takes images along the bottom half of the film as it’s wound out of the canister.
At the end of the roll you’d simply twist a dial.

The swiveling twin lenses would be repositioned from the bottom half of the filmstrip to the top where they would make a second strip of stereo images.

Using a 36-exposure roll of film, the View-Master Personal Stereo Camera yielded a whopping 69 stereo images. Wow!
With lots of other clever features, the View-Master Personal Stereo Camera was a breeze to use.
A bubble level appeared right in the viewfinder to help you hold the camera level. When taking pictures in “you-are-there” 3D, you don’t want sea-sickening tilted horizons.

Built into the top of the camera was the Expo-Sure, a clever light-metering system. First, you set the speed of the film you were using (100 ASA was the top speed setting!) and select the season (winter or summer lighting). To take a picture, you set the f-stop and shutter speed control knobs to match up the subject color (marked dark, average, and light) to the sky brightness (bright/sun through cloudy/dull). When you lined up the marks, the f-stop and shutter speed were automatically set for a perfectly exposed picture. No light meter needed. It also indicated the depth of field right on the dial. Did you want more of the picture in deep focus? You would just use a smaller aperture. The Expo-Sure automatically adjusted for the new shutter speed setting—it was an all-mechanical analog computer!

The camera’s focus was fixed, but for close-up subjects, a snap-on lens attachment would add magnification and slightly change the angle of the two lenses—like crossing your eyes to thread a needle. For indoor or night shots, there was a flash unit that synced to the camera and fired flash bulbs.
After taking the pictures, the film was developed like any other roll of slide film. Instead of being cut up and mounted into individual slides, the film would be left uncut as one long strip.
With other 3D cameras, you’d have to carefully measure and cut the left and right images from the filmstrip, then manually trim and mount them into a frame, spacing and aligning the images by hand. One slip of the razor blade or sloppy alignment and you’d have ruined your picture. Again, too much trouble for most casual photographers.

No worries. The next element of Gruber’s View-Master system, The View-Master Film Cutter, made it easy to create your own V-M reels. It had twin precision cutting dies and a rock-solid filmstrip advance mechanism. With a twist of the knob, the sprocketed film automatically locked into position. You pressed the lever down—kaCHUNK!—and both left and right images were crisply punched out with a single stroke. You inserted each chip of film into its matching slot in an empty View-Master reel. No tricky alignment needed: the precise slots snugly held the film in perfect registration. There were even blank spaces on the reel to write your own captions for each of your seven images.
Because the View-Master reels you made would fit any View-Master viewer, you could send reels to friends and they could view them with the viewers they already had or could easily get. But for the ultimate in sharing your 3D View-Master pictures with a group, there was the Stereo-Matic 500 projector, the last part in the View-Master system.
The Stereo-Matic 500 projector featured twin lenses that automatically aligned the left and right views as you focused. Its polarized filters matched the lenses in the special glasses the audience wore. Your photos were projected in bright, colorful, thrilling 3D for all to see up on the silver screen (a metallic screen surface was required to maintain the polarization).
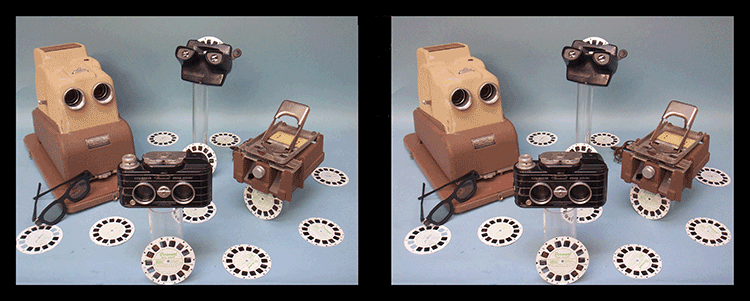
You can see this picture in 3D by “free viewing.” Hold the page at arm’s length and cross your eyes. Relax your focus and adjust your gaze so that you see three boxes. The center overlapped image will “pop” into 3D as you focus on the black camera in the middle.

View this anaglyph image using red/green filter 3D glasses. Remember “right eye = red.”
The entire View-Master 3D system worked quite well. With rugged construction and clever design, my camera, film cutter, and projector still work flawlessly after 50 years. I’ve taken thousands of 3D images: wedding albums, birthdays and holidays, baby pictures and family events, scenic travel photos, even some “artsy” shots—all with great results.
Traveling with the View-Master camera is great fun and a real conversation starter among fellow travelers and other photographers. The camera’s unique sliding “guillotine” shutter makes a distinctive pishhhhhht-click sound with each picture you take and gets plenty of attention, wanted or not. I’ve often gotten curious looks and been asked about my unusual camera on trips abroad. Qu’est-ce que c’est cette caméra? ¿Qué clase de cámara es ésa? I’d just pantomime holding up an imaginary View-Master viewer while make the “flicking the lever” gesture and I’d get knowing smiles and nods back.
Once an all-ages, all-family product, today the View-Master brand continues on as a preschool toy. Making your own 3D View-Master reels is still possible, though you’ll have to be resourceful. Vintage View-Master cameras, projectors, and accessories can be found on eBay (and at collector prices!). Kodachrome film is now just a colorful song lyric, but Fujichrome 35mm slide film and developing is still available.
One way or another you, too, can still make friends and family go “Wow” with your own personalized View-Master 3D photos. Determined do-it-yourselfers can still have fun making their own View-Master 3D reels using modern digital cameras. Service bureaus can print your digital files to high-quality transparency film. Designer Shab Levy offers an ingenious system and kit for View-Master reel making (see below).
You can also hack a low-cost hardware store item into a slide bar for taking stereo images with your regular digital camera or smartphone.
Level Best 3D Camera Slide Bar Hack
For taking 3D photos with a regular camera you need a tripod and stereo photo slide bar. Professional slide bars cost $50 or more, but you can make a DIY slide bar fast and cheap that will work just as well. Here’s how:

Find a T-square with a frame that’s big enough to sit flat on the top of your tripod head. Drill a 5⁄16″ inch hole in body of the level to fit onto the tripod’s stud, or if needed, add a ¼″-20 bolt and nut to attach to the tripod.
Drill another hole near the end of the steel rule to hold your camera. Attach your camera with a ¼″-20 bolt and a nut. Carefully thread the bolt into the camera’s socket, and then tighten up the nut behind the rule to secure the camera. You’re done! (If you have an adapter that will mount a smartphone to a tripod, use that to mount to the slide bar.)
To shoot 3D, level the camera on the tripod. Loosen the T-square thumbscrew and slide the bar so that the camera is against the tripod head. Retighten the screw and take one picture. Loosen the screw, slide the camera bar over 2½″ (that’s the standard intraocular spacing for normal 3D picture taking) and retighten the screw. Take your second picture. Now you have a stereo pair of images, one for each eye. Of course, if your subject moved between the two exposures the 3D effect is lost. Works best with static scenes.


You can print out your pictures side-by-side for free viewing (like the 3D pictures in this chapter), or use Photoshop to combine the images into a red/green anaglyph and view with some red/green glasses. To make your own View-Master reels, I refer you to Shab Levy’s slick kit with everything you need: precision die-cut empty reels, software templates, a mounting rig and complete instructions. As of this writing, you can find it at: gravitram.com/a_kit_for_making_your_own_custom.htm.
Colorful Comic Kaleidoscope
Ordinary kaleidoscopes need ambient light to work: you view by pointing it to the light. This one has built-in illumination so you can hold it right up against a printed page, like a comic. The special RGB LED (RadioShack 276-016) has a color-changing feature that continuously cycles through a rainbow of colors, making viewing black-and-white comics a trippy treat!

Make the body from a 1¼″ diameter Tube-Pak cut to 6½″ length. Cut three strips of black ABS 11⁄8″ wide and 6½″ long. Arrange in a triangular shape with the shiny sides in and insert into the tube. The three shiny surfaces make a great first-surface mirror kaleidoscope!

Cut a 11⁄8″ diameter disc out of ABS. Drill or grind a ¾″ hole in the center. Drill three small holes near the edge and thread the LED’s legs through. Bend the legs to ensure the LED will shine inside of the mirrors when the disc is in place. Attach the switch to the disc with superglue.

Wire the LED’s flat-side lead to ground of a 3V button cell battery holder and wire the center leg to positive. Then wire an SPST momentary switch between the third LED leg and ground. Press the button to turn on the LED and then cycle through its modes, the last of which is a cycle that goes continuously through all the colors.

Cut a 13⁄16″ hole in the center of both caps. Make a hole for the switch button the side of one cap and make a matching notch in the end of the tube. Position the disc with the LED in place inside and slip the battery between a mirror and the tube. Slide the cap on with the switch through the small hole and in the notch. Put the other cap on the other end. If needed, cover the back and side of the LED with a small piece of black electrical tape to shade your eye from glare.
Slide the scope directly over your favorite comics and press the button to select a color mode—cool!

Scan to see the Colorful Comic Kaleidoscope in action!