Chapter 4
Thermoforming Plastics

The 1960s were a golden age for toys in America due to a timely combination of postwar factors. The Baby Boomers were in their prime toy-buying years (“for ages 6–12”), while the boom in the economy created more purchasing power for their parents. For the first time, toys were sold using network television advertising campaigns, launching nationwide fads—fast, fast, FAST! The graduate of the 60s was told there was a “great future in plastics,” while at the same time the space race spurred an interest in science education and technological toys.
Productive Plastic Playthings
A Look Back at 1960s Maker Toys
Among the time-tested playthings like dolls and trucks came a new category of toys: “make-and-play.” There had been creative kid crafts before, like paint-by-number kits or Erector sets, but these modern maker toys inspired a generation of kids to mass-produce their own creations using miniature, at-home versions of industrial manufacturing methods and advanced “space-age” materials. With clever research and development and bold marketing approaches, Mattel led the way in make-and-play.


My favorite childhood toy was the Mattel Vac·U·Form machine. The pungent smell of melting plastic filled my bedroom as I spent many fun hours molding little cars, bugs, toys, and signs. The resultant flimsy toys really weren’t much fun to play with, but that didn’t matter. The way the flat plastic instantly changed shape due to an invisible vacuum was magical.
Invented by Eddy Goldfarb, Mattel’s 1963 Vac·U·Form used air pressure to mold small squares of colorful polystyrene into three-dimensional shapes. After three minutes on the 110-volt plug-in heater, the softened plastic was stretched and formed over a mold with a few quick strokes of the pump handle. Vacuum forming thermoplastics, the process used by Boeing to make jet airline interiors, was now at the fingertips of kids across America.
And those fingertips often got blisters! Unlike today’s super-safe car-seated and bike-helmeted kids, Baby Boomers braved the dangers of toys like the Vac·U·Form. Its exposed heating plate reached the skin-sizzling temperature of 350°F. You can tell it’s Mattel, it’s . . . OWWWWW! No matter. With the awesome power of the Vac·U·Form pressurized plastic, kids cranked out cars, planes, signs, disguises—all kinds of mini toys using the many molds that came with the toy.

Just as innovative as the Vac·U·Form’s design was its marketing. Like Barbie with her never-ending array of clothes (sold separately!), the line of Vac·U·Form toys had dozens of accessories and refill kits for making jewelry, medals, badges, airplanes, animals, boats, military vehicles, and more. Each kit supplied more molds, more projects, and more sheets of plastic, including both transparent and metalized chrome in gleaming colors. A nation of kids was mesmerized by the Vac·U·Form’s TV commercial featuring the magical moment of transformation: molded shapes took form before your eyes, set to the peppy ba-boom beat of timpani.

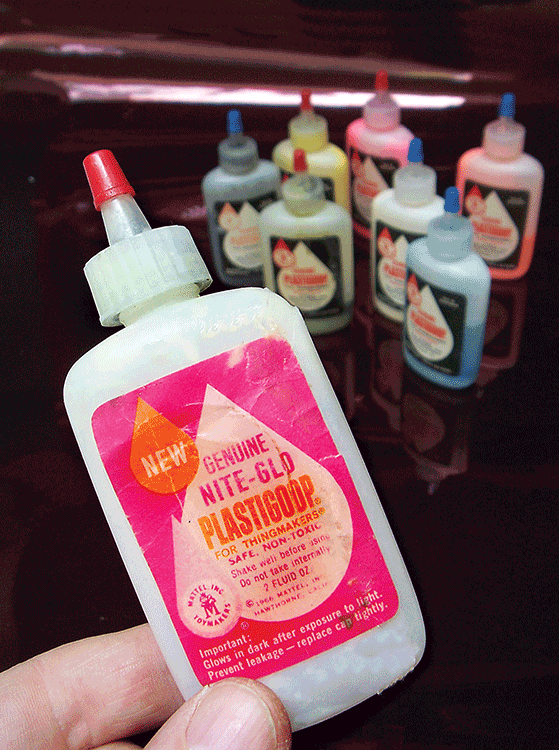
A familiar smell can trigger a flood of childhood memories, and just one pungent whiff of burning plastic is enough to evoke for me the Thingmaker, a spin-off of the Vac·U·Form. The same heater that softened stiff sheets of styrene could be used to cure liquid plastisol. This goopy mix of polyvinylchloride in a solution of plasticizers is used to manufacture soft parts like tool grips, squeezable coin purses, and flexible fishing lures. Renamed Plastigoop and packaged in handy squeeze bottles, the protean plastic came in a dozen colors, including an exotic glow-in-the-dark formula. The Thingmaker’s molds were made from die-cast zinc, the same metal used in toy cap guns, which reproduced each tiny mold detail, from the hairs on a spider to the gruesome stitches on a shrunken head.
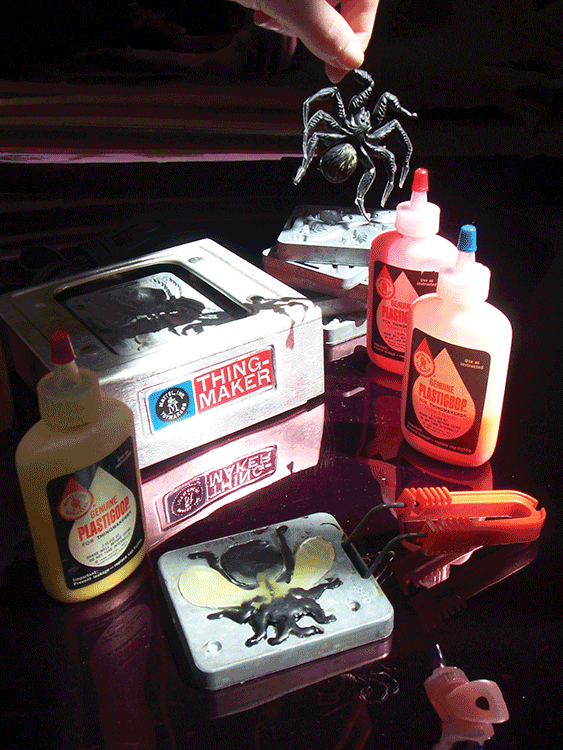

Like its older brother the Vac·U·Form, the Thingmaker offered the excitement and danger of high-temperature techniques. The fun began by filling the mold with various colors of Plastigoop. Heating the mold on the Thingmaker’s oven cured the Plastigoop into a wiggly gel. The last step was to quench the finished mold in a pan of water, making a satisfying blast of steam. The only concession to safety was the wobbly wire handle used to lift the smoking hot molds.

There were many different themes for Thingmaker sets, but the most successful was Creepy Crawlers. The TV commercial featured a James Mason sound-alike voiceover, drolly describing how to scare Mom and annoy newspaper-reading Dad with the wiggly worms and rubbery bugs. Mattel went on to produce Giant Creepy Crawlers (with flocking to make the bugs fuzzy), Creeple People (cute/ugly trolls with interchangeable heads, arms, and legs that connected together on a pencil), Fighting Men (army men with wires for bendable arms), and Fright Factory (shrunken heads and skeletons).

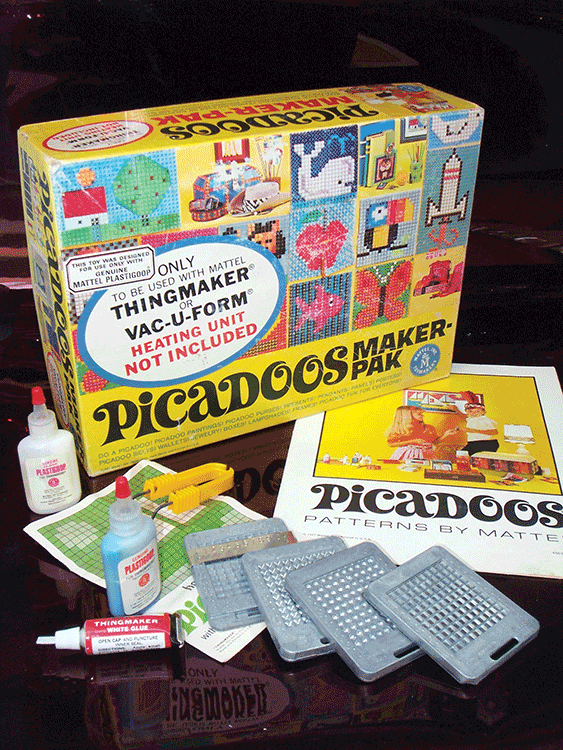
For kids who wanted to stuff that was less scary or gross, there were sunnier-themed sets: Fun Flowers, Mini-Dragons, Picadoos (plastisol pixel pictures), Zoofie-Goofies (pipe cleaner animals), and even sets that made rubbery versions of comic strips like Charles Schulz’s Peanuts. All required, of course, ever more bottles of colorful Plastigoop, sold separately.
Other toy companies sold similar items. Topper Toys produced a thinly veiled

knock-off of the Thingmaker called Johnny Toymaker, a casting toy that made racing cars for boys and rose-decorated sunglasses for girls. Kenner’s 1964 Electric Mold Master boasted that it “makes solid—not vacuum-formed toys.” Boys could mold army men and mini toy guns that shoot, and girls created small doll and accessories, including multicolored “miniature teenagers at a birthday party” with tiny bongo drums, record players, and soda glasses.
Perhaps the weirdest heat-powered plaything was the Strange Change Time Machine. Instead of merely molding raw plastic into mini toys, this clever contraption provided endless play with 16 different time capsule creatures. “Create ’em! Crush ’em! Create ’em! Again and again—in the Strange Change Machine!” The time-lapse TV commercial showed a square plastic lozenge magically melt and transform into an octopus. Reheated, the mini creatures were loaded into a vise-like press and were squeezed back into the original square shape complete with an embossed Mattel logo. You didn’t really “make” anything, but it was a mystifying trick!

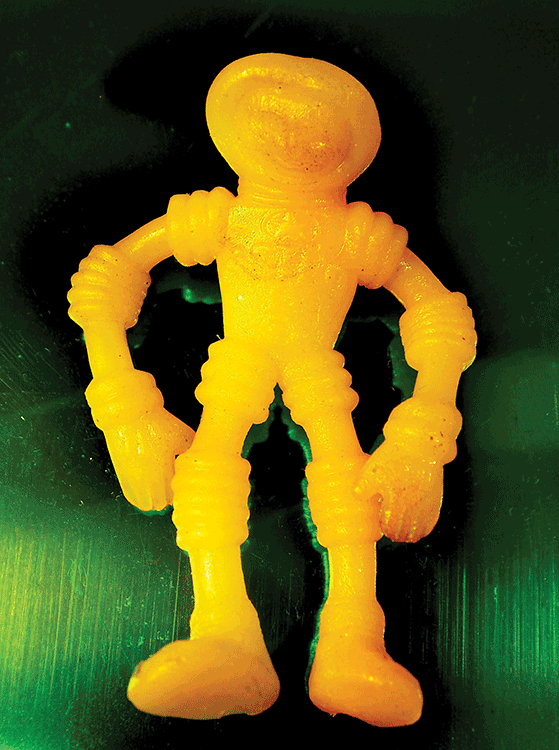

A space age “shape memory” plastic made it all possible. During manufacture the molded plastic creatures were radiated with a high-energy electron beam that cross-linked the polymer’s molecules, permanently locking them into shape. These extra connections within the shape could be deformed temporarily into a square brick, but when reheated they sprang back into their original creature shape.


The look of the toy was pure 1960s with snazzy, metallic red housing, shiny zinc fittings, and a transparent transformation chamber with a swiveling door. The assortment of creatures included tiny dinosaurs, kooky spacemen, and mini monsters. The instruction sheet flipped over to make a jungle island backdrop. Even the package’s plastic shipping tray was vacuum formed into a sculpted volcanic rock pit. The entire toy was like a sci-fi monster movie set shrunk down into miniature toy form.

The name Time Machine was an apt one: it felt like you needed one. It seemed to take forever for the toy’s oven chamber to warm up, and even longer for each of the creature shapes to unmold and then cool down. The ominous warning stamped on the top of the toy, CAUTION—CONTACT WITH RIVETS OR PLASTIC PARTS MAY CAUSE BURNS, was also from another time, one before the Child Safety Protection Act.

One hugely popular 1960s maker toy did have an infamous safety problem. Like the Thingmaker before it, Incredible Edibles used a heated oven (with a hinged cover in the form of a bewigged, buck-toothed bug) to let kids mold squiggly spiders and squirmy worms. The fresh twist was that the finished product was actually edible. The ingredients listed glycerol and tapioca starch sweetened with sodium cyclamate and saccharin.
The moldable comestible was dubbed Gobble-Degoop and marketed as “Sugarless!” Parents were repelled more by the taste than the fun “gross out” theme, but kids gobbled it up. The unforeseen problem was that diabetic kids were sickened by the mixture’s starch, which turned into sugar when digested. After $50 million in sales, the FDA allowed Mattel to put warning stickers on all the toys already out in the stores instead of recalling them.


An earlier candy-making toy promised real sugar in its most kid-appealing form: cotton candy! Commercial cotton candy machines were expensive and complicated with spinning electrical coils and strong motors. A kid’s only chance for the rare treat was a trip to the circus or state fair. But in 1962 Hasbro’s affordable, battery-powered Hokey Pokey Cotton Candy Maker spun real cotton candy at home anytime.


The patented design had a red scalloped plastic motorized base with six ball-shaped feet that supported a deep aluminum drum. Mom loaded a few spoonsful of sugar into a metal cup and heated the cup over a kitchen burner. Using the metal tongs, she lifted the cup of molten sugar into place atop the toy’s central shaft and turned on the motor. The molten sugar was flung out of the madly spinning cup in an instant to make one small batch of cotton candy. The metal cup then could be cooled down on the included asbestos stand. Asbestos? Flying molten sugar? The moon-faced kids illustrated on the package happily twirled their paper cones of cotton candy, sweetly oblivious to any potential domestic dangers.


Toys offer kids a way to emulate grownups and play pretend, and maker toys are no different. Dad’s basement woodworking “man cave” was the inspiration for Kenner’s 1962 Motorized Home Workshop. Although scaled down, the versatile styrene toy version could be configured into seven different power tools, including lathe, jigsaw, drill, and sander, just like Dad’s Shopsmith.
The gimmick that made it all safe for Junior? Instead of using wood, the raw material was colorful, open-cell urethane foam, and the saw and drills were made of plastic. The battery-powered motor “stopped at the press of a finger.” It was fun to make clouds of foam “sawdust” with the motorized tools as you cut, sanded, and turned your project on the lathe. The box blurb promised “planes that fly and boats that float,” but the flakey foam made fuzzy and feeble results. Oh well, the fun was in the making.


When it comes to mass-producing plastic parts, the manufacturing process used by toy companies is injection molding. A two-part metal mold is held tightly closed in a horizontal hydraulic press as molten thermoplastic is injected at high pressure into the mold cavity. The mold is opened and the cooled plastic part is ejected. Unlike vacuum forming or casting, injection molding with its closed mold creates parts with perfect detail on all sides.
What better maker toy than a miniature version of the very process used to make real toys? Mattel’s Injector from 1969 had a plug-in heater and a hand-powered injector piston.

To use, you just slid open the chamber and inserted a small plastic pellet (called Plastix). While the plastic melted, you chose your mold. A small toggle provided the clamping pressure to hold the mold halves together. When you slipped the mold under the nozzle and pushed down firmly on the lever, it would squirt a piston full of plastic into the mold. With different themed versions you could mold your own Hot Wheel Factory car bodies or Western World cowboys and Indians.


So where are the maker toys of today? Social trends have changed and so have playthings. Today’s over-scheduled kids don’t have as much free time to spend waiting for long heating and cooling cycle times to make a leisurely batch of Creepy Crawlers. Kids now “grow older younger;” whereas toy manufacturers of yore could market toys to kids ages 6–12, today’s 10-year-old is already using computers and getting her first iPhone. Tweens aspire to create with real, adult materials and tools: they’re at the yarn shop, art store, or Maker Faire, not in the toy store. They can try their hand with sophisticated 3D printers and laser cutters found at makerspaces and schools.
Toy makers must now focus on younger ages that are inherently less patient, capable, or interested. Despite clever updates by manufacturers to address modern toy safety standards, it’s hard to compete with the high-tech appeal of video games and electronics.
The economy has changed and toys reflect those trends. Just as manufacturing industries are being replaced by an information-driven service economy, early maker toys with their “thing-making” play pattern have given way to the virtual experiences of electronic games, apps, and websites aimed at kids.
Still, the spirit of DIY lives on and these early maker toys engendered an interest and curiosity in the very kids that grew up to be many of the Makers of today. Despite the huge popularity of “just assemble” activity toys like LEGO, it’s encouraging to see young kids together with their parents learning to solder and building real hands-on creative skills at Maker Faires.

Photo courtesy Troy Fischer
Kitchen Floor Vacuum Former
From the lid on a Starbucks coffee, to the curved interior panels of an airliner, vacuum-formed plastic parts are everywhere. And for good reason: vacuum forming makes light, durable, and cool-looking 3D parts. Here’s how to cook up plastic parts quickly in your own kitchen with a low-cost, maker-friendly rig.

Large commercial machines have built-in vacuum pumps, adjustable plastic-holding frames, overhead radiant heaters, and pneumatically raised and lowered platens. The Kitchen Floor Vacuum Former is much simpler. It uses the broiler in your kitchen oven to melt the plastic. You manually flip the plastic onto the form. A household Shop-Vac supplies the suction. All you have to build is a simple wooden frame and a hollow box.
1. Make the Frame
- Measure the interior of your oven, then subtract a few inches from the width and depth for clearance. This gives the size of the biggest frame you can use, which in turn determines the maximum size sheet of plastic you’ll be able to mold. My oven is 21″× 16″, so I made an 18″× 13″ frame.
- Measure and cut lengths of 2 × 4 you need to make your frame, allowing for the thickness of the sides. Make square cuts with your favorite saw: circular, jig, or handsaw. My 18″× 13″ frame calls for two 18″ pieces and two 10″ pieces.
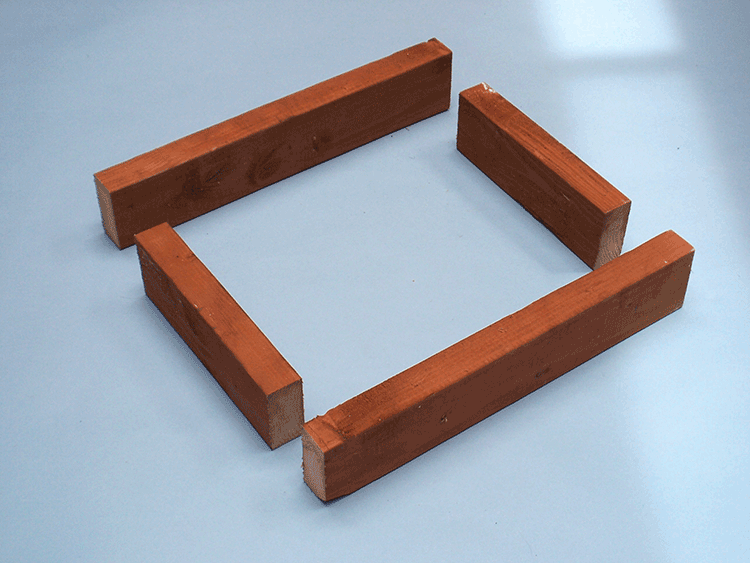
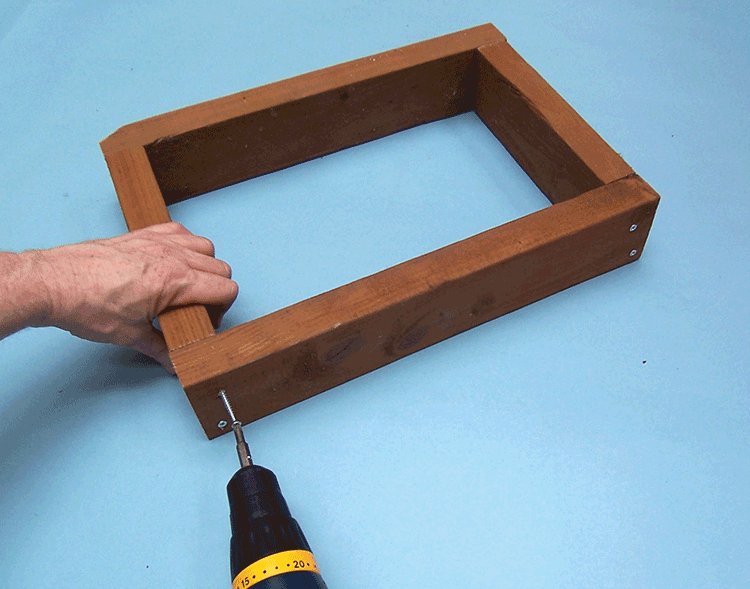
- Assemble the frame using 2 screws in each corner for maximum strength. Stagger the fasteners so as not to split the wood.
 2. Make the Vacuum Box
- Calculate the dimensions of a shallow box with a top slightly larger than your frame. For my 18″× 13″ frame I made a 20″× 15″ box.

The height of the box is not critical. I made the height of the box just large enough to mount the vacuum floor nozzle along one side.
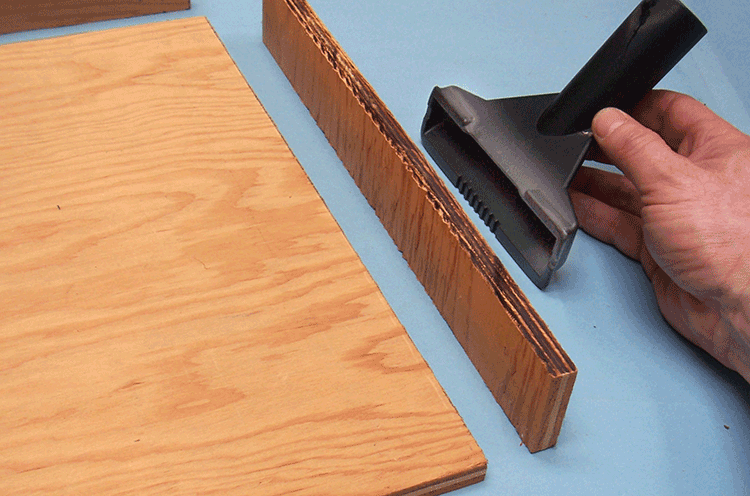
When you have the dimensions, cut four sidepieces and a bottom out of plywood, accounting for the material thickness again.
- Cut a top panel for the box out of pegboard, large enough to overlap all four sides. The pegboard’s holes are used to suck air from under and around the form.
- Drill a large hole in the side of the box where you will mount the vacuum floor tool. This is the main air vent.

- Use screws to assemble the four sides, and then add the back.

- Cut a piece of wood dowel or 2″× 2″ to make a post that will support the center of the top panel. When vacuum forming, the top panel may tend to bow in. This support post prevents that.

- Screw the post down from the back of the box, and then fasten the pegboard to the sides with screws.

- Mount the vacuum over the side hole with small screws.

- Finally seal all the edges with duct tape. Don’t forget the seams around the vacuum tool. Tape a border around the top, but leave an open area in the center slightly smaller than your frame. Your Kitchen Floor Vacuum Former is ready to use!

Tiki Mask

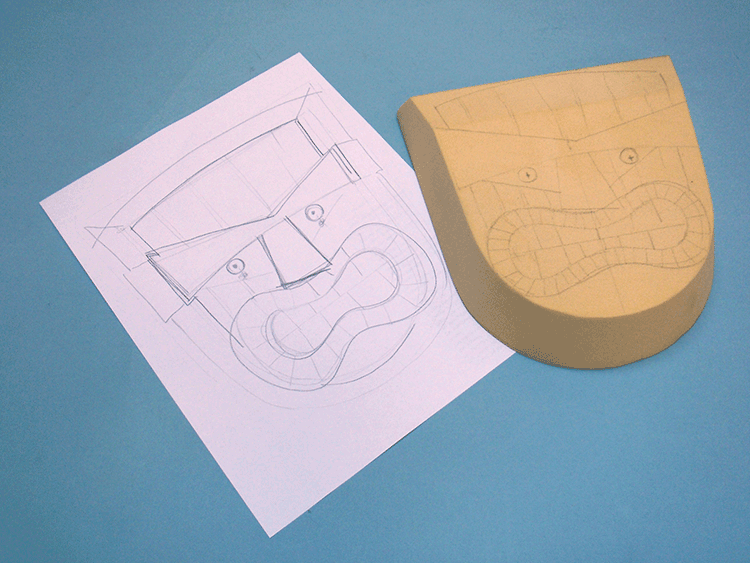
Here’s an idea for a fun, first vacuum forming project: a kooky tiki mask. It’s easy because there is only one part to make. There’s plenty of leeway in tiki design: almost any approach will work. Make it simple or complex, symmetrical or free form, brutal or refined, friendly or freaky—it’s totally up to you. A mask is also a great example of what vacuum-forming does well: making lightweight yet strong 3D parts quickly and easily.


1. Form Materials
You can make your form out of nearly anything. Wood is a good choice for most simple forms: it’s cheap; easy to drill, saw, and sand; and strong enough to make many parts. An especially good wood to use is jelutong. Its soft grain-free texture makes it a pleasure to carve and sand.
You can also make forms out of plaster. Sculpt a shape out of clay, then cast liquid plaster all around it. After the plaster hardens, remove the clay and drill air venting holes through the bottommost features of the mold. Sucking plastic down into a concave “female” mold cavity will give parts with a very detailed surface that will match your clay original perfectly.

If needed, combine different materials to build up your form. Found objects can be a great source of shapes and details that would be hard to make from scratch. You can add small plastic letters, caps and lids, or pieces of toys to build up your form. I keep a collection of basic shapes that I can combine and reuse to make new forms.


I used urethane foam for my mask. The surface of the mask doesn’t need to be perfectly smooth and the foam is especially easy to cut and carve with woodworking tools. You can order urethane foam in various densities for more durable forms, but if you’re just making a few parts you can use florist’s foam (get it at a hobby store). If you need just one rough-surfaced part you can even use leftover Styrofoam. It’s not very strong and it may melt and fuse a bit to the hot plastic sheet when being formed, but I’ve used it successfully on occasion.
To form the foam, cut out the basic outline with a saw, then drill or cut out smaller sections as needed. File or sand to create curved surfaces. Use a rotary tool to sand and grind out smaller shapes. Sculptor’s tools or dental tools are great for creating small details or textures. You can crunch the foam to make small depressions.


2. Mold Design
Here are some things to keep in mind when making a vacuum form:
- Undercuts Avoid undercuts in your mold shape and in any details. The softened plastic sheet will stretch and wrap around underneath all the features of your form. After the plastic cools and gets firm it will be impossible to get the trapped form out.

- Draft angle To make it easier to get the plastic off your form, avoid using vertical sides. Make your form so that there are a few degrees of angle (draft) on all sides.

- Vent holes For concave shapes or details, drill a series of tiny vent holes. These holes will let the air flow around your mold and suck the softened plastic down into your form.

 Extra height If you plan on trimming your part away from the rest of the sheet, add a little extra height to the form. That will ensure that your final part won’t have any unformed edges.
3. Plastics and Sources
You can use nearly any thermoplastic material. Polystyrene sheet works especially well and is low-cost. It comes in large 4′ × 8′ sheets in various thicknesses. Check with your local plastic supply company; they may have a bin of odd sizes, cut-offs, and leftovers that may suit your project. 0.030″ is a good thickness, but you might want to try something thicker if you need a stronger part. IASCO–TESCO (iasco-tesco.com) sells small sheets of styrene in various thicknesses and in solid colors.

4. Vacuum Forming
When you’re ready to vacuum form, get set up on the kitchen floor near your oven. Hook up the Shop-Vac and test.
Place your mold on the top of the box. To help air flow, place your mold on top of some coins, which will act as spacers. You can also use a small piece of window screen.


Measure the plastic to fit your frame and score with a sharp knife. Bend the sheet backward to snap at the score line.

Place the plastic over the frame and staple all around. Don’t skimp on the staples: the softened plastic will try to pull away so staple every inch or so.

Place the frame, plastic side up, in the oven four or five inches away from the broiler. Have your oven mitts ready and set the broiler on high.

BE CAREFUL! Watch the plastic carefully as it warms! First it will look wavy, then it relaxes back flat, and finally the plastic will begin to sag in the center. Test the plastic by pressing down near a corner with a pencil eraser or chopstick: if it’s soft, it’s ready to remove. If left too long under the heating element, the plastic will smoke and burn!
With your oven mitts on, remove the frame and flip it plastic side down. Quickly and carefully, place it over the form and press down. When the frame is pressed firmly flat against the top of the box, turn on the vacuum.

Whoosh! The plastic is instantly sucked down over the form by vacuum power!

If your part has some intricate detail or hard to mold feature, use a heat gun to soften the plastic in that area.
BE CAREFUL! You could melt right through the plastic!
Continue pressing down on the frame for 20 more seconds while leaving the Shop-Vac on until the plastic has cooled. Then turn it off and lift up the frame. Your form may fall out, but typically it will stay inside the formed plastic. To remove the form, press on the back gently or tap the frame firmly on a table or counter so that the form can fall freely. You may have to carefully pry the form out a little at a time with a screwdriver or knife.

5. Trim and Finish
Carefully remove the plastic from the frame. Look out for sharp staples!

Score the plastic and snap to remove the formed part from the rest of the plastic. Use a surface gauge to scribe a mark all around the part for a more precise trim.


If you need a lip on your part, trace around the shape leaving a flat border all around. Score with an X-ACTO blade and snap. Clean up the edges of the plastic with sandpaper. Drill, trim, or paint your part for your final application. I’m finishing this one as a mask with large eyeholes, small side holes for elastic, and a rim around the bottom for extra strength.

Here’s the finished tiki mask. I spray painted the entire mask blue, then added shading by spray painting from the side only with purple accent color. Then I hand-painted the small details for the flowers, teeth, and eyes. To wear the mask, add some elastic cord tied at each end with a knot.

Glowing Tiki Lamps
Take your tiki mask to the next level by adding lights to make a glowing lamp.

If you made your mask with a lip around it, place it on another piece of styrene sheet and trace around it. Score on the line with a hobby knife and snap off to make a back panel. Wire up a low-voltage light using a small battery pack (look for the kind with the built-in on/off switch) and an incandescent light bulb. Hot-glue the battery pack and light bulb to the back panel so that the bulb will illuminate the panel but not be seen through the mask’s eyeholes.
Use the Velcro dots around the rim to fasten the mask to the back panel. You can easily remove the mask to turn it on or off and change the batteries.
Paint the dowel to look like a piece of bamboo. Add some painted lines and spots as well as hitting it with some random patches of black spray paint (see picture).
Hot-glue the back pane to the dowel. Stick it in the ground or place it on your deck for your next backyard party!


Tiki Jell-O Mold
Here’s another idea for your backyard tiki party: a tiki-shaped Jell-O mold!
For this, I made a vacuum form of the tiki mask but instead of using styrene I used polyethylene terephthalate. Sometimes called PETG or PETE, it’s used to make food and beverage containers since it’s transparent and tough and not as brittle as styrene. Look for the 1-in-a-triangle plastic recycling symbol molded in your fast-food or take-out container, or food packaging—that’s PETE! Find sheets in various thicknesses at your local plastic supplier or online.
I used it here to make a mold for casting gelatin. Just vacuum form as before, but this time leave a generous rim all around the mask and don’t cut any eye or strap holes.
For best results, make the gelatin double strength (or even more for a chewy treat). Add 2½ cups of boiling water to two packages of gelatin. Stir until dissolved. Pour into the mold and refrigerate for three hours until firm. To unmold, dip the bottom of the mold into a pan of warm water for 20 seconds. Place a serving plate upside down over the mold and flip both over.


Marble Maze Games
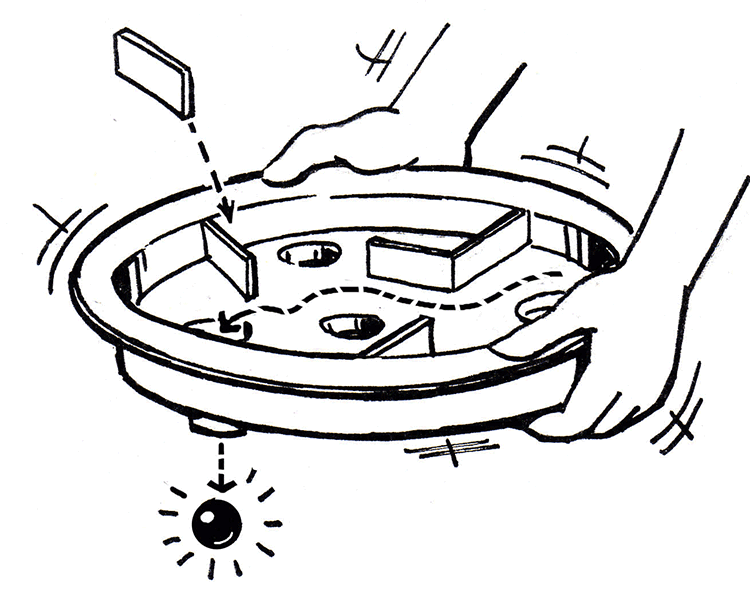
Here’s a twist on a classic skill game: the tip-and-tilt marble maze. Hold the maze tray with two hands and tip and tilt to roll your marble through the maze to the goal. Make it, play it—then hack your maze to create different games. In a multiplayer version it’s a race: the first player to get his marble through the maze and to the finish wins!
1. Make the Form
Make a form by cutting an 11″ disk out of ½″ plywood or particleboard. Cut the ¾″ wood dowel into ¾″-long pegs. Arrange the pegs on the disk to create a pattern of holes for a maze obstacle course. Each vertical peg on the male form will create a marble pit on the inverted vacuum-formed female part. Mark the positions of the pegs on the disk and drill a small hole for each. Use a wood screw through the backside of the disk to attach each of the pegs. Later, if you like you can quickly reposition the pegs to make a completely different maze layout.


2. Vacuum Form
Use your Kitchen Floor Vacuum Former to make the maze tray. When cool, remove the form and trim it to make a rimmed tray. While you’re at it, make a couple more trays.
Cut off the bottom of one pit to make a “finish” hole.

3. Fabricate the Maze

Measure, score, and snap off some ½″ wide strips of styrene. Hold a strip in position to make a wall for your maze and mark the length to suit. Score at that length and snap off. Hold the strip in position on the maze tray and glue with some MEK solvent (see the appendix for sources). Attach more lengths of plastic strips together to create a path of maze walls around the pits. Test it: tilt and tip the tray to get your marble through the maze, around the pits, and down the hole. Too hard? Reposition the walls until it’s just challenging enough! You can make periodic “safe” areas along your maze: little corner pockets on either side of a pit that you can tip your marble into and then rest before attempting the next part of the maze. Draw a dashed line to show the final path through your maze.
4. Hack the Design to Make New Games
- Race against the clock Use a timer to see how quickly you can do the maze. Fall into a pit? You must start over from the start—hurry, the clock is running. You could even hack an electronic timer’s stop button with an extra switch, triggered by the marble coming down through the finish hole.
- High score maze Mark each hazard pit along the path with ascending point values—the further you get, the higher your score.
- Multi-marble Use more than one marble at a time. Ulp! How many marbles can you get all the way to the finish?
- Color puzzle maze Mark the pits with different colors—first to get all the colored marbles into their matching pits wins!
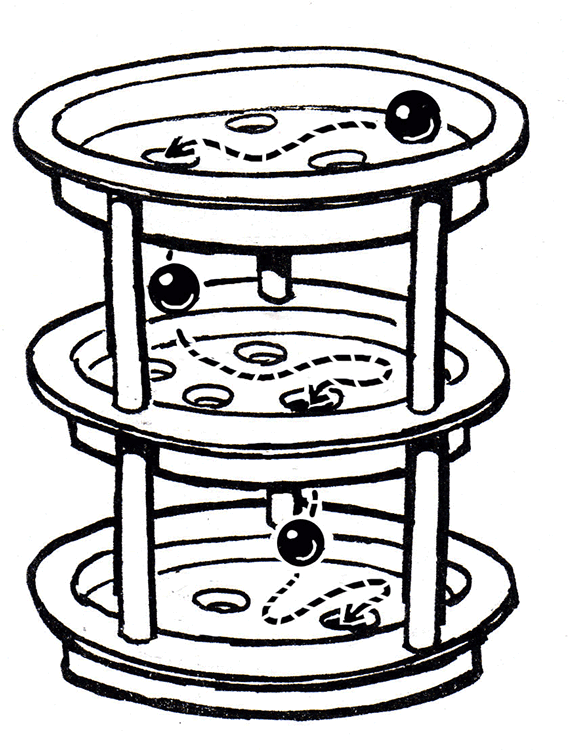
- 3D maze Make a multilevel stacked maze! Drill small holes in the rim of each maze and use screws to fasten 4″-long lengths of wood dowels to stack the mazes. Start your marble on the top maze. The marble falls down to the next level as you go. Can you go all the way?
- Multiplayer maze For multiplayer marble maze action, connect the trays with long flexible tubes (I scrounged air tubes from a hospital ventilator). Connect one end of the tube to the finish hole of one maze, then zip tie the other end to the rim of the other maze. Get your marble through the maze, down the hole, and then lift your maze to send the marble through the tube and out into the other maze for the next player.


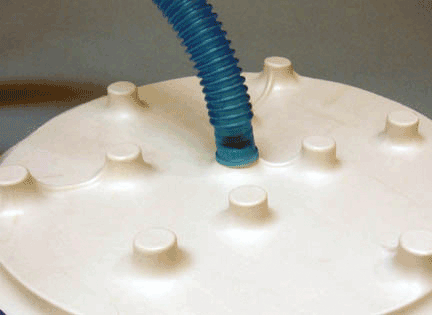
Connect more mazes in series to make a giant multiplayer relay maze! Or connect two mazes with two tubes for back-and-forth action. Each player gets three marbles: first one to get all his marbles into his opponent’s maze wins!
Strip Heater
This may be the simplest project in the book, yet one of the most versatile. The strip heater is an electrically heated coil that is stretched in a straight line. Place a sheet of plastic over it and when softened, bend or twist the pliant plastic into a new shape without any molds or forms. When it cools, your part retains its new shape. Simple, fast, and elegant.

The fact that hand-forming thermoplastics requires no expensive molds or tooling featured prominently in the history of toy design. During World War II, plastic materials were used to make bubbles and windshields for fighter planes and bombers, so their availability was limited. At the same time, Elliot and Ruth Handler were just starting their new business making picture frames and desk accessories. Being resourceful, given the limited materials and lack of a shop, Elliot heated scraps and leftover bits of acrylic in his kitchen oven, and, by cleverly twisting and bending the strips, created this swell doll furniture. Out of this modest beginning grew Mattel Toys, one of the largest toy companies ever!

Photo courtesy Derek Gable
Make It!
I used a pre-wired heating element made by BriskHeat. It comes with directions for mounting the element in a plywood channel, lined with heatproof fiberglass and foil. I’d recommend using adhesive-backed foil tape instead: it adheres to the plywood and also traps the fiberglass’s fraying edges.
- Cut the wood into three long pieces, one 42″× 6″ for the base and two for the top, each 36″× 25⁄8″.
- Center the two smaller pieces on top of the third to make a long trough ¾″ wide and screw into place.
- Attach two layers of strips of the foil tape along the channel. Lay the fiberglass mat on top and staple the fiberglass to the plywood. Be sure to lay the fiberglass down and into the trough—that’s the space for the heater strip. Staple the cloth to the wood.
- Use aluminum tape all around the edges of the cloth to fasten it to the wood. This will help keep the cloth in position and trap any fibers on the cut edges of the cloth.
- Lay the heater strip into the trough and attach a wood screw about an inch from each end of the base. Tie the strip’s strings together over the screws to hold the strip straight and just snug. Route the connecting wires from each end and join them to assemble the power plug. Attach one more wood screw to the foil tape on the base connected to a long wire. Connect the other end to ground on a 110V outlet.
Your strip heater is ready to try!

Easy Easel

I saw this fun artifact in the window of an antique shop: a mid-twentieth-century easel for reading the morning paper at the breakfast table. It was cleverly made out of a single piece of bent aluminum with silk-screen graphics. On the front was a minimalist mustachioed figure with the words “BREAKFAST WITH FATHER” in a campy retro-1890s typeface. The back simply said: “WIFE’S SIDE.” Perfect for today’s hipster ironic breakfast. But when I went back to buy it, it was gone!

So here’s a version you can make easily at home from one piece of ABS, heated and bent into shape.
Make It!

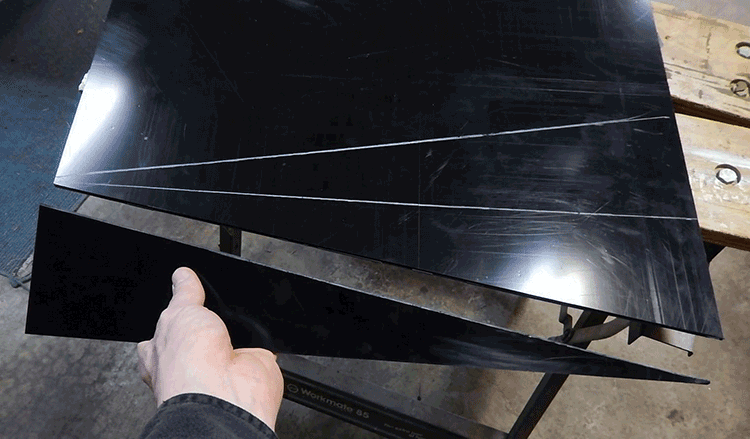
Measure an equilateral triangle with a height of 20″ and a base of 8″ on your piece of ABS. Mark your score lines with a china marker. Dimensions aren’t critical so you can modify to use what material you have or to make various sized easels.

Use the scribing knife and straightedge to make a deep groove along the sides of the triangle. It may take a few passes to do it.

Bend the plastic over the edge of a table groove-side up to cleanly snap out the triangle shape. Use the scraping tool to smooth all the edges of the triangle.

Plug in the strip heater and let it warm up. Use basic and usual safety precautions: don’t leave the plugged-in strip unattended. Have a fire extinguisher at the ready. Always heat plastics in a well-ventilated area.
While the heater is warming up, mark your bending lines with the china marker. Draw one line 1″ from the base, another one 2″ from the base, and a third 11″ from the base. If you’re using textured material and want to see the texture on the face of the easel, make the 11″ line on the back (non-textured) side and the other lines on the textured side.
Before you bend your easel, try making practice bends on some scrap pieces of plastic. You’ll get a good feel for how long to heat a given thickness of plastic (test it by giving it a test wiggle—is it softened yet?). Make your bends with the heated side of the plastic on the outside of the bend. If left too long or too close to the heater, the plastic could warp, scorch, or bubble. Next time, keep the plastic a little further from the heating strip and make your bend sooner.

You’ll make the bends in order from longest to shortest. Place the triangle over the heater, textured-side-up, with the 1″ bending line directly over the heater. Wait until the plastic is softened. Test it carefully by giving it a little test bend, but be careful—don’t touch the really hot part of the plastic. Wear your work gloves!

When softened, remove the triangle and place it textured-side-down with the 1″ line over the edge of your work surface. While holding the triangle in place, press the base down to make a 90-degree bend. Use the wood board to press down against the edge of the table to make a neat, even bend. Hold until cool.

To make the second bend, place the triangle back over the heater with the textured-side up and with the 2″ line directly over the strip. Let soften.
When ready to bend, put the triangle on your worktable, textured-side-up. Place the edge of the 1″ wood board between the already-bent edge and the 2″ bending line. Press the board down firmly as you lift the triangle to make the second 90-degree bend. That makes the “trough” of the easel. Hold the triangle up against the face of the bending board until cool.

To make the curled tip, use the heat gun to soften the tip of the triangle. Then give it a twist with a needle-nose pliers and hold until cool. Done!

For the middle bend, place the triangle back on the heating strip, this time textured-side-down with the 11″ line over the strip. When it’s softened, remove the plastic and bend it back at a 45-degree angle. Hold until cool.


Like the original collectible that inspired it, this handy easel holds your morning paper or tablet at the breakfast table or you could use it on the counter as a cookbook stand. It also makes a nice Make: magazine holder on your workbench.

Display Stands
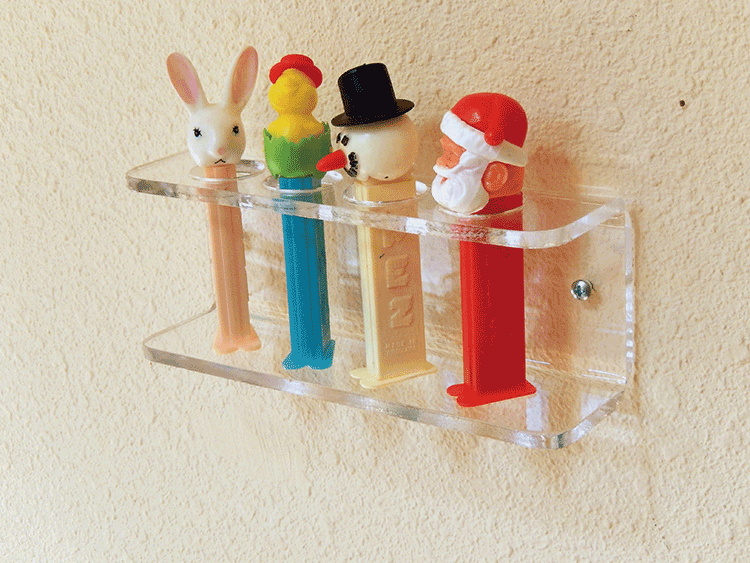

It’s always nice to be able to display your collectible toys and art in an attractive way. Art galleries and museums often create custom display stands out of clear acrylic. You can make your own nice-looking stands using the strip heater and a propane torch. With the torch you can “flame polish” the acrylic to give a perfectly smooth and clean edge. Pro shops use high-temperature hydrogen-oxygen torches for professional results but you can get by with your household propane torch.
Here a simple design for displaying PEZ dispensers. You can adapt the design by making it wider to hold more or changing the shape and proportions to display other toys or things. The display can stand on a table or shelf, or can be attached to a wall with two screws.

1. Layout
Lay out the design on piece of ¼″ thick acrylic. The protective film makes it easy to measure and mark the locations of the drilled holes. The large holes will accept the PEZ feet. The small holes are for mounting screws. The outside corners will be radiused.
2. Cut and Drill
You can scribe and snap thinner pieces of acrylic, but thicker acrylic over 1⁄8″ will need to be cut. Use a special saw blade with fine carbide teeth to minimize chipping. You can cut on a band saw, saber saw, or circular saw. Clamp your work and keep an even cutting speed and feed. Look out for marred edges where the acrylic is melting due to friction!
Drilling acrylic can also be tricky due to its brittle nature. If you will be doing a lot of plastic drilling consider getting some special drills at your plastic supply shop. The filed-down edges of the drills prevent them from catching in the plastic as the hole is finished. Be careful when drilling large holes: keep the speeds low and the feeds easy and intermittent to reduce frictional heat from galling up the holes. Always place a scrap piece of wood underneath the sheet to be drilled to minimize chipping.

Cut and sand the radiused outside corners. I used a disc sander.

Leave the film on while cutting and drilling to protect the face of the acrylic. When all these operations are done, carefully peel the film off both sides before flame polishing and bending. Carefully sand any rough edges or use the scraper to smooth out the edges before final polishing.
If you’re lucky enough to be near a Maker space, you could try having your acrylic laser-cut for you. In that case you’d have nearly unlimited options for cut-out shapes, intricate designs, and fine detail, way beyond anything that could be cut manually!

3. Flame Polish
It will take a while to build up your skills with the torch, so be sure to practice on edges of scraps and leftovers until you are confident enough to polish your work piece.
Wear safety goggles and gloves. Hold the work piece in a clamp or vise, or you can hold it in your hand. Position the edge so it faces up and you can see it clearly. Light the propane torch and adjust so it has a fine pencil tip and adjust for a medium-blue flame. Stroke the flame across the only the edge of the acrylic. Move smoothly and continuously—don’t linger! You want to melt the plastic just enough to make a glossy, smooth finish on the edge, but no more! The plastic can very quickly bubble or burn. With practice you’ll find the right speed and distance to produce an even, smooth finish. Of course, the entire time you must also be very careful with the flame and keep it away from any materials that could ignite!
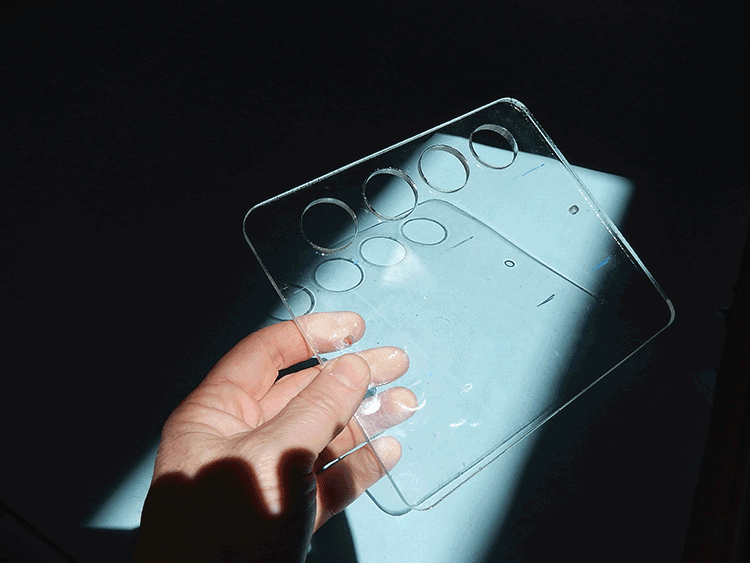
4. Bend
For thin sheets of acrylic, you can heat from either side, but for thicker pieces you must heat the outside of the bend. It needs to be softer since it’s bending around a larger radius than the tighter inside of a corner. Also, thicker acrylic needs a little more time on the strip heater to heat through.
For this project, the exact location of the bends isn’t critical, but you do want them to be parallel and each 90 degrees. You can check each bend by placing the shelf on a flat, smooth surface and checking the bend with a small square. Before the bend cools, you can make minor adjustments. I like to work on a big mirror: the reflection helps me see when things are truly vertical and square.


Here are some other display stands I made. Note the eye-shaped hole to hold the carving. You can cut or grind any shape you need to fit your object d’art!


Five-Minute Foam Factory
What keeps your coffee warm, but also rides the Pacific surf? What’s used to cushion delicate audio gear in shipping, but makes an annoying, squeaky sound? What’s banned in over 100 cities, but you can find it just about everywhere? It’s expanded polystyrene (EPS) foam. It’s a great insulator (for that coffee cup and wall insulation), lightweight and stiff, and impervious to water (great for surfboards)—but it’s also impractical to recycle and can be an unsightly part of the waste stream. Our landfills and waterways are filling up with used coffee cups, grocery store meat trays, and tossed-out take-out packaging. With this easy-to-make foam cutter you can reuse leftover EPS foam to create treasures from trash!


Because EPS is a thermoplastic foam it can be cut with a hot wire like a knife through butter. You can buy expensive commercially made hot-wire cutters, but here’s how to build a quick, super-simple DIY design for next to nothing, and how to get great results with some clever accessories and foolproof techniques.
For the cutting wire, this design uses a fine wire made of nichrome (nickel-chromium). It’s held vertically on a table and kept taut by a bent aluminum arm. A model train transformer converts AC power into a controllable and safe 12 volts of DC power to warm up the wire. This hands-free design lets you guide the pieces of foam into the stationary wire and slide the foam around to make effortless cuts.


1. Make the Base
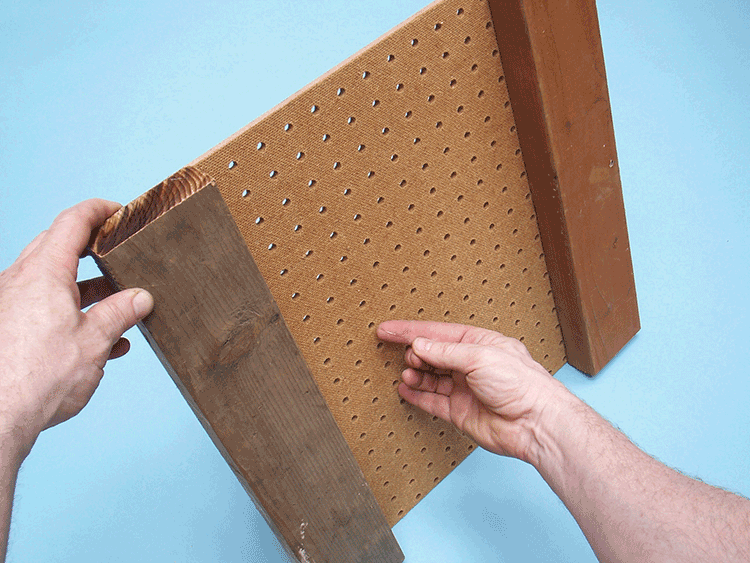
Measure and cut the pegboard to make a tabletop. Mine is 18″ × 18″.
Measure and cut two pieces of 2 × 4 to make leg rails.

Use screws to attach the top to the rails.
Place a ¼″ drill bit through one of the pegboard holes over the middle of a 2 × 4 and drill all the way through the rail. This will be the hole that the rod fits into.

2. Bend and Insert the Rod
Cut the aluminum rod to 21″ in length. Mark off 12″ and bend the rod about 90 degrees.

Insert the short leg of the bent rod in the drilled hole. Mark the position of the closest pegboard hole beneath a point an inch or so from the tip of the rod. Then mark the top surface of the rod directly above the marked hole.

Use the hacksaw to make a shallow notch across the top of the rod where it’s marked.

Insert the rod and drill a small 1⁄16″ pilot hole through the rail and into and through the rod.

Drive a nail into the hole and through the rod. This prevents the rod from swiveling in its hole as you cut the foam in different directions.

3. Add the Wire
Thread two nuts onto the bolt. Wrap, then tie, the nichrome wire around the bolt, and then add the remaining two nuts. Tighten the nuts to pinch the wire.


Align the nuts so that they all lay flat. Put on a drop of superglue to lock it tight.

Thread the nichrome wire through the marked hole and pull it up vertically.
Press the tip of the rod down slightly and hold it there. At the same time, make a loop in the wire so that the tip of the loop just reaches the deflected rod. Hold that loop and tie it off in a simple overhand knot.

Press the arm down and slip the loop over the rod and into the notch. Let go. The gentle spring force of the rod should make the wire taut. If it’s too loose, shorten the wire by tying another knot. Trim any stray ends.
4. Check the Circuit
Let’s check the circuit. You might remember this formula from your high school physics class: Voltage equals resistance times current.
- V = I * R

You can measure the resistance of the wire with a voltmeter: set it to ohms and measure the wire by placing a probe at each end point. My wire measures 7 ohms. My transformer puts out 12 volts DC. Plugging that into the formula gives you:
- 12 = (I) * 7
or
- 12 / 7 = I
- I = 1.71 amps
The current needed, therefore, is just under two amps. My train transformer is rated at two amps, so that’s good, at least for short time periods. The resistance of the wire will change at various temperatures, so the current drawn will vary. Many train transformers have a built-in thermal breaker—if they get too warm, they’ll shut off. If that happens, unplug the transformer and let it cool down. It should work again later.
5. Power Up!
Use the alligator clip lead to attach the train transformer. Unplug the transformer. Connect one clip from one side of the regulated DC contacts to the bolt underneath the table. Connect the other lead to the remaining DC volt contact on the transformer. Make sure the variable control is on its lowest setting, then plug in the transformer.


Ready to test it? Lastly, connect the unconnected alligator clip to the base of the rod. You’ve created a circuit that sends current through the wire. Adjust the transformer’s control so that the wire gets warm—not glowing red-hot. No heat? Check your connections and make sure the clips aren’t touching at the transformer.
Test your cutter with a scrap of foam. Place the foam on the table surface and gently slide it into the hot wire—it should cut easily with just the slightest pressure. Adjust the voltage if needed. Don’t press too hard, though, or you’ll pull the wire into an arc and your cuts will be curved instead of straight.

Use that connection to the rod as your on/off switch. You can see when it’s connected and the hot wire is “on.”
Cutting Techniques
You can cut free-form shapes easily—just keep the foam moving at a smooth, constant speed. You’ll notice the slightest wiggle in your movements will result in a wavy or ridged part!
Try the following simple fixtures and guides for easy cutting and perfect parts.
1. Straight Cuts
Make a guide from a piece of 1 × 2 and some ¼″ dowels. Drill two holes on 1″ centers and slip in pieces of dowel. Plug the dowel pins into the pegboard and you’ve got an adjustable fence for smooth, straight cuts.

Position the fence close to the wire to cut thin strips.
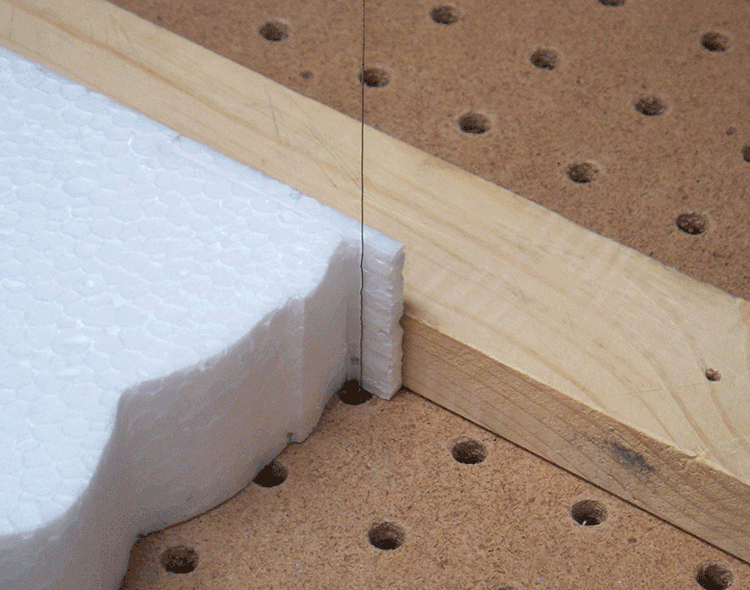
Position the fence farther away to make wide cuts and to square up blocks.

For size adjustments of less than 1″, remove one of the dowel pins and use the remaining pin as a pivot. Swivel the fence around to adjust the angle until the distance between the wire and the fence is just right, then place a second long dowel pin behind the fence at the closest pegboard hole. Fast and easy!


2. Circles
Make a circle cutter guide out of a wood dowel and a nail. Cut a dowel to a length so that when it’s inserted into a pegboard hole, it’s flush with the tabletop. Drill a 1⁄16″ pilot hole and insert a small nail—head first. Tap in with a hammer. You have a dowel with a pointy pin sticking out—be careful!

Place the dowel in any pegboard hole. The distance from the wire to the pin will be the radius of your circular cut. Energize the wire. Slide a piece of foam into the wire and impale the foam onto the pin. As you spin the foam around on the pin, you’ll cut a perfect circle. Turn off the wire and remove your part.


3. Angled Cuts
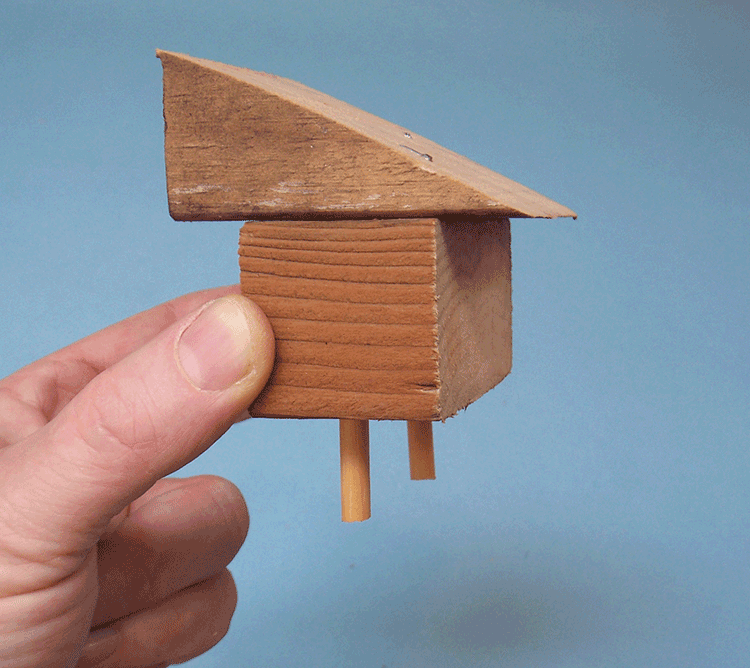
You’re not limited to 90-degree cuts. Build an elevated and angled wedge table and you can make beveled cuts!


4. Conic Sections
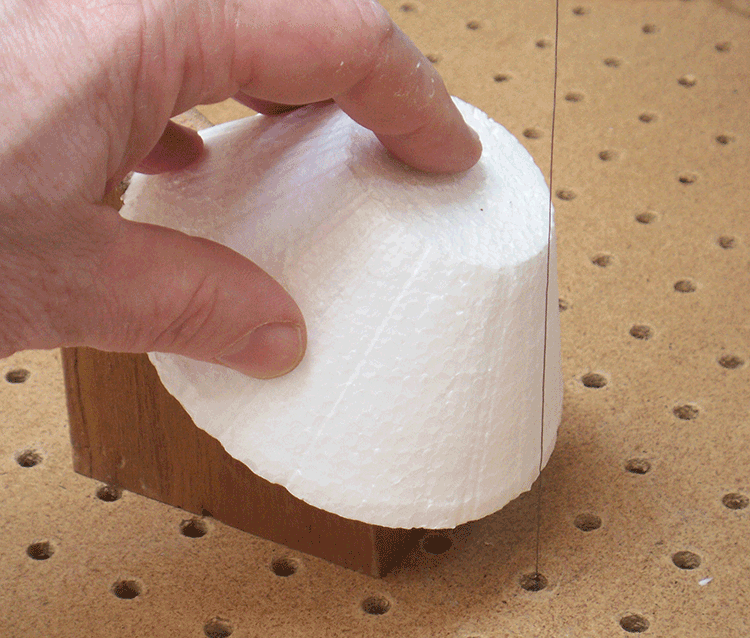
Combine a raised and angled stand with a circle-cutting action and you can cut cones! Make a wedge block as before with an angled top and dowels on the bottom to fit the cutter table. Then add an upside-down nail as a pin on the top angled surface.
Spin the foam around the angled axis and you’ll cut a circle with an angled side—a cone.


5. Surfaces of Revolution
You can actually cut compound curved surfaces with a straight wire! A cone cutter with an offset axis will create a hyperboloid, the same shape as a power station cooling tower. Use an angled pin, just as with cutting a cone, but position it so that its axis of the pin and the cutting wire are skew lines: non-intersecting lines in different planes. Spin the foam carefully around the pin. The angled axis will cut a twisted shape. Of course you’ll have to cut or break apart the surrounding ring of foam to free your part. Try various angles and distances between the pin and the wire to make gently or tightly curved shapes.


6. Templates
For perfect results with complex shapes, make a cardboard template to use as sort of a “slide guide.” Cut your shape out of thin cardboard and pin it or tape it to the foam using double-sided tape.

Slide the hot wire along the edge of the cardboard as you cut the foam.

You’ll get a smooth and accurate cut. If you happen to stray and cut wide of the edge, just go back and cut again. Use the template over and over for identical perfect parts, again and again!

Photo Stand-ups
This simple project makes a cut-out “paper doll” from a favorite photo. Print out a picture of a figure on a sheet of label stock. Carefully cut out the figure from the background.

Peel off the back and stick it to a piece of EPS foam (a black-colored meat tray looks cool!).
Then, use the paper figure cut-out as a slide guide as you cut the foam with the hot wire. The wire won’t cut through the paper.

Make a notch at the bottom and add a small stand—makes a fun stand-up figure!

Foam Plate Flier
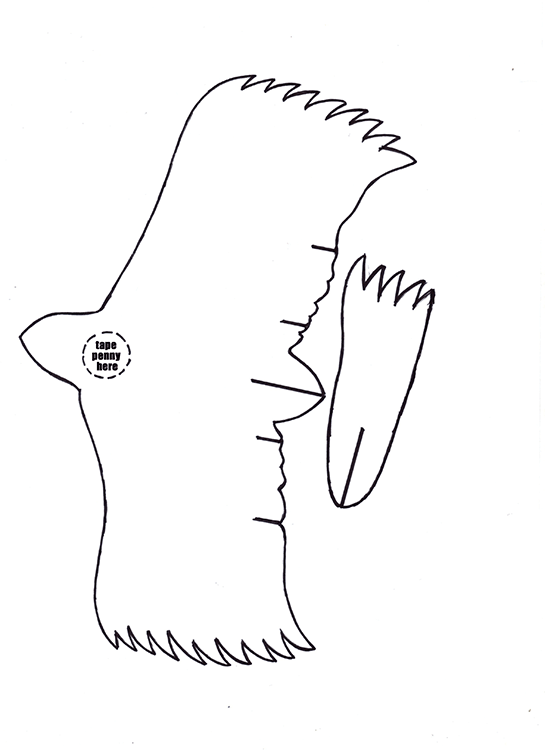
“Upcycle” your used foam picnic plate into a flying falcon! See the appendix for a clip-and-use pattern.
1. Trim the Pattern
Glue the pattern onto thick paper or card stock and carefully cut out the two shapes, one for the wings and body and one for the tail fin. Be sure to cut out the thin slots in the pattern for the tail and for the ailerons.

2. Cut the Foam
Pin or tape the pattern in place on a foam plate using double-sided tape. Fire up your foam cutter and cut away. If you make a mistake and cut a little wide of the pattern, just go back and trim again. Be sure to cut the slots, too.

3. Assemble
To assemble, slide the tail into the slot as shown. Add a penny with double-sided tape for a nose weight. Bend the ailerons up a bit and adjust the tail to be perpendicular. The curved shape of the plate makes a cool dihedral on the wing tips.


4. Fly!

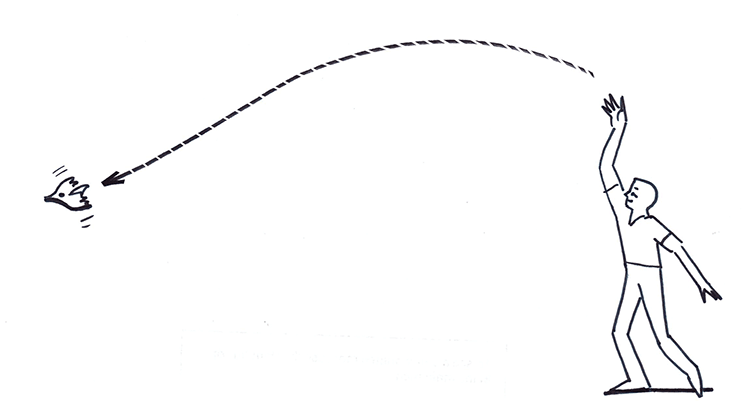
To fly, toss gently overhand from a high point. The falcon should glide down. Adjust the ailerons, tail, and position of the weight if needed.
Identical Snowflakes
Since it takes very little force to cut with a hot wire, you can cut a stack of foam pieces to make a bunch of identical parts, all at once. Try this: make a snowflake design by folding a 6-inch diameter chipboard circle and cut your design. Leave the side edges uncut. That way there’ll be no closed “holes” in your snowflake design.

Unfold and pin to a stack of Styrofoam picnic plates.
Carefully cut along the guide (go slowly!). You’ve made a stack of identical snowflakes! Make some small slits at the outside edge of the snowflakes.


You can connect them slot-to-slot to build a snowflake sculpture.


Halloween Skull Slices
You can also make multiples of varied thicknesses of any shape by using the ripping fence.
1. Cut the Shape
First I cut a skull shape. If you have a design that has an unconnected hole, like the eyeholes in this skull, you can cut them by first poking a small pilot hole through the foam with a pencil.

Unhook the nichrome wire from the rod, thread the wire through the hole, and reconnect the loop over the notch.

Turn on the hot wire and cut the hole!
2. Cut the Slices
When finished cutting the holes, disconnect the wire, remove the shape, and reconnect the wire. Place the ripping fence in position, turn the shape on edge, and then cut slices to create skull-shaped Halloween decorations.

Double- and Triple-Cut 3D Shapes
You can also create 3D shapes by making a sequence of two cuts at 90 degrees to each other. This example makes a cute teddy bear figure.
1. Draw
First, draw matching front and side views of the bear’s 3D shape onto some thin cardboard. You can also download the pattern online and print it out. These will serve as cutting templates.

Use the guide fence to square up a block of foam, then carefully double-side tape the front-view and side-view templates on the foam. Be sure to line up the patterns.
2. Cut the Front View
Cut along the pattern with the hot wire—but be careful to leave all the cut pieces in place as you go.

I’ve temporarily removed the shape to show the result of the first cut.

3. Cut the Side View
Put the bear profile shape back in the block and tape on the side view. Be careful to register the side view’s position with the previous cut and keep the cut-off portions together in place. Turn the block 90 degrees and make the side-view cut.

This exploded view shows the bear shape surrounded by its cut-off parts.
Carefully remove the trimmed-away sections to see your 3D shape.


Here are more ideas for things to make with cut foam: signs, picture frames, floating pool-party decorations, gliders and boats, rocket nose cones and fins, boomerangs . . . what shapes will you make with your hot-wire foam cutter?