Chapter 6
Holiday Projects

Holidays are a fun opportunity for making your own toys, games, and crafts. You can use them as seasonal decorations, play party games, or even give them as personalized gifts. It’s the thought that counts, so think about making some of these!
Mad Monster Candy Snatch Game

Here’s a classic toy reimagined for Halloween candy-giving and party fun. It's the Mad Monster Candy Snatch game, which combines the nerve-racking dexterity of the game Operation (BZZZZZT!) with a monster head–shaped candy dispenser. Put the fun in fun-sized candy and make your little goblins earn their treats with this tricky game!
The see-through green monster head is filled with fun-sized candies. Do you dare to snatch a snack? Use the forceps to carefully reach inside its mouth. If you can maneuver out a candy, you’ve won a treat! But be careful—if you touch the side, you lose. The monster wakes up with crackling, shocking sound effects and announces “YOU MAKE MONSTER MAD! YOU LOSE!!” as his angry eyes flash red. No treat for you!
It’s simple to make, and you can customize it to make it as easy or difficult to play as you like. You can even personalize it with your own voice, choice sayings, and sound effects.

1. Make the Monster’s Head
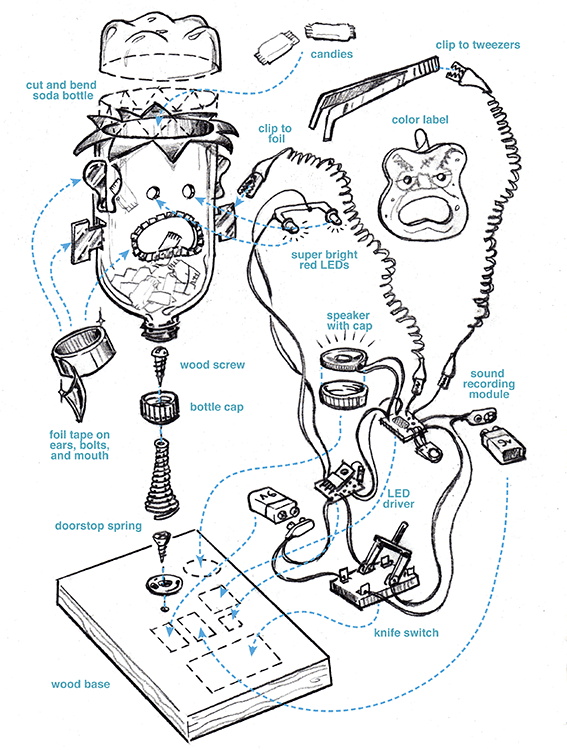
Empty the soda bottle and save the cap. Rinse it out and remove the label. Cut off the bottom of the bottle to make a big opening. Jaggedly cut the edges to form the monster’s spiky hair; don’t be too neat, he’s a mess! Mask off the remaining part of the bottle (again, don’t be too precise). Paint the jagged tips of the bottle with black spray paint. When dry, bend each of the triangular points outward to make the pointy “hair.”
Find the candy monster pattern page in the appendix. Cut out on the thick black dashed lines. Fold over on the thin fold lines. Wrap the pattern around the bottle, and using a black permanent marker, trace the cut lines onto the bottle. Use a hobby knife to carefully poke a starting slot. Using sharp scissors, cut along the lines. Punch out the eyeholes with the 3⁄16″ punch to fit the LEDs. Fold back the ears and neck bolts at 90 degrees so they stick out.
Cut a piece of aluminum tape ½″ x 6″ and cut slits ¼″ all along one long side. Next cut more slits on the other long side, alternating the cuts so you don’t snip the strip all the way through. Then stick the tape to the inside edge of the mouth hole: place the uncut center of the tape all along the edge, folding over onto the outside and inside of the bottle. It should create a foil-lined edge all along the mouth opening. Cut more pieces of aluminum tape and stick to both sides of the ear flaps and neck bolts. To finish the head, go to makerfunbook.com and download the file for the face label, and print it out on an adhesive label sheet. Cut it out along the dotted line and be sure to cut out the eyes and mouth. Carefully center it over where the eyes and mouth should go and adhere it to the outside of the bottle.
2. Make the Base
Cut the wood panel to size. I painted mine yellow.
Remove the rubber tip from the doorstopper and find a round-head wood screw that will be a good, tight fit inside the end of the spring. Drill a hole on the center of the bottle cap just big enough for the screw. Thread the wood screw from the inside of the cap and tighten the screw inside the spring.
Drill a pilot hole and fasten the doorstop’s mounting base into the center of the wood panel. Twist the spring until it fits tightly. Twist the upside-down bottle onto the cap. Test the spring by filling the monster head with a couple handfuls of candy and give it a push. The candy-filled head should deflect and wobble but not bend over.
3. Make the Circuit
First, test the sound circuit; add a 9V battery. Press and hold the REC button and speak clearly into the microphone. Let go of the button to stop recording. You can record up to 20 seconds of sound. If you like, go to makerfunbook.com to the sound prerecorded just for this game. It has crackling sound effects, zapping lab sounds, and the monster saying: “YOU MAKE MONSTER MAD! YOU LOSE!!” Hold your phone’s speaker right up to the circuit’s microphone and press and hold the REC button as before to record this sound into your circuit. (Or, if you prefer, you can instead record your own sounds and voice.)
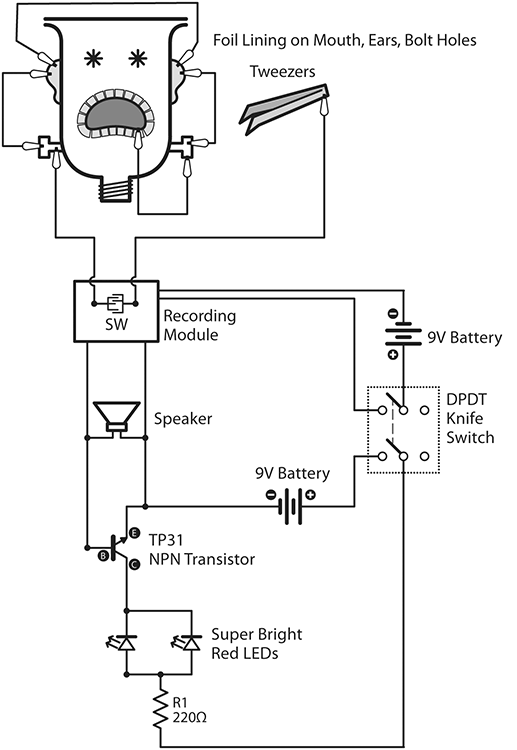
You’ll need to slightly modify the sound-playing circuit so that the game’s tweezers and foil sensors trigger the PLAY button contacts. Here’s the modified circuit for the game.
Scan this QR code to hear the monster.


Here’s the unmodified circuit board.

Carefully remove the PLAY button from the circuit board by prying up the metal tabs on the back of the board. Remove the metal retaining ring and the gray elastomeric button.

Insert two small wires through the holes on either side of the switch pad (SW) and very carefully solder one wire to each of the two traces. Don’t short out the traces! When you touch the ends of the two wires together, it should trigger the sound player. Test it!

Solder up the rest of the circuit for flashing the LEDs: Add the power transistor to the perf board, and after noting the E, C, and B legs, wire up the connections to the speaker, then solder the connections to the dropping resistor and the two LEDs. Wire the LEDs up in parallel about 2½″ inches apart on a 12″ long lead that will reach into the monster’s head. Wire up the 9V clip, add the second battery, and test the circuit. The LEDs should flash brightly as the sound plays. If not, check polarity on the LEDs, transistor, and battery.
Use a small cylinder or plastic cap from a milk bottle to make a resonant chamber for the little speaker. It won’t take much to improve the naked speaker’s tinny sound. Superglue the speaker to the cap.
You don’t really need the knife switch but it adds a cool “mad-scientist’s lab” look to the monster. Use some wood screws to mount the switch to the board. If you want, you can wire the switch to turn the power on and off. Just wire each half of DPDT in series with each 9V battery. See the wiring diagram for details.
Use the double-sided adhesive foam tape to mount all the components to the base.
4. Assemble the Game
Screw the head back into the spring/cap base. Twist the bottle a little if needed to make the mouth face forward.
Thread the wired-up LEDs in through a neck-bolt hole and insert the LEDs into the eyeholes from the inside. They should fit snugly, but if not, tack them in place with a bit of hot glue or superglue. The wire should be loose and not restrict the bottle from bobbling.
Now connect everything together using alligator clip jumpers. For an even more mad-scientist look, wrap the wires tightly around a pencil first to give them a “coiled cord” look.
Connect one of the wires from the PLAY sound trigger to the tweezers. Connect the other PLAY sound trigger wire to foil on a neck bolt; then use more jumpers to connect the foil mouth, foil ears, and the other neck bolt all together.
Final test: Close the switch and touch the tweezers to the foil on the edge of the mouth; the monster should talk and flash his eyes! Test the other contact points on the neck bolts and ears with the tweezers, too.
Load up the monster head with some fun-size candies and you’re ready to play!
How to Play
- Easy game Reach into the monster’s mouth with the tweezers and try to get a candy without “waking the monster” (touching the sides). BZZZZZT!—your turn is over; pass the tweezers to the next player. If you’ve succeeded, eat your candy or add it to your trick-or-treat bag! You can make the game easier to win by simply cutting larger holes for the ears and neck bolts.
- Simple strategy Add a die or spinner labeled Mouth, Ear, and Neck. On your turn, spin the spinner and try to snatch a candy from the opening indicated. If you’re successful, you can try again—but if you miss, you lose all your candies—put them back into the monster’s head and let the next player go! Will you risk it or play it safe?
- Name that candy The player to your right names which specific candy you must try to get. You may have to do a little careful digging with the tweezers to win!
Magic Moving “Ouija Be Mine” Card
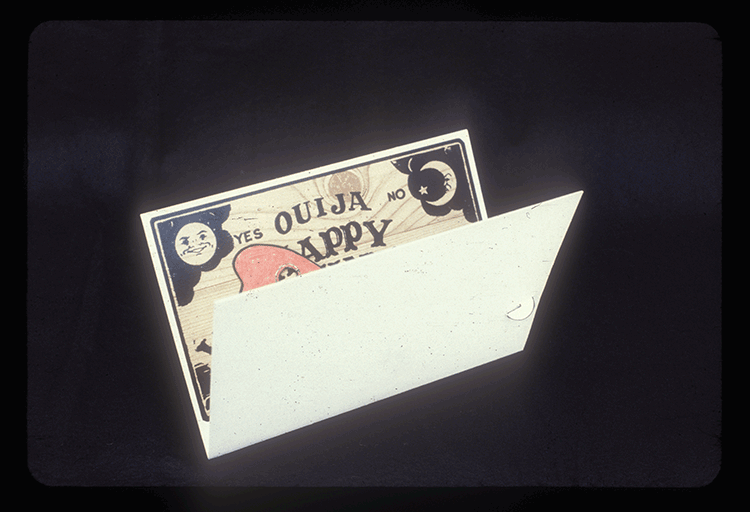
Want to send your Valentine a really special message next February 14th? Here’s an animated pop-up card you can make for Valentine’s Day. When you slowly open the card, a hand sweeps across and moves the heart-shaped planchette over the Ouija board, spelling out the message: “HAPPY VALENTINE’S DAY!” It’s both mysterious and romantic, perfect for any secret admirer to make and send.


1. Print and Cut
It’s also easy to make: just go to makerfunbook.com and download the two graphic files or use the images in the appendix. Print them on card stock or laminate a paper version onto thin cardboard.
Cut the hand and long tab out on the solid lines. Don’t forget to cut out the circular hole in the planchette! Use a small 1⁄8″ diameter punch to make the two small holes in the hand and one hole in the tab. If you don’t have a punch, carefully cut the small holes with sharp hobby knife. Check to make sure the tabs on your brads fit inside the holes. If your brads are bigger, enlarge the holes.
Score and slightly bend the tab on the dotted line.
Trim off the bottom part (unused) and gently score and fold the body of the card on the dotted line. Cut the slot and the small hole in the card with a sharp hobby knife.
2. Assemble
To assemble, use a brass brad to fasten the tab to the hand, then thread the tab through the slot in the card. Finally, fasten the hand to the card with a second brass brad. (The brads even look like two little brass buttons!)
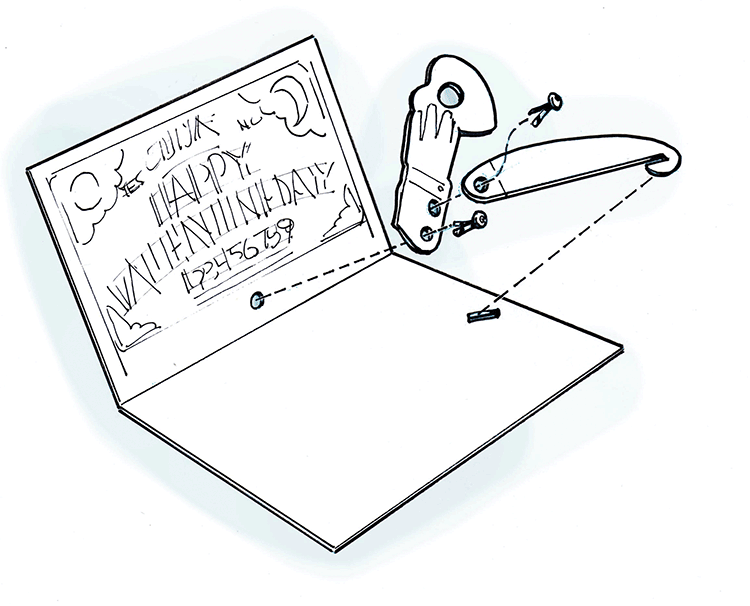
Check the action by opening and closing the card and make any fine adjustments to the brads or re-crease the folds for smooth and easy movement. Hope this card will help you “make” it a Happy Valentine’s Day!
Custom Cookie Cutters
Make your own custom-shaped cookie cutters—two ways! One way is to cut and bend metal strips. The other way uses the Kitchen Floor Vacuum Former to make plastic cookie cutters. You can make metal ones pretty quickly, but if you want to make multiple cutters of the same design, you could mold several on the same vacuum form.
Draw your cookie shape outline to use as a same-size pattern. Keep it simple; small details are okay but a bold silhouette will work best. Narrow shapes or delicate features will break apart and be frustrating to cut, bake, and frost.
Here’s an example of how to create a successful cookie cutter design. My daughter Laura wanted to try making some cookie cutters based on her comic book characters, Rhino B and Stag B, aka, The Bug Boys. You can see them at the top of the page.
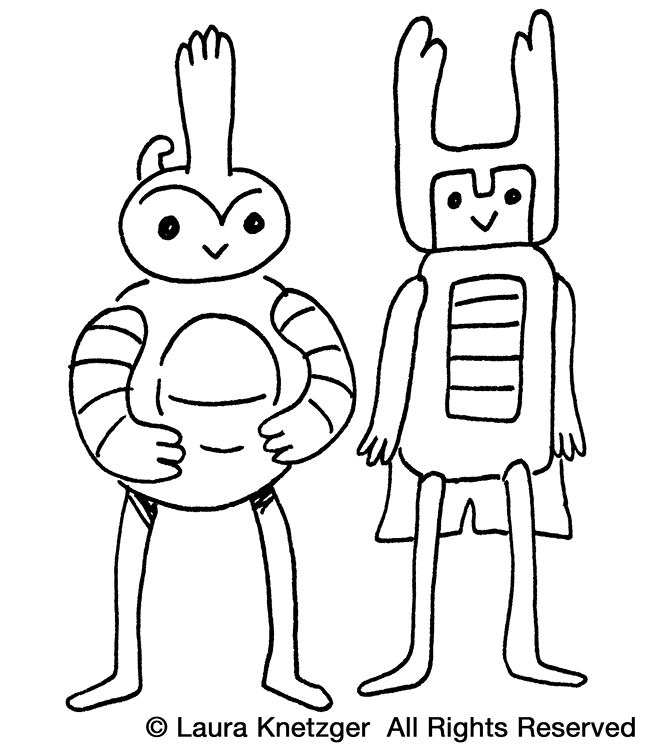
As drawn, the Bug Boys comic legs and horns might be too thin for cookies. Let’s simplify the design and modify the proportions a bit.
Metal Cookie Cutters

For metal cookie cutters use 0.015″ aluminum sheet, available at hardware stores. Measure 1-inch wide strips, then score firmly with a hobby knife. Bend the score against the edge of a table, then bend back and forth until it splits. Repeat to make as many strips as needed. Sand the edges to remove any sharp burrs.
Use needle-nose pliers to hold the strip and carefully make bends to match your pattern. Use a pencil or dowel inside to form tight corners. The soft aluminum bends easily and holds its shape. Keep your bends perpendicular to the strip!

To make longer strips or join the ends, drill matching 1⁄8″ holes. Use pop rivets with backing washers to fasten strips together. Done!


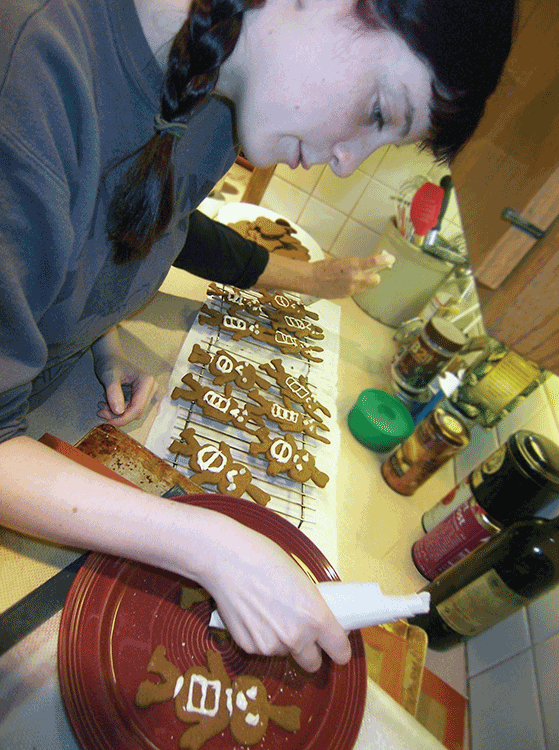
Let’s try them. Laura’s making gingerbread cookies. She rolls out the dough and presses down to cut.

How’d they come out? Pretty good—making the arms legs and horns thicker makes it easy to cut and bake.

Plastic Cookie Cutters
To make plastic cookie cutters, first cut your shape out of wood, then vacuum-form plastic over it. (See Chapter 4, “Thermoforming Plastics,” on how to build and use your own Kitchen Floor Vacuum Former!)
1. Make the Form
Transfer your design to the foam or wood. The cutters don’t have to be too tall but allow a little extra height, since you will later cut off the top of the form to make a cutting edge—1″ high should be plenty. Give the form some draft where you can to make it easier to get the form out later.

2. Mold the Plastic
Vacuum form some 0.030″ plastic (thicker if you can get it!) over your form. It’s okay if there are some webs or places where the plastic doesn’t closely stretch over the form. You only care about the very top of the shape—that’s the part that will cut the cookie dough.
3. Trim
Cut the formed plastic all around the shape, leaving a generous rim. The rim will give the plastic part strength. You can cut with a saw or just score and snap off as you go around the shape.
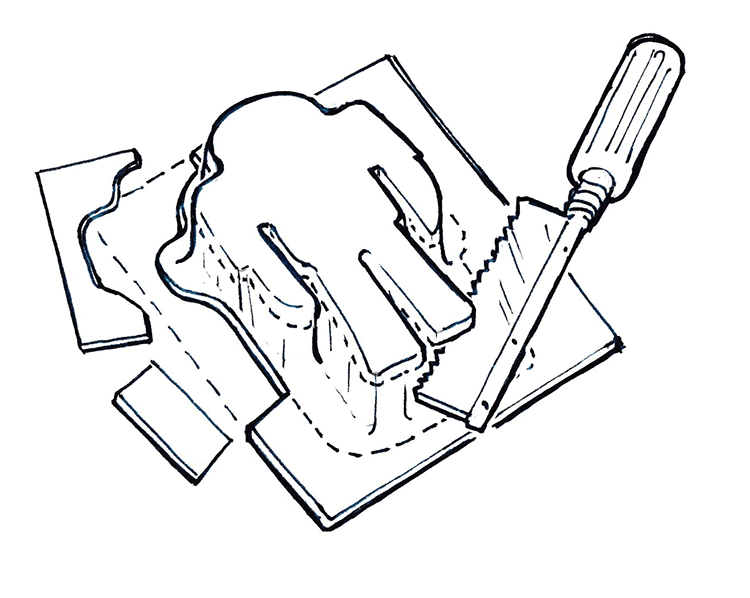
Use the surface gauge to scribe a mark all around the top of the form, just below the top face of the shape. If you don’t have a surface gauge, use a small pencil. Turn the shape over with the face flat on the table. With the pencil also flat on the table, slide the pencil along so it makes a mark all around the side of the shape at the same height.
Use the hobby saw to cut the face off the top of the part where marked. Keep your cut even and flat. To finish it off, place a sheet of sandpaper face up on a tabletop and place the cookie cutter on top, flange side up. Slide the cutter back and forth, around and around to sand the top cut flat.


Magic Cat Projector
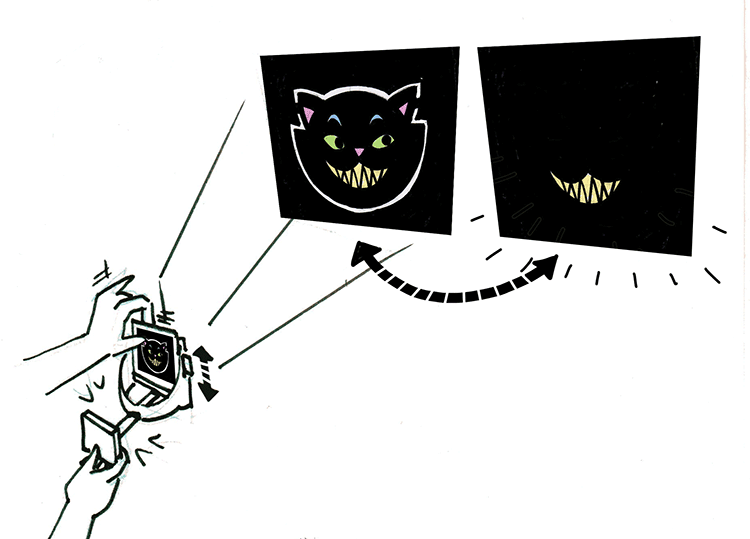
Make this fun mini projector toy for Halloween. It throws a shadow image of a black cat—which then magically disappears, leaving only his spooky grin!

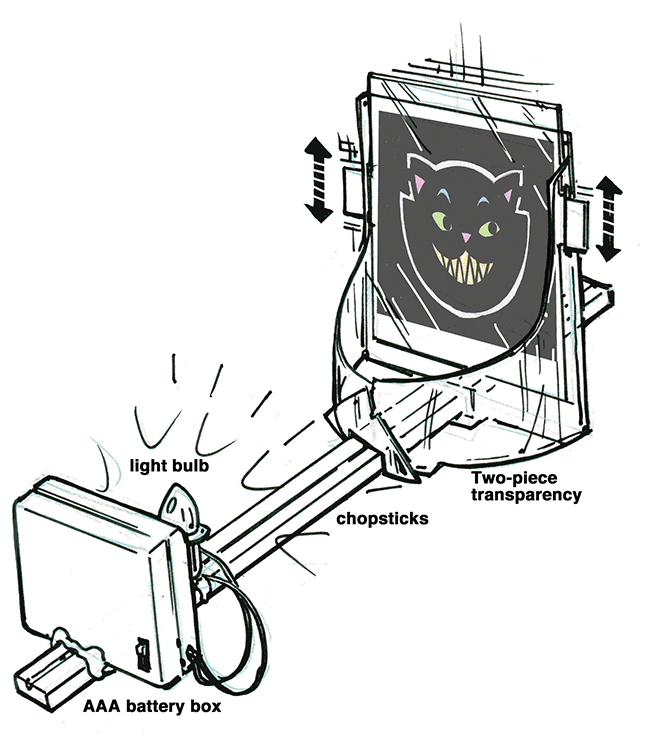
1. Print and Cut
Go to makerfunbook.com to download the image file. Print it out full size on a single sheet of transparency film. Or use the clip-and-use in the appendix and make a copy on clear transparency film.
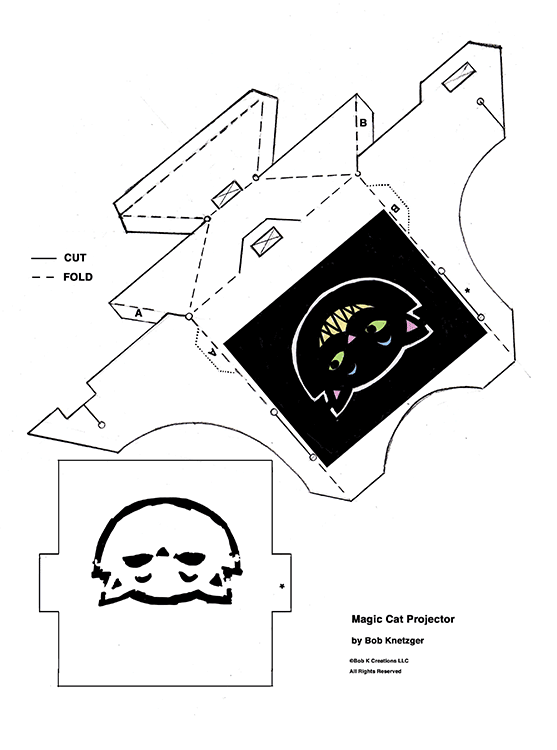
Use a hobby knife to cut out the two shapes. Carefully cut the slits as shown and use a small-sized (1⁄8″ hole) paper punch to make the little circles to provide stress relief at the inside corners.


2. Assemble
Score on the dashed fold lines by tracing over them with a ballpoint pen and straightedge.

Then fold as shown. The sides fold forward and interlock.

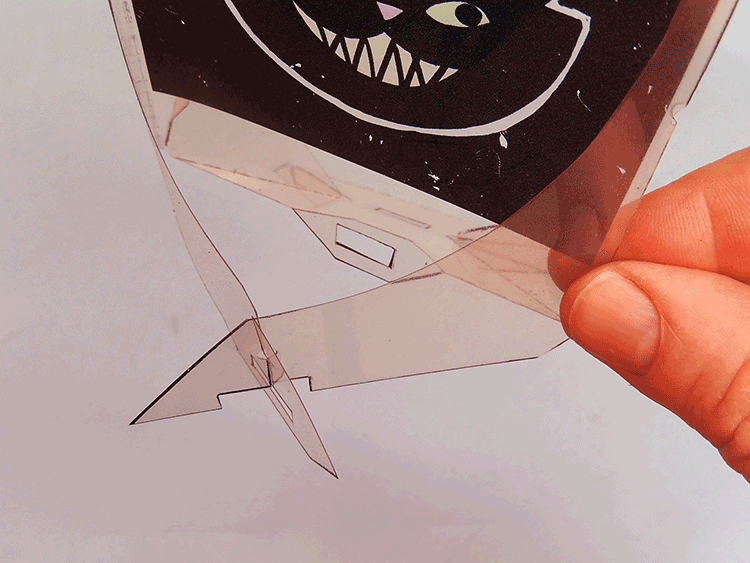
Fold the bottom backward and bend the two wings up. Bend the A and B tabs in. Tape the tabs to the center at A and B.

Thread an unbroken take-out chopstick through the square holes.


Match the asterisk on the slider, and center and insert the ears of the slider into the slits in the center. It should freely slide up and down in the slits.

Solder the two leads from a 4 AAA battery pack to the contacts of a PR13 flashlight bulb. The battery box I used had a built-in on/off switch. If yours doesn’t, just take the batteries out to turn it off.
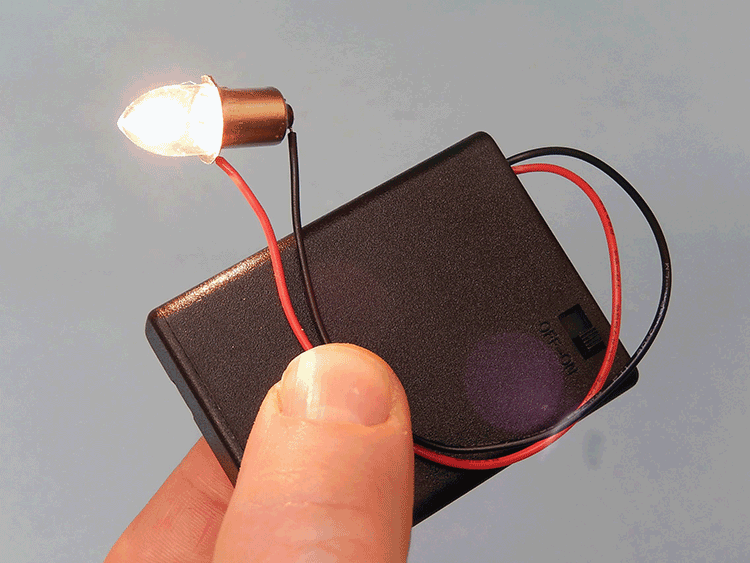
Hot-glue the battery box to other end of the chopsticks.

Hot-glue the light bulb to the chopstick and to the backside of the battery box.

Dim the lights and slide the film up and down to make the cat disappear and reappear!



Scan the QR code and see the Magic Cat Projector in action!
“Gnome Math Required” Holiday Hats
Once upon a Christmas time I had to come up with some stocking stuffers. Whatever it was, it had to be simple, easy, and fast, since I wanted to make a bunch of them for friends and family. Our backyard garden gnome was the inspiration: I’d make felt gnome hats for everyone. And all I needed to make the pattern was a little geometry and a piece of string!
I knew the basic shape was a cone and could be “rolled” from a circular piece of felt, but what dimensions should I use?
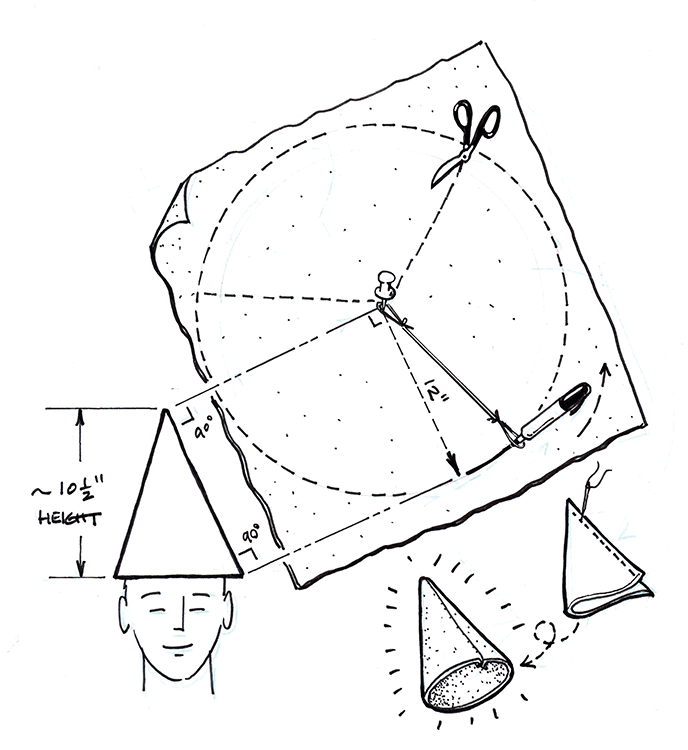
I made a quick orthographic sketch with an auxiliary view to find out. I envisioned a cone, not too squat or too pointy, that was about 10½″ high. The vertical dimension in the frontal view is not really the radius (it’s foreshortened), but by making an auxiliary view that is perpendicular to the projection lines, the edge view of the side of the cone becomes the true-length radius of the true-size flat circle. Now I knew the radius dimension: 12″.
1. Mark the Pattern
To lay out the circles on the felt, tie loops on each end of a piece of string so that the distance between the end of the loops is 12″. Place the felt on the cardboard and put a pin in the center. Put one string loop over the pin and put the other loop around the marker tip. Keeping the string taut, draw a circle.
An average 7½″ hat size has about a 23″ circumference (2πr = C). So, each felt circle will yield three hats. Use the string loops to divide the circle into thirds. Put the pin on a point right on the circle, then use the string and marker to measure, and tick-mark a point along the circumference. Place the pin in the new mark and make another mark along the circumference. Do it again and again to make six marks all around the circle. The marks won’t be perfectly spaced, but that’s okay.
Use the straightedge to draw a radius line from the center to one of the marks on the circle. Draw two more radii to make three “fat pie pieces.”
2. Cut and Sew
Cut out the three pie-shaped pieces of felt. Fold a felt piece over, matching the straight sides, and sew a seam to join the edges. One quick run through the sewing machine and it’s done!
Turn the felt inside out and presto: a holiday gnome hat! You can whip out a stack of hats in no time for everybody on your holiday list!
With the leftover felt pieces, I made mini-sized gnome hats for friends, family, and pets, too.


Photos by David Corina


Photo by Pat Fullam