Sourdough starter
Sourdough bread
Farmhouse loaf
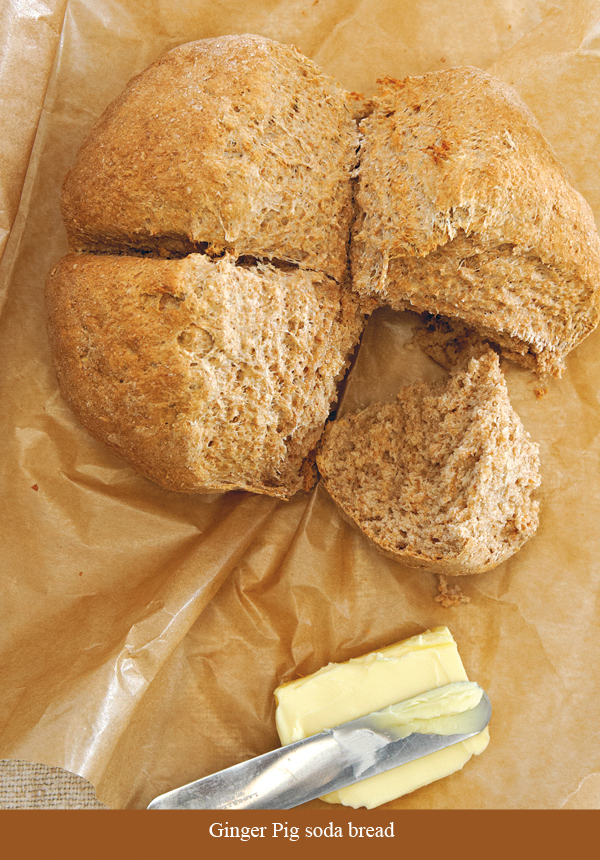
Ginger Pig soda bread
Basic quiche with two fillings
Quiche with mustard and cheese crust
Mutton and black pudding pie
Wensleydale and onion tart
Chicken & chorizo sausage pie
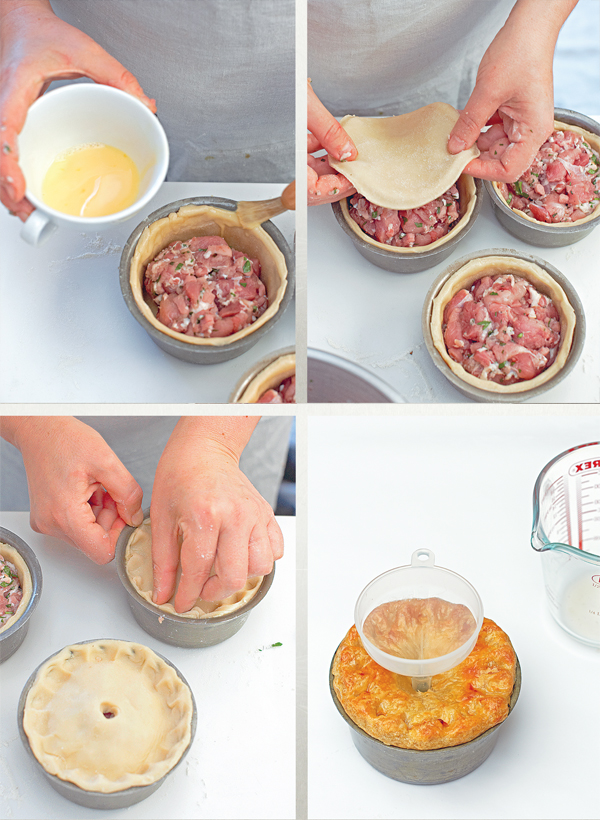
Ginger Pig pork pies
Sausage rolls with Stilton
Sausage rolls with smoked bacon & chilli
Sausage rolls with spicy lamb
Black pudding & sausagemeat palmiers
Sue’s Cornish pasties
Classic steamed suet pudding
Pea & ham filling
Mutton & carrot filling
Steak & smoked oyster filling
Steak & kidney filling
Sourdough
There is something almost magical about the ancient method of making a natural starter in order to make bread. Simply mix together flour and water, following the directions, and watch the mixture gradually come to life: pinprick-sized bubbles start to appear and slowly multiply, until you have a frothy batter. How does that happen? It’s just carbon dioxide forming in the batter – simple but amazing.
Another surprise is that you can keep a starter going for literally years. In fact, it’s worth doing just that because the older the starter, the better the results. Sourdough bread is a complex living thing, and you will get a lot of variety in the beginning, but don’t give up too early. As time goes on, everything starts to settle down and you will get a more reliable loaf. Never again will you take a baker’s skill for granted.
The speed that your starter takes to get going can vary a lot, depending on temperature, location and season. These differences can also affect the end result, and that, I believe, is what makes sourdough bread so fascinating. Try it yourself and I’m sure you’ll be hooked.
Sourdough starter
- 200g (7oz) strong bread flour
- 200ml (7fl oz) bottled mineral water
- Mix the flour and water in a large Kilner jar or something similar. Cover and leave in a warm place for 24 hours, until tiny bubbles start to erupt on the surface.
- At this point, discard half the mix and add the listed ingredients again. Mix well, cover and leave for a further 24 hours.
- Repeat this process a further 3 times and the starter is now ready to use.
Takes 5 days
Making a starter is a slow process, but very gratifying. Each day the activity in the jar should increase, with more and more bubbles on the surface of the mixture, and a distinct sour note will develop, which is exactly what you want.
Sourdough bread
- 500g (1lb 2oz) strong bread flour
- 250ml (9fl oz) sourdough starter
- 200ml (7fl oz) warm water
- 2 tsp salt
- Place the flour, starter and water in a bowl and stir well. The mixture will be a little wet and sticky, but that is normal. Leave for 10 minutes, then sprinkle in the salt and knead for 5 minutes using an electric mixer fitted with a dough hook.
- Line a wicker bread basket or ovenproof dish with a tea towel, generously sprinkle with flour and place the shaped dough within it. Cover with another tea towel and put in a warm place to prove (rise) for 10–20 hours, until almost doubled in size.
- Preheat the oven to 230°C/450°F/gas mark 8. Place a heatproof dish filled with hot water at the bottom of the oven – this will help to create a good crust on the bread. Put the dough on a floured baking sheet and bake for 20 minutes. Reduce the heat to 200°C/400°F/gas mark 6 and bake for a further 20 minutes. The bread should sound hollow when tapped on the bottom; if it doesn’t, bake for longer and test again.
Makes 1 loaf
Takes 1 hour, plus 10-20 hours to prove
Sourdough cannot be rushed – and why would you want to when you have painstakingly created your own starter? The bread will take longer to prove than an ordinary yeast loaf, so if you’re impatient, make the dough before you go to bed and leave it to prove overnight. The wait won’t seem so long if you’re asleep!
Farmhouse loaf
- 775g (1lb 11oz) strong white bread flour
- 15g (½oz) fresh yeast, or 1 heaped tsp dried yeast
- 2 tsp salt
- Lightly grease a 900g (2lb) loaf tin with butter. Put the flour into a large mixing bowl, crumble in the fresh yeast and rub in so that it is evenly distributed. Alternatively, add the dried yeast and stir in thoroughly. Add the salt once the yeast has been combined.
- Make a well in the centre of the flour, then pour in 530ml (18½fl oz) cold water if using fresh yeast, or tepid water if using dried yeast. Using the fingertips of one hand, gradually mix the flour from the sides of the bowl into the water until you have a sticky dough.
- Turn the dough onto a floured work surface and knead until it becomes elastic and slightly shiny. This will take several minutes. Return the dough to the bowl, cover with a clean tea towel and leave somewhere warm until it has doubled in size (up to 1 hour).
- Lift the dough from the bowl, being careful not to knock out too much air, and lay it on a floured work surface. Using your fingertips, gradually work the dough into a large rectangle about the same length as your loaf tin and 3 times its width.
- Fold the outer thirds of the dough into the middle to make it roughly the same size as the loaf tin and place it inside. Cover again with the tea towel and leave to double in size while the oven heats up to 220°C/425°F/gas mark 7.
- Once the dough has proved, bake it for 25–30 minutes, until the base of the loaf sounds hollow when tapped. Set aside in the tin for 10 minutes, then transfer to a wire rack to cool.
Makes 1 large loaf
Takes 1 hour, plus 1½ hours to prove
Nothing beats the taste and smell of freshly made bread. This farmhouse loaf provides the perfect base for a tasty sandwich with some mature cheddar and tangy pickle.
Soda bread
Bicarbonate of soda rather than yeast is used as the raising agent in the Ginger Pig recipe: it’s quicker to use and produces a slightly denser loaf with a tighter texture. Traditionally, soda bread is made with buttermilk, but I have always found ordinary milk just as good. The loaf is a quick solution when you have run out of bread and there’s no time to go to the shops – something that often happens on the farm when we are busy with the stock. All the ingredients are store-cupboard staples, so it’s easy knock up a fresh loaf of soda bread to go with soup or good cheeses and pickles. You can also add sugar and dried fruit to the dough for a lovely teatime loaf. We toast slices on the Aga and top them with lots of melting butter. What could be nicer with a good cup of Yorkshire tea?
Ginger Pig soda bread
- 400g (14oz) wholemeal flour
- 1 tsp bicarbonate of soda
- dash of salt
- 2 tsp cream of tartar
- 400ml (14fl oz) full-fat milk
- 2 tbsp olive oil
- Preheat the oven to 180°C/350°F/gas mark 4.
- Combine all the dry ingredients in a bowl, then add the milk and half the olive oil. Using your hands, quickly mix together until you have a smooth dough.
- Place the dough on a floured surface and knead for 5 minutes, until smooth and soft.
- Shape into a ball, flatten with your hand and cut a cross on the top. Transfer to a floured baking sheet and bake for 30–35 minutes. Serve hot.
Serves 6–8
Takes 50 minutes
With this recipe on hand and a few staple ingredients in the cupboard, you need never fear running out of bread. The loaf does not keep as well as yeasted bread, but that’s rarely a problem because it’s eaten so quickly.
Shortcrust pastry
The basic ingredients for shortcrust are flour, fat and water, but egg(s) can be added for greater richness. Soft, plain wheat flour gives the best texture; bread flour is too high in gluten, producing a tough end result. Always combine it with butter or lard, preferably at room temperature so that they can be easily incorporated without overworking the dough. The aim is to achieve a light, crumbly texture. When mixing shortcrust ingredients, it is important to incorporate as much air as possible. For this reason, flour should always be sifted, and the fat worked in gently, lifting your fingers high out of the bowl to trap lots of air in the crumb.
Baking an empty pastry case before adding the filling helps to prevent it becoming soggy. The technique is called blind baking, and the first step is to line the pastry case with a sheet of crumpled baking parchment (the crumpling makes it easier to fit). Fill it with uncooked rice or dried pulses (or special ceramic beans, if you have them) and bake in the middle of an oven preheated to 200°c, 400°F, gas 6 for 15 minutes. Reduce the temperature to 170°C, 325°F, gas mark 3, remove the beans and paper, then bake for a further 10 minutes, until the pastry is dry and lightly golden.
Basic quiche with two fillings
- For the basic custard
- 6 eggs
- 350ml (12 fl oz) double cream
- 250ml (9fl oz) milk
- freshly ground black pepper
- ½ tsp salt (less if using bacon or lots of cheese)
Cheese and bacon filling- 350g (12oz) lardons or bacon trimmings
- 1 large onion, peeled and finely sliced
- 200g (7oz) strong, firm cheese, such as Cheddar or Lancashire, grated
Roasted vegetable and feta filling- 1 red pepper, deseeded and roughly chopped
- 1 green pepper, deseeded and roughly chopped
- 1 red onion, peeled and roughly chopped
- 6 garlic cloves, peeled
- 3 tbsp olive oil
- 150g (5½oz) feta, cut into 1cm (½in) chunks
For the pastry- 250g (9oz) plain flour
- 125g (4½oz) soft butter
- 1 egg
- 1 tsp salt and ½ tsp sugar
- First make the pastry. Tip the flour onto a work surface, make a well in the middle and place the butter, egg, salt and sugar in it. Mix the ingredients in the well, then draw in the flour around the sides, taking care not to overwork the mixture. Add 40ml (1½fl oz) water, knead a few times to ensure the dough is smooth, adding a little more water if needed, then kneading again. Cover with clingfilm and place in the fridge for 1 hour.
- Butter a 33 x 26cm (13 x 10in) baking dish, or two 20cm (8in) tart tins. Roll out the chilled pastry and use to line your prepared dish/tins. Prick the base with a fork, then place in the fridge for 10 minutes.
- Meanwhile, preheat the oven to 170°C/325°F/gas mark 3. Make the basic custard by whisking together the eggs, cream, milk and seasoning.
- Remove the pastry case/s from the fridge and blind bake. If making the cheese and bacon filling, sauté the lardons in a dry frying pan until the fat runs. Add the onions and cook gently until soft. Remove the cases from the oven and scatter the mixture across the base, pour in the egg mix and top with the cheese.
- If making the vegetable filling, toss the peppers, onion and garlic in the olive oil. Season and roast for 30 minutes, stirring halfway through. When soft, use the back of a spoon to crush the garlic and mix it through the vegetables. Scatter them across the pastry base, sprinkle with the feta, then pour in the egg mix.
- Bake the large quiche for 40 minutes or the 2 smaller ones for 20–30 minutes, until set.
Serves 6–8
Takes about 2 hours, plus 1 hour to chill
The quiche has been done a huge disservice by mass-production, which turns out bland and flabby articles. With a proper shortcrust pastry case and an egg-rich filling, the quiche is a fantastic dish. It should be served just warm, when it will have enough stability to be neatly sliced.
You can add almost whatever you please to the basic custard – smoked salmon and chopped asparagus; slow-cooked onions and rosemary; lots of fresh green herbs and garden peas – the combinations are endless.
Quiche with mustard and cheese crust
- 1 tbsp olive oil
- 400g (14oz) smoked bacon, chopped
- 125ml (4fl oz) double cream
- 2 eggs
- sea salt
- freshly ground black pepper
- 50g (2oz) Parmesan or Cheddar cheese, grated
For the pastry- 250g (9oz) plain flour
- 175g (6oz) chilled butter, diced
- 1 tsp English mustard powder
- 50g (2oz) Parmesan or Cheddar cheese, grated
- 2 egg yolks, beaten
- First make the pastry. Put the flour and butter into a bowl and rub together with your fingertips until the mixture resembles breadcrumbs. Mix in the mustard and cheese, then pour in the egg yolks and mix with a round-bladed knife until a dough forms. Knead lightly on a floured surface until smooth, then cover in clingfilm and place in the fridge for 30 minutes.
- Preheat the oven to 200°C/400°F/gas mark 6.
- Roll out the pastry on a lightly floured surface and use to line a 30cm (12in) loose-bottomed tart tin. Make sure there are no cracks in the pastry, then prick the base with a fork.
- Chill the pastry case for 10 minutes, then blind bake for 20 minutes. After the temperature is reduced, bake for a further 20 minutes.
- Meanwhile, heat the olive oil in a frying pan and fry the bacon until just cooked. Whisk together the cream, eggs and seasoning and pour into the pastry case. Add the bacon, sprinkle with the cheese and bake for 40 minutes. The filling should be soft but set in the centre.
Serves 6
Takes 2 hours, plus 40 minutes to chill
Deliciously flavoured with cheese, the rich yet crisp pastry used here also includes a bit of mustard for a slight kick. With its classic egg and bacon filling, the quiche makes a perfect meal with steamed new potatoes and fresh salad leaves.
Mutton and black pudding pie
- 3kg (6lb 8oz) shoulder of mutton, boned and cubed
- 1 tbsp olive oil
- 2 onions, peeled and chopped
- 25g (1oz) flour
- 500ml (18fl oz) red wine
- sea salt
- freshly ground black pepper
- 1 bay leaf
- 300g (10½oz) black pudding, roughly chopped
- 1 egg, beaten (for brushing the pastry)
For the pastry- 650g (1lb 7oz) plain flour
- 250g (9oz) chilled lard, diced
- 2 eggs, beaten
- pinch of salt
- Preheat the oven to 200°C/400°F/gas mark 6. Place the mutton in a large ovenproof pie dish with the oil, toss well, then roast for 35 minutes, until browned. Add the onions and roast for a further 10 minutes. Reduce the temperature to 170°C/325°F/gas mark 3. Sprinkle the flour over the mutton and stir well. Pour in the wine, then add the seasoning and bay leaf, mixing well. If the meat is not covered with the liquid, top it up with water. Cover with a cartouche (circle of baking parchment or greaseproof paper) and foil and place in the oven for 3 hours. Stir in the black pudding and set aside to cool slightly.
- Meanwhile, make the pastry. Put the flour and lard in a bowl and rub together until evenly blended. Add the eggs, salt and 100ml (3½fl oz) chilled water and mix until you have a smooth dough. Cover in clingfilm and place in the fridge for 25 minutes. Preheat the oven to 190°C/375°F/gas mark 5.
- Lightly flour a work surface and roll out the pastry until large enough to cover the pie dish with some overhang. Cut strips of pastry as wide as the lip of the dish and brush on one side with beaten egg. Lay them, egg side down, all around the lip, then brush with beaten egg again.
- Working quickly, cover with the remaining pastry, pressing the edges together. Trim off the excess pastry, then crimp around the edges. Brush the remaining beaten egg all over the pie, cut a cross in the middle of the top and bake for 45 minutes.
Serves 6–8
Takes 4¾ hours
This recipe is a speciality that Les, our chief pie-maker, researched and produced. It is a real man’s pie, with thick, crispy pastry and a hearty filling full of earthy flavours in a rich sauce. It’s so good that Les cooked it for the Two Hairy Bikers crew, who came to the farm to film him making it.
Wensleydale and onion tart
- 2 onions, peeled and sliced
- 1 tbsp olive oil
- 2 eggs
- 275ml (9½fl oz) double cream
- sea salt
- freshly ground black pepper
- 1 bunch of chives, chopped
- 250g (9oz) Wensleydale cheese, grated
For the pastry- 250g (9oz) plain flour
- 75g (2½oz) chilled butter, diced
- 50g (2oz) chilled lard, diced
- 2 egg yolks, beaten
- First make the pastry. Put the flour into a bowl, add the butter and lard and rub together with your fingertips until the mixture resembles breadcrumbs. Using a round-bladed knife and a cutting motion, mix in the egg yolks until a dough forms. Knead gently until smooth. Lightly flour a work surface and roll out the pastry to roughly the size of a teaplate. Cover in clingfilm and place in the fridge for 10 minutes.
- Preheat the oven to 180°C/350°F/gas mark 4. Lightly butter a 23cm (9in) loose-bottomed tart tin.
- Roll out the chilled pastry again and use to line the tin. Prick the base with a fork, then blind bake. Set aside and reduce the oven temperature to 170°C/325°F/gas mark 3.
- Place the onions and oil in a pan and fry gently for 10 minutes, until lightly golden, then scatter into the cooked pastry case.
- Mix together the eggs, cream, seasoning and chives, add the cheese and carefully pour into the pastry case. Bake for 35 minutes, until set and golden.
Serves 4
Takes 2 hours
Our friends in Hawes, North Yorkshire, make fantastic Wensleydale cheese. Being firm believers in local produce, we use it in this tart, which is much loved by everyone in our Yorkshire fold. Alter the cheese as you wish to suit your locality or palate.
Chicken & chorizo sausage pie
- 2kg (4lb 8oz) chicken
- 4 chorizo sausages
- 50g (2oz) butter
- 50g (2oz) plain flour
- freshly ground black pepper
- pinch of salt
- 4 sprigs of flat leaf parsley, chopped
- 1 egg, beaten (for brushing the pastry)
For the pastry- 650g (1lb 7oz) plain flour
- 250g (9oz) chilled lard, diced
- 2 eggs, beaten
- pinch of salt
- Preheat the oven to 190°C/375°F/gas mark 5. Place the chicken and sausages in a lidded casserole dish. Cover with water, place a sheet a sheet of baking parchment over the dish, then put the lid on. Place in the oven for 1½ hours.
- Transfer all the meat to a bowl and set aside until cool enough to handle. Discard the chicken skin, then strip the meat off the bones. Roughly chop both the chicken and chorizo, return to the bowl and mix.
- Skim the fat off the stock in the casserole dish. Melt the butter in a saucepan, add the flour and mix to a smooth paste. Slowly pour in 850ml (1½ pints) of the stock, stirring constantly until it thickens and boils. Pour it over the meat mixture, add the seasoning and parsley and mix well. Place in a large pie dish about 10cm (4in) deep. Set aside.
- To make the pastry, put the flour and lard in a bowl and rub together until evenly blended. Add the eggs, salt and 75ml (3fl oz) of chilled water and mix until you have a smooth dough.
- Preheat the oven to 200°C/400°F/gas mark 6. Lightly flour a work surface and roll out the pastry until large enough to cover the pie dish with some overhang. Cut strips as wide as the lip of the dish and brush on one side with beaten egg. Lay them, brushed side down, all around the lip, then brush with egg again. Cover the dish with the remaining pastry, trim off the excess, then crimp the edges together. Brush egg all over the pie, cut a cross in the middle and bake for 20 minutes, then reduce the temperature to 170°C/325°F/gas mark 3 and bake for a further 30 minutes.
Serves 6–8
Takes 3½ hours
Here’s a delicious pie full of tender chicken and spicy chorizo under a shortcrust lid. It’s perfect for a family meal or casual lunch with friends.
Hot-water crust
As the name suggests, hot-water crust is a crispy pastry that uses hot water rather than cold to help form the dough. It also differs from other pastries in using hot lard rather than butter for the fat content, but we like to be different and use a mixture of both for extra flavour and a good texture. The result is a thick, sticky pastry that bakes to a smooth, shiny and firm finish, just as you see in pork pies. While most pastries need time to rest and cool before use, hot-water crust must be used immediately, otherwise it dries and cracks and becomes impossible to shape.
Being robust and easy to mould, hot-water crust is particularly suitable for making hand-raised meat and game pies. In this case, the pastry is rolled out in the usual way, but a mould, such as a large tin or jam jar, is placed in the middle, then the pastry is raised up around it and patted into shape. After chilling, the mould is carefully lifted out and the pastry case is filled with a meat mixture. A pastry lid is added to cover the filling, a small hole is pierced in the top and the pie is then baked. The filling shrinks slightly as the pie cooks, so a rich jelly is poured through the hole to fill any gaps between the meat and the pastry. Once set, the pie will freeze well or it will keep for several days in the fridge, but it is better eaten fresh.
Ginger Pig pork pies
- For the filling
- 100g (3½ oz) butter, melted
- 25g (1oz) lard, melted
- 1kg (2lb 4oz) fatty minced pork
- 1tsp freshly ground nutmeg
- 1tsp freshly ground white pepper
- 1½ tsp salt
- 1 egg, beaten (for brushing the pastry)
- 2tsp flat-leaf parsley, chopped
For the pastry- 700g (1lb 9oz) plain flour
- 50g (2oz) icing sugar
- pinch of salt
- 200g (7oz) lard
For the jelly- 2 pig’s trotters, cleaned
- 4 peppercorns
- 2 bay leaves
- Place the trotters in a saucepan of cold water and bring to the boil. Remove the trotters and discard the liquid. Return them to the pan, cover with 3 litres (5¼ pints) fresh water, add the peppercorns and bay leaves and cover tightly. Bring to a simmer and cook for 4 hours, ensuring that the trotters are immersed and adding a little more water if necessary. Strain the liquid through muslin, cover and chill until set. If runny, heat to reduce; if extremely firm, reheat with a little water or stock to loosen.
- Preheat the oven to 170°C/325°F/gas mark 3. Brush four 12 x 6cm (5 x 2½in) pie tins with the melted lard. Dust with flour.
- Put the pork in a bowl with the nutmeg, pepper, parsley and salt. Mix well, then set aside. To make the pastry, mix the flour, sugar and salt in a bowl. Melt the butter and lard with 200ml (7fl oz) of water until almost boiling. Pour this liquid over the dry ingredients and mix quickly to make a smooth, glossy dough.
- Divide the dough into 8 pieces, 4 at 185g (6½oz) and 4 at 115g (4oz). Cover with clingfilm and a clean tea towel to stop them from cooling and setting hard. Roll out the larger pieces of dough and use to line the pie tins, pressing lightly to fit. Divide the filling between the tins, then brush the pastry rim with beaten egg. Roll out each small piece of pastry and make a 1cm (½in) hole in the centre. Place on top of the pies and crimp the edges together. Brush with the egg and bake for 1 hour. Set aside to cool in the tins.
- Heat up the jelly, then slowly pour through a small funnel into each pie hole. Allow to set for 2 hours before serving.
Makes 4 pies
Takes 6 hours, plus overnight setting
Here’s our recipe for a traditional pork pie. It’s a classic and we are known for it, though our recipe has never been published before. The jelly, which is made the night before should be firm but not rubbery.
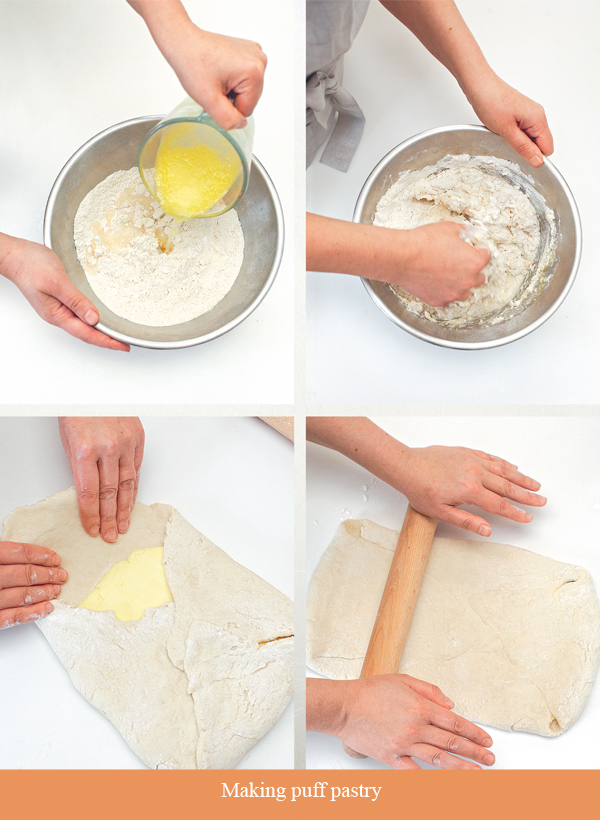
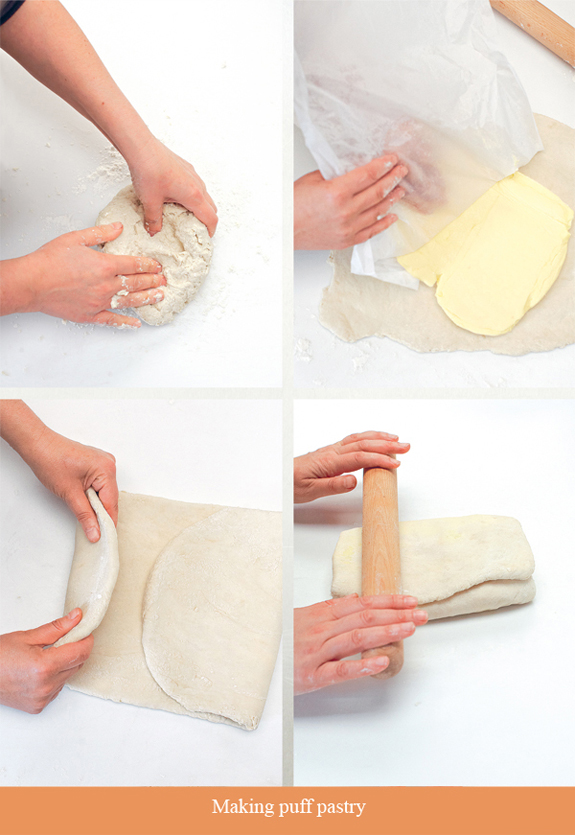
Puff pastry
The origins of puff pastry are unclear. It was certainly known in ancient Greece and during medieval times, but it is the nineteenth-century pastry cook Richard Feuillet who is credited with popularizing it since then.
Making puff pastry requires time and patience because the dough is layered with butter, then folded and rolled several times to create multiple layers that puff up when baked. The end result is delectable and well worth the effort. However, do note the following tips:
• Chilling puff pastry is very important because without it you won’t get such defined layering. Also, if warm pastry goes into the oven, it is more likely to become gooey than to rise, so keep any pastry you’re not actually working with covered in clingfilm in the fridge.
• Handle the pastry carefully, as bending or squashing the layers means it won’t rise properly.
• Have the oven nice and hot. The layers rise when the butter boils, creating steam that lifts the dough.
• Make extra to freeze and you’ve got a speedy meal in the bank. Puff pastry keeps for up to three months if well covered in clingfilm, and can make a quick pie lid for leftovers, or an open tart base simply scattered with roasted vegetables, bacon and cheese.
Sausage rolls with Stilton
- 550g (1lb 4oz) minced pork
- 175g (6oz) pork fat, minced
- 100g (3½oz) breadcrumbs
- 2 tsp dried mixed herbs
- 1 tsp chopped sage
- 150g (5½oz) Stilton cheese, crumbled
- sea salt
- freshly ground black pepper
- 1 egg, beaten (for brushing the pastry)
For the pastry- 600g (1lb 5oz) very strong white flour, preferably ‘00’
- 450g (1lb) chilled butter
- pinch of salt
- 2 tbsp white wine vinegar
- To make the pastry, sift the flour into a large bowl. Melt 50g (2oz) of the butter and mix with the salt, vinegar and 230ml (8fl oz) of ice-cold water. Add this liquid to the flour and mix to a smooth dough. Cover in clingfilm and place in the fridge for 1 hour.
- Make the puff pastry. Place the remaining butter between 2 sheets of clingfilm and roll it out to the thickness of your finger. On a lightly floured work surface, roll out the chilled pastry to a rectangle just over twice the size of the butter. Place the butter in the middle and fold the sides of the pastry over it. Roll out again to a rectangle the same size as it was before the butter was added, then fold in thirds. Roll out once more, give it a quarter turn and fold in thirds again. Cover in clingfilm and chill for 1 hour. Repeat the rolling and folding 4 more times, adding a light dusting of flour each time, then wrapping and chilling as before. Leave to rest in the fridge overnight.
- Combine the pork and fat in a bowl. Add the breadcrumbs, herbs, cheese, seasoning and 125ml (4fl oz) of water. Mix with your hands until evenly blended. Chill overnight.
- Preheat the oven to 180°C/350°F/gas mark 4. Roll the pastry out to about 40 x 30cm (16 x 12in) and cut it into 3 lengthways strips about 10cm (4in) wide. Work the sausagemeat into a long roll as thick as your thumb and place along a strip of pastry. Brush the exposed pastry with egg, then roll over and crimp the edges. Repeat twice more, then cut each length into 4 equal pieces. Brush with egg, place on a baking sheet and bake for 50 minutes.
Makes 12
Takes 7 hours to make the pastry, plus overnight chilling and 1½ hours to cook
Perfect for parties and picnics, sausage rolls are popular with everyone. With the addition of tangy Stilton, they are even better, so make lots!
Sausage rolls with smoked bacon & chilli
- 1 quantity chilled puff pastry
- 1 egg, beaten (for brushing the pastry)
For the filling- 200g (7oz) smoked, rindless streaky bacon
- 500g (1lb 2oz) minced fatty pork
- 100g (3½oz) breadcrumbs
- 1 tsp sweet, smoked paprika
- ½ tsp chilli powder
- 1 tbsp sweet chilli sauce
- sea salt and freshly ground black pepper
- Chop the bacon as finely as you can; you might find this quicker if you start with scissors and then use a sharp knife.
- Mix the bacon with all the other filling ingredients, seasoning liberally with pepper, but adding just a little salt as the bacon is already quite salty.
- Make the sausage rolls.
Makes 12
Takes 1½ hours
Made with slightly salty, smoked streaky bacon, minced pork and just a touch of spice and sweet chilli sauce to pep them up.
Sausage rolls with spicy lamb
- 1 quantity chilled puff pastry
- 1 egg, beaten (for brushing the pastry)
For the filling- 700g (1lb 9oz) minced fatty lamb
- 100g (3½oz) breadcrumbs
- 2 tsp cumin
- 2 garlic cloves, crushed, peeled and finely minced
- 1 tbsp finely chopped flat leaf parsley
- 1 tsp harissa paste
- Put all the filling ingredients into a large bowl, season generously and mix until well combined.
- Make the sausage rolls.
Makes 12
Takes 1½ hours
A nod to northern Africa with our lamb merguez sausagemeat encased in butter-rich puff pastry. Serve with a minty yoghurt for perfect picnic fodder.
Black pudding & sausagemeat palmiers
- 500g (1lb 2oz) minced pork
- ½ tsp fine sea salt
- ½ tsp freshly ground black pepper
- 4 sage leaves, finely chopped
- 1 bunch of parsley, finely chopped
- ½ tsp dried thyme
- 50g (2oz) breadcrumbs, dried on a tray in a low oven for 20 minutes
- ½ quantity chilled puff pastry
- 125g (4½oz) black pudding, casing removed
- 1 egg, beaten (for brushing the pastry)
- Mix the pork with the seasoning, herbs and breadcrumbs, then stir the mixture well for 2 minutes to get a good texture.
- On a lightly floured surface, roll the pastry into a rectangle the thickness of a £1 coin.
- Roll the sausagemeat mixture into a similar-sized rectangle and place on top of the pastry.
- About 2.5cm (1in) away from the edge of one long side, crumble the black pudding onto the sausagemeat in a strip about 1cm (½in) wide.
- Starting at the edge with the black pudding, roll up the rectangle fairly tightly. Cover in flour-dusted clingfilm and chill for 45 minutes, or until you’re ready to use it (the roll will keep for 2 days in the fridge).
- Preheat the oven to 200°C/400°F/gas mark 6. Slice the chilled roll into 5mm (¼in) rounds and lay them flat on a baking sheet, leaving a 2.5cm (1in) gap between them to allow for expansion. Brush with a little beaten egg and bake until crisp and golden – about 10 minutes.
Makes 50
Takes 25 minutes, plus 45 minutes to chill
Traditionally shaped like palm leaves (hence their name), palmiers are usually made as sweet biscuits. Here, though, I’ve given them a savoury twist, and they’re really delicious.
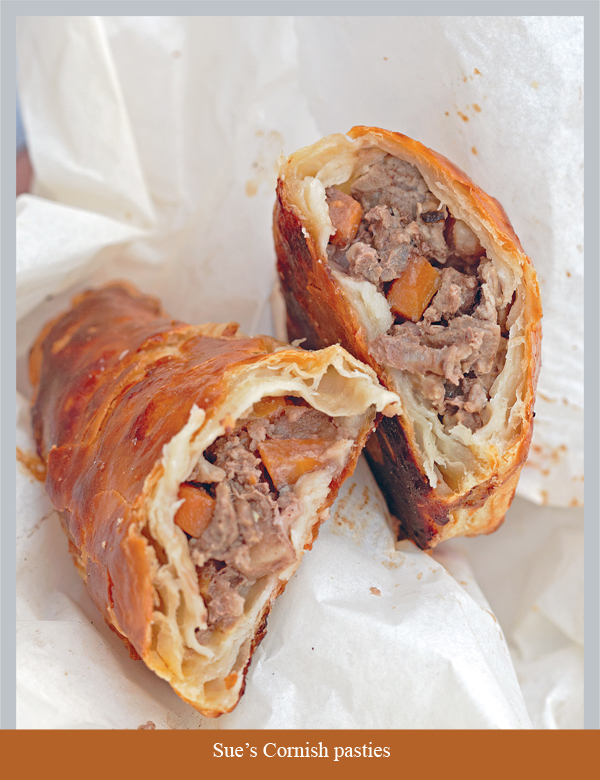
Sue’s Cornish pasties
- 1 large potato, peeled and diced
- 1 large carrot, peeled and diced
- 1 large onion, peeled and diced
- 200g (7oz) beef fillet tail, diced
- sea salt
- freshly ground black pepper
- dash of Worcestershire sauce
- ½ quantity chilled puff pastry
- 1 egg, beaten (for brushing the pastry)
- Preheat the oven to 200°C/400°F/gas mark 6.
- Place the potato, carrot and onion in a saucepan, cover with water and bring to the boil. Simmer for 2 minutes, then drain and set aside to cool. When cool, add the beef, seasoning and Worcestershire sauce and stir together.
- Divide the pastry into 4 equal pieces. Place on a lightly floured surface and roll each piece into a rough circle about 20cm (8in) wide. Using an upturned round teaplate, cut a regular circle from each piece.
- Spoon the beef mixture into the centre of each pastry circle. Brush beaten egg around the filling, then carefully bring the edges of the pastry together and crimp tightly with floured fingers. Brush beaten egg all over each pasty and place on a baking sheet. Bake for 15 minutes, then lower the temperature to 180°C/350°F/gas mark 4 and bake for a further 30 minutes.
Makes 4
Takes 1½ hours, plus 30 minutes to chill
Sue has been working as my housekeeper for many years and last year when we became really busy she extended her days to help in the bakery and undertook making the Cornish pasties. Tail end of beef fillet is not the right shape for use as steak, but it is ideal for making these superior pasties, and relatively cheap too. Enjoy the pasties hot or cold – they are delicious either way.
Classic steamed suet pudding
- To make the pastry, combine the flour, suet and salt in a bowl. Add 100–150ml (3½–5fl oz) of cold water and mix until a smooth dough forms.
- Grease a 900g (2lb) pudding basin, preferably metal, with lard. On a lightly floured surface, roll the pastry into a circle large enough to line the basin and slightly overhang the sides. Fold the circle in half, then into thirds. Unfold and cut away one-third. Carefully lift the pastry into the basin, working it into the base and sides, and brushing the overlap with water to make a good seal. Roll out the discarded third of pastry to fit the top of the basin.
- Fill the lined basin with your chosen filling. Add some liquid as directed by the filling recipe you have chosen.
- Brush the pastry edge with water, sit the pastry circle on top and press together to seal. Fold in the overhang after adding the circle lid.
- Cover the top of the pudding with a double sheet of baking parchment and foil, both of them pleated in the middle to allow for expansion as the pudding cooks. Tie in place with string and make a loop across the top as a handle.
- Sit the basin on a trivet in a saucepan and pour in enough boiling water to come halfway up the sides. Cover with a tight-fitting lid and simmer gently for 4½ hours, checking the water level frequently.
- To serve, remove the foil and parchment, run a sharp knife around the edge of the pudding, then invert onto a plate.
Serves 4
Takes 5 hours
A steamed savoury pudding is real comfort food on a cold winter’s day, and fairly thrifty too because the long, slow cooking tenderizes even the cheapest cut of meat.
Suet puddings are best made in a metal basin because it reaches a higher temperature than glass or earthenware and allows the pastry to take on a light golden colour, which makes the pudding look even more appetizing.
Pea & ham filling
- 650g (1lb 7oz) raw bacon or ham, cubed
- 15g (½oz) flour
- 200g (7oz) freshly shelled or frozen peas
- 1 onion, peeled and diced
- 1 bunch of flat leaf parsley, chopped
- 1 tsp grain mustard
- 100ml (3½fl oz) double cream
- 1 bay leaf
- freshly ground black pepper
- Place the bacon in a bowl, add the flour and toss to coat.
- Add all the other ingredients and mix well. Spoon the mixture into the pastry-lined pudding basin.
- Add enough water to come about 2.5cm (1in) from the top. Continue as for Classic steamed suet pudding.
Serves 4
Takes 20 minutes
Ask your butcher if he has any offcuts of bacon or ham that you can use for this dish. Alternatively, use a small slipper cut (corner piece) of ham.
Mutton & carrot filling
- 750g (1lb 10oz) shoulder or neck of mutton, cubed
- 15g (½oz) flour
- 2 carrots, peeled and diced
- 1 onion, peeled and diced
- 1 garlic clove, crushed, peeled and diced
- leaves from 1 large sprig of thyme, chopped
- 1 bay leaf
- sea salt
- freshly ground black pepper
- 100ml (3½fl oz) red wine, or very good beef stock
- Place the mutton in a bowl, add the flour and toss to coat.
- Add the vegetables, garlic, herbs and seasoning and mix well. Spoon the mixture into the pastry-lined pudding basin.
- Pour in the wine and top up with enough water to come about 2.5cm (1in) from the top. Continue as for Classic steamed suet pudding.
Serves 4
Takes 25 minutes
The intense flavour of mutton is perfect for this pudding. For this filling, and Steak & smoked oyster filling and Steak & kidney filling, stock can be used instead of wine, but do try to use a full-bodied, jellied stock. Apart from adding lots of flavour, it reduces the amount of salt required and does away with the need for gravy browning. If you don’t have a good stock already, use our Beef stock recipe.
Steak & smoked oyster filling
- 650g (1lb 7oz) braising beef, skirt, chuck or brisket, cubed
- 15g (½oz) flour
- 2 cans of smoked oysters (about 175g/6oz in total)
- 1 onion, peeled and diced
- 1 garlic clove, crushed, peeled and diced
- 1 bunch of flat leaf parsley, chopped
- 1 bay leaf
- sea salt and black pepper
- 150ml (¼ pint) red wine
- Place the beef in a bowl, add the flour and toss to coat.
- Add the smoked oysters in their oil, the onion, garlic, herbs and seasoning and mix well. Spoon the mixture into the pastry-lined pudding basin.
- Pour in the wine and top up with enough water to come about 2.5cm (1in) from the top. Continue as for Classic steamed suet pudding.
Serves 4
Takes 20 minutes
The oysters add a delicious depth of flavour to this filling. If you would rather not add red wine, you can use good beef stock instead.
Steak & kidney filling
- 650g (1lb 7oz) braising beef, skirt, chuck or brisket, cubed
- 200g (7oz) kidneys, cored and cubed
- 15g (½oz) flour
- 1 onion, peeled and diced
- 1 garlic clove, crushed, peeled and diced
- 1 bunch of flat leaf parsley, chopped
- 1 bay leaf
- ½ tsp Worcestershire sauce
- 1 tsp soy sauce
- sea salt and black pepper
- 150ml (¼ pint) red wine
- Place all the meat in a bowl, add the flour and toss to coat.
- Add the onion, garlic, herbs, sauces and seasoning and mix well. Spoon the mixture into a pastry-lined pudding basin.
- Pour in the wine and top up with enough water to come about 2.5cm (1in) from the top. Continue as for Classic steamed suet pudding.
Serves 4
Takes 25 minutes
If you’re not fond of kidneys, use mushrooms instead. If you would rather not add red wine, you can use good beef stock instead.