B-8. Manual Carries
Casualties carried by manual means must be carefully and correctly handled, otherwise their injuries may become more serious or possibly fatal. Situation permitting, transport of a casualty should be organized and unhurried. Each movement should be performed as deliberately and gently as possible. Casualties should not be moved before the type and extent of injuries are evaluated and the required first aid is administered. The exception to this occurs when the situation dictates immediate movement for safety purposes (for example, it may be necessary to remove a casualty from a burning vehicle); that is, the situation dictates that the urgency of casualty movement outweighs the need to administer first aid. Manual carries are tiring for the bearers and involve the risk of increasing the severity of the casualty’s injury. In some instances, however, they are essential to save the casualty’s life. Although manual carries are accomplished by one or two bearers, the twoman carries are used whenever possible. They provide more comfort to the casualty, are less likely to aggravate his injuries, and are also less tiring for the bearers. The distance a casualty can be carried depends on many factors, such as —
- • Nature of the casualty’s injuries.
- • Strength and endurance of the bearer(s).
- • Weight of the casualty.
- • Obstacles encountered during transport (natural or manmade).
- • Type of terrain.
- a. One-man Carries. These carries should be used when only one bearer is available to transport the casualty.
-
- (1) The fireman’s carry (Figure B-3) is one of the easiest ways for one individual to carry another. After an unconscious or disabled casualty has been properly positioned, he is raised from the ground, then supported and placed in the carrying position.
-
- (a) After rolling the casualty onto his abdomen, straddle him. Extend your hands under his chest and lock them together.
- (b) Lift the casualty to his knees as you move backward.
- (c) Continue to move backward, thus straightening the casualty’s legs and locking his knees.
- (d) Walk forward, bringing the casualty to a standing position; tilt him slightly backward to prevent his knees from buckling.
- (e) As you maintain constant support of the casualty with one arm, free your other arm, quickly grasp his wrist, and raise his arm high. Instantly pass your head under his raised arm, releasing it as you pass under it.
- (f) Move swiftly to face the casualty and secure your arms around his waist. Immediately place your foot between his feet and spread them apart (approximately 6 to 8 inches).
- (g) Grasp the casualty’s wrist and raise his arm high over your head.
- (h) Bend down and pull the casualty’s arm over and down on your shoulder, bringing his body across your shoulders. At the same time, pass your arm between his legs.
- (i) Grasp the casualty’s wrist with one hand, and place your other hand on your knee for support.
- (j) Rise with the casualty positioned correctly. Your other hand is free for use.
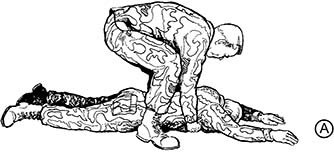 Figure B-3. Fireman’s carry
 (
Illustrated A — J).
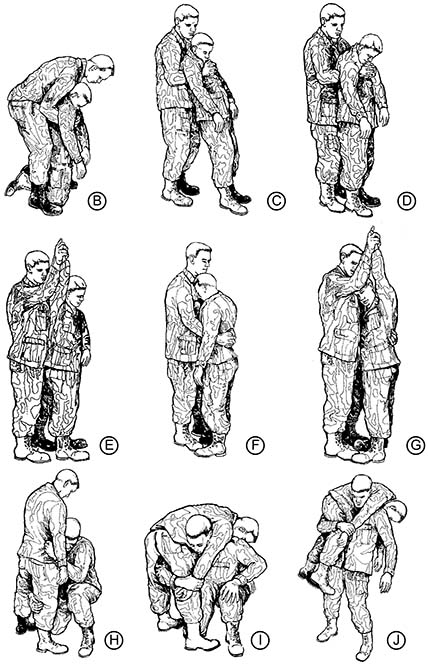 Figure B-3. Fireman’s carry
 (
Illustrated A — J) (
Continued)
.
-
- (2) The alternate method of the fireman’s carry for raising a casualty from the ground is illustrated in Figure B-4; however, it should be used only when the bearer believes it to be safer for the casualty because of the location of his wounds. When the alternate method is used, care must be taken to prevent the casualty’s head from snapping back and causing a neck injury. The steps for raising a casualty from the ground for the fireman’s carry are also used in other one-man carries.
-
- (a) Kneel on one knee at the casualty’s head and face his feet. Extend your hands under his armpits, down his sides, and across his back.
- (b) As you rise, lift the casualty to his knees. Then secure a lower hold and raise him to a standing position with his knees locked.
 Figure B-4. Fireman’s carry
 (
alternate method)
for lifting a casualty to a standing position (
Illustrated A — B)
.
-
- (3) In the supporting carry (Figure B-5), the casualty must be able to walk or at least hop on one leg, using the bearer as a crutch. This carry can be used to assist him as far as he is able to walk or hop.
-
- (a) Raise the casualty from the ground to a standing position by using the fireman’s carry.
- (b) Grasp the casualty’s wrist and draw his arm around your neck.
- (c) Place your arm around his waist. The casualty is now able to walk or hop using you as a support.
 Figure B-5. Supporting carry.
-
- (4) The arms carry (Figure B-6) is useful in carrying a casualty for a short distance (up to 50 meters) and for placing him on a litter.
-
- (a) Raise or lift the casualty from the ground to a standing position, as in the fireman’s carry.
- (b) Place one arm under the casualty’s knees and your other arm around his back.
- (c) Lift the casualty.
- (d) Carry the casualty high to lessen fatigue.
 Figure B-6. Arms carry.
-
- (5) Only a conscious casualty can be transported by the saddleback carry (Figure B-7), because he must be able to hold onto the bearer’s neck. To use this technique —
-
- (a) Raise the casualty to an upright position, as in the fireman’s carry.
- (b) Support the casualty by placing an arm around his waist. Move to the casualty’s side. Have the casualty put his arm around your neck and move in front of him with your back to support him.
- (c) Have the casualty encircle his arms around your neck
- (d) Stoop, raise him on your back and clasp your hands together beneath his thighs, if possible.
 Figure B-7. Saddleback carry.
-
- (6) In the pack-strap carry (Figure B-8), the casualty’s weight rests high on the your back. This makes it easier for you to carry the casualty a moderate distance (50 to 300 meters). To eliminate the possibility of injury to the casualty’s arms, you must hold his arms in a palms-down position.
-
- (a) Lift the casualty from the ground to a standing position, as in the fireman’s carry.
- (b) Support the casualty with your arms around him and grasp his wrist closer to you.
- (c) Place his arm over your head and across your shoulders.
- (d) Move in front of him while still supporting his weight against your back.
- (e) Grasp his other wrist and place this arm over your shoulder.
- (f) Bend forward and raise or hoist the casualty as high on your back as possible so that his weight is resting on your back.
NOTE
Once the casualty is positioned on the bearer’s back, the bearer remains as erect as possible to prevent straining or injuring his back.
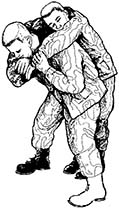 Figure B-8. Pack-strap carry.
-
- (7) The pistol-belt carry (Figure B-9) is the best one-man carry for a long distance (over 300 meters). The casualty is securely supported upon your shoulders by a belt. Both your hands and the casualty’s (if conscious) are free for carrying a weapon or equipment, or climbing obstacles. With your hands free and the casualty secured in place, you are also able to creep through shrubs and under low-hanging branches.
-
- (a) Link two pistol belts (or three, if necessary) together to form a sling. Place the sling under the casualty’s thighs and lower back so that a loop extends from each side.
NOTE
If pistol belts are not available for use, other items such as a rifle sling, two cravat bandages, two litter straps, or any other suitable material, which will not cut or bind the casualty may be used.
-
-
- (b) Lie face up between the casualty’s outstretched legs. Thrust your arms through the loops and grasp his hands and trouser leg on his injured side.
- (c) Roll toward the casualty’s uninjured side onto your abdomen, bringing him onto your back. Adjust the sling, if necessary.
- (d) Rise to a kneeling position. The belt will hold the casualty in place.
- (e) Place one hand on your knee for support and rise to an upright position. (The casualty is supported on your shoulders.)
- (f) Carry the casualty with your hands free for use in rifle firing, climbing, or surmounting obstacles.
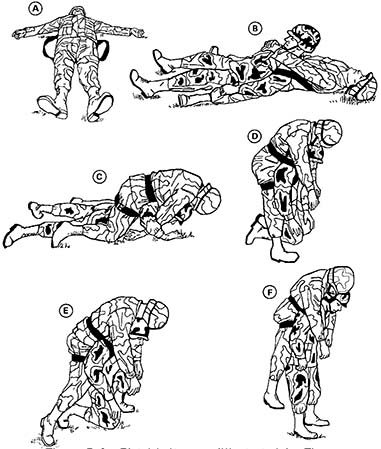 Figure B-9. Pistol-belt carry
 (
Illustrated A — F)
.
-
- (8) The pistol-belt drag (Figure B-10), as well as other drags, is generally used for short distances (up to 50 meters). This drag is useful in combat, since both the bearer and the casualty can remain closer to the ground than in any other drags.
-
- (a) Extend two pistol belts or similar objects to their full length and join them together to make a continuous loop.
- (b) Roll the casualty onto his back, as in the fireman’s carry.
- (c) Pass the loop over the casualty’s head, and position it across his chest and under his armpits. Then cross the remaining portion of the loop, thus forming a figure eight. Keep tension on the belts so they do not come unhooked.
- (d) Lie on your side facing the casualty.
- (e) Slip the loop over your head and turn onto your abdomen. This enables you to drag the casualty as you crawl.
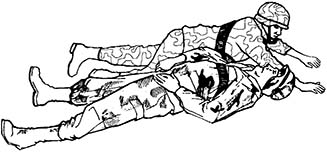 Figure B-10. Pistol-belt drag.
-
- (9) The neck drag (Figure B-11) is useful in combat because the bearer can transport the casualty as he creeps behind a low wall or shrubbery, under a vehicle, or through a culvert. If the casualty is unconscious, his head must be protected from the ground. The neck drag cannot be used if the casualty has a broken arm.
NOTE
If the casualty is conscious, he may clasp his hands together around your neck.
-
-
- (a) Tie the casualty’s hands together at the wrists.
- (b) Straddle the casualty in a kneeling face-to-face position.
- (c) Loop the casualty’s tied hands over and around your neck.
- (d) Crawl forward dragging the casualty with you.
NOTE
If the casualty is unconscious, protect his head from the ground.
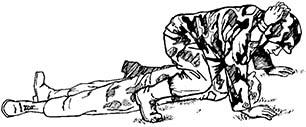 Figure B-11. Neck drag.
-
- (10) The cradle drop drag (Figure B-12) is effective in moving a casualty up or down steps.
-
- (a) Kneel at the casualty’s head (with him lying on his back). Slide your hands, with palms up, under the casualty’s shoulders and get a firm hold under his armpits.
- (b) Rise (partially), supporting the casualty’s head on one of your forearms. (You may bring your elbows together and let the casualty’s head rest on both of your forearms.)
- (c) Rise and drag the casualty backward. (The casualty is in a semisitting position.)
- (d) Back down the steps, supporting the casualty’s head and body and letting his hips and legs drop from step to step.
NOTE
If the casualty needs to be moved up the steps, you should back up the steps, using the same procedure.
 Figure B-12. Cradle-drop drag
 (
Illustrated A — D)
.
-
- (11) The LBE carry using the bearer’s LBE can be used with a conscious casualty (Figure B-13).
-
- (a) Loosen all suspenders on your LBE.
- (b) Have the casualty place one leg into the loop formed by your suspenders and pistol belt.
- (c) Squat in front of the standing casualty. Have him place his other leg into the loop, also.
- (d) Have the casualty place his arms over your shoulders, lean forward onto your back, and lock his hands together.
- (e) Stand up and lean forward into a comfortable position.
- (f) Continue the mission.
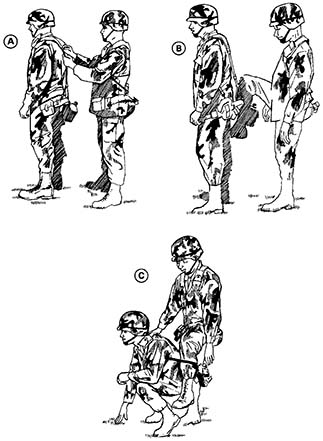 Figure B-13. Load bearing equipment carry using bearer’s LBE
 (
conscious casualty) (
Illustrated A — F).
 Figure B-13. Load bearing equipment carry using bearer’s LBE (
conscious casualty) (
Illustrated A — F) (
Continued)
.
-
- (12) The LBE carry using the bearer’s LBE can be used with an unconscious casualty or one who cannot stand (Figure B-14).
-
- (a) Position the casualty on the flat of his back.
- (b) Remove your LBE and loosen all suspender straps.
- (c) Lift the casualty’s leg and place it through the loop formed by your suspenders and pistol belt. Then place the other leg through the same loop. The LBE is moved up until the pistol belt is behind the casualty’s thighs.
- (d) Lay between the casualty’s legs; work your arms through the LBE suspenders.
- (e) Grasp the casualty’s hand (on the injured side), and roll the casualty (on his uninjured side) onto your back.
- (f) Rise to one knee and then push into a standing position.
- (g) Bring the casualty’s arms over your shoulders. Grasp his hands and secure them if the casualty is unconscious. If the casualty is conscious, have him lock his hands in front if he is able to do so.
- (h) Lean forward into a comfortable position and continue the mission.
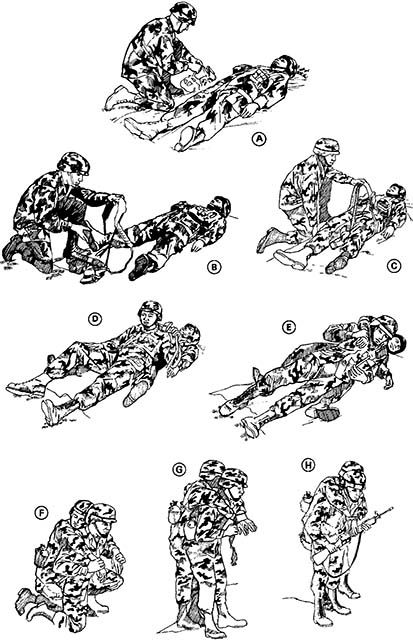 Figure B-14. Load bearing equipment carry using bearer’s LBE
 (
unconscious casualty or one that cannot stand) (
Illustrated A — H)
.
-
- (13) The LBE carry using the casualty’s LBE (Figure B-15) can be used with a conscious or unconscious casualty.
-
- (a) Position the casualty on his back with his LBE on.
- (b) Loosen the casualty’s two front suspenders.
- (c) Position yourself between the casualty’s legs, and slip your arms into the casualty’s two front suspenders (up to your shoulders).
- (d) Work his arms out of his LBE suspenders.
- (e) Grasp the casualty’s hand (on the injured side), and roll him (on his uninjured side) onto your back.
- (f) Rise to one knee, then into a standing position.
- (g) Grasp the casualty’s hands and secure them, if the casualty is unconscious. Have the casualty lock his hands in front of you, if he is conscious.
- (h) Lean forward into a comfortable position and continue the mission.
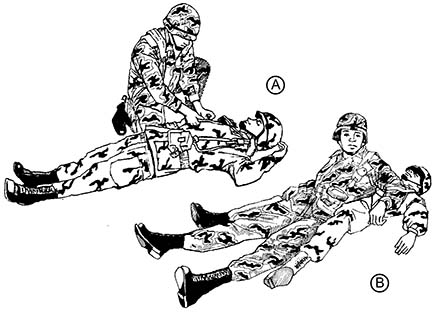 Figure B-15. Load bearing equipment carry using casualty’s LBE
 (
Illustrated A — G)
.
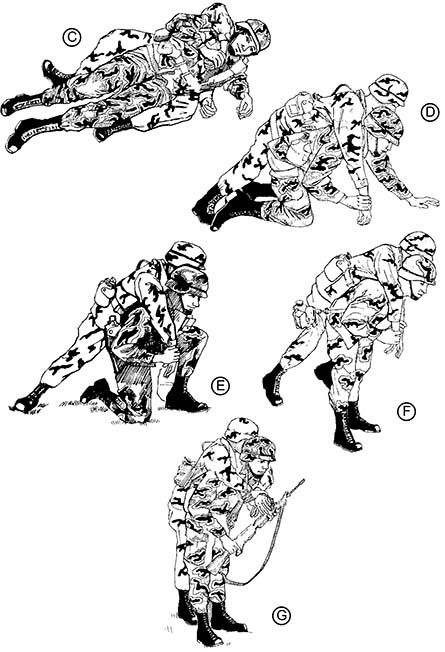 Figure B-15. Load bearing equipment carry using casualty’s LBE
 (
Illustrated A — G) (
Continued)
.
- b. Two-man Carries. These carries should be used whenever possible. They provide more casualty comfort, are less likely to aggravate injuries, and are less tiring for the bearers. Five different two-man carries can be used.
-
- (1) The two-man support carry (Figure B-16) can be used in transporting either conscious or unconscious casualties. If the casualty is taller than the bearers, it may be necessary for the bearers to lift the casualty’s legs and let them rest on their forearms. The bearers —
-
- (a) Help the casualty to his feet and support him with their arms around his waist.
- (b) Grasp the casualty’s wrists and draw his arms around their necks.
 Figure B-16. Two-man supporting carry.
-
- (2) The two-man arms carry (Figure B-17) is useful in carrying a casualty for a moderate distance (50 to 300 meters) and placing him on a litter. To lessen fatigue, the bearers should carry the casualty high and as close to their chests as possible. In extreme emergencies when there is no time to obtain a spine board, this carry is the safest one for transporting a casualty with a back injury. If possible, two additional bearers should be used to keep the casualty’s head and legs in alignment with his body. The bearers —
-
- (a) Kneel at one side of the casualty; then they place their arms beneath the casualty’s back, waist, hips, and knees.
- (b) Lift the casualty while rising to their knees.
- (c) Turn the casualty toward their chests, while rising to a standing position. Carry the casualty high to lessen fatigue.
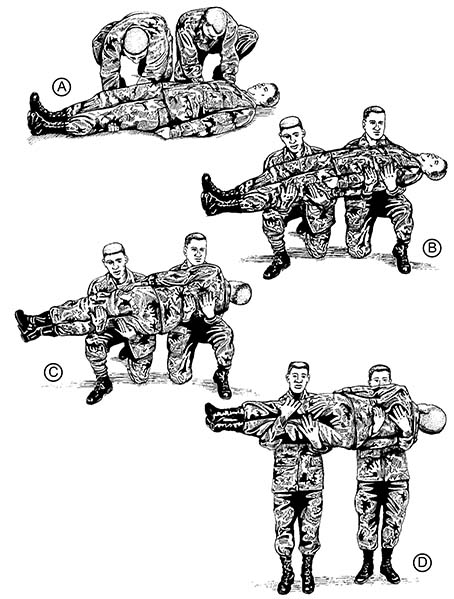 Figure B-17. Two-man arms carry
 (
Illustrated A — D)
.
-
- (3) The two-man fore-and aft-carry (Figure B-18) is a useful two-man carry for transporting a casualty for a long distance (over 300 meters). The taller of the two bearers should position himself at the casualty’s head. By altering this carry so that both bearers face the casualty, it is useful for placing a casualty on a litter.
-
- (a) The shorter bearer spreads the casualty’s legs and kneels between them with his back to the casualty. He positions his hands behind the casualty’s knees. The other bearer kneels at the casualty’s head, slides his hands under the arms, across the chest, and locks his hands together.
- (b) The two bearers rise together, lifting the casualty.
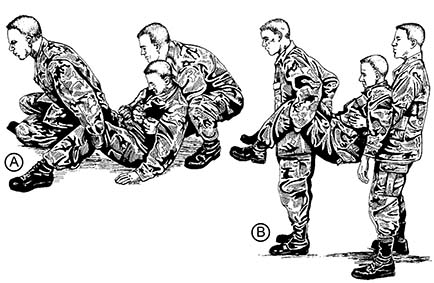 Figure B-18. Two-man fore-and-aft carry
 (
Illustrated A — B)
.
-
- (4) Only a conscious casualty can be transported with the four-hand seat carry (Figure B-19) because he must help support himself by placing his arms around the bearers’ shoulders. This carry is especially useful in transporting a casualty with a head or foot injury for a moderate distance (50 to 300 meters). It is also useful for placing a casualty on a litter.
-
- (a) Each bearer grasps one of his wrists and one of the other bearer’s wrists, thus forming a packsaddle.
- (b) The two bearers lower themselves sufficiently for the casualty to sit on the packsaddle; then, they have the casualty place his arms around their shoulders for support. The bearers then rise to an upright position.
 Figure B-19. Four-hand seat carry
 (
Illustrated A — B)
.
-
- (5) The two-hand seat carry (Figure B-20) is used when carrying a casualty for a short distance or for placing him on a litter. With the casualty lying on his back, a bearer kneels on each side of the casualty at his hips. Each bearer passes his arms under the casualty’s thighs and back, and grasps the other bearer’s wrists. The bearers rise lifting the casualty.
 Figure B-20. Two-hand seat carry
 (
Illustrated A — B)
.


