Page Numbers
Kindle devices allow the reader to change the text size of the book they are reading. Because of this, the page you see in Word will not necessarily be a full page on the Kindle device. What you see in your Word document as page 5, for example, may well be page 10 on a Kindle. Therefore we do not include page numbers in the Kindle version of the book.
However, the way we will save the Word document for the Kindle version will strip out page numbers for us if they are in the document. If you intend to publish your book as a paperback, then add page numbers now.
Page Numbering in Word
I like Word, but I also hate it for making things so complicated. Something that should be as easy as adding page numbers to a document is a process that takes a little figuring out.
Step-by-Step Instructions
You might like to add page numbers after you’ve completed your book, but I am doing it now to highlight an important point that you need to keep an eye on.
Page numbers in a printed book need to start on an odd-numbered page.
As you edit the book, the page you started numbering on may shift around from odd to even and back again. Therefore, you will need to check this before submitting it as a paperback.
Click at the top of the page where you want to start your page numbering. Now check to see what page number it is. In Word, the information is displayed bottom left:
So, the page I want to start numbering on is an even page. That’s no good. The easiest way to fix this is to insert a blank page before the one you want to start the numbers on. That will then give me the odd page I need:
NOTE:
Be aware that we will be adding a table of contents before the numbering starts, so we may need to delete or add blank pages to make sure numbering remains on an odd page.
OK, let’s add the page numbers.
Click at the top of the page you want to start numbering on.
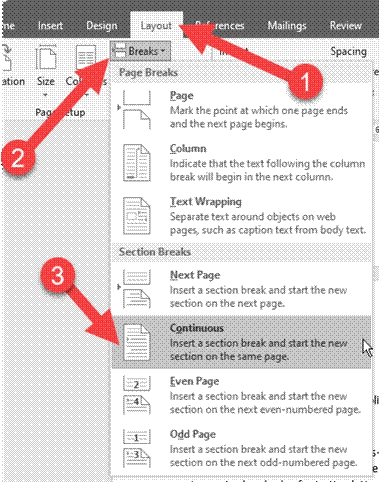
On the Layout
tab of the ribbon bar, click Breaks
and select Continuous
from the list:
On the Insert
tab of the ribbon bar, click Page Number
and move your mouse down to Bottom of Page
, and select the position and style you want to use.
Word will jump you to the Design
tab in the ribbon bar. In the Navigation
section, DESELECT the Link to Previous
button so that it is no longer highlighted.
Scroll back in your Word document to the page before your continuous page break, and click into the Footer section of the page to select it:
Now click the Footer
button in the Header & Footer
section of the ribbon bar at the top:
Select Remove Footer
.
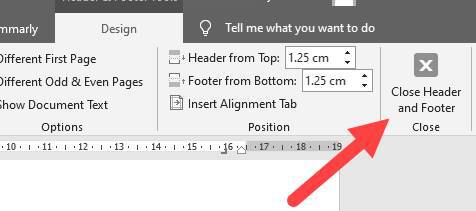
Now click on the Close Header and Footer
button:
Click again on the page of your document where you want page numbers to begin.
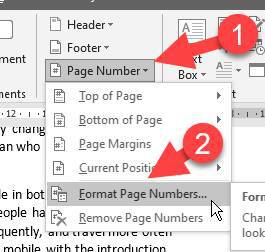
Go back to the Insert
tab, and click Page Number
, Format Page Number
:
Select Start at:
and enter 1 in the box.
Click OK to save.
Your page numbering should now start at 1, on the page you specified.
There should be no page numbering on pages before this “first page.”
Table of Contents
Your book needs a table of contents, whether you are creating just a Kindle version or a paperback as well.
Let me show you how to insert a table of contents into your book.
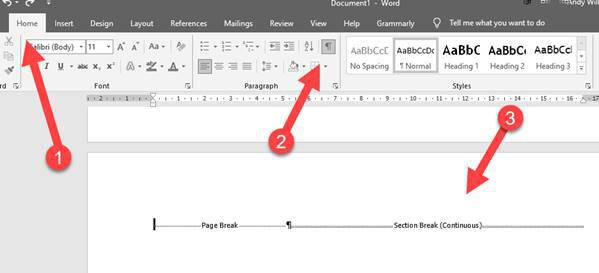
Word has a special feature to automatically insert a table of contents (TOC). Scroll to the place in your document where you want the TOC to appear. Make sure this is before
the continuous line break that you added for your page numbering. To help locate the line break, click the pilcrow button on the Home
tab:
Make sure you click at some point before this continuous break so that your TOC appears on un-numbered pages.
Click on the References
tab in Word’s ribbon bar and then click on the Table of Contents
button:
All of the “built-in” TOC styles contain page numbers, but that is fine as they will be used by the paperback and stripped out of the Kindle when we save this document in the two separate formats.
Just click on the TOC you want, and it will be inserted into your document.
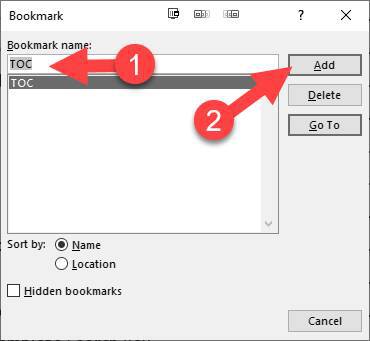
We now need to insert a bookmark at the start of the TOC so that Kindle devices can “GoTo TOC.” This is easy enough.
Move your cursor to the start of the table of contents title (click just before the title starts), and then on the Insert menu
on the ribbon bar, select Bookmark
.
Type TOC as the bookmark name, and then click the Add
button.
This will add a bookmark that Kindle readers can access.
NOTE:
If someone complains that your book does not have this feature, Kindle may remove your book from the marketplace until you add it, so it's important to do it now.
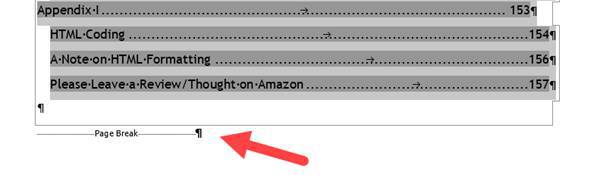
After the last entry in your TOC, insert a page break. This ensures that the next section of your book does not begin on the same page as the final entries of your TOC.
It’s a good time to check whether your page numbering still starts on an odd page. If not, then fix that by deleting the page you added earlier or adding a new blank page before it. Be careful not to interfere with the Section Break you added earlier, or it could mess up that page numbering.
Updating a TOC
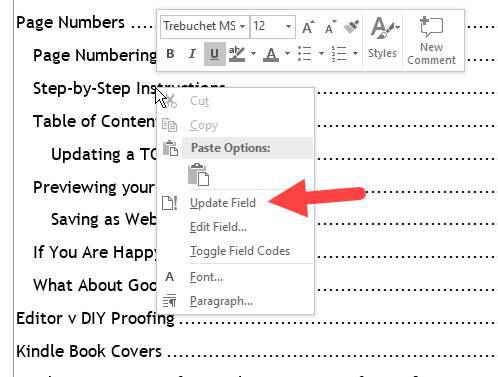
As you work on your book, you may add new sections or arrange and delete other parts. You’ll probably want to update the table of contents as you go along. This is very easy.
Right-click any entry in the TOC and select Update Field
from the menu.
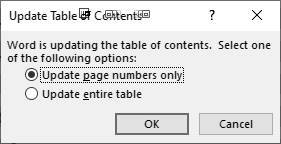
A dialogue box sometimes appears with two options:
You can either update the whole table or just the page numbers. If you’ve added and deleted sections in your book, update the whole table to be sure they are inserted into the TOC
.
Previewing your Book
I don’t usually preview my kindle books until I actually submit them to Amazon. During the submission process, you get the chance to preview your book.
However, you may want to preview your book before you upload it. The free Kindle Previewer software available from Amazon will allow you to do this.
Previewer download URL:
Download and install it (there are Windows and Mac versions). I’ll be showing you the Windows version, so it may look a little different if you are on a Mac.
The Kindle Previewer only works with a few file formats which do not include Word or Open Office native formats. Accepted formats are Mobi, ePub, HTML, and OPF.
The easiest thing to do is to save your book as HTML using Word’s Web Page, Filtered
format. This is the same format we’ll use to upload the finished book to Amazon, and I have found that this format is the most reliable.
Saving as Web Page, Filtered
Before doing anything else, save your document in Word’s DOC or DOCX format.
With that saved, you can now create the HTML version of the file.
You can do this in Word by selecting Save As
and selecting a location to save your document.
In the dialogue box that opens, choose the Web Page, Filtered
option.
Don’t click the Save button yet, as we need to make sure the image size is reduced.
Click on the Tools
button, and select Web Options
.
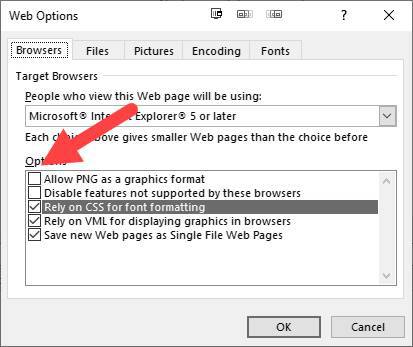
This opens a screen showing web options (web options because we are saving as a web page):
The important option here is the top one. Make sure Allow PNG as a graphics format
is disabled. Leaving this enabled will cause some images to be saved in a very large PNG format. Remember I recommended not using PNG images? Well, this will make sure that none of your images are converted to PNG when the HTML conversion is made. If you have any PNG files in your document, they won’t be embedded in the HTML file.
Once done, click on the OK button, and save your file.
When you do that, the active document in Word will be the newly created web page filtered version of your book.
This will include a .htm document and a folder containing all of your images.
When you come to submit the book to Amazon, you’ll need to zip up the .htm document and image folder into a single zip file. I’ll show you how later.
Since we want to load this document into the Kindle Previewer, we first need to close it in Word.
Do that now. Close your Word document.
OK, open the Kindle Previewer software:
Click the Open Book
link and navigate to where you saved the HTML version of your book.
You’ll get a dialogue box saying that your document is being converted. Wait for this to finish, and your book should open in the previewer
.
If you get a message saying the conversion failed, check to make sure you closed the copy of your document in the word processor, and try again.
In the top left of the sidebar, you’ll see a dropdown box for Device Type
.
This allows you to change the emulator so that you can see what your book looks like on a tablet, phone, and Kindle E-reader. On the right side of your screen is the book preview.
When you change the Device Type
setting, the preview will show you how the book looks on that device:
You can navigate through your book by clicking the left/right arrows in this preview screen or clicking directly on the page you want to view:
It is worth going through every page of your document to check that the formatting and general layout looks OK. In particular, check:
Any images you have in your document. Are your images clear? If not, you might want to redo them.
Numbered lists. Do they all start at the correct number?
Bullet lists. Do they look OK with correct alignment?
Blank pages? Remove any pages that are blanks.
Do sections/chapters all start on a new page? If you find any that don’t, insert a page break before that title in your Word document.
If You Are Happy, Zip it Up.
When you are happy with your book format, you need to create the zip file that we will upload later to Amazon during the submission process.
When Word saved your document as web page filtered HTML, it saved the main book file as an HTML file in your chosen folder. It also created a folder inside this folder to store all images in your book.
The next step is to zip-up the HTML document and all of the images into a single zip file.
There are a lot of different zip tools available, so I cannot show you exactly how to do this. However, if you have a zip program installed on your computer, such as WinZip or WinRar, then you can create the zip file quickly and easily from Windows File Explorer
.
I use WinRar, and the first thing we need to do is select both the HTML file and the folder containing the images.
Then right-click on the highlighted pair and select Add to Archive...
A dialogue opens to ask for more information on the type of archive you want to create. The only thing to change here is that I want a ZIP file:
Clicking on OK will create the zip file containing my book.
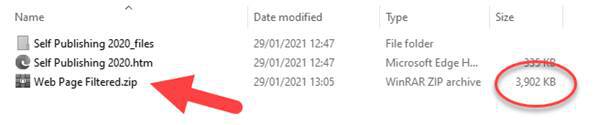
If you open the zip file that you have just created, you should see the HTML file and the folder containing your images. You can also check out the file size of the zip file. Mine is 3.9Mb.
When you submit your book to Amazon, it is this zip file that you’ll upload.
Before you go any further, consider the file size of your zip file.
Mine was 3.9 MB in size because of all the images in the book. Since I’ll be paying a download fee PER megabyte, it is in my interest to reduce the file size of this book.
If your zip file is really large, check out your images folder that was created when you saved your book as Web Page Filtered. Look to see if there are any really large files you could optimize to make smaller.
What About Google Docs?
Google Docs is a great tool for writers because your books are stored in the cloud. That means you can literally access your work from any computer, or even a tablet or smartphone, from wherever you happen to be at any given time.
To upload a book to Amazon that was written in Google docs, download the book as a web page zip file and then upload that zip file to Amazon.
The zipped-up Web document with images will be downloaded to your computer.