Converting to “Paperback” Format
We are going to check the Word document for a few common problems, but before we do, I just want to make sure we are all starting from the same place. You should already have your book written in Word and have it published on Kindle.
After following the previous section of the book, your Word document should have:
1. A title page.
2. Disclaimer / Copyright Information.
3. Table of Contents.
4. Page numbers.
5. All Word styles like Normal, Heading 1, Heading 2, etc. correctly used.
6. A good quality font that you have the license to use in a print book.
Make sure the above checkpoints are all true for your document before you move on.
Before we do anything, save a copy of your Word file as a separate paperback version. That way, any changes you make (and they will be minor) will only affect the paperback version of your book.
Check #1 – Page Size & Margins
Make sure that your Word document is set up to use the correct page size and margins you chose earlier. You can find the settings for these on the Layout
tab:
Check #2 – Correct Use of Styles
We need to make sure the styles we have used in our Word document are correct. They should be. After all, you have already published your book on the Kindle platform, and styles needed to be correct there. Nevertheless, go through your document and make sure that paragraphs use the “normal” style, main headings use “heading 1,” and so on.
Check # 2 – Links
This check is a simple one too. If you have used hyperlinks in your book, make sure they are short enough for the reader to type into a web browser. Do not create hyperlinks like this because paperbacks aren’t clickable. Instead, if it is a short URL that is easy to write, like google.com, then write the full URL. Otherwise, use a link shortener like Google’s tool or Bitly.
Check #3 – Numbered Lists
Go through your book and make sure that bullets and numbered lists look OK. Also, make sure that numbered lists start from the right number. If you are making use of the built-in numbered lists in Word, beware. I have had a lot of problems with numbered lists not starting at 1. The list seems to think it is part of a previous list. You’ll spot this in your book because your list won’t start at number 1.
You can reset the starting number of any list in Word if you find an error.
Also, make sure that if you use bullet lists, they look OK. Sometimes you can find bullet list items that are formatted as child items and indented further than they should be.
Check #4 – Layout
This is a simple check, but an important one. With the Kindle document, the spacing between lines was automatic and simple. The rule was never to use empty lines to space things out. With Kindle, you used the pre-formatted styles like “normal” and “Heading 1” to apply uniform spacing in the document.
The reason for that was the same reason we didn’t want page numbers in the Kindle format – Kindles don’t have “pages.”
Physical books obviously do, so we need to check the layout for a few common problems
.
Problem 1 – Empty Lines at the Top of a Page
This should not happen if you have made sure you have no empty lines (remember the pilcrow?), but do go through and make extra sure. I always proof my books with two pages visible in Word and the pilcrow button enabled. Therefore, this type of problem is easy to spot:
In that screenshot, can you see the gap at the top of the right-hand page?
As you can see, that gap is a misplaced pilcrow and needs to be removed. Go through your document and make sure there are no gaps at the top of the pages.
Problem 2 – Headers at the Bottom of Pages
This problem isn’t restricted to headers. It actually includes anything that appears at the bottom of the page but would be better off starting at the top of the next page. For example, here is a header that should be moved to the top of the next page:
That headline is right at the bottom of the page and should be moved onto the next page. There are two ways to do this. Simply add in a line space (yes, a pilcrow), or insert a “new page” break so that the headline appears at the top of the next page. I recommend you use the line space option as it causes less of a problem if you want to use the manuscript to update your Kindle version of the book
.
Can you think of other situations that might require an element to be moved onto the next page?
What about this:
The page ends with a colon, and the data that the colon refers to is on the next page. It doesn’t look great. This can be OK if the page with the hanging colon is on the left side of the open book, so the reader can see the data on the right-hand page as they are reading the book.
If in doubt, remember that colons like this are usually followed by something important, so it may be best to keep it all on the same page. Add a page break if you can, to make sure the colon is on the same page as the information it refers to.
Check #5 - TOC Update & Check
The next step is to update your table of contents to make sure page numbers are correct. This should always be one of the final checks because if you need to go back in for editing, layout, or page spacing, the page numbers can change for specific headlines and screw up the table of contents. Therefore, complete other checks first, then update the TOC.
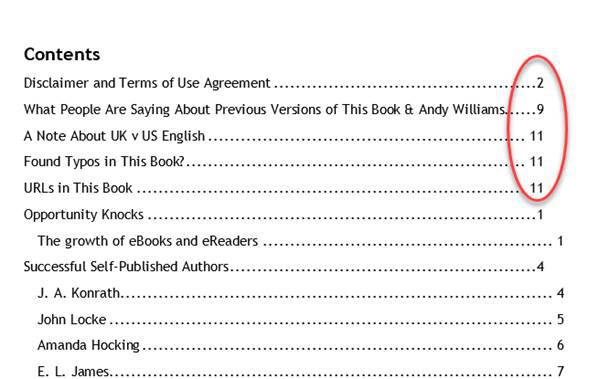
Once updated, check to see if you want to edit the TOC further. For example, the pages that appear in your book BEFORE the first numbered page may appear in your TOC and need to be edited out of the TOC. Here is mine for this book:
Those lines at the top are in the first section of the book before page numbering officially begins. Therefore I’d need to remove those lines from the table of contents, and they can simply be highlighted and deleted. To prevent this from happening, simply do not use Headers in Word for these titles. Use normal text, but make it bigger and bold. It will simulate a headline appearance without being included in your table of contents.
Check #6 - Page Numbers Start on Right-Hand Side
When you publish your book as a paperback, the page numbering MUST start on the right-hand side of the book, like this:
Failure to do so will mean your book will not be accepted by Amazon until you fix it.
Before this first numbered page, you have the title page, disclaimer, table of contents, and maybe some other stuff. It can, therefore, be a little confusing trying to make sure your first numbered page is on the right-hand side. The easiest way of checking this is to count your pages from the beginning. The first numbered page should be an “odd” page (1, 3, 5, 7, 9, and so on).
As I am writing this book, I just checked, and my first numbered page is the 11th
page, so I am fine. However, be aware that updating any page before this first numbered page, e.g., TOC, can change the number of pages at the start of the book, so this check should be completed after all others.
Check #7 – Image DPI “Requirements”
When you take a screenshot, the software you use will probably be capturing at between 72 – 100 DPI. DPI is a measure of the number of “dots” that are used in an inch to create the image. When you publish a book on Amazon, they will tell you that you need 300 DPI images, and you do if you want every image crisp. However, that is not possible with screenshots because although you can convert them to 300 DPI, you are converting from 72 DPI, so the image won’t be any clearer.
If you have the problem that images are lower than 300 DPI, and you cannot do anything about them, e.g., screenshots, then don’t worry about it. You can still publish your book. Amazon calls this a “non-blocking” issue. In other words, the issue won’t block the book from publication. The one thing that will help make your images clearer in the final book is to do that black & white conversion we talked about earlier when talking about images.
Images in Word
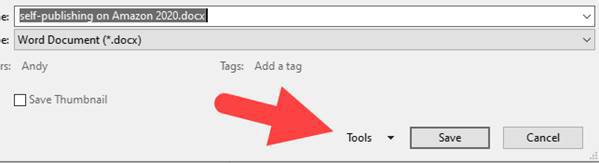
Word might compress images in your documents, which reduces their DPI. To check and fix this issue, we first need to save the Word document using the Save As button.
In the dialog box that opens, click the Tools menu,
and select Compress Pictures.
The Compress Pictures dialogue box opens up:
Select the box to delete cropped areas of pictures, and select High fidelity
to make sure images are not compressed.
Click the OK button.
Now click the Save
button to save your document.
What we have just done is turn off the compression of images for this document only
. When you create your next book, remember to save your document this way the first time.