
Be sure to check the label to determine what wax or blend you are getting, as the price will vary accordingly. Don’t pay the pure beeswax prices if paraffin has been added to the mix!
Rolled candles are made from sheets of wax, and as the name implies, the wax is rolled around a wick, much as you would roll a sheet of dough around a filling to make jelly rolls. This is the simplest method of making candles. It’s easiest for the beginner—and a good way to introduce children to candlemaking.
What makes rolled candles so easy to produce is the availability of commercially produced sheets of wax made specifically for rolling. Although it is possible to make sheets of wax for rolling candles yourself, this is not advised. Wax sheets are available at craft shops and from candlemaking suppliers and they come in dozens of lovely colors. There are two types of commercially prepared wax sheets for making rolled candles: the majority are made of pure beeswax, which, although more expensive, are longer burning than paraffin or paraffin with stearic acid. The second type of sheet wax is a mixture of beeswax and paraffin, which is less expensive than pure beeswax. Also available, though less often, are sheets of paraffin without beeswax. These are the least expensive of all, but have the disadvantage of a much shorter burn time.
Be sure to check the label to determine what wax or blend you are getting, as the price will vary accordingly. Don’t pay the pure beeswax prices if paraffin has been added to the mix!
Most wax sheets for rolled candles are formed in a honeycomb pattern. This type of sheet is embossed with a hexagonal (honeycomb) indentation—it looks like the wax from a honeycomb! The most common size is 8” x 16”. You can cut the sheets to suit your specific purpose. The honeycomb-patterned sheets are rolled out under an embossing wheel. You can purchase these in the natural beeswax colors (pale honey to dark brown), or you can purchase them in various colors that have been dyed after the wax was bleached.
Another type of wax for making rolled candles is smooth and flat. These are useful when you don’t want a textured candle. The pure-white smooth sheets make an elegant-looking candle that gives a stylish appearance.
Sheets of beeswax bought preformed in a honeycomb pattern are ready for use. However, they need to be warm enough to be pliable before you start to roll. A blow-dryer is a handy tool to keep on hand for warming sheets of wax. Beeswax is the easiest to work with because of its natural flexibility.
Paraffin or beeswax/paraffin blend wax sheets are used in the same manner, but paraffin tends to be brittle. Therefore a blend or straight paraffin will be a bit more difficult to handle, requiring extra attention in order to keep the sheets warm enough to be pliable. If your wax sheets have become cold and aren’t pliable enough to roll, you can do several things:
Using your blow-dryer, waft warm air over the sheets of wax
Iron them with a warm iron between sheets of paper
Quickly dip the sheets into hot water

If you have a buffet warming tray that can be set on low heat, you can use that to keep your paraffin or beeswax/paraffin blend sheets warm and pliable. Just make sure that it is a concealed-element warming tray as you don’t want the sheets near an open heat source.
Here are some tips for preparing to roll your own candles.
Although using purchased wax sheets is the easiest way to make rolled candles, if you are adventuresome—and if you have some leftover wax you want to make use of—you can try making your own wax sheets.
You’ll need:
A piece of plywood the size of the sheet you want.
A large, deep pot for melting the wax. A deep steamer of the type used for asparagus or corn will work, as will a deep stock pot.
To prepare the plywood, soak it in water for 1 hour or more (to prevent it from absorbing the hot wax). Dip the plywood into the melted wax, using tongs or pliers to hold it firmly. Allow the wax-covered plywood to cool for about a minute. Dip the wax-covered board into the wax again, and again allow it to cool. Repeat this process five or more times depending on the thickness of the wax sheet you want. Scrape the wax at the edges of the board; then peel off the sheet.
Homemade wax sheets lend themselves to various uses. Although purchased sheets come in various colors, you can tint your own wax sheets any color you like, or make multicolored layers for an interesting effect.
What’s nice about homemade sheet wax is that you don’t have to warm it up before using it. It will be warm when you remove it from the board. While it is still warm, you can form it into different shapes as you roll it.
Should the wax cool too much, just drop it into hot water (100–110° Fahrenheit) for a minute or two to soften it again. Keep a pot of warm water at hand for this purpose.
As you work with the wax, you’ll think of many more ways to use it artistically. The more accustomed you get to shaping your homemade wax sheets, the more ideas you will get for using it. You’ll find wax is wonderful for sculpting and hand-molding, like clay. If making mud pies was one of your favorite childhood pastimes, playing around with wax that’s in between the liquid and solid states will give you a lot of satisfaction! Here are a few ideas for using your homemade wax sheets creatively:
Make the sheets thicker and roll into votives or pillars.
Roll three or more slender candles and twist them into a braid.
Using a long wick, keep rolling until you have a long, thin candle.
Give your children some warm—but not hot!—wax sheets and let them play to their heart’s content. They can push the pliable wax around and make odd and curious shapes without making a mess. And you can always remelt the wax and use it later. Or, you can insert a wick (see p. 127) and burn their artwork.
You can make rolled candles any diameter you like. You can make tall slender rolled candles with two or three sheets. Medium and large size rolled candles can be made simply by adding more sheets until you reach the size you prefer. Rolled candles lend themselves to various shapes, the most common and easiest being a simple cylinder. To make this type of rolled candle, you lay out the sheet (preferably on a warm surface) and lay on it a wick cut to the proper size. Begin rolling at the short (8”) end of the sheet and keep rolling until you reach the end. It’s that simple!
When making beeswax candles, be sure to keep your hands clean. If you don’t, the beeswax will act as a cleaner for you! The result will be grubby, dirty-looking candles!
Purchased sheets of wax made for rolled candles
Wick (or wicks if you plan to make several). Use a flat-braided wick for beeswax, a square-braided wick for paraffin.
A blow-dryer or warming tray
A sharp knife or razor blade
A straightedge or ruler
Scissors (for cutting wick)
A hard cutting surface
There are no hard and fast rules for selecting wick size. This is especially true for wicks for candles that are thicker on the bottom (i.e., have a larger diameter) than they are at the top. The choice of wick size and type is largely a matter of judgement and experience. Follow the wick manufacturer’s instructions when you start out, and then keep careful notes of your results. This will help you to determine wick size for different candles.
Generally speaking, the best solution is to use a wick size suitable for the largest diameter of your candle. However, be aware that the thicker wick will make the thinner top burn down more quickly. Candles that are the same diameter at the top and bottom, such as plain rolled candles, don’t have this problem.
Another way to get the most burn time out of your wick is to keep it trimmed. Sometimes the wick on a candle gets long, making the candle smoke. If the candle flame flares out at the top, it needs trimming. There is no need to prime (pre-wax) a wick to make a rolled candle. However, the tip of the wick needs to be primed prior to being lighted. To do this, simply pull a small corner piece of wax from the edge of the sheet and press it around the end of the wick.
Remember that there is a relationship between the wax’s melting point and the wick size (and type). The finished candle’s diameter is a critical factor in determining how well the finished candle will burn. Always take notes so that you can repeat a success or adjust what went wrong.
Make sure your cutting surface is properly prepared. It should be covered with a piece of heavy cardboard or a mat.
Decide what size rolled candle you want to make. Cut a wick (or wicks) 2 inches longer than the size of the finished candle. Set aside.
Warm your wax sheets until they are pliable enough to roll easily. Use a blow-dryer (set on low) or put them on a heating pad or warming tray.
Be sure to watch your wax sheets carefully while they are warming. Depending on the warmth of your room, they can easily melt on a heat source. If you accidentally overheat and get a melt, just save the wax to make poured candles!
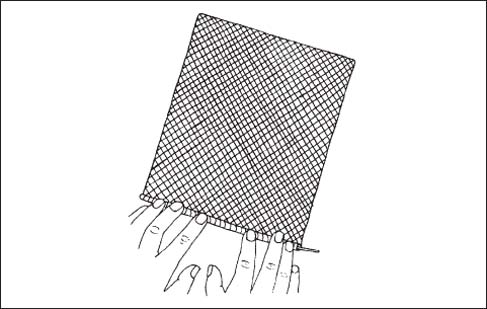
Rolling a beeswax candle
4. Lay the sheet of wax flat on a smooth surface, such as a countertop or a table. Then bend a 1/8” fold at the end of the short side to make a place for the wick. Press the wick gently into the edge of the wax before beginning to roll. Make sure the wick is firmly embedded in the wax.
5. Next, roll up the wax tightly, making sure that the wick is closely held in the wax at each turn. Keep rolling with a firm and even pressure. This is to avoid letting air bubbles form between the layers. Take care to roll in a straight line to keep the ends flat (for cylindrical candles).
6. When you have rolled the entire sheet, press the final end into the candle so that it adheres to the last layer of wax.
7. Once you have finished rolling your candle, cut the wick to ½” in length and neatly trim the bottom end with your knife or razor to get a flat surface on which the candle can rest.
If your candles seem uneven or the layers aren’t quite close enough, roll the finished candle on your countertop back and forth (like fashioning a roll of cookie dough) until the candle has a round shape and the layers all hold together. Do this with a gentle but firm hand.
You can carve a taper shape into your rolled candle. To do this, use a sharp knife to trim the wax into a cone shape, then smooth the edges with a heated butter knife. Trim the wick to ½”.
To make a diagonal rolled candle, cut your sheet of wax in half to make two triangles, using your straightedge or ruler and a razor blade or other sharp implement such as an Exacto knife. Cut the wick to fit the longer edge (the 8” edge) and roll the wax sheet toward the pointed end. Take care to keep the long, straight edge even in order to end up with a flat bottom. This method will give you a spiral-shaped candle that is very attractive.
To make sure the bottom of the candle is flat, melt it. Heat up an old metal pan—a pie pan, cake pan, or cookie sheet—over a low flame on the stove, gently press the bottom of the rolled candle onto the metal until it flattens out smoothly. This simple step also prevents unrolling.
Using seven sheets of beeswax (9” x 12” each) and a primed wick 10” long, plus 2 ounces of melted beeswax, you can make a square candle from the textured sheets of beeswax. These are quite easy to make, with little mess as you need melt only a small amount of wax.
Lay the primed wick across one beeswax sheet as described above. Roll up the entire sheet around the wick.
Place another sheet of beeswax next to the edge of the end of the first sheet and again roll tightly. Keep the edges even as you roll so that they remain the same length.
Using your metal ruler, press the sheets against a third sheet of beeswax at a 90° angle, pressing the roll into a square shape as you turn it over each time.
Continue adding the remaining sheets, using the ruler at each turn to make the sides square. After you have the edges shaped, lightly score each remaining sheet against the ruler to help you fold (not roll) the wax around the inner core of squared wax sheets.
Press the end of the final sheet firmly into place as you bend it around the candle. This step will insure that the finished candle does not unroll as it burns.
Holding the finished candle upside down over a cookie sheet lined with paper to catch the drips, use a small spoon to pour some of the melted beeswax into the cracks between the layer of wax sheets. Smooth some melted wax evenly over the bottom to seal the candle together and give a flat surface.
You can make your own birthday candles easily by using the rolling method. Just cut the sheets of wax (you won’t need many) to the length you like and roll away. Since wax sheets come in various colors, you can make a set of birthday candles each of a different color.
You can also make multicolored rolled candles. This is a lot of fun, especially for kids. Buy wax sheets in various colors and roll your candles using a different color for each layer. You can mix and match for holidays—such as red and green for the Christmas season—or to go with your décor.
The pouring method is used to make many different types of candles. In fact, pouring is the most versatile way to make candles. Molded candles are poured candles; cast candles are poured candles; many novelty candles are made by pouring; and pouring is possibly the easiest method of making quantities of candles in different shapes and sizes. It’s also an excellent method for making decorated and fancy candles. Poured candles lend themselves to many effects. Subsequent chapters will provide specific details on the various candles you can make with the pouring method.
Pouring oil and wax into containers to make rudimentary lamps is a technique as old as history. Most of these used some sort of liquid fuel, such as oil, or animal fat that would harden at room temperature, especially in cold climates. There are two types of poured candles: those made in molds, to be removed and used as freestanding candles, and those poured into containers in which they will be burned. The first type, poured in a mold and released, like a gelatin dessert or a fancy cake baked in a Bundt or other shaped pan, is a bit trickier to handle. The second type is the easiest poured candle you can make.
Molded candles are not a modern invention. They have been made ever since the fifteenth century. Originally made in wooden molds, often carved to give an embossed effect, these molds were tricky for the candlemaker to work with because, at that time, candles were made of beeswax, which is sticky and hard to remove from a mold without modern additives (such as stearic acid).
Today’s candlemakers are fortunate in that additives make it possible to use just about anything that will hold hot wax as a mold.
You can make a candle that is designed to burn itself into a shell, in which you can then place a votive or tealight. To burn a candle down the middle and use it as a holder, it is important that your burn it so that the well is created correctly. Light the candle and allow it to burn until the wax has melted to a diameter of about 1¾”. When the wax collected in the pool around the wick reaches a depth of about 1/8, extinguish the candle and pour out the melted wax. (Save if you like.) Trim the wick and light the candle again. Repeat these steps until you have melted the center of the candle sufficiently to allow the insertion of a smaller candle.
Although it is possible to make candles from paraffin wax alone, and hand-dipped or molded candles do not absolutely require stearin added to the paraffin, there are definite advantages to adding stearin to paraffin no matter what kind of candle you are making. Here’s why:
Stearin makes candles easier to remove from their molds because they contract more during the cooling process when stearin has been added to the wax.
Candles made with stearin have a longer burn time.
Paraffin is translucent and can be dull-looking. Adding stearin makes the candle opaque and much whiter, giving a nicer appearance.
Remember, the paraffin wax you can buy in supermarkets to use for sealing jars of jams and jellies should not be used to make candles. It melts at low temperature and does not harden enough. Always use paraffin wax specially made for candlemaking to guarantee good results.
In addition to stearin, there are other additives that are useful. One class of these is called “microcrystallines.”
Micro Soft is a very soft wax. Adding it to paraffin keeps the wax mixture soft for a longer time, which is especially useful when making molded candles. Generally speaking, add 10 to 20 percent of Micro Soft to your paraffin when you want an especially pliable wax for shaping. It is also an excellent additive for floating candles.
Micro Hard wax, which has a higher melting point than paraffin, is used to make chip candles (see p. 178).
Whatever additives you are using, check the label on the package. The supplier’s information will make it clear exactly what use each is for and tell you how to use the micros and in what proportion.
While you don’t need to stir melting wax, you will need to stir in your additives—stearic acid, other waxes, colorants or dyes, and scents (if you use them).
Practically any old thing will do for stirring the melted wax—old long-handled wooden spoons are ideal. If you don’t have any, chances are you can pick up some cheaply at a garage or yard sale, or at a flea market. I once bought a bunch of old wooden utensils—spoons, scrapers, mallets, and a couple whose purpose I didn’t know—at a flea market for a few dollars. And I still use them.
There’s a type of wooden utensil that’s like a flat spoon with a hole in the middle. This is especially good for stirring wax that’s beginning to thicken.
Another handy stirrer can be had for free at your paint store. Paint stirrers are flat paddles given away with the purchase of paint, and paint store salespeople are usually happy to give you a few extra because they are imprinted with advertising for the brand of paint and/or the store. So when you have an occasion to buy paint, ask for extra stirrers and stash them away.
Container candles are a category of poured candles. This type of candle covers a broad spectrum of candles—molded and cast, as well as container. The definition of a container candle is that it is not removed from the mold (container) in which it is poured. It is produced simply by pouring hot wax into a container—and then it is burned in its container. Many containers can be reused indefinitely, especially those of heavy glass or metal (such as food tins). Since container candles are the simplest and easiest type of candle to make, we will begin our exploration of the art of pouring candles with them.
Container depth is important. Generally speaking, due to the need of the wick for adequate oxygen to burn the candle properly, it’s a good idea to select containers no more than 5 or 6 inches tall. Shorter ones—even very small ones—are ideal as they burn well and can be made in quantity and set around different areas of your rooms to give a candlelit feeling to the entire space. For example, baby food jars or other votive-candle size containers can be utilized this way.
Not only jams and jellies, but all sorts of foods come in glass jars suitable for making container candles. These often come in interesting shapes. For example, I ordered by mail some sample all-fruit jam, made in France. The little jars in which the preserves came make adorable containers. Made of heavy glass, they are l½” in diameter and 2” tall, and have a charming flared, fluted bottom. (Leave it to the French!) As you can see, the possibilities are almost endless. Once you become aware of them, you’ll notice jars of food that will make excellent and attractive containers, so save them up and you’ll have plenty of interesting-looking and original candle containers on hand! The following are some guidelines.
Always pick containers that are either the same diameter at the top and at the bottom, or are wide-mouthed at the top. Do not use anything with a narrow neck.
Glass and metal are the best materials for containers. Ceramic will also work, but it is opaque and will not give a glow as the candle burns down. Never use wood, milk cartons, or any other flammable materials for containers. Glass is a good choice, but make sure it is heavy enough not to crack under the burning candle’s heat. All sorts of glass containers will work fine. For example, glasses made of heavy recycled glass (usually pale green: they are made from old Coke bottles) are perfect. Goblets or glasses of heavy glass, often hobnailed (that is, they have bumps on the surface), are very useful and can be refilled indefinitely. Another good choice is the square-shaped heavy glass containers that contain a jelled room deodorizer that evaporates as it is exposed to air. When empty and washed, these types of jars make perfect container candles.
Before you remove the labels from food jars to use for making container candles, make a note of how many ounces the jar holds. You can put the lid on the empty jar with a label marked with the jar’s volume. This saves measuring.
The list is virtually endless. Once you let your imagination run wild, you’ll see containers for candles almost everywhere you look! If you select glass for your container candle, you have the choice of clear or colored glass. Colored glass will mask any color in the candle wax, so it’s best to use untinted wax in a colored glass container and let its color glow with a jewel-like brilliance. On the other hand, if you want colored candles for a particular scheme of décor, or just because you like certain colors of candles or want to use them ritually for candle magic ceremonies, use clear glass containers instead.
Any clear jar or glass can serve as the foundation for an ornately constructed multicolored candle. Fancy glass—cut crystal, pressed glass, embossed glass (“depression glass” is wonderful, and comes in various colors)—will look beautiful as it burns when filled with plain wax. Medium to shallow glass bowls are also nice.
The possibilities for containers for container candles are practically limitless. Once you begin making container candles, your imagination will be ignited (as was mine). Here are some additional ideas I’ve developed that you can use. And you will undoubtedly discover many that I haven’t thought of!
Jars for preserving (of the Mason type) are perfect for container candles. They come in a variety of sizes—the pint and half-pint sizes are recommended (the quart is too deep)—and shapes—some are cylindrical, higher than the diameter; others are short and squat with a larger diameter than depth (this shape is my personal favorite). The glass is heavy and made to withstand heat, as the preserving process involves a boiling water bath, so there’s no need to worry about the candle flame cracking the glass. Also, these jars are always wide-mouthed, making them easy to fill when pouring, and their wide mouths make it a snap to balance a dowel or chopstick for a wickholder on the edges.
Most of these jars are beautifully embossed with fruit and/or flower patterns, which makes them ideal for gift-giving as well as decoration around the house. And, since they come with lids, you have a complete gift package—just tie a ribbon around the wide part of the lid’s rim and make a nice bow. No muss, no fuss! Container candles in preserving jars are very popular and several upscale mail-order catalogs offer them—at high prices. You can make your own for very little cost—the jars are often offered for sale at big discounts during summer when most home-preserving is done.
You can even fool the recipients into thinking they are getting homemade jam or jelly by coloring your wax and scenting it to match different fruits, such as strawberries, cherries, blueberries, and so on. You can also use them to make chip candles (see p. 178) that will resemble pieces of fruit suspended in a jelly. Of course, the recipient of your gift will realize the “preserves” are a candle in disguise as soon as the jar is opened. I guarantee you they will be delighted at your subtle subterfuge.
A great characteristic of preserving jars is that they are hard to break. They can be used over and over again, and it’s easy to refill them innumerable times, so if your friends aren’t candlemakers, tell them to return your jars when the candles are used up. Just beware—they might ask for a refill!
Old preserving jars have hinged lids and are made of heavy glass. These make really nice container candles. You can often find them at flea markets—or look in your grandmother’s basement! A few are still made today for use as canisters, often out of recycled green glass. I have one I bought ten years ago at a boutique in Vermont that is faceted like a cut jewel and makes a sumptuous container candle that glows with a wonderful mystery when it burns down a bit and the flame reflects off the many facets.
Another great container from my collection is an old piece of “depression glass,” which was originally meant to be a canister. It’s many-sided—like the facets of a crystal—and “gives a lovely light.”
Keep your eyes open for old drinking glasses at flea markets or yard sales. They were made to last and are usually thick and heat resistant. Many are embossed (I have one with grape vines and bunches of grapes on it). These antique glasses make marvelous container candles.
Here are some more unique and interesting ideas:
Metal ice cube trays—though new ones may be hard to find in this era when plastic rules—make splendid container candles. Using an ice cube tray has a double advantage. It’s easy to pour and you get the effect of a multi-wick candle. When lighted, the tray of little cubes gives a brilliant light.
You can also make neat miniature container candles in a mini-muffin tin. Line the cups with foil liners before pouring in the wax. When the wax has hardened, lift out each mini-candle. For a dinner party, you can set one of these little miniature candles at each person’s place, perhaps placed on a saucer.
Slice oranges in half and juice them. Then, carefully pull out the membrane and pulp until you are down to the shell of the orange peel. Fill with wax. When the wax is cool but not solid, insert a cored wick. These ingenious candles are wonderful for outdoor parties.
I once found an old tin mold—what it’s original purpose was I don’t know, for it wasn’t a cooking pan. However, this curiously shaped, age-tinged object, interesting in itself, made one of the best container candles you can imagine. If you look about you as you go, you’ll find many such objects.
What you will need:
Wax—Usually plain paraffin with a melting point of 130° Fahrenheit
Stearic acid—Optional but will give a longer burn time
Wick—Medium-sized, one for each container; cored wicks are preferable, but not essential
Wick sustainers (tabs)—One for each container
Colorant—If you want a colored candle
Scent—Optional but nice
Double-boiler or concealed-element heater
Thermometer
Ladle and/or vessel for pouring—Preferably with a handle
Small sticks—A dowel or chopsticks or even a slim garden stake will work for suspending the wick over the container
Weights—You need to weight the wick in the container if you are using a noncored variety; small washers or nuts will work fine
Utensil for poking holes in the wax—This can be a skewer, a chopstick, a pencil, or a small stick
Containers—See above for various options
Though a thermometer is not absolutely necessary for melting plain paraffin (you can watch it carefully), if the wax is not the right temperature (the package will give the correct melting point), problems can result. Overheating the wax will change its chemical construction. Therefore, a thermometer is strongly advised.
Assemble all of your tools and materials in the order in which you will be using them before you begin your candlemaking operation. You don’t want to have the wax melted and then start looking for a container or other needed tool!
Measure the wax. To ascertain how much wax is needed to fill your container (or containers, if you are making multiples), fill the container with water and pour the water into a measuring cup to determine the container’s volume. Then dry the container thoroughly. To avoid this chore, you can first insert a plastic bag into the container and fill that with water to measure.
• 127 mp wax is sold specifically for use in container candles. It has a soft consistency and low melting point, and holds scent in until the candle is burned, without additives.
• 128 mp wax is also specially blended for use in containers (and votives), but it may require additives.
• 130 mp requires additives.
Once you have determined how much wax you need to fill your container (see how to weigh wax, p. 83), set up your pots for melting and begin melting the wax.
Attach a wick sustainer to the wick, which should be l” longer than the height of the container you are using. Put the wick sustainer on one end, which will be the bottom. If you are using an uncored wick, you will need to tie a small weight to the wick.
In some large diameter candles, lead cored wicks are used because they burn at a higher temperature than fabric wicks. However, there is now concern about the health hazards of leaded wicks. No one knows just what the risk is but, to me, common sense dictates not to use lead.
Lay the dowel or chopstick across the top of your container. Tie the top end of the wick to it so that the wick hangs steadily in the container.
Warm the container before pouring wax into it. You can do this step one of several ways: place it in a warming oven (150°) for a few minutes; put it in the sink and run hot water into it; or set a pan of water on the stove on low heat and put the container (or containers) in the water to warm them before use. Be sure that the container is dried thoroughly before use.
If you are using glass containers, warm them slowly (the hot water method is safest). If metal, don’t let them get so hot they burn your fingers. Always use a hot pad to handle a heated container.
After the wax has reached the proper melting point (usually 150–160° Fahrenheit; check your thermometer frequently), you are ready to pour. If you are not coloring the wax, go ahead and pour it into the warmed container. If you are using color or scent, add it to the wax and stir well before pouring.
For a multicolored candle, or several different colored candles, transfer the melted wax into other tin cans and add the colors and/or scents to each batch before pouring. Be sure to stir thoroughly to disperse additives.
The temperature needed to melt wax varies with the type of wax used. If your wax catches fire:
Turn off heat immediately. Do not move the pan.
Smother flames with a metal lid or damp towel.
Never use water to put out a wax fire.
Begin pouring slowly, to one side of the dowel holding the wick. Be sure you keep the wick centered in the container, using the bottom tab or weight to do so. You may need to hold it in place for a few moments to allow it to set. This “tack pour,” of about ½” of wax in the bottom of the container, is an important step, for a wick that is off-center will cause the candle to burn lopsidedly. Allow the ½” of wax at the bottom to cool sufficiently enough to stabilize the centered wick.
If you are making a single-color candle, continue pouring the wax until it is about ½” from the top. Wait a few minutes for the wax to begin to congeal. Then, with your skewer, poke a few holes into the cooling wax. Pour a bit more wax into these holes. This second pour (the “repour” or “cap pour”) is to fill in spaces caused by air bubbles that formed in the first pour.
Repeat the repouring process until the wax cools.
Inexperienced candlemakers often underestimate the amount of wax needed for the finishing (filling of holes to eliminate air spaces and leveling) process. Keep a sufficient amount melted for this. You can always reuse any leftover wax for another candle.
Wax shrinks as it cools, and the candle will develop a depression in the center. Pour some more melted wax into this center when the candle is firm to the touch in order to make a flat surface.
When the candle has cooled completely (this takes from eight to twenty-four hours, depending on the candle’s diameter), trim the wick to 1/3” above the candle’s surface.
You can achieve a lovely and interesting effect in a clear glass container by pouring different colors on top of one another. First, divide your melted wax into batches, for however many colors you want—if you want only two colors, you need only two extra tins in which to mix them. If you want a many-colored striped candle—and there are no limits except the size of your container—you’ll need a tin for each color.
If using only two colors, you can pour one layer of each color—or you can alternate the colors into more layers. Red and white would give a peppermint effect. If you are using several colors, pour one layer at a time, allowing each to harden before pouring the next to give a clean separation of colors.
The National Candle Association offers a number of technical papers at www.candles.org. Especially interesting is “Dyes & Pigments.” Also available: “Color Stabilization,” “Dyes and Fragrances in Candles,” “Color Fade Problems,” and “Colorants for Candles.”
For a vertical-against-horizontal effect, push the poker down into the wax layers while they are still congealing. Then pour one or more colors into the holes during the repour. Follow instructions above for finishing off the candle and preventing the center depression from forming.