CHAPTER 7
Molded Candles
Molded candles are made by pouring liquefied wax into a mold for a specific shape. For example, for an impressive square pillar candle, use a quart-size milk container as a mold. Or, for a nice squat shape, use a pint-size milk container. Tin food cans make good molds for cylindrical or round pillars. You can also create pillar molds yourself using cardboard, rubber, or metal.
Using Disposable Molds
Disposable molds are all around you. Just look about and you’ll see them. (Check the trash bin!) Waxed milk, half-and-half, and heavy cream cartons, sour-cream and yogurt cartons, juice cans of various sizes—from individual servings, which make nice small pillars, to huge 48-ounce ones and several in between—can all be used. Tuna-fish cans and cat-food cans make nice candles that are larger in diameter than they are high. These are excellent for use on the dinner table for they don’t get in the way of people seeing each other, as some tall candle centerpieces can do.

Some disposable molds—especially milk cartons and the like—may require reinforcement (that’s what you’ll need the masking tape for). Or, they may need wax that is somewhat cooler, so they don’t collapse or melt. (Milk cartons are waxed inside.) Experiment with one first before making several.
Molds, Molds, Molds
Candlemaking has become such a popular craft/hobby that there are now literally hundreds of interesting molds available at craft shops and from candlemaking suppliers. These include reproductions of fancy antique European wood molds. Tin and pewter molds are also available from Colonial Williamsburg. You can even buy silicone molds of cartoon characters! Renaissance fairs, held all over the country, often feature candlemaking and sell various molds.
Commercially available molds are many and varied, from straight-sided to pyramid and other shapes. They may be made of acrylic, metal, or natural or silicone rubber material. All of these work well so long as you use the proper mold release agent. (Consult the package for information.)
For myself, I prefer using simple—usually disposable—molds, like milk cartons, tin food cans, and found objects such as sea shells (which we will cover later). Using a simple mold gives you lots of creative latitude, allowing you to create innumerable variations.
Molding Terminology
With this handy list under your belt, you’ll have the all the scoop you need on molds.
Mold seal—This is similar to putty. It is used to hold the wick in place in order to keep the hot melted wax from leaking through the hole in the mold, which is there for the wick to be inserted. It is reusable.
Rigid plastic molds—These are available in a wide variety of unusual shapes—from hexagons and spheres to pyramids. For making unusual candles, these are the easiest and cheapest for the beginner. They may not be suitable for scent, however; check with your supplier.
A wide variety of molds is available commercially, from your local craft shop or through mail order. You can also order molds online. (Refer back to “Suppliers” section in Chapter 5 for more details.)
Metal molds—These are very sturdy, and can be used again and again. Metal molds sold specifically for candlemaking can be expensive, but tin cans are free. Check your tins for inside ridges (sometimes circular ones) and/or seams, which will leave imprints on your candles. These imprints can either be left as decorative elements or scraped and polished off.
Rubber/latex molds: These are made of a flexible material, which makes them quite versatile. You can achieve outstanding effects with much detail and relief. Their flexibility makes them good for making candles of odd shapes that could not have been removed from a rigid mold. The disadvantage is that they can be reused for only a limited number of times.
Glass molds—These give candles a nice gloss, after polishing. You can reuse them as long as you don’t break them! A release agent is an absolute must. Also, glass makes great container candles that don’t have to be removed from the molds.
Molded Candle Basics
To make molded candles you will need:
Wax—Paraffin with a medium melting point of 135–145°F
Beeswax—Up to 50 percent of the paraffin by weight (optional)
Stearic acid—Approximately 10 percent of the paraffin by weight (a bit more won’t hurt if you have to melt a second batch for filling holes)
Wick(s)
Colorant(s)—Your choice
Scent(s)—Your choice
For a 2–3” diameter candle, use 1/10 ” square braid. If adding beeswax at half or more, the wick should be increased by one or more sizes according to the size of the candle (diameter). Read the manufacturer’s instructions carefully.
For equipment, gather together:
A double-boiler or concealed-element heater
A thermometer
A pouring pot, pitcher, or ladle
A thin rod-skewer, chopstick, or dowel
Masking tape
An ice pick (or knitting needle)
Mold(s)
Mold release agent (vegetable oil can be used)
A pan for holding water to cool the filled molds
A weight, such as a brick (full cans of food in large tins will work)
A sharp-edged tool, like a razor blade, Exacto knife, or craft knife
Nylon pantyhose (for polishing finished candle)
Candles made with rigid molds, that is, hard plastic, glass, or metal, need stearin added or they will stick to the mold and be extremely hard to release from it.
The Molding Process
After determining the volume of your mold, melt the amount of wax advised by the maker of the mold you are using. If you are using an improvised mold, such as a milk carton, you will know the volume (i.e., half-pint, pint, quart, etc.). As mentioned earlier, you can mark tin food cans and/or jars with the volume they hold by reading the labels before you soak them off.
Be sure your mold is clean and dry—water in a mold will spoil a candle. Wipe the mold with mold release or salad oil, but use it sparingly, for too much oil will give the finished candle a mottled effect (unless that is your aim).
Next, melt the amount of wax you need in the pot. After the wax has melted, put in additives, such as stearic acid, colorant, and scent. Watch your thermometer carefully and maintain the melted wax at a temperature of 160-180° Fahrenheit. Adjust heat accordingly.
Rubber Rules
Silicone rubber or “RTV” (room temperature vulcanizing) molds release the candles in them easily and so need extremely little mold release agent or none. You will note that the inner walls of these types of molds have an oily feel naturally. However, take note that natural rubber molds are allergic to stearic acid—it will make pockmarks inside the mold, making it unsuitable for reuse. To harden wax for use in rubber molds, use 1 to 3 percent of “Micro Hard,” the hardening polymer discussed on p. 104. Vybar is an additive that increases the opacity of wax and helps it to burn more efficiently. Also, Vybar reduces the shrinkage of paraffin wax. It is ideal for candles made in rubber molds. Generally, allow 1 ounce of Vybar to 20 ounces of paraffin, or other wax. Proportions can vary with need. Disposable molds such as milk cartons don’t need mold release agents. You simply cut the cardboard and peel it off.
Wick Preparation
Using a length of wick twice the height of the mold, prime it by dipping into hot wax. (See “Wick Priming,” p. 73.) Thread a wicking needle with the wick and insert the wick through the hole at the top of the mold. Seal it with mold seal, pressing down firmly so that it is firmly attached. (Rubber molds do not need this sealing step.) Then, stick a toothpick through the wick at the base to hold it centered in the mold. Place the mold on top of an upside down cup or bowl, or whatever else will support the mold.
Prepare the Filling
Plan to make a wax blend of 10 percent stearin and 90 per cent paraffin. A rough guide for measuring how much wax you will need is weighing an already-made candle of the same size as the one you are going to make. Melt the stearin by heating it in a small double-boiler, improvised if necessary with two saucepans or a bowl over a saucepan. The stearin is melted when it becomes a clear liquid. If you want a colored candle, next add the colorant you have chosen to the stearin. Don’t add too much at once. You can always add more if the color is too pale for your taste. If you do need to add more dye, simply melt a small amount of stearin and put the dye in it before adding to your wax mixture. (Ten percent is not an absolute proportion of stearin to paraffin.)
When using beeswax as an additive, a release agent should be used on the inside of rigid molds because beeswax is particularly sticky. This precaution applies if you are using more than 10 percent beeswax.
Transfer the stearin/dye mix to your major melting pot. Add the measured/weighed wax to the pot with the stearin and dye. Heat while stirring until everything is melted and the color is even and smooth. Add whatever scent you have chosen, being sure that it is made for use with candles. Some scents are not only unsuitable for candlemaking but can be dangerous.
Check the Temperature
Heat the wax to 180° Fahrenheit, being very careful not to overheat it. Keep the thermometer inserted into the melting wax until it reaches the correct temperature and stops rising. Remove the melting pot from heat at this point. (You can leave the melting pot in the hot water after removing the pot from the heat source to keep the wax warm enough to work with.)

Pouring into the mold
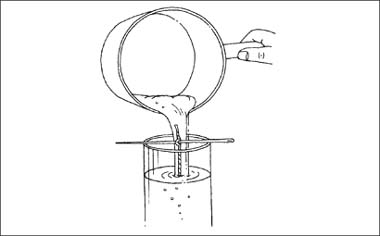
Make sure your mold has been warmed. When your mold is ready and your wax has reached the correct temperature required for the particular mold—always follow the mold supplier’s instructions—you are ready to pour the wax into the mold. Pour slowly and evenly to avoid splashing hot wax on yourself and to avoid air bubbles forming in the wax. Pouring on a slant will help prevent air bubbles. Either pour directly from the melting pot (which should be a pitcher with a handle), or ladle out the wax (warm the ladle first) into the mold. Or, you can ladle wax into a separate pouring jug if you like. Pour smoothly and gently, avoiding any turbulence. Also, be sure to save some wax for the finishing process.
Add the Wick
After you have poured the wax into the candle, wick the mold. If you are using purchased molds, follow the manufacturer’s instructions for wicking the mold carefully. (All commercially made candle molds come with detailed instructions on how to wick them.) One-piece molds—metal, acrylic, or rubber—have a hole in the base. You thread your wick through this hole to the top and pull it through the open end. You must then hold the wick taut by tying a rod to it. Two-piece molds—mostly for fancy shapes, like an egg-shape—require you to tape the wick to one half of the mold. You then must pull it tightly across the shape and tape it securely to the opposite end. Finally, you put together the two pieces and insert them into the purchased mold holder, which creates a seal between the two halves.
Wicking a Molded Candle by Suspension
This is a fairly easy method if your mold has a wide mouth, such as a milk carton or a medium to large tin food can. It works best with molds taller than they are wide. Lay a stick—a short dowel, a chopstick, a pencil, even a straight twig—across the top of the empty mold. Tie the wick to it and tie a small weight onto the bottom end. Keep it centered.
Wicking the mold
Give Your Candles a Bath
Wax shrinks away from the sides of the mold as it cools. To hasten this process, immerse the filled molds in a pan of cold water. Be sure the pan is large enough to hold them without crowding, or the hot molds will heat the water in the pan, defeating the cooling process. Water should not cover the tops of molds. Fill to within ½” of top of mold.
To determine the right size pan, put the empty molds in it and hold them down while filling the pan with water. Remove the molds—the pan is now ready to use. Don’t try to fill the pan with water after you have put the filled molds in it: You may get water into the wax inside the molds, which would ruin the candles.
After you have filled your molds, transfer to the cool water bath that you have already prepared, handling the molds carefully (with mitts or pot holders) so as to not burn yourself—or suddenly drop one!
After the molds are placed in the water bath, place a weight on each one. This will prevent the filled mold from floating upward. The idea is to submerge the entire candle in the water just ½” from the top rim.
Finishing the Candle
Because wax contracts so much as it cools, there is a danger that the center of a candle might sink. The repouring process (described in greater detail in the preceding chapter, on p. 112) prevents this from happening.
After the wax has cooled enough to form a skin of about 1/8 ” thick, begin repouring. To do this, poke holes in the wax, pushing down around the wick all the way to the bottom of the candle. Then add wax to refill the holes, but be careful to do it a little at a time so that it does not overflow.
During the repouring process, make sure that the additional wax you are pouring in is the same temperature as originally (180° Fahrenheit). If the wax is cooler, it will not adhere properly; if hotter, the candle may crack. You may need to refill the center to get a level surface. Molded candles are usually finished from the bottom end, unlike container candles, which are finished at the top. Therefore, if you need more wax to make the candle flat, it won’t matter if it is a different color than the original candle as it won’t show—unless you set it on a plate. An easy way to level the base of a candle is to stand the candle upright in a warm pan. This will melt the base just enough to create a nice flat surface.

Leveling the base
After repouring, leave the mold in the water for 1 hour or more to cool thoroughly. If the water in the pan is getting warm, just add a few ice cubes.
Before attempting to remove the candle from the mold, make sure it is completely hardened and cold throughout. This can take from several hours to twenty-four hours, depending on the size of the candle and the type of wax mixture you used. A properly set candle will release from the mold easily. The general rule of candlemaking is to wait for eight hours before removing the candle from its mold. The point here is that if the candle is not completely cold through and through, into its center, removing it from the mold may cause it to have a distorted shape.

Never hit or pry at a mold to get the candle out. Be patient and wait until it’s completely cold. If you bang your mold you may make marks in it that will be permanent. These will mar any future candles you make in that mold.
A Candle Is Born
When you see that the wax has shrunk away from the sides of the mold (just like a cake, when done, shrinks from the sides of the baking pan), it is ready to be released. At this point, turn the mold upside down very carefully and remove the wick sealer. Then remove the candle.
If you have reused old wax to mold a candle and the color turns out to be less than pretty, the remedy is “overdipping.” Just melt some new wax in a container deep enough to immerse the molded candle and give it a quick dip to coat it.
Occasionally it will happen that there are seam lines at the sides of molded candles. These can come from use of two-part molds, or from tin-can molds. If you get a seam line, simply give your candle a shave along the seams. Any sharp blade will work, but there is a special tool used for scraping dry paint off glass that is superb. This item holds a single-sided razor blade and is easy to manipulate. You can buy such a tool in a paint store or hardware store.
To get a candle out of a mold made from an empty tin food can (washed and dried well), simply use your can opener to cut out the bottom end and push the candle out through it using the cutout bottom end as a pusher.
Help, It’s Stuck!
Into every life, some rain must fall. Sometimes, despite your most careful preparation, a candle will refuse to come out of its mold. If, having tried all of the standard methods already described, you still can’t get the candle out of the mold, don’t despair. There are some alternative means you can try to get that stubborn wax free of its mold.
Put the candle in its mold in the refrigerator for half an hour. Remove it and again try to release it. This usually works.
If the fridge fails, run the mold under hot water. This will warm the wax enough to get it to release, but it will also mess up the smooth, shiny surface that was effected by the water bath. Again, don’t despair. You can polish the candle (use the tried-and-true nylon pantyhose method) back to a sheen.
If polishing the candle doesn’t give the shiny result you want, overdip the candle into a new batch of melted wax for a fresh outer coat. Dip it into a batch of colored wax, which will cover a bad surface more completely than translucent plain paraffin.
Save Your Pantyhose!
Nylon pantyhose make excellent polishing cloths for finished candles, so if you get a run, don’t fret—just put it in a plastic bag in your work area to store them. After you have removed the seam lines, if you need to do so, rub your finished candle with old nylon pantyhose to give it a nice polish. This will also smooth away any shaved-off seam lines.
Voilà! You now have a finished molded candle. Stand back and take pride in your accomplishment. And there are now lots of creative things you can do with your molded candle. We’ll be discussing those throughout the book.
Automatic Wicking
It’s possible to insert a wick into a candle that has already hardened. This is an easy way to make candles. Just pour your wax into the mold, let it harden, release it, and insert a wick. To do this, you will need an ice pick, a heavy knitting needle, or a wicking needle. Heat the implement over a burning candle or other heat source and, holding the hard candle firmly in one hand, slowly and carefully push the hot needle through the candle from one end to the other until you have a hole clear through. Now, using a stiff wick (primed or cored), push the wick through the hole. If the hole is bigger than the wick and there is air space, pour in a little melted wax to fill in the gap.
Wicking Disposable Molds
The easiest way to wick a candle made in a disposable mold is to use the method for wicking an already hardened candle. There are, however, other choices.
If you don’t want to make a hole in a disposable mold in order to use it again, use the method for wicking a hardened candle. A hot ice pick works best, but any heated pointed instrument will work fine.
You can punch a hole in the bottom of the mold, using an ice pick or screwdriver (or hammer, if the mold is metal). Then, seal the hole with mold sealer—or use putty, chewing gum, modeling clay, or masking tape. Since the bottom of the mold becomes the top of the candle, this method seems to work best since the end into which the wax was poured will always have an irregular surface.
Technical Assistance Online
The National Candle Association offers a number of technical papers for sale at www.candles.org. Here are some you might find useful for making molded candles:
Topic: Paraffin Waxes
“Vybar Polymers—Synthetic Additives for Paraffin Modification”
“Additives for Candles: Epolene Polyethylene Waxes”
“A-C Polyethylene Waxes for Candles”
“Elvax Ploymers: Its Use and Properties”
“The Crystal Structure of Paraffin Waxes and the Effect of Polymeric Additives”
Topic: Non-Paraffin Waxes
The Craft of Moldmaking
The easiest molds to use are the simple shapes we have already described—squares or rectangles (such as milk cartons) and cylinders (such as food tins). However, if you are the adventurous type—or artistically inclined—you may not be satisfied with these basic shapes (although they can be used to make some extremely interesting-looking candles).
Once you progress beyond these block or cylinder shapes and want to extend your repertoire of candlemaking, you will need two-piece molds (extensively described below). Many of these can be purchased, and you can make your own.
Moldmaking is not easy. It is exacting and complex work. As with any other technical art, people spend years mastering the moldmaking process. But it’s fun to try. There are many books that cover this topic. Check out your library or the Internet for books dealing specifically with moldmaking.
You can also learn from professional candlecrafters. Your local craft store may give classes in moldmaking. Also, adult education programs given at local colleges and universities may have such courses available. If you are interested in gaining expertise in this challenging but rewarding art form, investigate these options.
Moldmaking Step by Step
Molds can be made from many materials. You can choose plaster, clay, natural rubber, or silicone rubber. Whichever material you use, the basic technique is the same. Follow these steps carefully to insure success.
Carefully choose the shape you wish to duplicate. Obviously, simple shapes are easier than complex shapes. Take some time to examine the piece and determine if it is truly suitable to use as a model. That wonderfully interesting widget with all sorts of protrusions might look great as a knick-knack—but how hard will it be to get wax out of a mold made from it? If the model you want to duplicate has “undercuts,” a one-piece mold is not advisable. Determine which direction the mold will come off of the model. Will it have to be pulled off in such a way as to risk damaging the hardened wax inside? Ask yourself if the model lends itself to being made as a one-piece mold. If not, you’ll have to devise a two-piece mold.
Problems: Draft and Undercut
The biggest problems for the moldmaker are draft and undercut. Draft is the taper form intentionally given to molds in order to make removal of the candle easier. An undercut is any flaw—such as an indentation or protrusion—in the model. Undercuts make candle removal (from a one-piece mold) difficult, if not impossible.
The shape you choose from which to model your mold is the clue to easy or hard removal. Latex molds can be peeled off like an adhesive bandage. However, remember that hardened wax is frangible. Trying to peel off a mold from the outstretched wings of an angel might break them off. So when choosing models, take their basic shape into consideration: the simpler the better (and easier).
If you want to make really fancy shapes, there are many good books available on candle moldmaking. Your craft store may carry a line of candlemaking books. Or, search the Internet’s many candle Web sites. Your library is also a good source.
Materials for Home Moldmaking
There is no one best material to use for making your own molds. As you experiment and gain experience, you may well develop preferences. You may find one or another material easier or more difficult to work with. Once again, there’s always a lot of trial-and-error to home candlemaking. That said, here are some general guidelines for moldmaking substances.
Clay—Clay is an excellent substance for replicating a shape (model) you have made yourself. It’s hard to reuse and best for making one-of-a-kind shapes. Don’t attempt to use clay for quantity candlemaking.
Latex—Latex is fairly easy to use as a brush-on liquid. (See “Making a Latex Mold: A Step by Step Guide.”) However, latex is somewhat time-intensive as you have to apply ten to twenty coats and wait for each one to dry before applying the next. The good news is that a latex mold can be reused several times, sometimes—depending on the shape—as many as twenty. The downside of latex molds is that they shrink as they dry. This can distort the shape. To avoid this problem, simply support the mold as it is drying. Although latex can be reused, it’s also great for a single use, especially if you are using an odd-shaped model. Be prepared, however, for your candle to emerge from the latex mold a bit smaller than the mold itself.
Natural Rubber—Natural rubber has many advantages. It is flexible and easy to handle. However, it has one big disadvantage: you can’t use stearin with a rubber mold. A chemical reaction between the two will ruin the rubber due to the corrosive quality of stearin (stearic acid). The good news is that natural rubber can be reused with candles made from wax that doesn’t need stearin as an additive. If you want to use a natural rubber mold just a few times, you can use stearin as part of your wax mixture because the chemical corrosion is a slow process. But, eventually, the stearin will make pits in natural rubber.
Plaster—Plaster of Paris makes excellent molds but it is entirely without flexibility. From a practical standpoint, plaster is best used to make a master mold from which you can then make molds of flexible material. Plaster can be used to create a two-part mold.
Polysulfide—This material is reasonably priced and fairly easy to use because of its flexibility. It can be poured over almost any object. Just remember to coat the model with a releasing agent. Petroleum jelly and liquid soap are good.
Polyurethane—This substance is inexpensive and mixes up easily. It is not advised for quantity production, especially if you are using stearin as an additive. Like natural rubber, there is a chemical reaction between the two, though less severe. The downside to polyurethane is that is doesn’t keep well. You have to plan to use it as soon as you open the can. It’s probably best used for molds with which you are going to do a short-run production of no more than a dozen candles, and make them at the same session of candlemaking.
Every mold material (except plaster bandages!) comes with a sheet of instructions and information about the material’s attributes and recommended uses. Be sure to read it and follow all instructions carefully. You may need to wear rubber gloves or take other precautions.
If so advised, be sure there is sufficient ventilation when using the moldmaking material. This caution cannot be emphasized enough, especially when using the chemically based materials.
Two-Piece Moldmaking
Once you have determined a suitable location for the break-line of a two-part mold, you will need a cardboard box out of which you can cut the bottom. This will be the container for your clay bottom layer, the mold model, and the moldmaking material. Its purpose is to hold the model in place while you cast the two separate parts, one after the other. The box needs to be the same size as your mold model, with an additional 2” in all directions—width, height, and depth. This extra space will be filled with clay to hold the model in place while you pour the moldmaking material over it.
What you will have is a four-sided box with no top and no bottom. Place the open-ended box on a flat, hard surface. A piece of plywood is good. Or, depending on the size, a cutting board. Layer some clay on the bottom—about 2”—to form a surface on which the mold model will rest. Prior to inserting the model, coat it lightly with mold release agent or vegetable oil (nonstick pan spray is good) to prevent its sticking to the clay.
Remember that poured candles are normally made upside down. Therefore, place your model in the box with its base flat up against one side of the cardboard box. Secure it with tape or mold seal so that no moldmaking material will get between the model base and the box wall. This end of the mold will hold the pouring hole for your mold.
After you have placed your model in the clay bed and secured its base tightly against one cardboard wall of the box, add more clay up to the location of the line of separation between the two parts of the mold you have chosen. Carefully embed the entire part of the model that will be the other half of the mold. The upper part, the exposed portion of the model, will be the half of the mold you make first. It should be clear of all clay to the line you have decided upon.
At this point, you want to smooth down the surface of the clay very carefully so that the level of the clay is in the exact place where you have decided the seam of the mold will be located. When selecting the parting line, remember that the more strategically you place the seam line the less it will be obvious in the finished candle (even though you can scrape and polish the seam line to some extent). Check your model before starting to see if there is a natural place for a break in the mold. If you can find such a place, and align the parting line with some decorative area of the model, the seam line will be almost invisible.
Having leveled off the clay to the parting line, you must now insert several small pegs or other objects (such as little beads) in a line around the model. These will serve as the registration points on the seam line so that when you put the two pieces together they will fit exactly.
At this point, you are ready to spray or coat the model embedded in the clay with mold release. For plaster or silicone, use petroleum jelly. For rubber and Latex, use mold release of the commercial variety.
Part One
To make the first piece of your two-piece mold, pour your moldmaking material over the model. Fill the space with sufficient material to create a mold wall thick and sturdy enough to hold the hot wax without distorting its shape by bending or buckling.
After filling the box with the moldmaking material, allow it to dry thoroughly. The time needed will vary with the moldmaking material you have chosen.
Part Two
To make the second part of the mold, turn the box upside down to remove the clay bottom. Do not remove either the model or the top half of the mold. Take out the mold registration pegs or beads.
Repeat the process for making the first half of the mold. Coat the exposed model with the appropriate mold release substance. Pour in the moldmaking material. Allow to dry. You now have the second half of your two-part mold.
All Together Now
Lift the cardbox off the mold, after it has dried thoroughly. The finished mold should split neatly apart along the separation line. Take out the original model. The space left behind is the mold into which you will pour the wax. The end of the mold that was pressed flat against the cardboard wall is the opening through which you pour wax.
When making candles from handmade molds such as we have been describing, you will need some sort of clamp system to hold the two pieces together while the wax hardens. This can be heavy rubber bands, duct tape, or whatever else you can improvise. (Store-bought two-piece molds come with their own clamp system provided.)
Making a Latex Mold: A Step-by-Step Guide
Liquid Latex can be purchased from most craft shops. It comes in jars or tubs, and approximately $15.00 worth of Latex will be enough for four or five molds, depending on size, shape, complexity, etc. Alongside the Latex in the craft shop you will usually find the Latex-thickening agent. It’s a good idea to have this as well, or your Latex may be too thin.
Be sure to cover your work surfaces with heavy brown paper (old grocery bags are great—you can cut them flat) and wear disposable clothes. If spilled, Latex is nearly impossible to get off of clothes, fabric (such as rugs), and most other surfaces.
Before beginning to make a Latex mold, carefully choose the object from which you are going to create the mold. You can use ornaments, plastic children’s toys, and any number of shapes. A stone ornament of a cat or a turtle makes a wonderful mold shape. Use your imagination—look around and see what you have that will serve the purpose.
The Next Step
Secure the base of the object you have chosen on a smooth surface, such as your kitchen counter, with blue tack (a type of mold seal available at craft stores) or double-sided masking tape.
Next, with a large brush—it can be the type artists use, or a small, disposable paintbrush—begin to paint your object with the liquid Latex. As you work, be sure to get the Latex into the crooks and crannies of the mold. Fill in any crevices carefully. Keep painting until you have completely covered the object with latex. Then paint another two inches around the base to form a lip for the mold. If you want to reuse your brush, immediately wash it in hot soapy water. Disposable (cheap!) brushes can simply be discarded.
Allow the mold to air-dry (liquid Latex dries fairly quickly). The thinner the coat, the faster it will dry, and vice versa. Continue this painting/drying process until the Latex covering your object is approximately 2 mm thick.
Once you are satisfied with the thickness of the mold, allow it to dry completely. Using liquid dish detergent as a release agent, carefully peel the mold off the object. Clean it and allow it to cure (dry) at room temperature for seventy-two hours before attempting to fill with wax.
Use the mold to make your molded candles, following the basic instructions given in this chapter. However, do not use stearin in rubber molds. It has a corrosive effect, which will rot the rubber.
Tips for Successful Latex Molds
Watch out for deep undercuts in your model. If it has these, the mold will be extremely difficult to remove.
Use untreated/unpainted plaster cast models to make interesting molds. These can be found at shops that carry ceramic craft materials.
Remember that handmade molds cast from objects have a limited lifespan. You cannot use them indefinitely.
Don’t make the mold too big. A too-large mold can distort the wax poured into it.
Don’t touch the rubber in between coats—this will interfere with the adhesion of subsequent coatings.
Don’t use metal objects for making Latex molds. Certain chemical reactions may occur that are inadvisable.
A two-piece mold makes removal a snap. But you have to carefully determine the parting line, where the mold separates into two pieces. It must be so located that you can pull the two pieces apart, free from any protruding areas of the shape (such as the angel’s wings).
Complex Molded Shapes
With patience and a little practice, it can be fairly easy to make molds at home, as long as you stick to shapes that lend themselves to a natural part line. But if you want to get really fancy, it’s possible to make three-part molds. Just remember that the more parts, the more possibility of wax leakage. Wax may leak from a mold that has more than one part line, and this can ruin the candle. Experienced candlemakers don’t advise beginners to attempt to construct molds of more than two parts. Once you have mastered the two-part mold construction, you may want to move on to more complex shapes.
Objects for Moldmaking
Here you are limited only by your imagination and your skills at moldmaking. Naturally, you will want to choose objects whose shape appeals to you aesthetically—or even to your sense of humor! Almost any object can be used for a mold. However, it must be made of nonporous material. Anything that can absorb water or any other liquid will be able to absorb wax as well. Follow this basic rule and then let your imagination run wild!
Models, Models Everywhere!
The object you use as the model for your mold can be just about anything (again remembering the caution about overly complex shapes). It might be an object you particularly care about—such as a pressed-glass jar (I have one of those, a tall cylinder that is “just right,” and makes a lovely and intricately patterned candle).
Your model could be a unique (one-of-a-kind) object that has surface texture that you’d like to reproduce in wax form. If you sculpt, it might be something of your own design that you would find appealing as a candle. Or, you might make a specific shape just to be a model for a mold.
Your child might be playing with modeling clay and come up with something that could be used as a model. Think what a thrill for him or her to see his or her artwork reproduced as a candle! Such an item would make an outstanding gift for a grandparent or other relative. Or, your child could take the candle made from his or her artwork to school for “show and tell.”
Garage and yard sales are prime sources for objects to be used as models. At them, you are likely to find oddly shaped—often old-fashioned or antique—objects perfect for moldmaking. For example, I once found an antique butter mold that was beautifully shaped. All sorts of glass containers, particularly cut glass or pressed glass, make good models. You could even use a piece of fruit such as an apple or a mango. One candlemaker I know looks for old carved wooden moldings—their intricacies make very unusual candles. You are limited only by your tastes and imagination in choosing models for your moldmaking.
Plaster Bandage Molds
Some molds you make you might want to reuse. On the other hand, you might want to make a temporary model out of clay, which you just peel off the finished candle and discard. Gauze, a type of plaster that doctors use to make casts for broken bones, is also good for making your own models. (I learned about this from doing mask workshops where we used the material to form masks right on the faces of the participants.) You wet the plaster bandage material and then use it to form a shape. You can either wrap it around an existing object, leaving a hole through which to pour the melted wax, or create a freeform shape (also leaving a hole). To use a plaster bandage for a two-part mold, wait until your form is thoroughly dry and then, using a sharp knife, slice it down the center, either vertically or horizontally. Proceed with the candlemaking process as described for two-part molds.