CHAPTER 13
Surface Techniques for Decorating Candles
Materials for decorating the surfaces of candles can be found all around you—in the garden, sewing room, even in the supermarket. Further, you aren’t limited to adding extra materials to the candle’s surface—you can alter, improve, or decorate it with paint; make impressions on the candle’s surface; or add more wax to the candle’s surface in a variety of ways to create different effects.
Candle-Painting
Painting the surface of a candle may be the easiest method for surface decorating, especially for the beginner. You paint a candle just as you paint on a piece of paper. The types of paints to use are water-based—tempera or acrylic—because they adhere to the candle’s surface best. Oil-based paints will slide off.
Tempera paint is available from arts stores; your craft shop may carry it as well. As you can mix your own colors quite easily, you need only purchase the basic primary colors: red, blue, yellow; and white and black. (Refer back to “A Guide to Mixing Colors,” p. 194.) From these five colors you can mix almost any color you can think of, except gold and silver, which are also available. Pens that are filled with gold and silver inks are excellent for fine-line drawing on candles.
Inspiration for painted candles abounds. You can paint an abstract design of your own making; geometric shapes such as triangles, squares, stars, etc.; or flower shapes in different colors. Decorating candles with painting is easy and fun, and leaves your imagination lots of room to be creative.
Paint with Wax
Not only can you paint your candles with poster paint or acrylic, you can overpaint them with another wax in as many colors as you like. To make painting wax, simply mix one part paraffin with 3½ parts of turpentine, following the instructions below:
Melt the paraffin and add the turpentine.
Permit the mixture to stand for a few days, stirring three times daily to help the turpentine evaporate. The result is a pasty wax pliable enough to use for painting.
Add color to your painting wax, using a different dish or container for each color you plan to use. If the wax is too stiff, put the containers in a pan of water and warm until the colored wax is pliable enough to use with a brush. Use artist’s paintbrushes for wax painting, but don’t expect to use them for any other purpose. I advise buying inexpensive sets of brushes and disposing of them.
Once you have painted your candles, be sure to leave them untouched in a protected place while they dry.
When the candles are thoroughly dry, overdip them in clear wax—quickly—for a final finishing touch.
You Don’t Have to Be an Artist!
Decorating candles with paint is fun. You don’t have to know how to draw. You can make interesting squiggles—sort of doodling in paint. Or, hold the paintbrush in one hand and the candle in the other and twirl the candle around, making a spiral design! Use your imagination—be creative.
Stenciling Candles
Stenciling is perhaps the easiest way to decorate a plain pillar or block candle to give it an elegant, interesting finish. Stenciling utilizes only the stencil and the paint, requiring no other tools but your brush. Stencils can be purchased in a variety of designs—usually from stores that sell wallpaper and interior decorating supplies. Or, you can make your own stencils.
Making Stencils
Remember how you learned to cut out a snowflake in first grade? You folded a piece of paper a few times and snipped here and there. Then, when you unfolded it you were astonished at the snowflake you had created. Making stencils is the same, only in reverse. You cut out a pattern from the paper using the same technique as with the snowflake. When making your own stencils, remember to use a heavy enough paper to wrap around the candle tightly. You don’t want the paint to seep through the stencil or slip underneath the template.
For example, first fold a sheet of 8½” x 11” typing paper in half across the short length. Next, snip three long cuts into the fold. Then, refold the paper about ½” from the cuts and make a few wedge-shaped snips in that fold. When you open it, you will have a simple pattern of leaves and diamond shapes. You can expand on this idea indefinitely and make shapes as intricate as you like.
Or, you can draw a pattern on the paper (or trace one from a picture) and cut it out with an Exacto knife. Using lace doilies or pieces of lace is yet another of the many options.

For a lacy edge on your candle, take a strip of lace and wrap it around the bottom edge. Tape the lace firmly in place with masking tape and spray paint over it. Leave the candle to dry thoroughly and then remove the lace “stencil” and the masking tape.
Once you have your stencil and your candle ready to go, wrap the stencil around the candle carefully and either tape it tightly or hold it with one hand, depending on the shape of the stencil. You might work better with both hands free to secure the candle and paint without worrying about the stencil slipping loose.
When you have your stencil securely in place, either brush or rub the paint into the open spaces. Usually the surface will be done with one coat, depending on the type of paint you are using.

One candlemaker uses spray paint to stencil candles. If you choose this medium, either do it outside or make sure there is plenty of ventilation. And be sure to protect all surfaces. Spray paint can go all over the place.
If you want a buildup of paint—such as with a silver or gold decoration—then you must apply several coats. Some paints are naturally thick and pasty, while others are thinner. For a flowing effect—such as calligraphy—use thinner paint. For a dimensional effect, use thicker paint.
A Neat Trick
You can create a stenciled effect without a stencil! This is a very easy technique for painting a design on the surface of a finished candle. Its only drawback is that you are limited to geometrical shapes, but you can make many beautiful designs with them. The secret? Masking tape!
Use artist’s masking tape—the kind that peels off easily, leaving no marks. Simply put tape on your candle, paint or spray-paint (you don’t have to bother about being neat or staying within the lines, as with a stencil). Peel off the tape and—bingo! You have a really neat design.
You can use this easy technique to create stripes, either vertical or horizontal. The horizontal stripes will give the effect of a layered poured candle—but with much less effort.
For example, you could make a stunning black and white striped candle by using a white base candle (pillar or block) and black paint. First, wrap the masking tape around the candle carefully to make as many stripes of whatever width you like. Then, spray the candle black. When you peel off the tape after the paint dries, you will have a bold design. Of course, you can do this with any colors, bright or pastel. This is a great way to experiment with using color without much effort or expense. And, if you don’t like the result, just scrape the paint off and remelt the candle for another use.
In addition to making horizontal and vertical stripes with the masking tape method, you can lay the tape in such a way that only tiny spaces are left—you can make squares, diamonds, triangles, and other geometric shapes just by the way you place the tape. For a checkered effect, first make vertical stripes and then make horizontal stripes. This will give you small squares that will result in a checkered design. You can even paint over more than once using tape. Once again, use your imagination and experiment! You’ll be surprised at what creative results you can achieve on a plain candle’s surface.
Other Surface Decorations
Another easy way to decorate the surface of your finished candle is to stick things on it, such as beads or small shells. You can do this while the candle is warm, either right after you make it, or by overdipping it in another coat of wax.
Using wax to attach decorations
An easy way to attach decoration to a candle is to use wax from another candle. To do this, simply lay the candle on its side. Holding the second candle over the first, allow the wax to drip in the desired area. Quickly attach your decoration while the wax is still warm. Try simply rolling newly overdipped candles in tiny beads, or glitter, or even sesame or poppy seeds. You can also use colored bits known as jimmies, which are made for decorating cookies and ice cream. Just make sure you are using a candle with a large enough diameter so that as it burns it does not melt the outer layer.
And, of course, never use anything flammable to decorate the surface of any candle.
Have you ever made a pomander by sticking an orange or an apple all over with cloves? You can do the same with a still-warm candle. Just press whole cloves into the sides all the way around, about halfway up the candle. You can do this with cinnamon sticks, too. The result will be pretty and fragrant!
Making Textured Candles
You can create a raised, or embossed, pattern on sheet wax and then use the sheet wax to decorate the surface of your candle. All you need is a raised (relief) pattern. It could be anything. For example, I have a wine bottle with a bunch of grapes on it that is perfect for this technique. Once you begin looking around for possibilities you’ll find they are abundant. The end result is a sheet of wax with an embossed design on one side, flat on the other.
To make embossed sheet wax, first coat the object with the design with mineral oil or petroleum jelly or pan spray. Then, cover it with silicone caulk. Let the caulk dry thoroughly. Carefully peel it off the original mold. You will have an embossing form. Either press just-made, warm sheets of wax into the mold, or fill it with wax like any other mold. Once you have your embossed wax, adhere it to the surface of the candle with wax glue, or wrap the wax sheet around the candle.
Decorating with Wax Scraps
Remember how, when you were a kid and your mother made piecrust, she would cut the scraps up into leaf or flower shapes to decorate the top of the pie? Maybe your mother didn’t do that—but it’s a common pastry technique you can transfer to the surface decoration of candles. As we have noted, there are many parallels to cooking and candlemaking. This wax-on-wax method is easy and utilizes bits of wax you have left over from the wax sheets or pots of melted waxes of various colors.
If the scraps have cooled, you can warm them up again with a blow-dryer. When the pieces are pliable enough, you can cut them into interesting shapes—leaves, flowers, stars, half-moons, etc.—and glue these to the candle’s surface, using wax glue or simply taking advantage of the malleability of warm wax surfaces (beeswax will stick by itself). With scraps, you can create a vine climbing up the candle, or a spray of flowers with leaves and a stem.
Child’s Play
If you have children about, you can let them have strips of wax that they can wind around the candle, making stripes. This is a fun way to let children help make holiday candles—using basic white pillars, you can make pans of colored wax to cut into strips for decorating in the colors appropriate to the holiday. Or make a batch of different colors and let the kids use their imaginations to make striped candles of many colors. Peppermint candy sticks can be simulated with this method by wrapping strips of red around a tall, slim, white pillar candle. As you can easily see, the possibilities are endless.
Kitchen Magic
Using sheet wax, you can cut shapes with cookie cutters and stick them on your candle’s surface as described above, with wax glue or with warm wax. Sets of cookie cutters in a multitude of shapes are available at kitchenware departments, or through mail-order catalogs. Depending on the size of your base candle, you can use regular cutters, or you can get mini-cutters, which are great for surface decoration of tapers and smaller pillars and blocks. A heart shape, for example, can be bent to make angel wings. Small heart shapes can be stuck on the candle all over for a romantic effect. Try a red candle with pink hearts, or the reverse.
Cookie cutter cutouts from sheet wax can be lots of fun for decorating your candles, and very easy. You can cover the entire surface of the candle with add-ons, or make one striking addition—like a medallion. Use this method when you have children helping you. They love to cut out the wax and stick the shapes on the candles. So what if some are a little crooked? It only adds to the charm!
Or, if you’d like to combine more than one surface decoration method in a clever way, use paints to decorate the cutouts you have attached to your candles.
Adding Texture to Finished Candles
In addition to painting, stenciling, and wax-on-wax methods, you can decorate a finished candle by adding texture—and color. Here’s an example for a two-tone textured candle:
You will need: a finished pillar candle; your candle dipping setup; 4 pounds paraffin wax; ¾ ounce microsoft additive; wax paint in a color of your choice—gold is nice; and a zest peeler (the kitchen tool used to remove peel from lemons and oranges).
Before starting this project, decide what colors you want to combine. What you are going to do is use the zester to create little fine ridges in the overdipped candle; then, you are going to rub the wax paint into the ridges, giving a two-color textured effect.
There are any number of effective color combinations for this technique—gold paint over an ivory candle; silver paint over a black candle; purple paint over a turquoise candle; blue over white; green over blue; orange over yellow; and so on.
The Process
First, overdip the finished candle in the color you have chosen, three times. Then plunge it into cold water for a moment. Remove the candle and let the wax cool a little, so that it is still warm to the touch. Pressing the zester firmly against the candle, draw it downward from top to bottom, which will score the wax in fine lines. Repeat until you have made score lines all around the candle.
Allow the candle to dry. Then, using your finger dipped into the paint, gently rub the paint onto the raised lines on one half of the candle, while you hold the other side. Let the paint dry and then do the other half. Let it dry completely before lighting.
You need not limit yourself to one color on the outer surface of the candle. You can use the same technique to make a candle of many colors. Just dip a finger into one pot of paint and rub on the color down a length, an inch or more wide. Do the same with a second color, a third, a fourth. Remember, however, to do only one side of the candle at a time so that you can hold the other half in your hand, or you will get a smeared mess.
Carved Candles
Another technique for altering the surface of a candle is cutting into it, or carving. This can be as simple or as complicated as you desire. For a marbleized effect, just take a vegetable peeler and peel away some of the outer layer of a white candle overdipped in a color, revealing the white beneath. Or, dip several layers of color on one candle and then cut notches into the candle to reveal each layer.
Red and Green Marbleized Candle
Dip a white candle into red wax once.
Dip the same candle into white wax three times.
Dip the candle into green wax three times.
Dip the candle into red wax once more.
Allow the candle to cool slightly between dippings. While the candle is still warm, make small indentations in it with your thumbs all around its surface. With a vegetable peeler (it should be good and sharp) begin to peel or shave off the candle, just as you would peel a potato. Work evenly up and down the sides of the candle, or around it if you are making a ball-shaped candle. Continue carving until you have reached the effect you like, exposing some of the underlayers of color. (This may take quite a bit of carving/shaving.)
Once you are satisfied with the result, re-dip the candle in clear wax at 185° Fahrenheit and watch carefully as the rough edges melt off. As the candle is immersed in the hot wax, more of the underlayers will show. When you’ve got the look you like, remove the candle from the hot wax and plunge it into cold water to achieve a shiny surface.
You can use this “dip and carve” technique on a candle of any shape. It is especially nice on balls and pillars. Tapers are too slender to benefit by this method, but they can be carved as well.
Carving Tools
You can carve candles with your fingernails, a nail, knives, palette knives, chopsticks, a linoleum cutter, various kitchen implements (a cake tester is great!), or a special carving tool—anything that will cut or shave away bits of the candle’s surface to reveal some of the color(s) underneath. Razor blades should be used carefully so as not to cut too deeply into the candle and weaken it, especially with tapers.
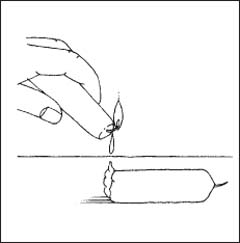
Carving with Heat
You can achieve some interesting effects by carving with a heated, sharp-pointed object, such as a nail or an ice pick. Using a candle flame as your heat source, heat the nail’s point and begin to make lines, swirls, or any other pattern you like in the wax as it melts around the heated point. Don’t dig in too deeply and work slowly at first. You can always go back and make the indentations deeper. Once you are used to this technique, you can quite successfully draw designs—such as vines and flowers as well as spirals and swirls—into the candle’s surface.
You can also use other kitchen tools—spoons, forks, knives, etc.—for heat carving. A spoon, for example, when heated will make round indentations, or you can use it to create smooth channels up and down, or around, the candle. A fork can be used to add texture as can a serrated knife-edge. Also, you can use your fingers to pinch up little raised shapes in the soft wax around the heated tool.
Surface Decorating Methods
To expand your creative surface decoration repertoire, try any or all of these approaches:
Overdip in clear wax to smooth out any blemishes.
Overdip in a different color. You can change the color completely by using a strongly colored overdipping wax.
Pour different colors of melted wax over the finished candle. (See “Dripped Dipped Candles,” p. 180.)
Splash the candle with crystalline wax. As it cools, it forms little crystals. This is a very effective means of decorating a single-colored candle.
Overdipping in ice water. If you dip the freshly made candle into ice water (not just cold water for shine), a square crystal formation will appear on the outer surface of the candle. This effect makes for attractive decoration.
Using a round-headed (ball-peen) hammer, you can make indentations around the surface of an overdipped white candle that will result in white rings decorating the surface, around little dents. This can be very pretty.
Ordinarily, the ideal is a smooth, shiny candle, but for a rustic effect you can sandpaper the surface. Fine sandpaper will give a nice finish (just like it does on wood). Coarse sandpaper will provide a “country” look. This is especially charming when you are setting a country theme dinner table—with baskets, checkered tablecloth and napkins, homey decorations, and plain wholesome food.
You can embed objects in your candle two ways. Either roll the warm candle in a pan of small objects, as described above, or use wax glue. Both methods work well, but wax glue is recommended for embedding larger, heavier objects—such as tiny washers or large beads. Candles with objects embedded in them can be overdipped into clear wax to help the objects adhere to the surface. Just make it a quick dip so you don’t cover up the decorations!
Decorating Supplies
Candle Varnish—This is a special varnish made for candles. It gives a hard surface and a brilliant shine. Paint candle varnish using a soft brush.
Gold and Silver Wax—For holiday candles and special occasions, gold and silver wax is wonderful. It can be rubbed on the candle’s surface in various ways and is easy to use. (See “Adding Texture to Finished Candles,” p. 234.)
Poster Paints (tempera)—These water-based paints are perfect for painting the surface of candles. If you mix them with a bit of dishwashing detergent, they will be easier to apply and adhere better. Best of all, cleanup is easily achieved with plain water.
Felt-Tipped Pens—Some felt-tipped and metallic ink pens will work well on candles; others will not. This is an area in which you will need to experiment.
Mixing Methods
Once you have mastered the basic techniques of candlemaking and examined the many possibilities for decorating your candles, the results you can achieve are varied and endless. From elegant gold-ridged pillars to rustic heavily textured blocks, you can make candles in interesting shapes and colors, and add patterns to the surface.
You don’t even have to make your own candles to decorate them! You can use store-bought candles as a base for your decorations and still have something uniquely yours. No matter which methods you choose, you can create artistic and beautiful, creative and satisfying candles of your own. Using just a few simple methods, you can bring the light of candles and the magic of lovely ornamentation to any occasion and make even an ordinary weeknight dinner a festive celebration.
As a bonus, all of the methods described in this chapter can be combined with each other for different and stunning effects. For example, you can paint and embed a candle. You can add texture and pattern to a candle. As usual with home candlemaking, the only limit is your imagination!
Starry Sky Candle
To make a wonderful star-studded candle representing the night sky, make or buy a white candle—any shape will do, but a spherical shape would work best. Get a box of the little stars that teachers paste on children’s school charts when they have been good or done an assignment well. Affix the little stars all over your candle. The glue-backed stars may stick by themselves, depending on the wax formula in the candle, or you may need to adhere them by either softening the candle or using wax glue. Once you have glued all the stars on your candle, spray-paint it a dark blue. When the paint is dry, peel off the little stars and there you’ll see a replica of the night sky! (Need I tell you an astrologer thought this one up?)