9
Card-Making with Conductive Paint
LYSSA TROEMEL / MAKER LAB GUIDE
Allen County Public Library–Georgetown
Type of Library Best Suited for: Any
Cost Estimate: $20–$40
Makerspace Necessary? No
PROJECT DESCRIPTION
In this project you will make a card using conductive paint. Participants will learn how to make a card, how to draw a simple circuit, and get a chance to be creative without restrictions. At Georgetown, conductive paint pens from Bare Conductive were used. Conductive paint is paint that’s electrically conductive, which means that you can paint wires onto any surface such as walls, furniture, and so on.
OVERVIEW
This is done as a one-day, two-hour program that is usually open to six people of all ages. This is a program that has proven popular with all age groups and is great to do with families. It is also offered multiple times during the month. Usually this program is offered in December to go with the holidays, but it can be done at any time during the year.
MATERIALS LIST
- ◦ Paper for folding
- ◦ LEDs (light-emitting diodes)
- ◦ Batteries (coin cell, CR2032 works well)
- ◦ Battery holders
- ◦ Conductive paint pens or conductive paint pot with paintbrushes
- ◦ Colored paper for cut-outs
- ◦ Any other craft supplies like glue, stickers, crayons, markers, and so on
- ◦ Scissors
NECESSARY EQUIPMENT
No specialized equipment is needed for this project.
Two examples of cards

STEP-BY-STEP INSTRUCTIONS
Step 1
Make the base of your card by folding paper in half or in quarters. Depending on the thickness of the paper, quarters may be more stable. The paper can be either cardstock or regular copier paper.
Step 2
Decorate the card and decide where you want to have your LEDs. Decorate as much as possible before adding the LED because you will need time to let the conductive paint dry, and it is very easy to brush and smear the paint while decorating. People can use whatever craft supplies they would like to decorate the front, insides, and back of the card. Have markers and other kinds of paper out so participants can draw or cut out designs. If stencils are available, those would be good to bring out too.
Step 3
Insert the LED into your design. There are two ways to do this:
If you don’t want to see the conductive paint, poke the LED legs through the paper and bend outwards. Insert the battery holder an inch or two away. Draw the circuit with the conductive paint. Make sure the paint for the negative does not cross the paint of the positive. Place a glob of paint under the legs of the battery holder.
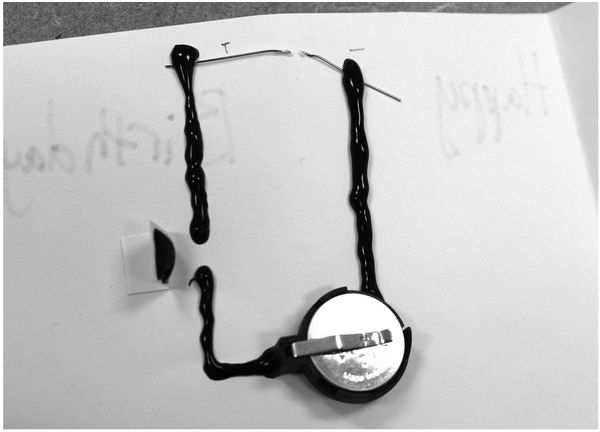
If you don’t want the LED to stay on all the time, leave a gap for a switch on either the positive side or the negative side. Add a piece of paper with a blob of conductive paint on one end and glue on the other.
Step 4
If you want to see the paint, follow step 3 except for poking the LEDs through the paper. You can just separate the legs of the LED and place them flat on the paper. If you want to incorporate the paint into the design, trace the outline of the shape. Remember to keep the positive and negative separate. If they are not separate, the circuit will not work. Try not to get any paint on your hands; it is very hard to wash off, but will wash off eventually.
Step 5
The LED will not light up right away. The paint will need to dry before you start to see any results. If the participant has decided not to add in a switch, they will probably start to see the LED light up as the paint dries.
Circuit example with switch

Circuit example without switch on front

Step 6
If the LED does not light up, check to make sure the participant didn’t connect or accidentally smear the paint so the positive and negative are connected. If this has happened, they may need to start over. If the participant hasn’t connected them, check the paint for breaks or weak spots. If this is the case, draw another line of paint, keeping the flow as consistent as possible.
LEARNING OUTCOMES
Participants should learn how to:
- ◦ Make a circuit with a switch.
- ◦ Make a circuit.
- ◦ Simple folding techniques.
RECOMMENDED NEXT PROJECTS
More complex circuits with more LEDs can be tried with the conductive paint. A good non-messy next step may be to use copper tape instead of conductive paint. There are also sticker circuits that have positive and negative marked on the sticker. You could also add in other card-making techniques like pop-ups, and other folding and engineering projects. Bare Conductive also has a store that has card kits with preprinted designs and other projects. They also have a touch board that allows for other components and is programmable like an Arduino. This would also be a good project to supplement with a paper-cutting machine like a Silhouette Cameo or similar device.