12
Fidget Flannels
AMANDA KRAMER
DIRECTOR OF ACCESS SERVICES/LIBRARIAN/ASSISTANT PROFESSOR
Library and Academic Technology at Washington College
Type of Library Best Suited for: Any
Cost estimate: $2 per participant
Makerspace Necessary? No
PROJECT DESCRIPTION
In this simple project, designed to get everyone “making,” students use a sewing machine and two pieces of cotton flannel material to stitch together a rectangular case with a small opening, essentially creating a pocket. This pocket is turned inside out and lines are stitched on the right side of the fabric to create a maze. Students insert a standard-sized marble and sew or hand seam the opening.
OVERVIEW
Whether it’s a student in third grade or a student in her third year of college, there’s nothing quite like prepping for a test or listening to a long talk in a classroom or a packed lecture hall. For some young people, situations like these are a piece of cake. For others, they’re the stuff of nightmares.
As part of the Washington College first-year research and writing course “Cultivating a Maker Mindset,” professors Amanda Kramer and Brian Palmer worked with students on this simple project called a Fidget Flannel—a small trinket that might be just what some need to make it peacefully through an anxiety-ridden situation.
Teaching students how to construct these flannels will sharpen their knowledge of sewing machine basics, but could also make a larger impact on your organization or campus. Creating a set of these simple trinkets—which allow the user to move or “fidget” a marble between seamed lines—and then donating them to a public library or a college’s disability services office teaches students the importance of sharing their gifts with others—one of the keys to cultivating a true “maker” mindset.
MATERIALS LIST
- ◦ One spool of 100 percent white cotton sewing thread. Note: 100 percent cotton thread should be used because it is sturdy; nylon thread has a tendency to break. Because these small flannels are meant to be handled frequently, cotton is important.
- ◦ 1 to 2 yards of soft, cotton flannel fabric with varying patterns. Some stores will advertise this flannel as “cozy” or “snuggle” fabric. One hundred percent cotton plaid flannel shirts from a thrift store would also fit the bill.
- ◦ Piece of paper and a pencil
- ◦ Chalk
- ◦ Assortment of round glass marbles
NECESSARY EQUIPMENT
- ◦ Any basic sewing machine in good working condition. Note: At Washington College, we purchased a Janome HD1000 heavy-duty sewing machine with a cast aluminum body. This type of machine is hard to break and easy to fix, which is critical when you have a high volume of student use on a machine.
- ◦ Basic sewing accessories like bobbins and assorted feet that come as part of the machine.
- ◦ A standard or quilting ruler, or a measuring tape
- ◦ Scissors
- ◦ Sewing pins
- ◦ Hand sewing needle
STEP-BY-STEP INSTRUCTIONS
Note: Prior to beginning the project (which will move quickly if you have several sewing machines that enable students to spread out), spend a class period showing students how to use a sewing machine—make sure it’s a hands-on session. Help them fill a bobbin, thread the machine, and sew a few rows of stitches on scrap fabric. This will build their confidence before starting this project.
- 1. Lay out your fabric, folded so that when you cut, you’ll be cutting out two pieces at a time.
- 2. Using your ruler or measuring tape, and your piece of paper and pencil, craft a simple “pattern” by measuring a rectangle that’s approximately 6 inches wide by 4 inches deep. Cut out the pattern.
- 3. Lay the pattern on the flannel and pin it to the fabric in two spots so it’s stable.
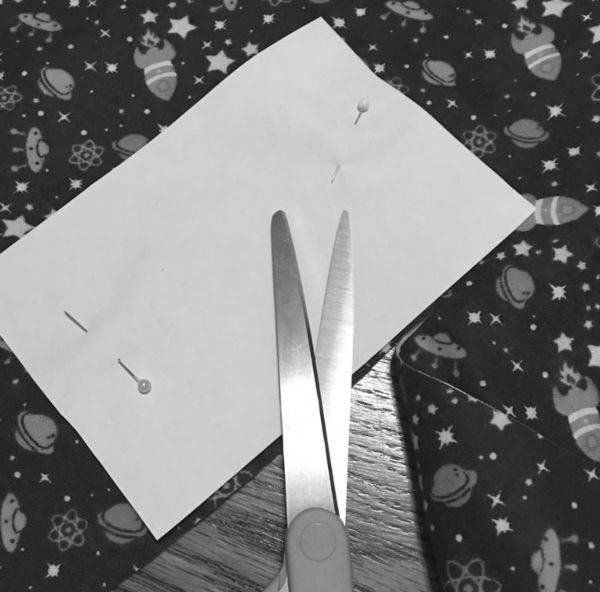
- 4. Use your scissors to cut around the pattern. Unpin the pattern from the fabric and you will have two pieces of rectangular fabric.
Cutting the pattern
- 5. Put the fabric right sides (the side or pattern image you want to appear on the finished product) together and pin in two or three spots so they are secured.
- 6. Move to the sewing machine (which should be threaded and set to a simple straight stitch). Sew a ¼-inch seam around three of the sides, leaving some room before hitting the end of each side to rotate the fabric. (Show students that the distance from the end of the fabric to the sewing line is ¼ inch.)
- 7. Rotate one last time and sew the final side, leaving a 1½-inch opening (this will be the place to slip in your marble).
- 8. Remove the pins from your fabric and snip away excess thread. Then, by gently placing your thumb into the opening you’ve left, carefully pull the inside out so that the pattern side of the fabric is now visible.
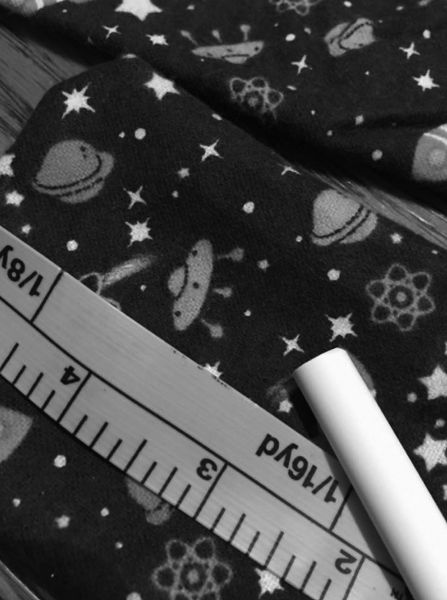
- 9. Lay your project down on your table—it should look like a rectangle. Lay the ruler or measuring tape across the center of the rectangle and make three chalk marks in the middle of the fabric—at approximately 1½-inch intervals.
Chalk-marking the flannel
- 10. You will now sew three lines of straight stitching that stop about an inch from the top of the fabric to create the maze. You will alternate your starting point for the lines. Your first line will start at the bottom of the rectangle (in line with your chalk mark) and move up to the middle chalk mark. Remove the fabric from the machine and turn it, stitching from the bottom of the opposite side (in line with your chalk mark) up to the second middle chalk mark. Remove the fabric again and turn it one last time, stitching again from the bottom of the opposite side up to the third middle chalk mark.
- 11. Place your marble inside the fabric pocket and move it around the maze, making sure that it can pass through easily.
- 12. At this point, you may choose to neatly sew the opening closed with the machine, or have students thread a hand-sewing needle, fold the ends of the opening in slightly, and use a few simple slip stitches to seam it shut, tying off the end into a knot.
- 13. Trim off all excess threads—and test it out!
LEARNING OUTCOMES
- ◦ Students learn sewing machine and hand-stitching basics.
- ◦ If paired with a brief discussion on forms of anxiety or characteristics of autism spectrum disorder, students will learn a little more about why “fidgeting” or touch can help regulate heightened sensory systems.
RECOMMENDED NEXT PROJECTS
Fidget flannels are a fantastic, simple “stepping-stone” project. In the course at our college, this project was used to get students comfortable with sewing machines and fabrics. Suggested next projects are:
- ◦ Sew a simple throw pillow and fill it with Poly-Fil stuffing
- ◦ Use a basic store-bought pattern to create pajama pants
- ◦ Teach beginner quilting by having students sew a potholder