13
Sew a Glowing Ghost Marionette
LYSSA TROEMEL / MAKER LAB GUIDE
Allen County Public Library–Georgetown
Type of Library Best Suited for: School or Public
Cost Estimate: $30–$40
Makerspace Necessary? No
PROJECT DESCRIPTION
This is a simple marionette that is made on a single control bar to look like a ghost. Participants use a sewing machine to make the understructure, and use conductive thread and LEDS (light-emitting diodes) to make the eyes glow. The understructure can also be done only by hand sewing.
OVERVIEW
The ghost marionette is typically made around Halloween and is made in one two-hour program. If there is no sewing machine available, this can be done by hand, but doing so will more than likely take longer. Participants are generally children, even though this is a class offered to all ages. During this two-hour program they learn how to use the sewing machine, how to hand sew, and how to make a simple circuit.
MATERIALS LIST
- ◦ White cotton fabric cut in a rectangle
- ◦ Two pieces of white tulle
- ◦ Long skewers or dowel rods
- ◦ Conductive thread
- ◦ Wearable LEDs
- ◦ Double battery holder or two LilyPad switched battery holders
- ◦ Two 2032 batteries
- ◦ Fiberfill
- ◦ Fishing line or thread
- ◦ Hot glue
NECESSARY EQUIPMENT
- ◦ Sewing machine
- ◦ Hand sewing needle
The finished ghosts

STEP-BY-STEP INSTRUCTIONS
Step 1
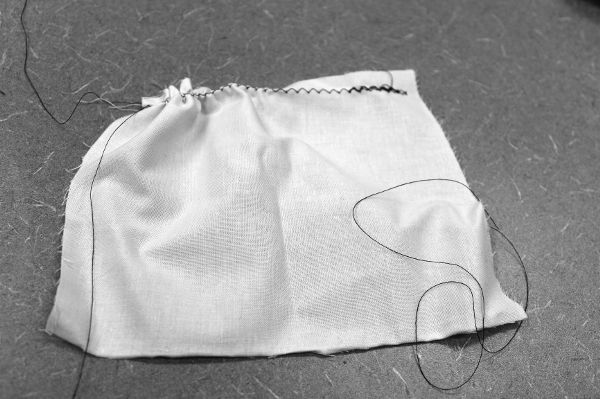
The first step is to make the marionette’s head. The fabric needs to be cut into a rectangle. The bigger it is, the bigger the head can be. On the white cotton fabric, sew a zigzag stitch on the two longest sides. It should be on the widest and longest stitch. Back stitch at only one end and leave a long tail at the end of the stitch. If you don’t have a sewing machine, make big single stitches. Then pull the top string gently and make a ruffle with the fabric on one side.
Example of making the ruffle
Step 2
Put the right sides together and sew along the edges, leaving one side open. You should leave the non-ruffled side open and you don’t have to stitch along the folded edge. Fill the head with fiberfill and pull the top thread to make a ruffle. Close up by hand stitching. If you don’t have a sewing machine for this, hand stitch two straight lines. Pull on the end of the thread to ruffle it. Sew up the side and follow the rest of these instructions.
Step 3
Hand sew on the LEDs with conductive thread with the battery in the back. The LEDs should be positioned so that the holes of either the positive or the negative LEDs are facing each other. If you are using two LilyPad battery holders, they can be sewn on directly. If you are using a double battery holder, you will need to snip the ends of the wire and strip them. The thread can be tied around the ends and the wire bent over the knots. Secure the connection with electrical tape. If you find people are having problems keeping any of the components in place, a little bit of hot glue will hold them down. Be sure to emphasize the importance of sewing in a straight line.
Step 4
A pocket made of scrap cotton fabric can be sewn onto the back to hold the double battery holder in place. To do this, simply fold in the edges and hand stitch the pocket to the back of the head.
Step 5
Now we make the rest of the marionette. You should have two pieces of tulle; suggested sizes are one piece that is 18 inches by 22 inches and one piece that is 18 inches by 24 inches. Place the larger tulle over the head that you now have and tack on the bottom ruffle and the top of the head. Don’t go all the way through to the other side of the tulle. Leave this open so the batteries can be changed. Place a second piece and also tack it on the top of the head.
Step 6
This is the last part. There should be at least three strings total: one from the head, and one from each side for arms. To attach the head, take a hand needle and stitch through to the head. If you have a thick needle, use it because the fishing line is thick and can be difficult to get through with a small needle. Take the other end of the string and tie it to the bar. For the arms, tie it to the edge of the bottom, larger tulle. Put a little bit of hot glue on the end tied to the bar.
Troubleshooting
If the eyes don’t light up, check to make sure the positives and negatives aren’t touching. If you are using the double battery holder, it is very easy for the wires and thread to cross if electrical tape has not been applied. If it still doesn’t work after this step, take out the stitches and re-sew. Chances are that the threads crossed somewhere inside where it can’t be seen.
LEARNING OUTCOMES
People making this marionette should learn how to:
- ◦ Use a sewing machine (if available).
- ◦ How to hand sew.
- ◦ Circuitry basics.
RECOMMENDED NEXT PROJECTS
After making this, people should work on a few more simple sewing projects to get familiar with the machine or hand stitching. Some projects that have been done at the Georgetown Branch are handwarmers, coasters, tomato and strawberry pincushions, and small tote bags. If they liked working with the conductive thread, Sparkfun has some tutorials and different projects that would also work; a superhero mask is another popular program we have done. They can also add any Arduino wearable into a conductive sewing project and use it to program the LEDs for a more advanced project. Once people are familiar with the sewing machine, they can start to work on closures like zippers and buttons.