14
Hand Sew a Mini Stuffed Animal
LEANNE POSEY / YOUTH SELECTION AND TEEN PROGRAMMING LIBRARIAN
Grand Prairie Public Library
Type of Library Best Suited for: Public or School
Cost Estimate: $50–$100 (20 participants)
Makerspace Necessary? No
PROJECT DESCRIPTION
This project aims to provide teens and tweens with the knowledge of how to do several basic hand stitches, including the running stitch, backstitch, and blanket stitch. This is a two-part project: “Learning Basic Hand Stitches” and “Creating a Mini Stuffed Animal.” These projects can be done during one program time, but they work best when split into a multipart program with two separate projects.
This program is geared toward novice sewers who have minimal experience with hand sewing. Participants learn a new skill in this hands-on program, and are given the opportunity to apply this new skill in a practical project.
OVERVIEW
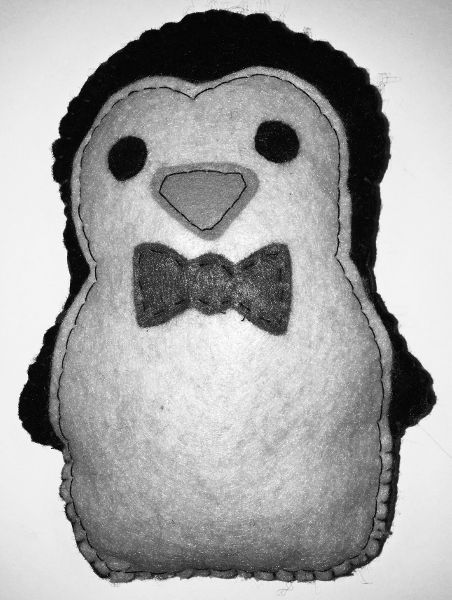
This craft project consists of two 45–60 minute programs: “Learning Basic Hand Stitches” and “Creating a Mini Stuffed Animal.” Program participants will first learn how to do the stitches necessary to create their mini stuffed animal, and take time to practice these stitches. During the second part of the program, attendees will apply their new skills and create a mini stuffed animal. This program used a template for a penguin mini stuffed animal, but other templates can be used. Templates can be purchased, created from a line drawing, or copied from a craft book as long as all copyright laws are followed.
Penguin mini stuffed animal

MATERIALS LIST
Learning Basic Hand Stitches
- ◦ Scrap felt or fabric
- ◦ Embroidery thread (preferably a contrasting color to the fabric)
- ◦ Handout with explanation of stitches
Creating a Mini Stuffed Animal
- ◦ All supplies from first list
- ◦ Black felt
- ◦ White felt
- ◦ Orange felt
- ◦ Any color felt
- ◦ Black embroidery thread
- ◦ Colored embroidery thread
- ◦ Penguin stuffed animal template
- ◦ Sharpies (black and silver)
- ◦ Stuffing (i.e., Poly-Fil Premium Polyester Fiber Fill)
NECESSARY EQUIPMENT
- ◦ Scissors
- ◦ Needles
- ◦ Optional: laptop with Wi-Fi and access to YouTube
STEP-BY-STEP INSTRUCTIONS
Part 1: Learning Basic Hand Stitches
Begin by viewing some videos on each of the stitches; this will help participants see the stitches being done and will help when they read the instructions on the handout. The YouTube videos by Red Ted Art offer simple and clear instructions for the stitches, but there are many videos to choose from. Then hand out the supplies needed for the first project: “Learning Basic Hand Stitches.”
After watching the videos, have participants read the handout and start practicing the stitches; have them spend approximately ten minutes on each stitch. During this time, walk around and offer assistance as needed. After participants have done each stitch, let them spend the remaining time asking questions and practicing the stitches they had the most trouble with. Participants may take their needle, thread, and fabric home with them; encourage them to practice before the second part of the project.
Hand Stitch Instructions
Running Stitch
Start by threading your needle and knotting the end of the thread. Place your needle on the back or “wrong” side of the fabric. Bring your needle through the fabric until the knot hits the fabric. Move your needle over to the left or right of where the thread comes through the fabric. How far over you move it will determine how large your stitch is. Push your needle through the fabric and pull until all excess thread is on the back side of the fabric. Your needle is now on the back side of the fabric. Move your needle over (how far over will determine how big of a space you will have between stitches), and bring the needle back through to the front of the fabric. Repeat.
Backstitch
Start by threading your needle and knotting the end of the thread. Place your needle on the back or “wrong” side of the fabric. Bring your needle through the fabric until the knot hits the fabric. Move your needle, however large you want your stitch to be, in the opposite direction you want to go in. If you are sewing a line to the right, move your needle to the left. Push your needle through the fabric and pull until all excess thread is on the back side of the fabric. Your needle is now on the back side of the fabric. Move your needle in the direction you are sewing in. You want to move your needle over one stitch length from your starting point. Bring your needle and thread through to the right side of the fabric. There should be a stitch-sized blank space between where your thread is now and the first stitch you made. Push your needle and thread back to the other side of the fabric at your starting point. Move the needle over again so there is a stitch-sized blank space; pull the needle and thread through to the front side of the fabric. Go to where your previous stitch starts, and push the needle and thread through the back side of the fabric. Repeat.
Blanket Stitch
This stitch is done on the edge of fabric. Line up two edges of fabric. Start by threading your needle and knotting the end of the thread. Place your needle on the back or “wrong” side of one of the pieces of fabric so that the knot is between the two pieces of fabric. Bring your needle through the fabric until the knot hits the fabric. Bring your thread around the edge of the fabric and push it back through the same spot you started the stitch in. Don’t pull the thread completely taut; leave a small loop. Bring your needle through this loop and finish pulling it through. Move a short distance to the right or left. Repeat.
Part 2: Creating a Mini Stuffed Animal
The second part begins by reviewing the stitches; this can be done verbally or by rewatching the videos. Next, make sure everyone has the supplies that are needed. Participants will begin by cutting out the template pieces and tracing them onto the various colored pieces of felt with black and/or silver Sharpies.
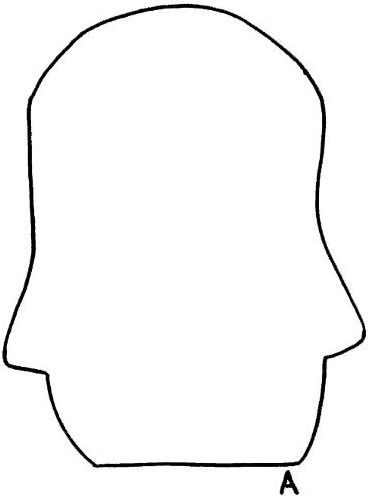
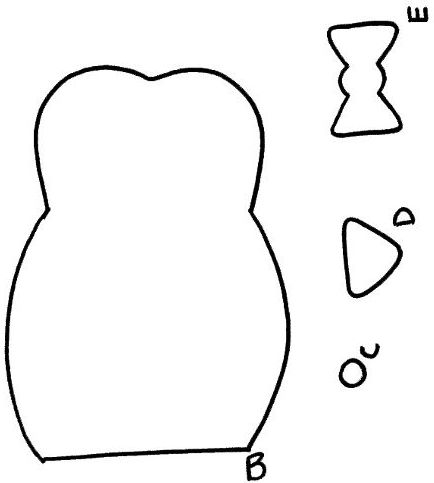
Template and Instructions
- 1. Cut out all template pieces.
- 2. Trace shape A onto black felt twice. (Body)
- 3. Trace shape B onto white felt. (Belly)
- 4. Trace shape C onto black felt twice. (Eyes)
- 5. Trace shape D onto orange felt. (Beak)
- 6. Trace shape E onto any colored felt. (Bow tie)
- 7. Cut all felt shapes out.
- 8. Using black thread, use the backstitch to sew the eyes and beak onto the white belly piece.
- 9. Using black thread, use the running stitch to sew the bow tie onto the white belly piece.
- 10. Using black thread, use the backstitch to sew the white belly onto one of the body pieces.
- 11. Using colored thread, use the blanket stitch to sew the two body pieces together. When they are three-quarters of the way sewn together stop, but do not knot off your thread.
- 12. Stuff the penguin with the desired amount of Poly-Fil.
- 13. Finish sewing the body pieces together with the blanket stitch.
- 14. Knot your thread as close to the fabric as possible and tuck the knot in.
Penguin template 1

You can resize this template on your copier to your desired size. Be sure to resize and adjust Template 2 to the same size.
Penguin template 2

You can resize this template on your copier to your desired size. Be sure to resize and adjust Template 1 to the same size.
LEARNING OUTCOMES
- ◦ Attendees understand and are able to do the various types of simple hand stitches.
- ◦ Attendees know when to use certain types of stitches on a project.
- ◦ Attendees complete a practical project using their new skills.
- ◦ Attendees should feel confident enough to attempt other hand sewing projects on their own, and undertake learning other types of stitches.
RECOMMENDED NEXT PROJECTS
There are several ways to expand on this project. This project could also be used as a stepping-stone that leads to teaching more complicated sewing classes using sewing machines. This route will require access to multiple sewing machines (depending on how many participants you have). This is a great opportunity to foster relationships with community business partners because many libraries, especially those without dedicated makerspaces, do not have the space to store or the funds to purchase multiple sewing machines.
Potential community partners may include craft stores that teach classes like Jo-Ann Fabrics, local businesses, or local nonprofits that emphasize creativity and similar skills. Reaching out and cultivating relationships with businesses and nonprofits benefits both parties. The library gains access to supplies and equipment it may not have the funds or storage space for, while the business or nonprofit gets advertising and exposure to program participants.
Another way to expand upon this project would be to continue with hand stitching. Future sessions could focus on teaching new stitches, such as the split stitch, stem stitch, threaded backstitch, satin stitch, and French knots. Additional programs could also offer more complex projects such as embroidering pillowcases or hand towels.