18
Sew a Zippered Pencil Pouch
LYSSA TROEMEL / MAKER LAB GUIDE
Allen County Public Library–Georgetown
Type of Library Best Suited for: Any
Cost Estimate: $20–$25
Makerspace Necessary? No
PROJECT DESCRIPTION
This is a simple pouch designed for pencils with a zipper and two buttoned pockets on the outside. It takes less than a yard of fabric to make and is an easy way to learn how to add a zipper to a project.
OVERVIEW
This is a class that is offered to all ages, but has mostly been taken by adults. It is a two-hour class that meets once but is offered multiple times during a period of a month. In the course of the class, participants learn how to change feet on the sewing machine, how to put in a zipper, how to sew a buttonhole and button, and how to follow pattern instructions.
MATERIALS LIST
- ◦ Fabric for outside
- ◦ Fabric for lining
- ◦ Thread
- ◦ Zipper
- ◦ Two buttons
- ◦ Fray Check
NECESSARY EQUIPMENT
- ◦ Sewing machine with zipper and buttonhole feet
- ◦ Hand sewing needle
- ◦ Awl or X-ACTO knife
- ◦ Iron and ironing board
- ◦ Pencil for marking; water-soluble works best
- ◦ Straight pins
- ◦ Toothpick or thick hand needle
Example of the finished pouch

STEP-BY-STEP INSTRUCTIONS
Step 1
First, cut out fabric according to pattern instructions found on the pattern pieces. If you want to make the process go faster, fold the fabric so the right sides are together and cut both layers at the same time. Place the pattern on the fabric, pin in place, and cut out. If you plan on reusing the pattern, I would advise removing the pattern before cutting.
Step 2
Put the right sides of the outer main pouches together. Add the lining fabric to each side. Sew at half an inch seam allowance. Press the seam open. Pin the zipper to the seam flaps and sew using the zipper foot. Keep the fabric flat like an open book so you don’t accidentally sew the pouch shut. I usually go all the way around instead of doing two seams. Either works, but the continuous seam allows for the zipper to be cut if needed. Seam rip the opening over the zipper.
Step 3
Take the fabric for the outer pockets. Fold the top down about half an inch and press. Fold in the sides about an eighth of an inch and press again. Keep the side with the half-inch fold at the top. This is where we will put the buttonhole.
Pouch template

You can resize this template on your copier to your desired size.
Step 4
Sew a buttonhole on the two pockets. You can use an automatic buttonhole maker or you can use the following with the buttonhole foot:
- ◦ Set your machine to a zigzag stitch. Set your stitch length and width to 1.
- ◦ Mark how long and wide your button is on your fabric.
- ◦ Stitch/backstitch along the top edge of where your button is going to be a few times.
- ◦ Turn the corner and adjust the stitch length and width to 2.
- ◦ Stitch/backstitch down the side.
- ◦ Repeat steps 1 and 3 for the bottom edge.
- ◦ Repeat steps 4 and 5. Make sure to get in fairly close.
- ◦ Place Fray Check on the fabric inside the buttonhole.
- ◦ Once the Fray Check is dry, use the awl or X-ACTO knife to cut open the buttonhole.
Step 5
After step 4, you can switch to the regular foot or keep the buttonhole foot on a little longer. Place the pockets on the outside and sew down the sides of the pockets to attach to the outer material.
Step 6
Either the normal foot or the zipper foot can be used for this last step on the sewing machine. Put the right sides of the pouch together and open the zipper a little bit so you’ll be able to turn out the project. Sew down the sides at 3/8 inch.
Step 7
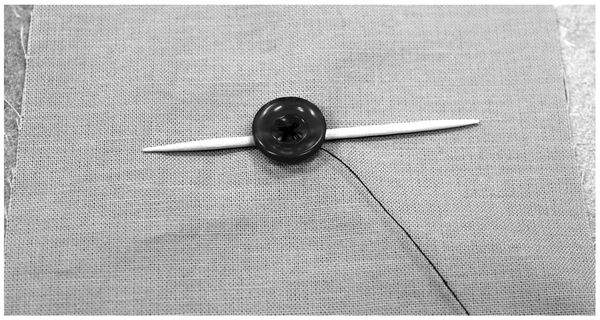
Attach the button behind the pocket. To do this, use the hand sewing needle to start the stitch on the inside. Then thread the needle through the button. Unless the button has a shank (single hole on the back of a button), place the toothpick between the button and the fabric. If you only have two holes, go from one to the other 3–4 times. If you have four holes in the button, go diagonal, making sure to go through each 3–4 times. Once you are done, take the toothpick out and take the thread around the threads under the button to gather them together. This is now a thread shank. Tie it off by pushing the needle through the thread shank and passing the needle through the loop. Repeat to double knot it and make it secure. The reason for doing it this way is that it puts the pressure and strain on the shank, making the button stay attached longer. If participants are having trouble handling the toothpick, a thick needle can be used and stuck into the fabric. Be careful not to stitch through the eye of the needle.
Example of the toothpick-under-button method on a scrap piece of fabric
Knotting off the button

Step 8
Press open the seams if desired and turn right side out. Pressing open the seams will allow it to lay flatter.
LEARNING OUTCOMES
At the end of this project, patrons should know
- ◦ How to put in a zipper.
- ◦ How to attach a button and make a buttonhole.
- ◦ They should also learn about using measurements for seam allowance.
- ◦ How to follow pattern instructions.
- ◦ How to change feet on the sewing machine.
RECOMMENDED NEXT PROJECTS
After this project, libraries and participants should try to work toward more complex sewing projects. Some suggestions include making a wallet with a zipper section, adding snaps to a project, or adding a zipper into a piece of clothing. It may also be a good idea to have a program about mending clothing that can go through how to fix buttons and replace zippers. Another good project would be to move onto more complex patterns or how to draft patterns based off of measurements.