22
Create a Soft Circuit Bracelet
SUSAN BARNUM / PUBLIC SERVICES LIBRARIAN @ TEEN TOWN
El Paso Public Library System
Type of Library Best Suited for: Any
Cost Estimate: Under $25
Makerspace Necessary? No
PROJECT DESCRIPTION
This project will teach participants how to use fabric-friendly circuitry to create a simple circuit with a custom switch to make a soft bracelet that lights up.
OVERVIEW
Sewing isn’t always thought of as a “technology,” but it’s actually one of the oldest and most influential technologies human beings have ever invented. Recent developments have created conductive thread, which can be used in pairing sewing with electrical projects. Conductive thread conducts electricity. It’s often made from stainless steel or regular fibers coated with a conductive substance. It can be bought online from various retailers, or it can be made by stripping old wires to repurpose the thin metal inside to sew with. As you sew with the conductive thread, you will want to use a straight stitch because it won’t cross over itself and therefore prevents possible short circuits. For the normal thread, stitch it any way you wish!
Creating the soft circuit is easy, but you want to plan ahead. It’s a good idea to roughly sketch out or visually plan where you want to place the electronic elements being used. The circuit can become part of the design of the bracelet itself, or participants can choose to hide the circuitry. The conductive thread is used to create the circuit. A circuit is a closed system that provides electricity from a power source to a device. The circuit described here is very simple and the switch, which is made out of a safety pin, is easy to implement. Participants will learn that when the circuit is open, or when the safety pin is not attached, the device is “off” and it won’t light up. You can discuss how batteries provide the power to move electrons through the circuit. This is voltage and is measured (naturally) in volts (V). The current of the flow of electrons is measured in amperes (A). Multiplying the voltage and the amps of the circuit lets you figure out how many watts (W) of power you have. V × A = W. Too easy!
MATERIALS LIST
- ◦ Loose LED (light-emitting diode) lights
- ◦ Cell-type batteries, at least 3 volts
- ◦ Battery holders that fit your type of battery
- ◦ Resistors
- ◦ Conductive thread
- ◦ Plain or normal thread
- ◦ Felt (though any fabric will do. Felt is a good choice because the ends will not fray)
- ◦ Safety pins
NECESSARY EQUIPMENT
- ◦ A clean work surface
- ◦ Scissors
- ◦ Needles (make sure the eye of the needle can accommodate the conductive thread, which is thicker than normal thread)
STEP-BY-STEP INSTRUCTIONS
Step 1
To begin, cut out a strip of fabric from the felt that will fit easily around your wrist. Make sure it’s wide enough to accommodate your electronic parts and any design you want to add to the project.
Close-up of components, materials, and beginning of the soft circuit

Step 2
Place the battery holder at one end of the strip of fabric. Make sure the negative end is pointing toward the closest end of the fabric. Securely sew it down using the normal or plain thread.
Step 3
Take your resistor and bend it into an interesting shape. It’s easier to sew it down to the fabric if you curl the ends into a pretty loop. Just make sure the metal doesn’t touch itself. There is no polarity on a resistor, so it doesn’t matter which end is pointing towards the battery. Place the resistor somewhere off center on the bracelet. Don’t put it right next to the battery holder! Sew it to the fabric using the normal thread.
Step 4
Take your LED light and find the positive, or anode end. This is usually the longest leg on the LED light. Bend the positive leg first into an interesting shape. Next bend the negative end. Remember which is which! Place the LED on the fabric with the anode end pointing towards the positive end of the battery holder. The resistor should be in between the battery holder and the LED. Leave some space between the resistor and the LED. Sew your LED to the fabric with a normal thread.
Step 5
Next, we’re using the conductive thread. Thread it through the needle, but don’t “double” the thread up. Start sewing, using a straight stitch, from the metal part of the positive end of the battery. Make sure you make a few loops of thread around the metal on the positive end to ensure a good connection.
Step 6
Start sewing your circuit out from the battery holder. You are going to connect to the resistor next. The circuit doesn’t have to be a straight line, but it is important not to cross over the circuit with the thread. That will create a short circuit and the bracelet won’t light up. Wrap a few loops of thread around the closest resistor wire end. Then cut the thread and knot it on the back.
Close-up of the “switch,” battery, and closed circuit

Step 7
Start again with the other end of the resistor. Sew from the resistor to the anode end of the LED. Wrap a few loops around the resistor when you start sewing and around the anode end of the LED. Then cut the thread and knot it.
Step 8
Start again with the negative end of the LED. Sew to the end of the fabric. Take the safety pin. Secure the safety pin to the fabric by sewing with the conductive thread through the small “circle” at the end of the safety pin. Loop through a few times. Cut the thread and knot on the back of the fabric.
Step 9
Using the conductive thread, go back to the battery holder. This time, from the negative metal end of the battery holder, sew until you nearly reach the end of the fabric. Sew a few “lines” of thread next to each other before you cut the thread again and knot it.
Step 10
Now is the moment of truth! Slot the battery into the battery holder. Close the bracelet by pinning the safety pin to the “lines” of thread you sewed on the other side. The circuit should close and the LED should light up!
Troubleshooting
If the LED doesn’t light up, check the polarity first. You can often wiggle the LED out of the thread and flip it and replace without resewing everything. If that doesn’t fix it, make sure there aren’t any short circuits where thread or wires are crossing.
This project describes how to make a very simple, unembellished version. If you have creative kids, encourage them to make their bracelet into something more interesting!
LEARNING OUTCOMES
At the end of this project, participants will. . .
- ◦ Recognize and properly use several different electrical components.
- ◦ Know how to construct a simple circuit and switch using nontraditional materials.
- ◦ Be able to use some simple sewing stitches.
- ◦ Gain a basic understanding of different electrical concepts such as conductivity, wattage, and other related topics.
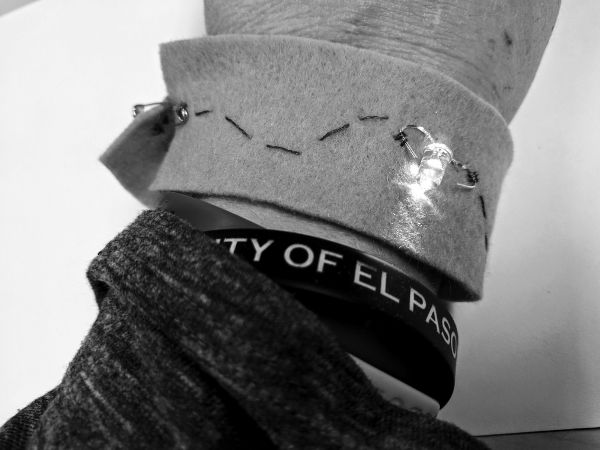
Rock your finished bracelet
RECOMMENDED NEXT PROJECTS
See my project “Create LED Origami Tea Lights” in the next chapter.