29
Create Your Own Catapults
LAURA BAKER / LIBRARIAN FOR DIGITAL RESEARCH AND LEARNING
Abilene Christian University Library
Type of Library Best Suited for: School, Public
Cost Estimate: $20 supplies per catapult; $500–$5,000 equipment
Makerspace Necessary? Yes
PROJECT DESCRIPTION
In this project, makers assemble a small catapult from precut pieces. They design how they will hold the projectile on the catapult and how the rubber bands will connect. After some shooting practice, groups see who can launch something the highest, the farthest, and the most accurately by landing an object into an empty box target. By tweaking the design and the way they launch an object, they discover how small alterations affect overall performance.
OVERVIEW
This is a project the Abilene Christian University Library does for its middle-school maker camp during the summer. It is a variation on the Angry Birds launchers that are popular with college engineering departments. By assembling and experimenting with a small catapult, kids learn about design and the trajectories of different objects. Some parts of the catapult are precut, but other pieces require decisions, a combination that works well with this age group of middle school students.
Kids can work on the catapults in groups of three or four to encourage collaboration. Have a large room or outside space available for test launching and for the final contest.
MATERIALS LIST (PER CATAPULT)
- ◦ Catapult pattern (available at tiny.cc/catapults)
- ◦ Sheet of plywood, ¾-inch thick
- ◦ Two pieces of wooden dowel, each 5 inches long and ¼ inch diameter
- ◦ Four screws (1.5-inch length)
- ◦ Projectile (wooden bead, dried bean, piece of hard candy, etc.)
- ◦ Box or trash can
- ◦ Decorating supplies (markers, stickers, glue, crepe paper, etc.)
NECESSARY EQUIPMENT
- ◦ Power drill/driver
- ◦ Sandpaper
- ◦ Band saw or CNC router (to precut catapult pieces)
STEP-BY-STEP INSTRUCTIONS
Preparation
Precut the pieces of the catapult using the pattern provided. Cut the pieces using a band saw or a CNC router. The circles inside the shapes indicate where a hole should go. Use a ⅝-inch drill bit (or something slightly larger than the wooden dowels) to make a hole completely through the pieces in the places indicated.
Assembling the Catapult
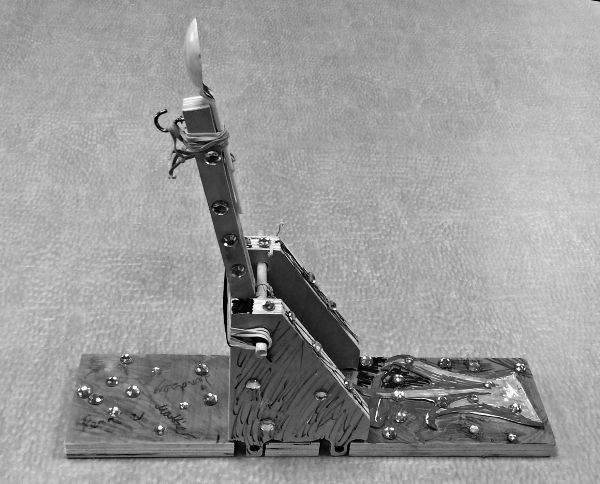
Use the photographs of the completed catapults to help you assemble the pieces. Have a completed catapult ready to show the makers how the parts fit together.
- 1. Distribute the pieces of the catapult. Have makers sand all the pieces to make them smooth.
- 2. Assemble and screw the sides. Insert the sides in the notches of the base and screw them in place using one screw in each notch.
Decorated catapult showing sides screwed at the base
Catapult arm mechanism
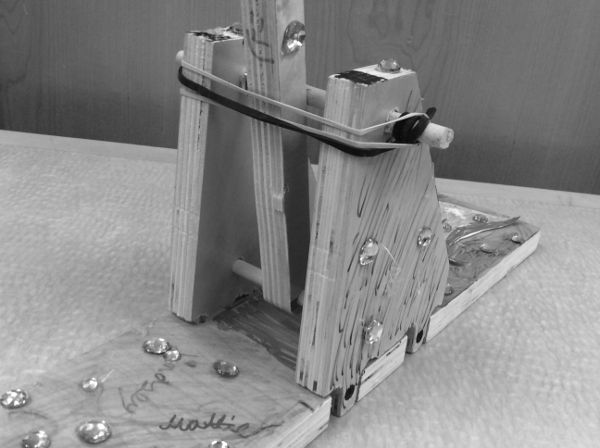
- 3. Assemble the arm. Insert one of the wooden dowel pieces into the lower hole on the side piece, through the hole in the catapult arm, and out the lower hole on the other side piece. This creates a hinge that lets the arm swing up and down.
- 4. Assemble the arm stop. Insert the other wooden dowel through the upper holes of the side pieces. This piece does not go through the arm. It acts as a stop for the arm to slam against when launching an object. About ½ inch of dowel should stick out on each side at the top.
- 5. Add the rubber bands. Hold the arm up so it rests against the stop. Thread a rubber band around the protruding outer end of the stop, stretch it past the back of the arm, and loop it around the other end of the stop. Have extra rubber bands for makers to experiment with tension.
- 6. Ask makers to decide how they will hold the projectile on the arm to launch it. Have cups, plastic spoons, cardboard, paper, and scissors ready to let them devise something. Some groups will want to decorate their catapults, too.
Shooting Practice
Go outside or to an empty hallway or long room.
Explain that you will test the catapults in three categories: height (measured vertically against a wall), distance (measured from the shooting line to where the projectile lands), and accuracy (whether a projectile can land in the target box or trash can in three attempts). Let the groups practice and make adjustments before doing actual trials. Keep it fun with lots of cheering on each attempt.
A key component of the activity is getting makers to realize how small changes in the design of the catapult affect how it performs. Encourage them to make informed decisions, not merely random ones. Leave plenty of time for the practice sessions, and ask them what they did and if it worked better or worse as a result.
Final Shots
Each group gets three rounds in each category of height, distance, and accuracy. Let people in each group take turns shooting, and have someone record the best of each attempt. Ask everyone to look at the catapults and try to guess what made the difference in that machine’s performance.
Catapult practice

Teacher’s Tips
- ◦ The placement of the projectile on the arm makes a difference. Things on the tip of the arm shoot better than things farther down the arm. A projectile that sits low in the bottom of the holder might not go as far as one that sits high on the edge.
- ◦ How far back someone pulls the arm before launching affects trajectory. There is an optimum angle. Anything farther than optimum wastes energy by launching upward instead of forward.
- ◦ Invariably, people will try to increase power by adding more rubber bands. It is possible to add so many rubber bands that it will break the arm or the wooden dowel that the arm hits against. Explain that every device has mechanical limitations that cannot be exceeded without damaging the machine. Either live within the limits, or modify the machine. Can you add padding to the arm or the dowel to absorb the shock? Can you use different material, like a metal rod instead of a wooden one, that will not break as easily?
- ◦ What happens if you extend the length of the arm with another piece of wood or by attaching a plastic spoon along the arm? The extra length affects distance.
LEARNING OUTCOMES
Through this project participants will . . .
- ◦ Learn to use hand tools, like drills and screws.
- ◦ Practice the scientific method of hypothesis, testing, and observation.
- ◦ Discover the relationships between mechanical design and energy, motion, and trajectory.
RECOMMENDED NEXT PROJECTS
This is a great project to accompany a history lesson about medieval machines, castles, and real catapults used for storming a castle. Partner with a history class in school or have lots of books ready about castles and catapults so makers can see how their object connects with history.