33
Build a Six-Piece Interlocking Burr Puzzle
ERIK CARLSON / LIBRARIAN I
White Plains Public Library
Type of Library Best Suited for: Any
Cost Estimate: CNC: about $2,000; Materials: about $4 per project
Makerspace Necessary? Yes (this could get messy)
PROJECT DESCRIPTION
The six-piece burr puzzle will get your makers to think more about how a CNC mill machine cuts, and how to draft out a diagram. There are some small challenges involved, and participants will use some problem-solving skills to cut the pieces out. It may take milling two or three puzzles before it comes out just right. Of course, you can lay it out for them, but that’s no fun. This program can be a bit nostalgic for older library users who used to play with wooden puzzles like these when they were younger, and interesting to younger people who enjoy puzzles and want to try making one of their own.
You can find diagrams online to download at www.craftsmanspace.com/free-projects/six-piece-burr-puzzles.html. These diagrams range from simple to complex. You can also find larger puzzles with more interlocking pieces if you and your makers are up for a bigger challenge. If you do not have access to a CNC mill machine, you can 3D print these pieces. The design process is fairly easy, but you can create some really colorful puzzles this way.
OVERVIEW
I teach this class in one 1.5-hour session with no more than five participants. By the end of the class, each person should be able to create the toolpaths for each of the puzzle pieces. A CNC mill machine will be able to cut out each puzzle piece fairly quickly. I ask participants to schedule time with me to run the machine. Alternatively, you can schedule a second session to mill the puzzle pieces.
MATERIALS LIST
- ◦ 48 × ½-inch square dowels
- ◦ Diagrams of burr puzzles
- ◦ Graph paper
NECESSARY EQUIPMENT
- ◦ CNC mill machine
- ◦ One computer for each participant
- ◦ Sandpaper
- ◦ Handsaw or table saw
- ◦ Chisel
NECESSARY SOFTWARE
- ◦ Basic CAM program, such as MakerCAM.com
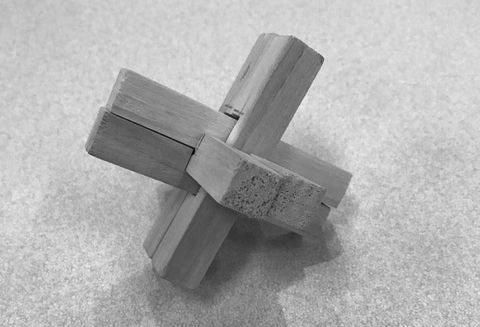
Completed CNC burr puzzle
STEP-BY-STEP INSTRUCTIONS
To get started, let’s cut our square dowels. Each participant will need six 3-inch pieces, but we should have a couple of extra pieces cut just in case.
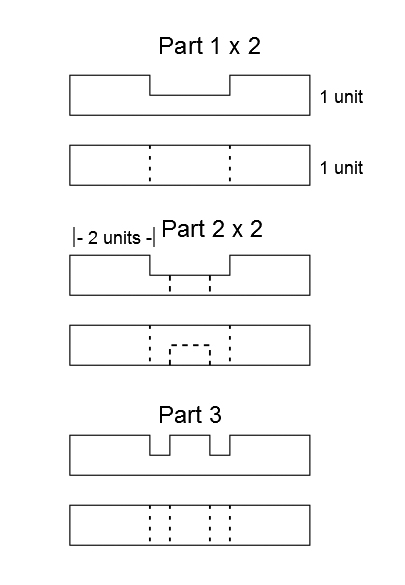
Choose a diagram to design and use graph paper to draw out the puzzle pieces. Here is the design that I am using for these instructions. For the complete puzzle there are two pieces for Parts 1 and 2, and one piece for Part 3. Part 4, the sixth piece, is left uncut and is used for solving the puzzle.
There are no measurements in this diagram, since the size of the cuts depends on the size of the dowels you are using. I cut the dowels into 3 inches to make the conversion simple since each piece can be broken down to three equal sections. So for Part 1, the first and third inches will be left uncut, and the middle inch will have a quarter-inch cut out of it. I draw out all three pieces on graph paper with the correct measurements.
Next, open MakerCAM.com. MakerCAM is free to use and runs off your browser, so you don’t need to download anything or create accounts. It is mainly used to create g-code, which is the program language that tells your CNC machine what to do. It has some simple design features that we are going to use to cut out our puzzle pieces with. There is a tutorial on the MakerCAM.com website that shows how to use the software.
Puzzle piece dimensions
We are going to use MakerCAM.com to add rectangles to the work plane. First find the intersection of the X-Y axis by using the “Hand” tool found at the top of the page. Each square on the grid is “1.” Click on “Insert” in the main menu and then choose “Rectangle.” Set the Width to 0.5” and the Height to 3” and click on “Ok.” This will give us the dimensions of the piece of wood we are going to cut. Next, place the Rectangle on the intersection of the X-Y axis. You can move pieces by highlighting them in red, then clicking and holding the mouse when it is placed on one of the lines. Make sure to zoom in on the grid so that the rectangle is placed right on the X-Y axis.
Now try to figure out how to add the first cut. You need to be able to see all of the negative space (area you are cutting out) as a shape, namely a rectangle. The first cut is a one-inch rectangle in the middle of the dowel. You will probably add a rectangle with a Width of 0.5 inch and a Height of 1 inch. This is fine, but the trick is to have the cut wider than the dowel in order to have a clean cut when the machine is finished. The dowel is 0.5 inch wide, so the cut should be 0.75 inch wide. When you teach a class this, you can have them discover this for themselves after they mill the first piece.
Now we will add the toolpath. Click on “CAM” on the main menu and then choose “Pocket Operation.” Here is where they will add the depth, “0.25.” I set the “Step Down Rate” to 0.03125” and I am using a 0.125” mill bit. I also change the “Feedrate” to 30, and the “Plungerate” to 10. Click on the “View Cuts” box in the upper right of the screen. Then go back to “CAM” and select “Calculate All.” You should see the cuts that the machine will make. Go back to “CAM” and select “Export Gcode” to save your work.
Go through this process to create the toolpaths for the next two pieces. The trick to Part 2 is using the same toolpath from Part 1 and then adding a toolpath for a smaller rectangle that is 0.25 × 0.5 × 0.25 inches. You will also need to figure out which toolpath to run first: the large rectangle from Part 1, or the small rectangle that they added for Part 2. The first time I tried to cut Part 2, I had to draw out the negative space on the piece of wood. This is a good way to visualize the cut. Depending on how you place the piece of wood, you may need to chisel out the corners so they come out square. This will be another learning experience for you, and you may choose to recut an extra piece.
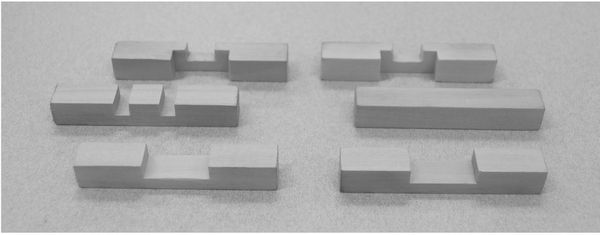
Finished puzzle pieces
For Part 3 you will add a rectangle 1 inch up from the bottom and 1 inch down from the top. Both cuts are 0.75 × 0.25 × 0.25 inches (make the width wider than the piece of wood by 0.25 inch to get a clean cut across).
When you have finished creating the toolpaths and saved them, you are ready to cut the pieces. Clamp the wood down, set up your CNC machine, and show them how to send their g-code to your CNC machine. I use a Shapeoko 2, so to operate the machine I use GRBL software.
When all five pieces have been cut, follow the instructions to assemble the puzzle. These can be great gifts or a fun way for participants to challenge their friends.
LEARNING OUTCOMES
Participants will learn:
- ◦ To create toolpaths with CAM software
- ◦ To set up and operate a CNC mill machine
- ◦ Problem solving-skills
- ◦ Drafting and proportions
RECOMMENDED NEXT PROJECTS
Once you are comfortable with this design, you can challenge yourself to cut out more pieces for a more complicated puzzle, and then try a nine-piece puzzle.