34
Create a Cardboard Sculpture Using a Laser Cutter
JACQUELINE R. MITCHELL / CREATIVE PRODUCTION LAB MANAGER
University of Nebraska at Omaha Criss Library
Type of Library Best Suited for: Any
Cost Estimate: $20–$30 ($5,000–$10,000 for laser cutting method)
Makerspace Necessary? No
PROJECT DESCRIPTION
This project guides you through the process of converting a 3D file to a physical 3D model using a flat medium such as cardboard. The best way to complete this project is to use a laser cutter within a makerspace. However, if you have patience and a knack for cutting, you can use a box cutter or X-ACTO knife and a cutting mat. This may limit you in how intricate you can get with your model and it is more time-consuming. If you are using this method, I highly recommend starting with very basic shapes. A laser cutter may be a worthwhile investment if you plan to conduct many of these types of projects in the future.
OVERVIEW
Patrons find a 3D model, then import the model into the recommended software. They assign their build settings according to their preferences and the limitations of their medium.
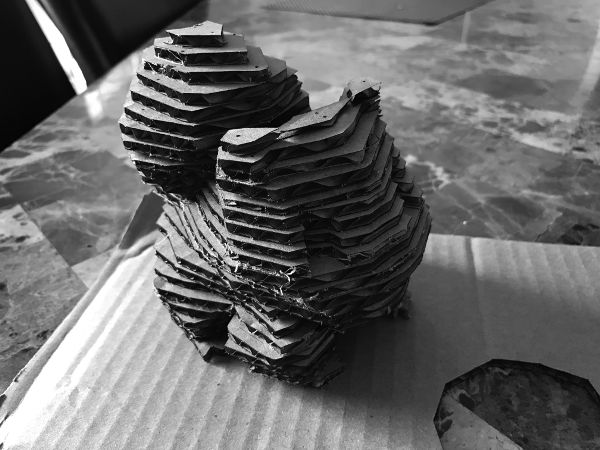
Laser-cut cardboard sculpture
MATERIALS LIST
- ◦ Cardboard
- ◦ Glue
NECESSARY EQUIPMENT
- ◦ Computer
- ◦ Laser cutter, if available. If unavailable, follow box cutter method.
- ◦ 123D Make (123dapp.com/make) (As of 2017, 123D Make has changed to Slicer for Fusion 360. This tutorial is still applicable to the new software. Download here: http://tinyurl.com/yay7gsp8.)
- ◦ Calipers (if needed to measure depth of cardboard)
- ◦ X-ACTO blade or box cutter, if not using a laser cutter
STEP-BY-STEP INSTRUCTIONS
- 1. Find your 3D model. You can build a 3D model with free software like Tinkercad or Sketchup. You can also find creative commons models on sites like Yeggi.com. For your first project, I recommend a simple model.
- 2. Open up 123D Make and go to “Import” in the upper left-hand corner and select your design. You should be able to see the full model in the preview window.
- 3. Take a look at the settings to the left of the object. Here you can set the object size. The bigger you make your object, the more details you will see in the final design. However, you want to make sure your object will fit the size of your cardboard and laser cutter or paper, so be careful not to exceed those dimensions.
- 4. Set your “medium size.” This option is located right above “object size.” You can select an option from the list or create your own by clicking the pencil. If you choose the box cutter method for this project, you will want to set this size to the size of your printer paper. For the laser cutter, set the size to your cardboard pieces, making sure those pieces will fit into the bed of your laser. Use the calipers to measure the thickness of your cardboard material if needed, and enter that into the space for thickness. You can also adjust the margins here as well.
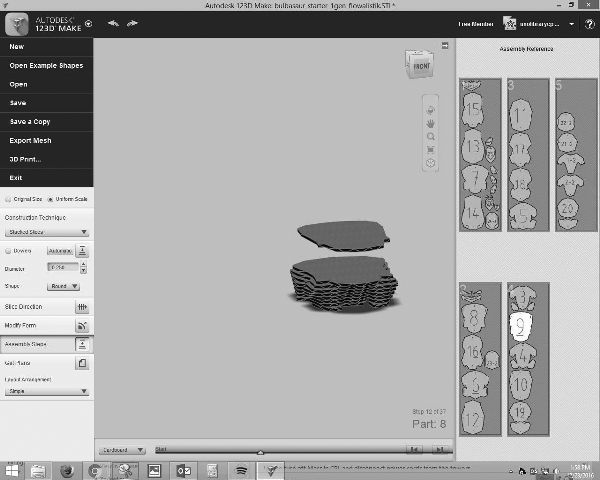
- 5. Take a look at all of the construction techniques listed below “object size.” For this one, we will use stacked slices. Go to Assembly Steps, select “cardboard” at the bottom, and use the slider to slide through the object layer by layer. When the slider reaches a certain layer, you will see it become highlighted in the Assembly Reference to the right. In these settings, you can also add dowels for easier assembly, change the slicing direction, and modify the form.
123D Make assembly reference
- 6. If everything looks okay, go to Get Plans on the bottom left. If you plan on using a box cutter, PDF will be fine to use. For the laser cutter, select either EPS or DXF. This is based on personal preference and the requirements of your machine.
- 7. Cut your pieces. For the box cutter/X-ACTO method, you will have to print each of the PDFs that are generated. You can cut out the individual pieces, then trace them onto the cardboard. Use the box cutter to cut them out. You will want to copy the numbers of the individual pieces on the new piece to prevent confusion when assembling. For the laser cutter, simply open the EPS or DXF and change the settings to match your laser cutter’s requirements. This will vary per machine, so it is important to have a good understanding of how your machine operates when attempting this project. If you selected dowels, use a sturdier material such as wood to make them. You can still use cardboard for the layers. If you can, keep the pieces contained within the cardboard because it is easier to assemble later.
- 8. Assemble the pieces. I like to assemble the pieces prior to gluing, so I make sure everything looks okay before the real deal. This is when your software really comes in handy. Reference the assembly steps from your model in 123D Make to have a layer-by-layer guide. Follow the software and numbers and you will have it together in no time! When you feel confident in your assembly, glue the pieces together. Now you have a 3D object you created on your own!
LEARNING OUTCOMES
- ◦ Patrons learn how software can slice 3D models into layers.
- ◦ The project provides a great visualization and conceptualization tool showing how virtual 3D models can be translated to the physical world.
- ◦ Patrons now have an understanding of how 3D printers interpret 3D models in order to print them.
RECOMMENDED NEXT PROJECTS
Patrons can experiment with more complicated designs they model on their own or find online. Additionally, they can test different construction techniques to see how they compare with the method used in this example. If your library has capabilities for 3D scanning, patrons could scan objects, then replicate them with cardboard. Though not as cost-effective, media such as wood and acrylic can be used in place of cardboard for future projects with the laser cutter.