38
Scribble Droid: Making a Robot out of Found Objects
LAURA BAKER / LIBRARIAN FOR DIGITAL RESEARCH AND LEARNING
Abilene Christian University Library
Type of Library Best Suited for: Public, School
Cost Estimate: $40–$50 per group of 10 makers (not including optional solder equipment)
Makerspace Necessary? No, unless using solder
PROJECT DESCRIPTION
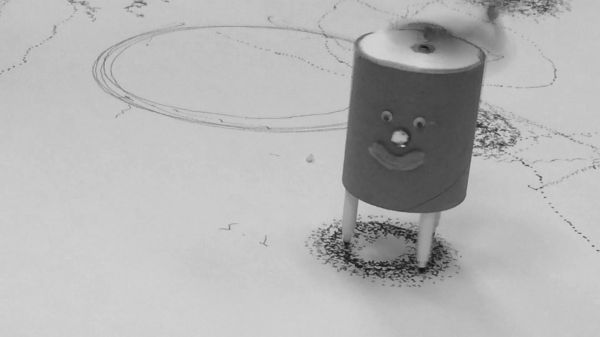
In this project, makers will use a combination of new and recycled objects to create a motorized device that scribbles by itself as it moves across a flat surface. Makers will take apart a small toy to reveal the motor inside. Repurposing the motor, they will wire it to a battery to make a complete circuit and will modify the motor to make it vibrate as it spins. The droid’s body is made from cups, cardboard tubes, and other items from the recycle bin. The legs are made from felt-tipped markers. When the offset motor is attached to the droid’s body, the vibration causes the droid to bounce and spin in a unique pattern, leaving a colorful marker design in its wake.
Scribble Android video at youtu.be/KVR-ac04qjc

OVERVIEW
During the summer, the Abilene Christian University Library holds a 2–3 day Maker Camp for kids. This activity is geared toward 4th–6th grade kids and middle schoolers, but we have also involved adult teachers and college students who want a fun way to learn basic circuitry. The activity can take 4–8 hours depending on how much kids decorate and tweak their androids.
This project is an interesting combination of new and recycled objects. It also combines the mechanics of circuitry with the aesthetics of decorating the android’s exterior, creating a fun merging of engineering and art.
For the toy to take apart, we have used inexpensive objects like battery-powered toy cars or pocket fans from the dollar store. Instead of repurposing a toy motor, however, the library can buy motors in advance.
MATERIALS LIST (PER MAKER)
- ◦ Mechanical toy for repurposing or buy a motor:
- — https://www.amazon.com/dp/B01HQH36AK (with wires)
- — www.mcmelectronics.com/product/28-12811 (no wires)
- ◦ Two AA batteries
- ◦ Thick rubber bands
- ◦ Felt-tipped markers
- ◦ Strong tape such as duct tape, painters tape, or even book tape (masking tape can work if used generously)
- ◦ Clean recycled containers (water bottles, empty yogurt containers, cardboard mailing tube cut into four-inch sections, packing foam chunks, etc.)
- ◦ Paper for the android to draw on
- ◦ Decorating supplies: crayons, markers, stickers, cardboard scraps, pipe cleaners, bits of fabric, yarn, wooden craft sticks, and so on
NECESSARY EQUIPMENT
- ◦ Hot glue gun
- ◦ Scissors
- ◦ Screwdrivers
- ◦ Optional: soldering irons and solder, extra wire, wire cutters or knife for stripping wire
STEP-BY-STEP INSTRUCTIONS
- 1. Use screwdrivers and scissors to take apart a small mechanical toy. Find and remove the motor inside. The motor will have two wires coming from it. You may need to re-solder the wires to the motor or replace them with newer, longer wire for more room later on. If the library purchased a motor, you can skip this step.
- 2. Connect the AA batteries to each other. Place two AA batteries side by side with the positive end of one battery up and the negative end of the other battery up. Tape them together so they form a pack. Cut a small piece of new wire about two inches long. Using a knife or wire strippers, remove the insulation from both ends of the wire. Solder one end to the positive node of the first battery and the other end to the negative end of the second battery. You should now have a battery pack with a small loop of wire joining the batteries at one end.
- 3. Connect the motor to the battery pack. Attach the wires coming from the motor to the free ends of the batteries, the ends that are not connected by the loop of wire. Solder one motor wire to the free positive end of one battery. If not using solder, hold the wires in place with tape or a wide rubber band. Connect the other motor wire to the free negative end of the second battery. As soon as the second wire touches the battery, the motor should run. Secure this second wire with tape or a rubber band so you can remove and reconnect it at will to turn the motor off and on. Congratulations! You have just made a complete circuit.
Wires connecting motor and batteries

- 4. Add something to the motor shaft to offset the motor. The motor needs to spin something off balanced so it will vibrate enough to move the droid. Wads of tape, craft sticks, or a small washer work well. If gluing, be sure not to get glue inside the motor.
- 5. Build the android body. Empty water bottles, upside-down plastic cups, and portions of mailing tubes work well. Have fun decorating the droid with stickers, pipe cleaners, and other supplies.
- 6. Attach the felt-tipped markers for legs or arms. Make sure the android can stand by itself.
- 7. Strap the motor and battery pack onto the android. Make sure the propeller has enough room to turn without hitting the robot.
- 8. Connect the wires to turn on the motor. The vibration should cause the android to bounce along on its marker legs and draw interesting patterns on a piece of paper.
- 9. Experiment with different placements for the motor, different heights of the marker legs, and different weights of propellers. Each change will create a new scribble pattern.
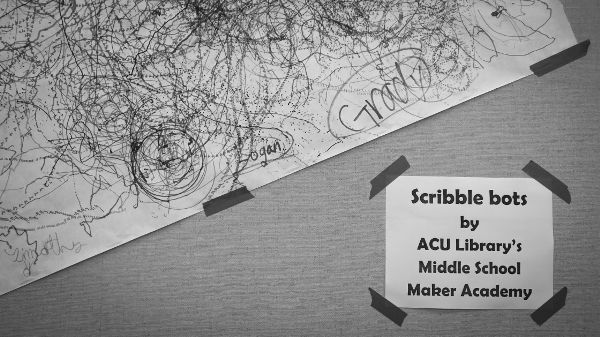
- 10. For extra fun, unroll a long length of butcher paper and tape it to the floor. Have several of the scribble droids drawing at the same time. Be sure to display the finished artwork in the library to showcase what your makers did.
Scribble art display

LEARNING OUTCOMES
- ◦ Explore new uses for everyday objects.
- ◦ Combine low technology with high technology to form new objects.
- ◦ Learn how to wire a complete circuit and to fix broken circuits.
- ◦ Investigate variables of balance, motion, weight, speed, and direction upon movement patterns.
- ◦ Appreciate how both art and mechanics work together to make a pleasing design.
RECOMMENDED NEXT PROJECTS
Add a switch to the motor/battery circuit to make it easier to turn on and off. The switch goes between one of the wires going from the motor to the battery. You can buy a switch from an electronics store or make your own using a paper clip or other metal object that you clip or unclip to the wire to complete the connection.