41
3D Printing and Robotics: Hooks and Hammers
MICHAEL CHERRY / TEEN AND YOUTH LIBRARIAN
Evansville Vanderburgh Public Library
Type of Library Best Suited for: School or Public
Cost Estimate: $5,000–$10,000 (less if library has 3D printer)
Makerspace Necessary? No
PROJECT DESCRIPTION
The Hooks and Hammers Challenge requires students to build their own Lego Mindstorms rover. In addition to building the automated vehicle, students are tasked with designing a hook or hammer that can be 3D printed and attached to the vehicle. The robot vehicles are programmed and challenged to complete simple tasks, such as ringing a desk bell with a hammer or picking up an object with a hook. This project requires a combination of engineering, computer programming, and computer-aided design.
OVERVIEW
The Hooks and Hammers Challenge was originally introduced as part of a robotics club at the Evansville (Indiana) Vanderburgh Public Library (EVPL). Over the summer, the EVPL hosts robotics camps at several locations throughout its eight-branch system. During the school year, the library offers a six-week robotics club on a seasonal basis. The Hooks and Hammers Challenge was designed for a robotics club offered to 5th–8th grade students. Students attending the club met once a week for a total of six weeks. This project takes multiple 90-minute sessions to complete and is described below.
MATERIALS LIST
- ◦ Desk bell
- ◦ Bulls-eye images
- ◦ Videos and books
NECESSARY EQUIPMENT
- ◦ 3D printer
- ◦ PLA filament
- ◦ Laptops
- ◦ Tinkercad account and Internet connection
- ◦ Lego Mindstorms software
- ◦ Lego Mindstorms NXT 2.0 and EV3
STEP-BY-STEP INSTRUCTIONS
Day 1
Introduce students to rovers by showing them videos of the Mars rovers Spirit, Opportunity, and Curiosity. Two great videos accessible via YouTube include the Science Channel’s “How Does NASA’s Curiosity Rover Work?” and NASA’s “A Tale of Two Rovers.” The former describes how the car-sized robotic rover explores the Red Planet. It illustrates how Curiosity is engineered, from its computer to its massive arm and eighteen cameras. The latter video explores Curiosity’s much smaller predecessors, Spirit and Opportunity. Additionally, a fascinating book that can accompany these videos is Alexandra Siy’s Cars on Mars: Roving the Red Planet.
After watching the videos, engage students by prompting them with discussion questions. For example, are there other ways that rovers or unmanned ground vehicles aid at certain tasks? Are there any industries that make use of robotic rovers other than aerospace? Discussion may center on the use of rovers for safety and rescue, surveillance, and other applications. Following the discussion, students are required to build a Lego Mindstorms rover. They can either build one from scratch or follow the building instructions for the 5-Minute Bot on the website www.nxtprograms.com. The chassis and wheels of the robot should be built by the end of the first program.
Day 2
Students engineer an arm that will attach to the chassis of their robot. The arm is controlled by an additional motor and will later include the 3D-printed hook or hammer. It is best to limit students to one additional motor that will control the movement of the arm. Students can also use gears and experiment with different gear ratios that transfer motion and power to the arm. Once the arm is built, it is attached to the base of the robot. Additionally, students may modify the base by adding other features.
Day 3
Students’ robots should be completely built by the third program, with the exception of the 3D-printed hook or hammer. Begin class by discussing and comparing the students’ designs. For example, compare how each student designed the robotic arm and discuss principles such as weight and balance. Following a brief discussion, introduce students to the Hooks and Hammers Challenge. Students are tasked with designing and 3D printing a hook or hammer that can be attached to their robotic arm. To facilitate this process, introduce students to Tinkercad and screen the Autodesk “Tinkercad Tutorial” that is accessible via YouTube. This short video describes Tinkercad and demonstrates how to use a set of geometric shapes to create models. The Hooks and Hammers Challenge is a great introductory project involving computer-aided design. It allows students to move and rotate basic shapes, stack solid objects, and use shapes to add or remove material.
Furthermore, describe how engineers use 3D printing as a way to quickly test and fabricate ideas. In this case, students fabricate a machine part that can be added to their robot. It is used to help them test a concept or solve a problem.
Day 4
The hooks and hammers are printed outside of class between the third and fourth week. Each print takes on average sixty minutes to print. Librarians can set up a 3D printer in class to demonstrate how this process works. Once students have attached their 3D prints to their robots, demonstrate how to program the robots using the Lego Mindstorms software. Students who designed a hammer must program the Lego robot to drive forward using the move block and corresponding motors. Upon reaching the desk bell, the arm is programmed to raise and strike down on the bell. Similarly, students completing the hook challenge program their robot to move forward using the move and wait blocks. Upon reaching a small object, the hook lifts the object up and drives toward a bulls-eye, placing the object in the center of the eye.
After mastering these programs, students reprogram their robots by adding additional blocks. For example, students completing the hammer challenge may want to strike the desk bell more than once. Students completing the hook challenge may want to add a sound block indicating victory upon completion. A sample video of the hook challenge can be accessed via YouTube by searching “Hooks and Hammers at the EVPL.”
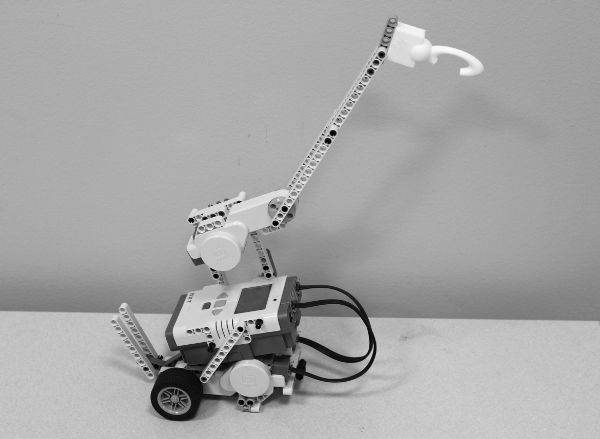
Robot with 3D-printed hook
LEARNING OUTCOMES
- ◦ Students learn about rovers and design and build a Lego Mindstorms rover of their own.
- ◦ They discover how unmanned ground vehicles help with space exploration, safety and rescue, and surveillance, among other applications.
- ◦ Students design and 3D print a hook or hammer for their Lego robot.
- ◦ They program the robot to successfully complete the Hooks and Hammers Challenge.
RECOMMENDED NEXT PROJECTS
Students can build another Lego Mindstorms robot that requires a 3D-printed part of their choice.