42
Create a DIY Raspberry Pi Bar Code Scanner
TOM TRAN / SYSTEMS LIBRARIAN, LIBRARY TECHNOLOGY DIRECTOR
Minnesota State University, Mankato Memorial Library
Type of Library Best Suited for: Any
Cost Estimate: $100
Makerspace Necessary? No
PROJECT DESCRIPTION
We will be configuring a Raspberry Pi camera module to read bar codes or QR codes. Libraries use different types of bar codes attached to books and other items. This project is great for students to learn Python programming, LINUX commands, and downloading and installing software.
OVERVIEW
In order to use the camera as a bar code scanner, you will learn how to configure the camera for the Pi. Participants will learn some general concepts of downloading LINUX software and installing it on the Pi. Participants will learn LINUX commands to configure software to read and translate bar codes and/or QR codes.
For this project, participants will be installing the SimpleCV software. SimpleCV is an image-processing software to perform image manipulation and recognition. Its scanner can read bar codes and QR codes. Participants will also be installing the ZBar library. ZBar is a module that provides an interface to the bar code reading library. And finally, participants will be installing User space Vide04LINUX (UV4L), which is a collection of modules for cross-platform drivers for audio and video streaming and output devices.
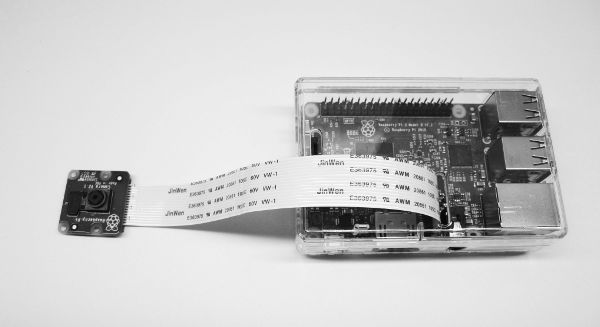
Raspberry Pi bar code scanner

The programming language we will be working with is Python, which is an easy-to-learn programming language. It can be used to create web pages, apps, and games. The Python script takes in the video feed from the camera and then compares it against the installed libraries to translate and display the bar code or QR code. The output will be displayed onto the screen
MATERIALS LIST
- ◦ Sample bar codes and QR codes
NECESSARY EQUIPMENT
- ◦ Raspberry Pi 3 model B running Raspbian OS (Debian Jessie version)
- ◦ Camera module v2 (Sony IMX219 8-megapixel sensor)
- ◦ Internet connection or Wi-Fi
- ◦ Monitor, keyboard, mouse, and cables
STEP-BY-STEP INSTRUCTIONS
- 1. Enable the camera on the Pi
- a. Connect the camera to the Pi (see your owner’s manual)
- b. Boot up Pi
- c. Open the terminal window
- d. Type the following command at the prompt: sudo raspi-config
- e. The raspi-config window will pop up. Select Enable Camera
- f. On the next screen, “Would you like the camera interface to be enabled?” Enable the camera by selecting <Yes>
- g. The camera interface is enabled. Select <OK>
- h. Select <Finish>. The system will prompt you to reboot the Pi. Go ahead and reboot.
- 2. Installing SimpleCV on the Raspberry Pi
- a. Open the terminal window
- b. Type the following commands in the terminal window to download the necessary updates and dependencies
- You will be prompted to continue [Y/n], enter Y
- This will take a few minutes to install.
- c. Installing SimpleCV from github
- d. Installing svgwrite:
- 3. Installing the ZBar library
- a. Open the terminal window
- b. Install updates and install python-zbar
- 4. Installing uv41
- 5. Create your Python file, read.py
- You will use the pico editor to create a Python file called read.py
- Type the programming codes and save the file
- Save the file and exit
- ^O WriteOut
- ^X Exit
- 6. Running the program
- a. Open the terminal window
- b. One way to run a Python script in the terminal window is to type the following command: python read.py
Place the bar code or QR code you want to scan in front of the camera. The bar code data or QR code will be displayed.
Sample QR code

LEARNING OUTCOMES
Through this project, participants will . . .
- ◦ Learn to use some LINUX commands to download and install updates and software.
- ◦ Learn about different bar codes used in libraries.
- ◦ Create and execute a Python script to read bar codes and QR codes.
RECOMMENDED NEXT PROJECTS
- ◦ A follow-up project to this might be to have participants 3D print cases for Raspberry Pi, a camera enclosure, and the mount stand for the Pi.