54
Turn Yourself into a Chocolate Lollipop!
SIENNA CITTADINO / TEEN LIBRARIAN
Carnegie Library of Pittsburgh
Developed by Sienna Cittadino, Sondra Hart, and Amalia Tonsor
Type of Library Best Suited for: School or Public
Cost Estimate: $2,000–$4,000 for all equipment and supplies
Makerspace Necessary? No
PROJECT DESCRIPTION
Around Valentine’s Day, library patrons are on the lookout for sweet ways to flex their creative muscles! Every participant in this program will walk away with a 3D replica of their head made of chocolate and attached to a lollipop stick. This project satisfies all sugar-related needs while also teaching a whole suite of interesting skills. If your patrons have interests ranging from food science to 3D modeling and you’re looking for a way to engage them, this project may be the answer. Depending on your participants’ comfort level, the entire process can be hands-on, or you can save some of the more precise procedures for time between program sessions. Be sure to save plenty of time for this program—using food-safe silicone is inspiring, but professional-grade materials require plenty of patience and testing.
OVERVIEW
The program consists of three main sections: capturing and printing the scanned 3D busts, creating the food-safe silicone molds, and making chocolates out of the finished molds. The first and third sections are ideal for drop-in programs, but the mold creation process is best saved for more structured learning environments and older participants. Set aside at least three days of program time. Above all, be ready to experiment and adapt. This program involves a lot of trial and error and has an adventurous spirit.
MATERIALS LIST
- ◦ Food-safe silicone mold-making kits
- ◦ Chocolate chips (consider allergies)
- ◦ Popsicle sticks
- ◦ Paper plates and cups
NECESSARY EQUIPMENT
- ◦ Computer or laptop
- ◦ Xbox Kinect or other 3D scanner
- ◦ Skanect software or other software for processing 3D scans
- ◦ Autodesk Meshmixer software
- ◦ 3D printer and PLA filament
- ◦ Laboratory or jewelry scale
- ◦ Induction burner and saucepan
- ◦ Measuring spoons or cups
- ◦ X-ACTO blade
STEP-BY-STEP INSTRUCTIONS
Step 1: Scan the Participants to Create 3D Busts
To capture the 3D scans of participants, you will need equipment that can perform a 3D scan and software that can process and edit the scans. A great option for performing the scans is Xbox Kinect. The accompanying Xbox is not required to use this device, and some libraries may even have one on hand if they bought an Xbox for gaming in recent years.
A popular and affordable option for the software is Skanect. So long as you are utilizing Skanect for noncommercial use, the free version has plenty of power to fuel this project. Simply download Skanect to your computer (Mac and PC versions are available) and create a “New” scan. Most of the default settings are fine, but it’s worth setting the “bounding box” to the rough size of the area you’ll be scanning.
After that, record the scan of the participant’s head. It may take a few tries to get the hang of the scanning process, but participants will likely enjoy figuring this out with the program facilitators. The rest is fairly straightforward, but stay open to experimentation. Be careful with the settings in the “Process” phase, because they can sometimes ruin a perfectly good scan. Export the scan to an .stl file and you should be almost ready to print!
Step 2: Tweak or “Fill in” the Scan
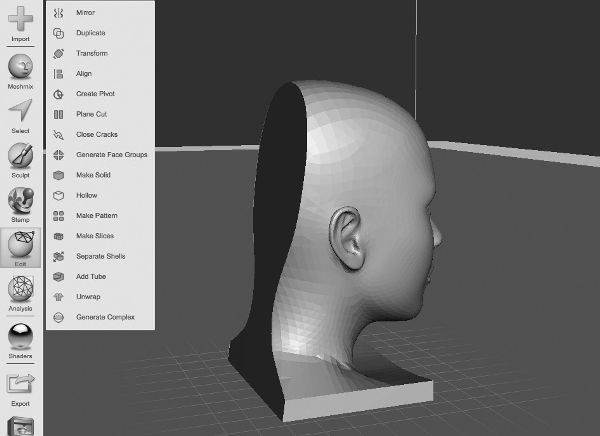
In some cases, the scans from Skanect or similar software end up “hollow.” The .stl files will have holes and gaps that make them hard or impossible to print. If this is happening, consider using a free program like Autodesk’s Meshmixer to fill in the .stl file. It has straightforward functions and can be used in future 3D printing programs. The “Make Solid” function can do wonders on a troublesome scan. Additionally, using Meshmixer will allow you to cut a flat plane onto the back of the scanned bust (removing the back of the head). While not necessary, this will make the final product neater and easier to remove from the mold.
A 3D bust with a flattened back plane in Meshmixer

Step 3: Load the .stl Files to the 3D Printer and Print
Once you have a satisfactory .stl file of the scan, load it up to print. Most 3D printers come with software for loading and editing the prints. Be sure to resize the print, if necessary. The silicone molds are pricey, so shoot for smaller busts. About 1.5 inches in height and 1 inch wide works well. The distance from the back of the bust to the tip of the nose should not be much longer than an inch. Once the size is set, print!
Step 4: Mix Silicone Molds
All previous steps must be completed before you begin this step. Depending on the age of your participants, the amount of time you have to do the program, and your ability to accept things going very, very wrong, it may be best to do this step on your own, splitting the program into two sessions. Set aside at least fifteen minutes for each mold.
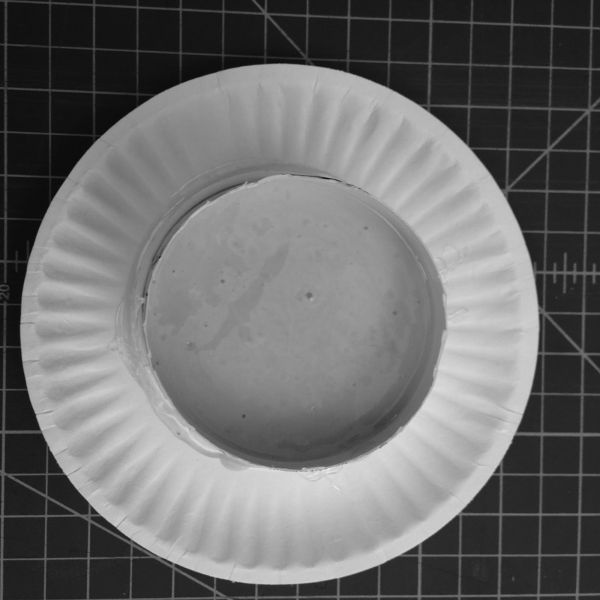
Create the mold containers with simple paper plates and cups. Cut the wide part (near the mouth) of the cup so you have a piece about two inches tall. Glue the wider end to the plate with hot glue. This is the container for your mold. Hot glue the 3D-printed bust with the nose facing up against the plate as best you can. If you cut off the back of the bust to a flat plane using Meshmixer, this step will be easier.
Closely following the instructions provided with your food-grade silicone, mix the components together. You will need a very precise scale and measuring equipment, as well as plastic spoons for mixing.
Once the mix is ready, pour it over the bust until the bust is completely covered. Wait at least a minute to see if some of the mold mix settles and exposes the nose or other parts of the face. Add at least a centimeter or two of silicone mold mix above the tip of the nose. Once completely covered, move to a safe location. Allow to dry for at least as long as the instructions specify.
Step 5: Remove the 3D-Printed Busts from the Molds
This step is simple but crucial. Carefully cut the cup and the solidified silicone mold away from the paper plate. Using a small knife or blade, cut away the silicone mold that is covering the 3D bust on the flat side that was against the plate. Then, using plastic utensils or a dull pair of scissors, remove the 3D-printed bust. Once it is out, you should see a very detailed mold of the bust! At this point, you can also notch the mold near the base of the neck or chin to create a slot for a lollipop stick.
A deceptively firm silicone mold in its paper cup and plate holder

Step 6: Melt the Chocolate and Create the Lollipops
If you chose to do the silicone mold portions of the program on your own, outside of actual program time, this is the step to bring back to the public. Using an induction burner (essentially a hot plate that meets most building safety codes), heat up some chocolate chips in a saucepan. The chocolate will melt very quickly, so have the molds ready, with Popsicle sticks inserted into the notches. Once melted, carefully pour the chocolate into the molds. Have someone take the molds to a refrigerator, and let the molds sit for about thirty minutes. If you have access to a freezer, you can cut this down to about fifteen minutes.
If you incorporated Popsicle sticks, be very gentle while removing the chocolate. Slowly pop the chocolate busts out of the molds, and wonder at the near-perfect likenesses of your participants! Participants can either eat the chocolates right away, or wrap them in cellophane and give them to friends and family. Depending on how much chocolate you’re able to buy, the molds can produce chocolate busts over and over.
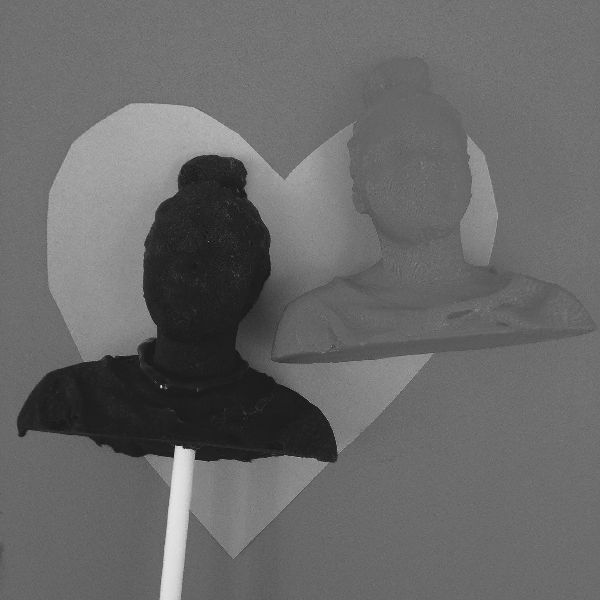
A finished lollipop and 3D-printed bust

LEARNING OUTCOMES
- ◦ Participants gain a better understanding of interdisciplinary projects. The chocolate lollipops demonstrate how tools and technologies from various industries can come together to create a single end product.
- ◦ Participants gain hands-on experience with 3D scanning, 3D printing, and food preparation.
- ◦ Participants learn to follow procedures while thinking critically to overcome roadblocks.
RECOMMENDED NEXT PROJECTS
Libraries may want to continue offering 3D scanning as a regular program offering. Try to use the 3D scanner and printer for practical purposes, leading sessions in which participants brainstorm an object that they could scan, modify, and print that would improve the library in some way. The 3D lollipops can also serve as an introduction to entrepreneurial programs. Since the lollipops can be packaged in cellophane and sold, participants can delve deeper into the world of marketing, creating merchandise, and graphic design.