57
Create 3D Prints on Fabric
HANNAH POPE / EMERGING TECHNOLOGIES LIBRARIAN
Appalachian State University
Type of Library Best Suited for: Any
Cost Estimate: $50 for 30 people (assuming the library already has a 3D printer)
Makerspace Necessary? No, but a computer lab would be ideal.
PROJECT DESCRIPTION
3D printing is a natural fit for makerspaces, but it can be used for more than just printing out spare parts or action figures. This project looks at 3D modeling and how the combination of 3D printing and sewing can enable libraries to create something that is unique to each library patron.
OVERVIEW
Users will learn the basics of 3D modeling, how to customize a design, and a technique for printing on fabric to accent their clothing. Patrons will be able to design something that they will add to the cuff or collar of their clothing, then learn how to print that onto tulle, lace, or net fabric. This technique can be applied to many other textiles projects including handbags, hats, and shoes. There is no limit to the ways that patrons can incorporate their 3D design work into their clothing, and this project is a great way to introduce participants to the world of e-textiles and wearable electronics.
MATERIALS LIST
- ◦ One yard of tulle, lace, or net fabric
- ◦ Standard thread of any color
- ◦ Large clips or clamps
- ◦ Filament—PLA or ABS, any color
NECESSARY EQUIPMENT
- ◦ 3D printer with heated print bed
- ◦ Standard sewing needles
- ◦ Scissors
- ◦ Computer lab with Internet access
STEP-BY-STEP INSTRUCTIONS
Step 1: Design
The first step in creating a successful 3D modeling project is to sketch out the intended design on paper. When designing for 3D printing on fabric, it is important to keep in mind a few key things:
- ◦ The fabric will be able to conform to the garment, but not necessarily the 3D-printed object on that fabric. Create designs and patterns that leave enough room to allow the fabric to be sewn on without breaking the 3D print. An example of something that would cause breakage would be a vine-like pattern. Non-connecting geometric shapes tend to work best for beginners.
- ◦ Design for the garment that you are accenting. Don’t create a design that is too big for your cuffs or collar. Make sure that the 3D print will work in the space available. This may mean measuring first.
Librarians can also use some of the premade designs available through this link: https://goo.gl/aLBEAG. Once you have created your design on paper, it is time to make it 3D.
Step 2: 3D Modeling
3D modeling can take time and effort to master, but a good place to start is with AutoDesk’s Tinkercad. This program is very useful for teaching patrons the basics of 3D design because it not only is simple to use, but it’s web-based. Users will be able to use the Internet in the computer lab to create Tinkercad profiles and start designing. There are also many shortcuts and tutorials available to help patrons learn this program. If you already have knowledge of another 3D modeling program, that can be used to create your design.
For patrons who are new to 3D design and Tinkercad, it may be useful for them to experiment in the program individually. Excellent Tinkercad resources can be found at Tinkercad.com and a shortcut sheet is available at http://bit.ly/2gEJDII. Librarians also have the option of preparing designs ahead of time, or using the ones available at https://goo.gl/aLBEAG.
Step 3: Create!
Once the patrons have sketched out their designs and begun to learn Tinkercad, have them produce their designs. They can use the premade designs, or “remix” them in Tinkercad, which gives the participants a chance to customize their designs. This will be the area with the biggest learning curve for those who have not used 3D design software before.
Step 4: Print
Those who have a 3D printer know that prints can take a long time. For this activity, participants will want to print their designs right away, but it is best to print them in between sessions. Because of the time involved, librarians and staff should consider breaking this activity into two sections; one for the 3D design of the pattern for their garment, and the other for the sewing portion.
3D printing on the actual fabric is relatively easy. First, make sure that the printer you are using has a heated print bed. This is important because the heat helps the plastic stay malleable while the fabric is being placed onto the bed. Next, if you are comfortable correcting g-code, add a pause after the second layer of the design. If you are not so comfortable, make sure that either the slicing program or the printer itself has a pause option. Then send the design to print. Once the print has completed two full layers, pause the print job.
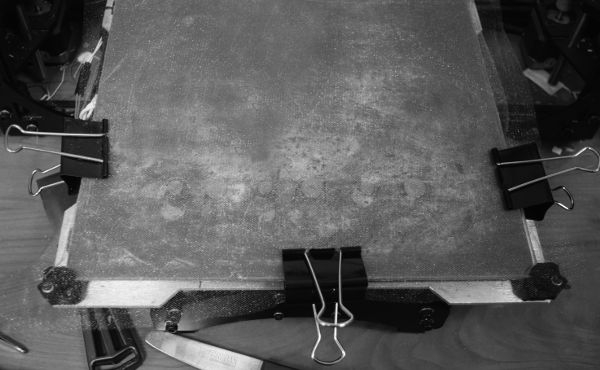
Starting the 3D print

Carefully slide the tulle, lace, or net fabric on top of the already printed layers. Make sure that the fabric is smooth, and fasten it with clamps to the print bed. Once the fabric is secure and as wrinkle-free as possible, resume the 3D print.
Adding the tulle to the 3D print
Voila! You have 3D printed on fabric.
3D prints on fabric

Quick Things to Keep in Mind
- ◦ The fabric that you use must be tulle, lace, net, or another variation that has clear holes in it. This is so that the second layer of the 3D print can fuse with the third layer, creating a bond with the fabric that is in the middle.
- ◦ When possible, create hollow geometric shapes. This leads to a shorter print time, less pulling on the fabric, and less weight on the overall garment. An example is the hollow pyramids that are available in the premade examples. Also, try to avoid shapes that may require supports. The fabric layer could damage the results of your print.
- ◦ If you have questions about 3D printer settings, consult your printer’s suggested temperatures for whichever filament you are using.
Step 5: Finalize
When the 3D designs are printed, it is time for the participants to add them to the clothing item of their choice. It is recommended but not required that the library staff give a brief overview of sewing stitches. A basic running stitch can be used to complete this project.
There are two methods that patrons can use to fasten the 3D-printed fabric onto their garment:
- ◦ Cut the fabric with the 3D print into a strip. Sew around the edges of the strip of fabric onto the collar or cuff (or wherever patrons want to sew it). This leaves the tulle/net/lace fabric visible on the garment. Depending on how heavy the 3D print is, stitches can be placed strategically in the middle of the fabric for support.
- ◦ Cut out the 3D-printed elements while leaving a ⅓-inch rim of fabric around each shape. Place the 3D-printed objects anywhere on the garment, then sew them into place using the fabric that remains around each element. This method greatly diminishes the visibility of the tulle/net/lace fabric that is used, yet gives focus to the 3D-printed design.
- ◦ The use of a sewing machine is not recommended, unless participants are very experienced.
Once all of the sewing is done, admire the completed garments of your participants! If the sewing is unable to be completed before the event time is up, consider having participants use social media to share their final outcome. You can now enhance any fashion choice by adding 3D-printed designs!
LEARNING OUTCOMES
- ◦ Participants learn the basics of 3D design using Tinkercad.
- ◦ Participants learn and use basic stitches to sew their 3D-printed designs onto fabric.
RECOMMENDED NEXT PROJECTS
This technique can be used to add the 3D printing to any other type of fabric-based project. Other projects include adding 3D prints to handbags, hats, gloves, or other clothing pieces and accessories. Once the technique of 3D printing on fabric is mastered, other e-textiles can be incorporated into the design. Try LEDs and circuitry from the “Create e-Textiles with LilyPad Arduino” project to enhance your 3D-printed fabric design.