61
Turn 2D Graphics into 3D Prints
SUSAN BARNUM / PUBLIC SERVICES LIBRARIAN @ TEEN TOWN
El Paso Public Library System
Type of Library Best Suited for: Any
Cost Estimate: Free to minimal
Makerspace Necessary? No, but desirable
PROJECT DESCRIPTION
This project will teach participants how to turn a digital “flat” image into a 3D model suitable for printing by using free editing software.
OVERVIEW
Many kids are excited about making their own 3D prints, but they don’t know how to get started designing their own unique projects. Learning to create a 3D object from scratch seems intimidating at first, and it’s made worse when you realize that many 3D design programs have a steep learning curve. This project is designed to make the process of creation easy and fun for young people (and their instructors.) This project is suitable for any library and can be scaled in detail or interest level to fit your audience.
Making a 2D object into a 3D object involves extruding a flat image into a 3D shape. This project uses free, Internet-based software so there is no cost involved in the creation of the objects and you won’t need Information Technology staff to install applications on your computers. While actually printing the final creation is awesome, if your library or school doesn’t own a 3D printer or have a makerspace, you can still do this project and have students create the files to print out elsewhere in town. Optionally, you can order 3D prints for participants (usually at a cost) from a third-party service online.
Note: If the free tools used in this chapter are unavailable, this project can still be completed using free, open-source software such as Blender or Inkscape. The drawback here is that these programs must be installed on a computer and participants will need to learn to use them. As an alternative to searching for images on Wikimedia Commons, participants can take photos with their phones or library-owned cameras.
MATERIALS LIST
- ◦ Access to the free websites Tinkercad (https://www.tinkercad.com), Wikimedia Commons (https://commons.wikimedia.org/wiki/Main_Page), and PicSVG (http://picsvg.com/). For participants who are under thirteen, it is suggested that the library set up accounts for Tinkercad ahead of time.
NECESSARY EQUIPMENT
- ◦ Computers connected to the Internet and using modern browsers such as Google Chrome or Firefox
- ◦ 3D printer (optional, but awesome to have)
STEP-BY-STEP INSTRUCTIONS
Navigate to Wikimedia Commons, where there are a huge number of pictures that are licensed for reuse and modification. Pictures with a greater amount of contrast are better for this project than ones that are more “grayed out.” You can instruct the students to squint their eyes at the picture. If they can still make out the basic shapes in the picture, then their picture likely has a lot of contrast. Pictures in which the subject is the main focus and the background is rather plain make for good choices. Contrast can, however, be adjusted somewhat in PicSVG. When searching the Commons, most kids like to type in keywords as if they are using Google Search. Wikimedia Commons will often give substandard results using this method. However, you can use this as an opportunity to talk about searching by other methods. The site is best searched by using broad terms or categories. For example, when searching for “Octopus,” poor results are returned. By searching for “Octopi” or “Octopuses,” the Commons will show more images and also give you image categories that can be explored further. The image I chose comes from the category “Octopuses in Art” and is in the public domain.
Picture chosen from Wikimedia Commons and loaded into PicSVG
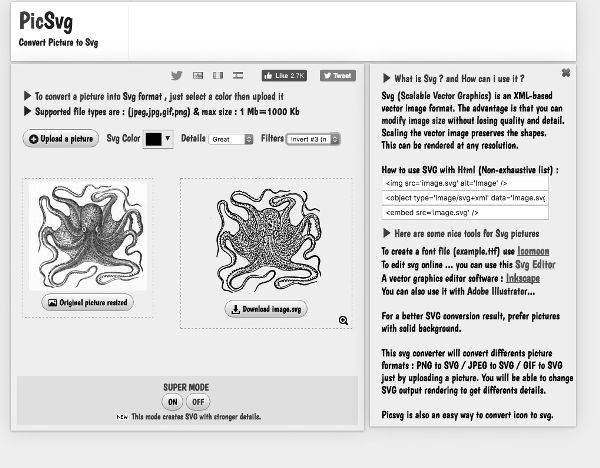
Once participants have chosen a picture that they like, they should download it to the computer. They will need to choose a file that is in the format of a JPEG, GIF, or PNG file type. After the file is downloaded, navigate to the website PicSVG. The front page is where kids will convert their files. Instruct them to “Upload a picture” and then choose the filter they like best. Keep the SVG color black. The area that is black will be “printable.” Once they are happy with the SVG file, download the “image.svg.” If there are elements of the image that aren’t “perfect,” we can fix these in Tinkercad.
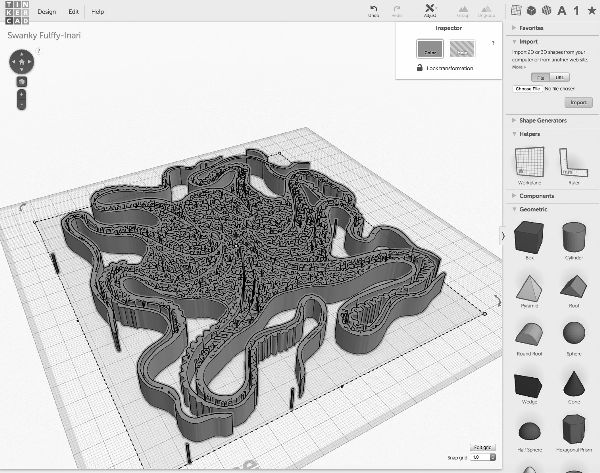
Next we are going to open Tinkercad. After participants are logged in, choose “Create new design.” After the Workplane loads, navigate to the right and choose “Import.” Choose the file and import it into Tinkercad. It will prompt you if your file is “too big” and you can scale it as appropriate until it loads. Often the file will still be rather large. You can resize the file in Tinkercad.
Moving the file around, you will notice that it’s already been converted in 3D form! At this point, participants can modify their model in many different ways. For example, if there are elements of the background that they don’t want to print, you can remove them in Tinkercad by choosing one of the geometric shapes in the menu to the left, engulfing the area to remove and then turning the shape into a “hole” and grouping all of the objects together. This will cause the area to “disappear.” Other things participants can do is to change the dimensions of the object. They can also use multiple copies of their object to create a unique 3D shape. Other ways to make the shape unique involve adding letters or creating a loop for a keychain. The tools in Tinkercad make this easy to do. Once participants are happy with their model, you can download the file.
File loaded into Tinkercad and extruded into a 3D shape
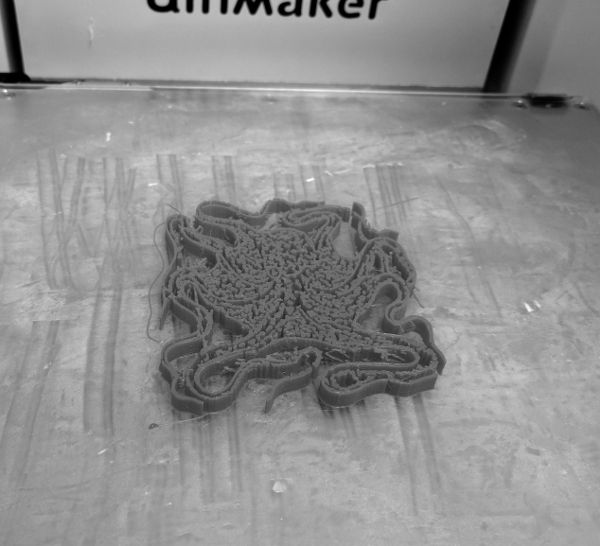
To download, navigate to the left side of the screen and click the tab marked “Design.” Choose “Download for 3D Printing” from the menu. You will be presented with several different file types. Most printers use the .STL extension.
Once the file is downloaded and you want to print the file, follow the directions for your brand of 3D printer. Optionally, if you don’t have a 3D printer, you can encourage your kids to print the file out at a local makerspace or university. Other ways to print the file include ordering the print online through 3D printing services (these include a cost).
LEARNING OUTCOMES
Participants will . . .
- ◦ Gain a basic understanding of Creative Commons media and why it is important to respect and understand copyright issues.
- ◦ Learn about different search strategies.
- ◦ Recognize different common media file types and how to use them.
- ◦ Learn how to download and convert files.
- ◦ Understand the basics of the simple extrusion of a 2D shape into a 3D shape.
The final product printed out from Tinkercad without extra modifications
RECOMMENDED NEXT PROJECTS
As a follow-up project, you might try remixing an object found on Thingiverse; see my project “Hack a 3D Print” earlier in this section.