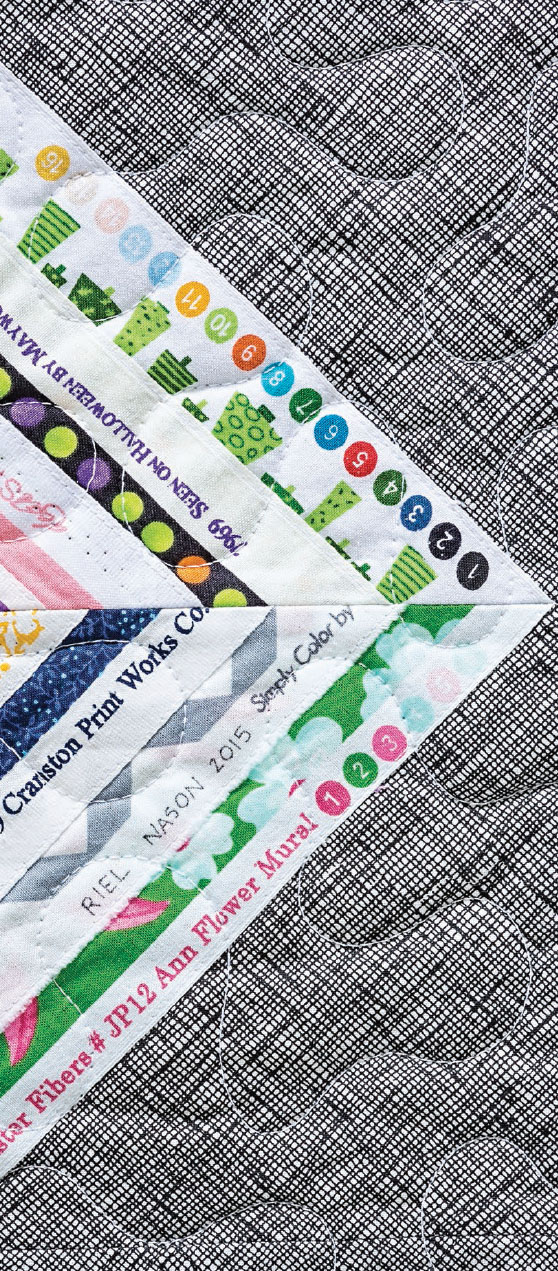


CREATE YOUR OWN SELVAGE
It’s always important to sign your creations, but with selvage quilts there’s an easy, clever alternative to a quilt label on the back. Your name deserves to go on the front of your masterpiece!
Using a permanent fabric marker with a fine tip, put your name on your quilt on a plain section of selvage—as if it is part of the selvage text. Do this before you quilt the top. Perhaps even plan ahead and put a plain white selvage in somewhere specifically for this purpose. I usually sign my quilts in the lower right corner, just as a painter signs a painting. I put my name and the year I finished the quilt. It’s a little surprise that you wouldn’t know is there unless you look for it, but it takes care of providing the quilt’s provenance to future generations (or to quilt museum curators, of course).
You can also go a step further and write a little message or record more information about you or the quilt. Where do you live? Who is the quilt for? How long did it take you to make the quilt? How many selvages did you use?
Tip
Use only a fine-tip marker and be sure to test it on a scrap selvage first to see that the ink will not run or bleed on the selvage surface.
QUILTING
Selvage quilts can be quilted the same as any other quilt. Projects in this book were quilted on either my (modest) home sewing machine or by long-arm sewing machine. For the ones I did myself, I didn’t make any changes from my regular quilting practices. I used cotton batting and my usual method of basting with safety pins. I quilted with 100% polyester thread, same as always. I left my regular presser foot on my machine (I know this is slightly unusual and most people use a walking foot or free-motion foot.) I did everything as if my quilt was made completely of regular fabric.
Really only two factors are unique to selvage quilts to watch out for:
• First, if you didn’t sew close enough to a selvage edge when you were making the quilt, the edge can get flipped up, folded, and sewn down when quilting. Also, the edges of shaggy-finish selvages can get sewn down either flipped up or off to one side. Be aware of this when quilting, and go slowly and carefully over areas where this may be an issue.
• The second consideration is that seams can be very bulky where selvages meet selvages. Corners especially can be a challenge to sew over. When planning your quilting design, you might wish to come up with something that avoids going directly over the bulkiest seams.
As to quilting style, you will notice that the projects in this book are quilted very simply—straight lines, overall stippling, overall repeating designs. Simple patterns not only look modern but also let the selvages continue to be the star, not overshadowed by fancy quilting. Remember that selvage quilts are scrap quilts. They are humble, recycled, and made using mostly free materials. Only background fabric must be purchased. In the whole scheme of things, they are relatively inexpensive to make. So why add to the cost by sending them out for a custom quilting treatment? If you are a fabulous fancy quilter yourself, then by all means go for it—this is just my take on things. But I think it is important to remember that plain, minimalist, or overall quilting can be a design choice—an excellent and confident design choice—and should not at all be thought of as merely a quick and easy solution or a choice that reflects a lack of effort.
USE AND CARE
Every quilt, regardless of what it’s made of and how it’s constructed, will last longer and stay in better condition when you properly care for it. You will decide how to care for your selvage quilt just as you decide what to do with any quilt you’ve made. That said, I have both used and washed some of my selvage quilts. I have washed them in cold water on the regular washing machine cycle and I have put them in the dryer, too. I have treated them the same as I do many other quilts I’ve made. I haven’t had any problems doing this.