RETRO-STRIPED
CHRISTMAS ORNAMENTS

TECHNIQUE
Overlap Method
Selvages create the look of stripes on these vintage-inspired ornaments. Modern and traditional combine on your Christmas tree.

Materials
Amounts listed will make a set of 4 ornaments, 1 from each pattern shape. Yardages are based on fabric that is at least 40˝ wide.
• Christmas fabric: ¼ yard for backing
• Wide-cut selvages: Approximately 40 strips, each 2˝–4˝ long
• Scrap fabric: 4 rectangles, each at least 1˝ × 2˝
• Template plastic, freezer paper, or cardboard
• Glue stick
• White thread
• Metallic or colored thread for hanging loop
Cutting
CHRISTMAS FABRIC FOR BACKING
Using the patterns, cut a template for each ornament. Use the templates to cut backing fabric for each ornament.
WIDE-CUT SELVAGES
• Cut selvage strips as you go during construction.
CONSTRUCTION
Steps in construction are to make 1 ornament at a time.
Make the Front
Referring to the Overlap Method, use the scrap rectangle and the selvages to make an ornament front.
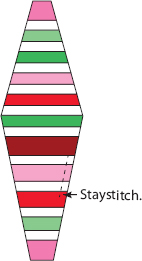
Use the same template that you used to cut the backing fabric as a guide. Place a scrap in the bottom position, covering and extending just beyond the tip of the template. Begin to overlap selvages from the scrap upward. Each selvage strip should extend slightly beyond the template edges. Use as many selvages as you need to cover the template completely. It will likely take 7–10 strips. If it takes more or fewer strips, that’s fine.

Glue and sew the scrap and selvages (to each other, not to the template). Press. Trim selvage excess using the template as a guide. The selvage front of the ornament and the backing fabric should be exactly the same size.

Tip
If you are confident with sewing a perfectly straight line across your selvages, try using a colored or metallic thread as an extra decorative touch!
Make the Ornament
Use a ¼˝ seam allowance throughout.
1. About ⅔ of the way down a long side of the ornament front, staystitch a 1˝ line about ⅛˝ from the edge. This is the area you will be leaving unsewn when putting the ornament together, and the stay stitching will keep the selvages from pulling loose when you turn the ornament inside out.
2. Place the selvage front and the backing right sides together. Sew around the outside with a ¼˝ seam, leaving the 1˝ portion that you staystitched unsewn. Backstitch to secure the seam on both sides of the opening.
3. Trim corners at a diagonal and turn right side out. Use a pen (with the cap on), a knitting needle, or another blunt-tipped tool to poke the corners all the way out. Press. Be sure that the fabric at the opening is folded inside nice and straight and pressed flat.
4. On the front of the ornament, topstitch around the perimeter, between ⅛˝ and ¼˝ from the edge. Your aim is that the unsewn fabric tucked inside at the opening will be caught and held in place by this stitching. If it isn’t, don’t worry because with the fold well-pressed you won’t be able to tell anyway. This top-stitched line is also a decorative element. Press.

FINISH THE ORNAMENT
Thread a needle with metallic or colored thread and loop through the top of the ornament. Knot and hang.
Fa la la la la, la la la lovely!

For all printable patterns or digital content: http://tinyurl.com/11124-patterns-download

For all printable patterns or digital content: http://tinyurl.com/11124-patterns-download