PICK A COLOR
PILLOW

TECHNIQUE
Overlap Method
Fold-Under Method
Nine simple blocks, each featuring a single color of selvages, combine for a cheerful pillow.

Materials
Yardages are based on fabric that is at least 40˝ wide.
• Solid fabric: ½ yard for pillow envelope back
• Wide-cut selvages: 5–7 strips, each at least 5½˝ long, from each of 9 different colors
• Narrow-cut selvage: 1 strip at least 15½˝ long
• Scrap fabric: 1 rectangle at least 1½˝ × 5½˝ from each of 9 different colors
• Backing: 17½˝ × 17½˝ (This will be inside the finished pillow and will not show, so it can be an ugly fabric you want to use up.)
• Batting: 17½˝ × 17½˝
• Pillow form: 16˝ × 16˝
• Glue stick
• White thread
Cutting
WOF = width of fabric
SOLID FABRIC FOR PILLOW ENVELOPE BACK
• Cut 1 strip 15½˝ × WOF.
Subcut 2 rectangles 12˝ × 15½˝.
WIDE-CUT SELVAGES
• From each of the 9 selvage colors, cut 5 strips 5½˝ long to start. Cut additional selvages, if needed, as you go during construction.
SCRAP FABRIC
• From each of the 9 colors, cut 1 rectangle 1½˝ × 5½˝.
NARROW-CUT SELVAGE FOR PILLOW BACK
• Cut 1 strip 15½˝ long.
CONSTRUCTION
Make the Selvage Blocks
Referring to the Overlap Method, use the scrap rectangle and the selvages to make a 5½˝ × 5½˝ block in each color. It will likely take 5 selvage strips for each block. If it takes more or fewer strips, that’s fine. You don’t have to use the same number of selvages in each block. Make 9 blocks.
Make the Pillow Front
Use a ¼˝ seam allowance and press seams open throughout.
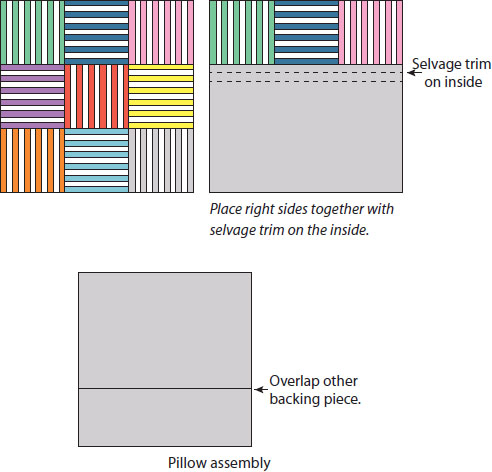
1. Referring to the pillow front assembly diagram, arrange the selvage blocks in a layout of 3 blocks across and 3 blocks down, alternating the direction of the selvage lines in every other block.

2. Sew the blocks in each row together. Press.
3. Sew the rows together. Press.
4. Use the backing and batting to quilt as desired.
Tip
Very simple quilting of straight lines just off to the side of each seam gives a clean look and is quick to do.
5. Trim quilted pillow front to 15½˝ × 15½˝.
Make the Pillow Envelope Back
1. Fold and press a ¼˝ edge to the back along 1 long side of a 12˝ × 15½˝ rectangle. Fold and press the same edge again, this time ½˝ to the back, to enclose the raw edge of the fabric. Topstitch along the folded-under edge. Press. Set aside.
2. Fold and press a ¼˝ edge to the back along 1 of the long sides of the remaining 12˝ × 15½˝ rectangle. Fold and press the same edge again, this time 1˝ to the back. Topstitch along the folded-under edge. Press.
3. Using the Fold-Under Method, prepare the 15½˝ narrow-cut selvage. Center the selvage over the top-stitched line on the rectangle from Step 2 and glue in place. Sew. Press.

Make the Pillow
1. Place the pillow front on a flat surface with its right side facing up.
2. Referring to the pillow assembly diagrams, place the pillow back with the selvage trim right side down (so the selvage side is against the pillow front). Place the selvage edge toward the center of the pillow and align the 3 other outer edges with the outer edges of the pillow front. Pin.
3. Place the remaining pillow back right side down. Place the folded-under edge toward the center and align the outer edges of the back with the outer edges of the opposite side of the pillow front. The pillow backs will overlap in the center. Pin.

4. Sew with a ¼˝ seam around the outside edge of the pillow. Backstitch several times where the edges of the back overlap to give this area added strength. It will be quite thick, especially at the narrow-selvage trim on the back, so go slowly.
FINISH THE PILLOW
1. Trim corners at a diagonal and turn right side out. Use a pen (with the cap on), a knitting needle, or another blunt-tipped tool to push the corners all the way out.
2. Place pillow form inside. Squeeze, fluff, and poke until the form nicely fills out your new pillow.