Chapter 4
More bash Shell Commands
Monitoring Programs
One of the toughest jobs of being a Linux system administrator is keeping track of what's running on the system — especially now, when graphical desktops take a handful of programs just to produce a single desktop. You always have lots of programs running on the system.
Fortunately, a few command line tools are available to help make life easier for you. This section covers a few of the basic tools you need to know how to use to manage programs on your Linux system.
Peeking at the processes
When a program runs on the system, it's referred to as a process. To examine these processes, you need to become familiar with the ps command, the Swiss Army knife of utilities. It can produce lots of information about all the programs running on your system.
Unfortunately, with this robustness comes complexity — in the form of numerous parameters — making the ps command probably one of the most difficult commands to master. Most system administrators find a subset of these parameters that provide the information they want, and they stick with using only those.
That said, however, the basic ps command doesn't really provide all that much information:
 $ ps
   PID TTY          TIME CMD
  3081 pts/0    00:00:00 bash
  3209 pts/0    00:00:00 ps
 $
Not too exciting. By default, the ps command shows only the processes that belong to the current user and that are running on the current terminal. In this case, we had only our bash shell running (remember, the shell is just another program running on the system) and, of course, the ps command itself.
The basic output shows the process ID (PID) of the programs, the terminal (TTY) that they are running from, and the CPU time the process has used.
The GNU ps command that's used in Linux systems supports three different types of command line parameters:
- Unix-style parameters, which are preceded by a dash
- BSD-style parameters, which are not preceded by a dash
- GNU long parameters, which are preceded by a double dash
The following sections examine the three different parameter types and show examples of how they work.
Unix-style parameters
The Unix-style parameters originated with the original ps command that ran on the AT&T Unix systems invented by Bell Labs. Table 4.1 shows these parameters.
Table 4.1 The ps Command Unix Parameters
| Parameter | Description |
-A |
Shows all processes |
-N |
Shows the opposite of the specified parameters |
-a |
Shows all processes except session headers and processes without a terminal |
-d |
Shows all processes except session headers |
-e |
Shows all processes |
-C cmslist |
Shows processes contained in the list cmdlist |
-G grplist |
Shows processes with a group ID listed in grplist |
-U userlist |
Shows processes owned by a userid listed in userlist |
-g grplist |
Shows processes by session or by groupid contained in grplist |
-p pidlist |
Shows processes with PIDs in the list pidlist |
-s sesslist |
Shows processes with session ID in the list sesslist |
-t ttylist |
Shows processes with terminal ID in the list ttylist |
-u userlist |
Shows processes by effective userid in the list userlist |
-F |
Uses extra full output |
-O format |
Displays specific columns in the list format, along with the default columns |
-M |
Displays security information about the process |
-c |
Shows additional scheduler information about the process |
-f |
Displays a full format listing |
-j |
Shows job information |
-l |
Displays a long listing |
-o format |
Displays only specific columns listed in format |
-y |
Prevents display of process flags |
-Z |
Displays the security context information |
-H |
Displays processes in a hierarchical format (showing parent processes) |
-n namelist |
Defines the values to display in the WCHAN column |
-w |
Uses wide output format, for unlimited width displays |
-L |
Shows process threads |
-V |
Displays the version of ps |
That's a lot of parameters, and there are still more! The key to using the ps command is not to memorize all the available parameters — only those you find most useful. Most Linux system administrators have their own sets of parameters that they use for extracting pertinent information. For example, if you need to see everything running on the system, use the -ef parameter combination (the ps command lets you combine parameters like this):
 $ ps -ef
 UID        PID  PPID  C STIME TTY          TIME CMD
 root         1     0  0 11:29 ?        00:00:01 init [5]
 root         2     0  0 11:29 ?        00:00:00 [kthreadd]
 root         3     2  0 11:29 ?        00:00:00 [migration/0]
 root         4     2  0 11:29 ?        00:00:00 [ksoftirqd/0]
 root         5     2  0 11:29 ?        00:00:00 [watchdog/0]
 root         6     2  0 11:29 ?        00:00:00 [events/0]
 root         7     2  0 11:29 ?        00:00:00 [khelper]
 root        47     2  0 11:29 ?        00:00:00 [kblockd/0]
 root        48     2  0 11:29 ?        00:00:00 [kacpid]
 68        2349     1  0 11:30 ?        00:00:00 hald
 root      3078  1981  0 12:00 ?        00:00:00 sshd: rich [priv]
 rich      3080  3078  0 12:00 ?        00:00:00 sshd: rich@pts/0
 rich      3081  3080  0 12:00 pts/0    00:00:00 -bash
 rich      4445  3081  3 13:48 pts/0    00:00:00 ps -ef
 $
Quite a few lines have been cut from the output to save space, but you can see that lots of processes are running on a Linux system. This example uses two parameters: the -e parameter, which shows all the processes running on the system, and the -f parameter, which expands the output to show a few useful columns of information:
- UID: The user responsible for launching the process
- PID: The process ID of the process
- PPID: The PID of the parent process (if a process is started by another process)
- C: Processor utilization over the lifetime of the process
- STIME: The system time when the process started
- TTY: The terminal device from which the process was launched
- TIME: The cumulative CPU time required to run the process
- CMD: The name of the program that was started
This produces a reasonable amount of information, which is what many system administrators want to see. For even more information, you can use the -l parameter, which produces the long format output:
 $ ps -l
 F S  UID PID  PPID  C PRI  NI ADDR SZ WCHAN  TTY      TIME   CMD
 0 S  500 3081  3080  0  80   0 -  1173 wait pts/0   00:00:00 bash
 0 R  500 4463  3081  1  80   0 -  1116 -    pts/0   00:00:00 ps
 $
Notice the extra columns that appear when you use the -l parameter:
F:System flags assigned to the process by the kernelS:The state of the process (O= running on processor;S= sleeping;R= runnable, waiting to run;Z= zombie, process terminated but parent not available;T= process stopped)PRI: The priority of the process (higher numbers mean lower priority)NI: The nice value, which is used for determining prioritiesADDR: The memory address of the processSZ: Approximate amount of swap space required if the process was swapped outWCHAN: Address of the kernel function where the process is sleeping
BSD-style parameters
Now that you've seen the Unix parameters, let's look at the BSD-style parameters. The Berkeley Software Distribution (BSD) was a version of Unix developed at (of course) the University of California, Berkeley. It had many subtle differences from the AT&T Unix system, thus sparking many Unix wars over the years. Table 4.2 shows the BSD version of the ps command parameters.
Table 4.2 The ps Command BSD Parameters
| Parameter | Description |
T |
Shows all processes associated with this terminal |
a |
Shows all processes associated with any terminal |
g |
Shows all processes including session headers |
r |
Shows only running processes |
x |
Shows all processes, even those without a terminal device assigned |
U userlist |
Shows processes owned by a userid listed in userlist |
p pidlist |
Shows processes with a PID listed in pidlist |
t ttylist |
Shows processes associated with a terminal listed in ttylist |
O format |
Lists specific columns in format to display along with the standard columns |
X |
Displays data in the register format |
Z |
Includes security information in the output |
j |
Shows job information |
l |
Uses the long format |
o format |
Displays only columns specified in format |
s |
Uses the signal format |
u |
Uses the user-oriented format |
v |
Uses the virtual memory format |
N namelist |
Defines the values to use in the WCHAN column |
O order |
Defines the order in which to display the information columns |
S |
Sums numerical information, such as CPU and memory usage, for child processes into the parent process |
c |
Displays the true command name (the name of the program used to start the process) |
e |
Displays any environment variables used by the command |
f |
Displays processes in a hierarchical format, showing which processes started which processes |
h |
Prevents display of the header information |
k sort |
Defines the column(s) to use for sorting the output |
n |
Uses numeric values for user and group IDs, along with WCHAN information |
w |
Produces wide output for wider terminals |
H |
Displays threads as if they were processes |
m |
Displays threads after their processes |
L |
Lists all format specifiers |
V |
Displays the version of ps |
As you can see, the Unix and BSD types of parameters have lots of overlap. Most of the information you can get from one you can also get from the other. Most of the time, you choose a parameter type based on which format you're more comfortable with (for example, if you were used to a BSD environment before using Linux).
When you use the BSD-style parameters, the ps command automatically changes the output to simulate the BSD format. Here's an example using the l parameter:
 $ ps l
 F  UID  PID PPID PRI  NI  VSZ  RSS WCHAN  STAT TTY      TIME COMMAND
 0  500 3081 3080  20   0 4692 1432 wait   Ss   pts/0    0:00 -bash
 0  500 5104 3081  20   0 4468  844 -      R+   pts/0    0:00 ps l
 $
Notice that while many of the output columns are the same as when we used the Unix-style parameters, some different ones appear as well:
- VSZ: The size in kilobytes of the process in memory
- RSS: The physical memory that a process has used that isn't swapped out
- STAT: A two-character state code representing the current process state
Many system administrators like the BSD-style l parameter because it produces a more detailed state code for processes (the STAT column). The two-character code more precisely defines exactly what's happening with the process than the single-character Unix-style output.
The first character uses the same values as the Unix-style S output column, showing when a process is sleeping, running, or waiting. The second character further defines the process's status:
<: The process is running at high priority.N: The process is running at low priority.L: The process has pages locked in memory.s: The process is a session leader.l: The process is multi-threaded.+: The process is running in the foreground.
From the simple example shown previously, you can see that the bash command is sleeping, but it is a session leader (it's the main process in my session), whereas the ps command was running in the foreground on the system.
The GNU long parameters
Finally, the GNU developers put their own touches on the new, improved ps command by adding a few more options to the parameter mix. Some of the GNU long parameters copy existing Unix- or BSD-style parameters, while others provide new features. Table 4.3 lists the available GNU long parameters.
Table 4.3 The ps Command GNU Parameters
| Parameter | Description |
--deselect |
Shows all processes except those listed in the command line |
--Group grplist |
Shows processes whose group ID is listed in grplist |
--User userlist |
Shows processes whose user ID is listed in userlist |
--group grplist |
Shows processes whose effective group ID is listed in grplist |
--pid pidlist |
Shows processes whose process ID is listed in pidlist |
--ppid pidlist |
Shows processes whose parent process ID is listed in pidlist |
--sid sidlist |
Shows processes whose session ID is listed in sidlist |
--tty ttylist |
Shows processes whose terminal device ID is listed in ttylist |
--user userlist |
Shows processes whose effective user ID is listed in userlist |
--format format |
Displays only columns specified in the format |
--context |
Displays additional security information |
--cols n |
Sets screen width to n columns |
--columns n |
Sets screen width to n columns |
--cumulative |
Includes stopped child process information |
--forest |
Displays processes in a hierarchical listing showing parent processes |
--headers |
Repeats column headers on each page of output |
--no-headers |
Prevents display of column headers |
--lines n |
Sets the screen height to n lines |
--rows n |
Sets the screen height to n rows |
--sort order |
Defines the column(s) to use for sorting the output |
--width n |
Sets the screen width to n columns |
--help |
Displays the help information |
--info |
Displays debugging information |
--version |
Displays the version of the ps program |
You can combine GNU long parameters with either Unix- or BSD-style parameters to really customize your display. One cool feature of GNU long parameters that we really like is the --forest parameter. It displays the hierarchical process information, but using ASCII characters to draw cute charts:
  1981 ?        00:00:00 sshd
  3078 ?        00:00:00  \_ sshd
  3080 ?        00:00:00      \_ sshd
  3081 pts/0    00:00:00          \_ bash
 16676 pts/0    00:00:00              \_ ps
This format makes tracing child and parent processes a snap!
Real-time process monitoring
The ps command is great for gleaning information about processes running on the system, but it has one drawback. The ps command can display information only for a specific point in time. If you're trying to find trends about processes that are frequently swapped in and out of memory, it's hard to do that with the ps command.
Instead, the top command can solve this problem. The top command displays process information similarly to the ps command, but it does it in real-time mode. Figure 4.1 is a snapshot of the top command in action.
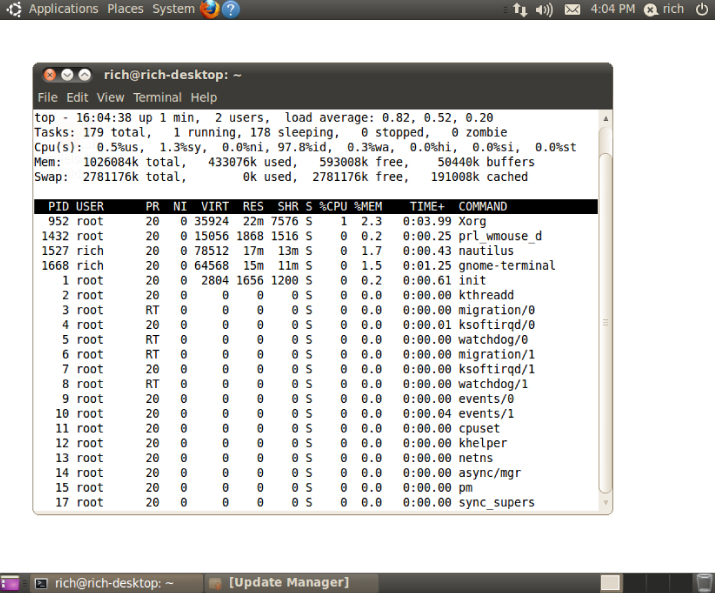
Figure 4.1 The output of the top command while it is running
The first section of the output shows general system information. The first line shows the current time, how long the system has been up, the number of users logged in, and the load average on the system.
The load average appears as three numbers: the 1-minute, 5-minute, and 15-minute load averages. The higher the values, the more load the system is experiencing. It's not uncommon for the 1-minute load value to be high for short bursts of activity. If the 15-minute load value is high, your system may be in trouble.
The second line shows general process information (called tasks in top): how many processes are running, sleeping, stopped, and zombie (have finished but their parent process hasn't responded).
The next line shows general CPU information. The top display breaks down the CPU utilization into several categories depending on the owner of the process (user versus system processes) and the state of the processes (running, idle, or waiting).
Following that are two lines that detail the status of the system memory. The first line shows the status of the physical memory in the system, how much total memory there is, how much is currently being used, and how much is free. The second memory line shows the status of the swap memory area in the system (if any is installed), with the same information.
Finally, the next section shows a detailed list of the currently running processes, with some information columns that should look familiar from the ps command output:
- PID: The process ID of the process
- USER: The user name of the owner of the process
- PR: The priority of the process
- NI: The nice value of the process
- VIRT: The total amount of virtual memory used by the process
- RES: The amount of physical memory the process is using
- SHR: The amount of memory the process is sharing with other processes
- S: The process status (
D= interruptible sleep,R= running,S= sleeping,T= traced or stopped, orZ= zombie) - %CPU: The share of CPU time that the process is using
- %MEM: The share of available physical memory the process is using
- TIME+: The total CPU time the process has used since starting
- COMMAND: The command line name of the process (program started)
By default, when you start top, it sorts the processes based on the %CPU value. You can change the sort order by using one of several interactive commands while top is running. Each interactive command is a single character that you can press while top is running and changes the behavior of the program. Pressing f allows you to select the field to use to sort the output, and pressing d allows you to change the polling interval. Press q to exit the top display.
You have lots of control over the output of the top command. Using this tool, you can often find offending processes that have taken over your system. Of course, after you find one, the next job is to stop it, which brings us to the next topic.
Stopping processes
A crucial part of being a system administrator is knowing when and how to stop a process. Sometimes, a process gets hung up and needs a gentle nudge to either get going again or stop. Other times, a process runs away with the CPU and refuses to give it up. In both cases, you need a command that allows you to control a process. Linux follows the Unix method of interprocess communication.
In Linux, processes communicate with each other using signals. A process signal is a predefined message that processes recognize and may choose to ignore or act on. The developers program how a process handles signals. Most well-written applications have the ability to receive and act on the standard Unix process signals. Table 4.4 shows these signals.
Table 4.4 Linux Process Signals
| Signal | Name | Description |
| 1 | HUP | Hangs up |
| 2 | INT | Interrupts |
| 3 | QUIT | Stops running |
| 9 | KILL | Unconditionally terminates |
| 11 | SEGV | Produces segment violation |
| 15 | TERM | Terminates if possible |
| 17 | STOP | Stops unconditionally, but doesn't terminate |
| 18 | TSTP | Stops or pauses, but continues to run in background |
| 19 | CONT | Resumes execution after STOP or TSTP |
Two commands available in Linux allow you to send process signals to running processes.
The kill command
The kill command allows you to send signals to processes based on their process ID (PID). By default, the kill command sends a TERM signal to all the PIDs listed on the command line. Unfortunately, you can only use the process PID instead of its command name, making the kill command difficult to use sometimes.
To send a process signal, you must either be the owner of the process or be logged in as the root user.
 $ kill 3940
 -bash: kill: (3940) - Operation not permitted
 $
The TERM signal tells the process to kindly stop running. Unfortunately, if you have a runaway process, most likely it ignores the request. When you need to get forceful, the -s parameter allows you to specify other signals (either using their name or signal number).
As you can see from the following example, no output is associated with the kill command.
 # kill -s HUP 3940
 #
To see if the command was effective, you must perform another ps or top command to see if the offending process stopped.
The killall command
The killall command is a powerful way to stop processes by using their names rather than the PID numbers. The killall command allows you to use wildcard characters as well, making it a very useful tool when you have a system that's gone awry:
# killall http*
#
This example kills all the processes that start with http, such as the httpd services for the Apache web server.
Monitoring Disk Space
Another important task of the system administrator is to keep track of the disk usage on the system. Whether you're running a simple Linux desktop or a large Linux server, you need to know how much space you have for your applications.
Some command line commands can help you manage the media environment on your Linux system. This section describes the core commands you'll likely run into during your system administration duties.
Mounting media
As discussed in Chapter 3, the Linux filesystem combines all media disks into a single virtual directory. Before you can use a new media disk on your system, you must place it in the virtual directory. This task is called mounting.
In today's graphical desktop world, most Linux distributions have the ability to automatically mount specific types of removable media. A removable media device is a medium that (obviously) can be easily removed from the PC, such as CD-ROMs and USB memory sticks.
If you're not using a distribution that automatically mounts and unmounts removable media, you have to do it yourself. This section describes the Linux command line commands to help you manage your removable media devices.
The mount command
Oddly enough, the command used to mount media is called mount. By default, the mount command displays a list of media devices currently mounted on the system:
 $ mount
 /dev/mapper/VolGroup00-LogVol00 on / type ext3 (rw)
 proc on /proc type proc (rw)
 sysfs on /sys type sysfs (rw)
 devpts on /dev/pts type devpts (rw,gid=5,mode=620)
 /dev/sda1 on /boot type ext3 (rw)
 tmpfs on /dev/shm type tmpfs (rw)
 none on /proc/sys/fs/binfmt_misc type binfmt_misc (rw)
 sunrpc on /var/lib/nfs/rpc_pipefs type rpc_pipefs (rw)
 /dev/sdb1 on /media/disk type vfat
 (rw,nosuid,nodev,uhelper=hal,shortname=lower,uid=503)
 $
The mount command provides four pieces of information:
- The device filename of the media
- The mount point in the virtual directory where the media is mounted
- The filesystem type
- The access status of the mounted media
The last entry in the preceding example is a USB memory stick that the GNOME desktop automatically mounted at the /media/disk mount point. The vfat filesystem type shows that it was formatted on a Microsoft Windows PC.
To manually mount a media device in the virtual directory, you must be logged in as the root user or use the sudo command to run the command as the root user. The following is the basic command for manually mounting a media device:
mount -t type device directoryThe type parameter defines the filesystem type under which the disk was formatted. Linux recognizes lots of different filesystem types. If you share removable media devices with your Windows PCs, you are most likely to run into these types:
- vfat: Windows long filesystem
- ntfs: Windows advanced filesystem used in Windows NT, XP, and Vista
- iso9660: The standard CD-ROM filesystem
Most USB memory sticks and floppies are formatted using the vfat filesystem. If you need to mount a data CD, you must use the iso9660 filesystem type.
The next two parameters define the location of the device file for the media device and the location in the virtual directory for the mount point. For example, to manually mount the USB memory stick at device /dev/sdb1 at location /media/disk, you use the following command:
mount -t vfat /dev/sdb1 /media/diskAfter a media device is mounted in the virtual directory, the root user has full access to the device, but access by other users is restricted. You can control who has access to the device using directory permissions (discussed in Chapter 7).
In case you need to use some of the more exotic features of the mount command, Table 4.5 shows the available parameters .
Table 4.5 The mount Command Parameters
| Parameter | Description |
-a |
Mounts all filesystems specified in the /etc/fstab file |
-f |
Causes the mount command to simulate mounting a device, but not actually mount it |
-F |
Mounts all filesystems at the same time when used with the -a parameter |
-v |
Explains all the steps required to mount the device; stands for verbose mode |
-I |
Tells you not to use any filesystem helper files under /sbin/mount .filesystem |
-l |
Adds the filesystem labels automatically for ext2, ext3, or XFS filesystems |
-n |
Mounts the device without registering it in the /etc/mstab mounted device file |
-p num |
For encrypted mounting, reads the passphrase from the file descriptor num |
-s |
Ignores mount options not supported by the filesystem |
-r |
Mounts the device as read-only |
-w |
Mounts the device as read-write (the default) |
-L label |
Mounts the device with the specified label |
-U uuid |
Mounts the device with the specified uuid |
-O |
When used with the -a parameter, limits the set of filesystems applied |
-o |
Adds specific options to the filesystem |
The -o option allows you to mount the filesystem with a comma-separated list of additional options. These are popular options to use:
ro: Mounts as read-onlyrw: Mounts as read-writeuser: Allows an ordinary user to mount the filesystemcheck=none: Mounts the filesystem without performing an integrity checkloop: Mounts a file
The unmount command
To remove a removable media device, you should never just remove it from the system. Instead, you should always unmount it first.
The command used to unmount devices is umount (yes, there's no “n” in the command, which gets confusing sometimes). The format for the umount command is pretty simple:
umount [directory | device ]The umount command gives you the choice of defining the media device by either its device location or its mounted directory name. If any program has a file open on a device, the system won't let you unmount it.
 [root@testbox mnt]# umount /home/rich/mnt
 umount: /home/rich/mnt: device is busy
 umount: /home/rich/mnt: device is busy
 [root@testbox mnt]# cd /home/rich
 [root@testbox rich]# umount /home/rich/mnt
 [root@testbox rich]# ls -l mnt
 total 0
 [root@testbox rich]#
In this example, the command prompt was still in a directory within the filesystem structure, so the umount command couldn't unmount the image file. After the command prompt was moved out of the image file filesystem, the umount command successfully unmounted the image file.
Using the df command
Sometimes, you need to see how much disk space is available on an individual device. The df command allows you to easily see what's happening on all the mounted disks:
 $ df
 Filesystem           1K-blocks      Used Available Use% Mounted on
 /dev/sda2             18251068   7703964   9605024  45% /
 /dev/sda1               101086     18680     77187  20% /boot
 tmpfs                   119536         0    119536   0% /dev/shm
 /dev/sdb1               127462    113892     13570  90% /media/disk
 $
The df command shows each mounted filesystem that contains data. As you can see from the mount command earlier, some mounted devices are used for internal system purposes. The command displays the following:
- The device location of the device
- How many 1024-byte blocks of data it can hold
- How many 1024-byte blocks are used
- How many 1024-byte blocks are available
- The amount of used space as a percentage
- The mount point where the device is mounted
A few different command line parameters are available with the df command, most of which you'll never use. One popular parameter is -h, which shows the disk space in human-readable form, usually as an M for megabytes or a G for gigabytes:
 $ df -h
 Filesystem            Size  Used Avail Use% Mounted on
 /dev/sdb2              18G  7.4G  9.2G  45% /
 /dev/sda1              99M   19M   76M  20% /boot
 tmpfs                 117M     0  117M   0% /dev/shm
 /dev/sdb1             125M  112M   14M  90% /media/disk
 $
Now instead of having to decode those ugly block numbers, all the disk sizes are shown using “normal” sizes. The df command is invaluable in troubleshooting disk space problems on the system.
Using the du command
With the df command, you can easily see when a disk is running out of space. The next problem for the system administrator is to know what to do when that happens.
Another useful command to help you is the du command. The du command shows the disk usage for a specific directory (by default, the current directory). This is a quick way to determine if you have any obvious disk hogs on the system.
By default, the du command displays all the files, directories, and subdirectories under the current directory, and it shows how many disk blocks each file or directory takes. For a standard-sized directory, this can be quite a listing. Here's a partial listing of using the du command:
 $ du
 484     ./.gstreamer-0.10
 8       ./Templates
 8       ./Download
 8       ./.ccache/7/0
 24      ./.ccache/7
 368     ./.ccache/a/d
 384     ./.ccache/a
 424     ./.ccache
 8       ./Public
 8       ./.gphpedit/plugins
 32      ./.gphpedit
 72      ./.gconfd
 128     ./.nautilus/metafiles
 384     ./.nautilus
 72      ./.bittorrent/data/metainfo
 20      ./.bittorrent/data/resume
 144     ./.bittorrent/data
 152     ./.bittorrent
 8       ./Videos
 8       ./Music
 16      ./.config/gtk-2.0
 40      ./.config
 8       ./Documents
The number at the left of each line is the number of disk blocks that each file or directory takes. Notice that the listing starts at the bottom of a directory and works its way up through the files and subdirectories contained within the directory.
The du command by itself can be somewhat useless. It's nice to be able to see how much disk space each individual file and directory takes up, but it can be meaningless when you have to wade through pages and pages of information before you find what you're looking for.
You can use a few command line parameters with the du command to make things a little more legible:
-c: Produces a grand total of all the files listed-h: Prints sizes in human-readable form, using K for kilobyte, M for megabyte, and G for gigabyte-s: Summarizes each argument
The next step for the system administrator is to use some file-handling commands for manipulating large amounts of data. That's exactly what the next section covers.
Working with Data Files
When you have a large amount of data, handling the information and making it useful can be difficult. As you saw with the du command in the previous section, it's easy to get data overload when working with system commands.
The Linux system provides several command line tools to help you manage large amounts of data. This section covers the basic commands that every system administrator — as well as any everyday Linux user — should know how to use to make their lives easier.
Sorting data
The sort command is a popular function that comes in handy when working with large amounts of data. The sort command does what it says: It sorts data.
By default, the sort command sorts the data lines in a text file using standard sorting rules for the language you specify as the default for the session.
 $ cat file1
 one
 two
 three
 four
 five
 $ sort file1
 five
 four
 one
 three
 two
 $
It's pretty simple, but things aren't always as easy as they appear. Look at this example:
 $ cat file2
 1
 2
 100
 45
 3
 10
 145
 75
 $ sort file2
 1
 10
 100
 145
 2
 3
 45
 75
 $
If you were expecting the numbers to sort in numerical order, you were disappointed. By default, the sort command interprets numbers as characters and performs a standard character sort, producing output that might not be what you want. To solve this problem, use the -n parameter, which tells the sort command to recognize numbers as numbers instead of characters and to sort them based on their numerical values:
 $ sort -n file2
 1
 2
 3
 10
 45
 75
 100
 145
 $
Now, that's much better! Another common parameter that's used is -M, the month sort. Linux log files usually contain a timestamp at the beginning of the line to indicate when the event occurred:
Sep 13 07:10:09 testbox smartd[2718]: Device: /dev/sda, openedIf you sort a file that uses timestamp dates using the default sort, you get something like this:
 $ sort file3
 Apr
 Aug
 Dec
 Feb
 Jan
 Jul
 Jun
 Mar
 May
 Nov
 Oct
 Sep
 $
It's not exactly what you wanted. If you use the -M parameter, the sort command recognizes the three-character month nomenclature and sorts appropriately:
 $ sort -M file3
 Jan
 Feb
 Mar
 Apr
 May
 Jun
 Jul
 Aug
 Sep
 Oct
 Nov
 Dec
 $
Table 4.6 shows other handy sort parameters you can use.
Table 4.6 The sort Command Parameters
| Single Dash | Double Dash | Description |
-b |
--ignore-leading-blanks | Ignores leading blanks when sorting |
-C |
--check = quiet | Doesn't sort, but doesn't report if data is out of sort order |
-c |
--check | Doesn't sort, but checks if the input data is already sorted, and reports if not sorted |
-d |
--dictionary-order | Considers only blanks and alphanumeric characters; doesn't consider special characters |
-f |
--ignore-case | By default, sort orders capitalized letters first; ignores case |
-g |
--general-numeric-sort | Uses general numerical value to sort |
-i |
--ignore-nonprinting | Ignores nonprintable characters in the sort |
-k |
--key = POS1[,POS2] |
Sorts based on position POS1, and ends at POS2 if specified |
-M |
--month-sort | Sorts by month order using three-character month names |
-m |
--merge | Merges two already sorted data files |
-n |
--numeric-sort | Sorts by string numerical value |
-o |
--output = file |
Writes results to file specified |
-R |
--random-sort | Sorts by a random hash of keys |
--random-source = FILE |
Specifies the file for random bytes used by the -R parameter |
|
-r |
--reverse | Reverses the sort order (descending instead of ascending |
-S |
--buffer-size = SIZE |
Specifies the amount of memory to use |
-s |
--stable | Disables last-resort comparison |
-T |
--temporary-direction = DIR |
Specifies a location to store temporary working files |
-t |
--field-separator = SEP |
Specifies the character used to distinguish key positions |
-u |
--unique |
With the -c parameter, checks for strict ordering; without the -c parameter, outputs only the first occurrence of two similar lines |
-z |
--zero-terminated |
Ends all lines with a NULL character instead of a new line |
The -k and -t parameters are handy when sorting data that uses fields, such as the /etc/passwd file. Use the -t parameter to specify the field separator character, and use the -k parameter to specify which field to sort on. For example, to sort the password file based on numerical userid, just do this:
 $ sort -t ':' -k 3 -n /etc/passwd
 root:x:0:0:root:/root:/bin/bash
 bin:x:1:1:bin:/bin:/sbin/nologin
 daemon:x:2:2:daemon:/sbin:/sbin/nologin
 adm:x:3:4:adm:/var/adm:/sbin/nologin
 lp:x:4:7:lp:/var/spool/lpd:/sbin/nologin
 sync:x:5:0:sync:/sbin:/bin/sync
 shutdown:x:6:0:shutdown:/sbin:/sbin/shutdown
 halt:x:7:0:halt:/sbin:/sbin/halt
 mail:x:8:12:mail:/var/spool/mail:/sbin/nologin
 news:x:9:13:news:/etc/news:
 uucp:x:10:14:uucp:/var/spool/uucp:/sbin/nologin
 operator:x:11:0:operator:/root:/sbin/nologin
 games:x:12:100:games:/usr/games:/sbin/nologin
 gopher:x:13:30:gopher:/var/gopher:/sbin/nologin
 ftp:x:14:50:FTP User:/var/ftp:/sbin/nologin
Now the data is perfectly sorted based on the third field, which is the numerical userid value.
The -n parameter is great for sorting numerical outputs, such as the output of the du command:
 $ du -sh * | sort -nr
 1008k   mrtg-2.9.29.tar.gz
 972k    bldg1
 888k    fbs2.pdf
 760k    Printtest
 680k    rsync-2.6.6.tar.gz
 660k    code
 516k    fig1001.tiff
 496k    test
 496k    php-common-4.0.4pl1-6mdk.i586.rpm
 448k    MesaGLUT-6.5.1.tar.gz
 400k    plp
Notice that the -r option also sorts the values in descending order, so you can easily see what files are taking up the most space in your directory.
Searching for data
Often in a large file, you must look for a specific line of data buried somewhere in the middle of the file. Instead of manually scrolling through the entire file, you can let the grep command search for you. The command line format for the grep command is:
grep [options] pattern [file]The grep command searches either the input or the file you specify for lines that contain characters that match the specified pattern. The output from grep is the lines that contain the matching pattern.
Here are two simple examples of using the grep command with the file1 file used in the “Sorting data” section:
 $ grep three file1
 three
 $ grep t file1
 two
 three
 $
The first example searches the file file1 for text matching the pattern three. The grep command produces the line that contains the matching pattern. The next example searches the file file1 for the text matching the pattern t. In this case, two lines matched the specified pattern, and both are displayed.
Because of the popularity of the grep command, it has undergone lots of development changes over its lifetime. Lots of features have been added to the grep command. If you look over the man pages for the grep command, you'll see how versatile it really is.
If you want to reverse the search (output lines that don't match the pattern), use the -v parameter:
 $ grep -v t file1
 one
 four
 five
 $
If you need to find the line numbers where the matching patterns are found, use the -n parameter:
 $ grep -n t file1
 2:two
 3:three
 $
If you just need to see a count of how many lines contain the matching pattern, use the -c parameter:
 $ grep -c t file1
 2
 $
If you need to specify more than one matching pattern, use the -e parameter to specify each individual pattern:
 $ grep -e t -e f file1
 two
 three
 four
 five
 $
This example outputs lines that contain either the string t or the string f.
By default, the grep command uses basic Unix-style regular expressions to match patterns. A Unix-style regular expression uses special characters to define how to look for matching patterns.
For a more detailed explanation of regular expressions, see Chapter 20.
Here's a simple example of using a regular expression in a grep search:
 $ grep [tf] file1
 two
 three
 four
 five
 $
The square brackets in the regular expression indicate that grep should look for matches that contain either a t or an f character. Without the regular expression, grep would search for text that would match the string tf.
The egrep command is an offshoot of grep, which allows you to specify POSIX extended regular expressions, which contain more characters for specifying the matching pattern (again, see Chapter 20 for more details). The fgrep command is another version that allows you to specify matching patterns as a list of fixed-string values, separated by newline characters. This allows you to place a list of strings in a file and then use that list in the fgrep command to search for the strings in a larger file.
Compressing data
If you've done any work in the Microsoft Windows world, no doubt you've used zip files. It became such a popular feature that Microsoft eventually incorporated it into the Windows operating system starting with XP. The zip utility allows you to easily compress large files (both text and executable) into smaller files that take up less space.
Linux contains several file compression utilities. Although this may sound great, it often leads to confusion and chaos when trying to download files. Table 4.7 lists the file compression utilities available for Linux.
Table 4.7 Linux File Compression Utilities
| Utility | File Extension | Description |
bzip2 |
.bz2 |
Uses the Burrows-Wheeler block sorting text compression algorithm and Huffman coding |
compress |
.Z |
Original Unix file compression utility; starting to fade away into obscurity |
gzip |
.gz |
The GNU Project's compression utility; uses Lempel-Ziv coding |
zip |
.zip |
The Unix version of the PKZIP program for Windows |
The compress file compression utility is not often found on Linux systems. If you download a file with a .Z extension, you can usually install the compress package (called ncompress in many Linux distributions) using the software installation methods discussed in Chapter 9 and then uncompress the file with the uncompress command. The gzip utility is the most popular compression tool used in Linux.
The gzip package is a creation of the GNU Project, in their attempt to create a free version of the original Unix compress utility. This package includes these files:
gzipfor compressing filesgzcatfor displaying the contents of compressed text filesgunzipfor uncompressing files
These utilities work the same way as the bzip2 utilities:
 $ gzip myprog
 $ ls -l my*
-rwxrwxr-x 1 rich rich 2197 2007-09-13 11:29 myprog.gz
 $
The gzip command compresses the file you specify on the command line. You can also specify more than one filename or even use wildcard characters to compress multiple files at once:
$ gzip my*
$ ls -l my*
 -rwxr--r--    1 rich     rich          103 Sep  6 13:43 myprog.c.gz
 -rwxr-xr-x    1 rich     rich         5178 Sep  6 13:43 myprog.gz
 -rwxr--r--    1 rich     rich           59 Sep  6 13:46 myscript.gz
 -rwxr--r--    1 rich     rich           60 Sep  6 13:44 myscript2.gz
$
The gzip command compresses every file in the directory that matches the wildcard pattern.
Archiving data
Although the zip command works great for compressing and archiving data into a single file, it's not the standard utility used in the Unix and Linux worlds. By far the most popular archiving tool used in Unix and Linux is the tar command.
The tar command was originally used to write files to a tape device for archiving. However, it can also write the output to a file, which has become a popular way to archive data in Linux.
The following is the format of the tar command:
tar function [options] object1 object2 ...The function parameter defines what the tar command should do, as shown in Table 4.8.
Table 4.8 The tar Command Functions
| Function | Long Name | Description |
-A |
--concatenate |
Appends an existing tar archive file to another existing tar archive file |
-c |
--create |
Creates a new tar archive file |
-d |
--diff |
Checks the differences between a tar archive file and the filesystem |
--delete |
Deletes from an existing tar archive file | |
-r |
--append |
Appends files to the end of an existing tar archive file |
-t |
--list |
Lists the contents of an existing tar archive file |
-u |
--update |
Appends files to an existing tar archive file that are newer than a file with the same name in the existing archive |
-x |
--extract |
Extracts files from an existing archive file |
Each function uses options to define a specific behavior for the tar archive file. Table 4.9 lists the common options that you can use with the tar command.
Table 4.9 The tar Command Options
| Option | Description |
-C dir |
Changes to the specified directory |
-f file |
Outputs results to file (or device) file |
-j |
Redirects output to the bzip2 command for compression |
-p |
Preserves all file permissions |
-v |
Lists files as they are processed |
-z |
Redirects the output to the gzip command for compression |
These options are usually combined to create the following scenarios. First, you want to create an archive file using this command:
tar -cvf test.tar test/ test2/The above command creates an archive file called test.tar containing the contents of both the test directory and the test2 directory. Next, this command:
tar -tf test.tarlists (but doesn't extract) the contents of the tar file test.tar. Finally, this command:
tar -xvf test.tarextracts the contents of the tar file test.tar. If the tar file was created from a directory structure, the entire directory structure is re-created starting at the current directory.
As you can see, using the tar command is a simple way to create archive files of entire directory structures. This is a common method for distributing source code files for open source applications in the Linux world.
Summary
This chapter discussed some of the more advanced bash commands used by Linux system administrators and programmers. The ps and top commands are vital in determining the status of the system, allowing you to see what applications are running and how many resources they are consuming.
In this day of removable media, another popular topic for system administrators is mounting storage devices. The mount command allows you to mount a physical storage device into the Linux virtual directory structure. To remove the device, use the umount command.
Finally, the chapter discussed various utilities used for handling data. The sort utility easily sorts large data files to help you organize data, and the grep utility allows you to quickly scan through large data files looking for specific information. Several file compression utilities are available in Linux, including gzip and zip. Each one allows you to compress large files to help save space on your filesystem. The Linux tar utility is a popular way to archive directory structures into a single file that can easily be ported to another system.
The next chapter discusses Linux shells and how to interact with them. Linux allows you to communicate between shells, which can come in handy when creating subshells in your scripts.