ART
THE FORM AND FUNCTION OF A HONEYBEE HIVE INSPIRES CREATIVE EXPRESSION.
Honeybees have been the inspiration for poetry, songs, and artwork for millennia. Henry David Thoreau, Kahlil Gibran, Emily Dickinson, and other writers and poets have found their muse in bees. Shakespeare wrote in Henry V, “For so work the honey-bees, creatures that by a rule in nature teach the act of order to a peopled kingdom.” Artists’ representations of bees are found in paintings, sculptures, and art from around the world: stamps from Russia, ancient coins from Greece, and the coat of arms of Napoleon I from France. Honeybees, and all they represent, speak a common language through art worldwide.
May bees inspire your creativity. Be fearless. Find your muse. Capture the beauty and symmetry of hexagonal cells through comb rubbings. Follow in the footsteps of ancient Egyptians by adding pigment to melted beeswax. Collaborate with bees by placing artwork in the hive. Brighten up beehives just begging for color, lines, and designs.
Create. Collaborate. Decorate.
LAB 43 |
COMB RUBBINGS |
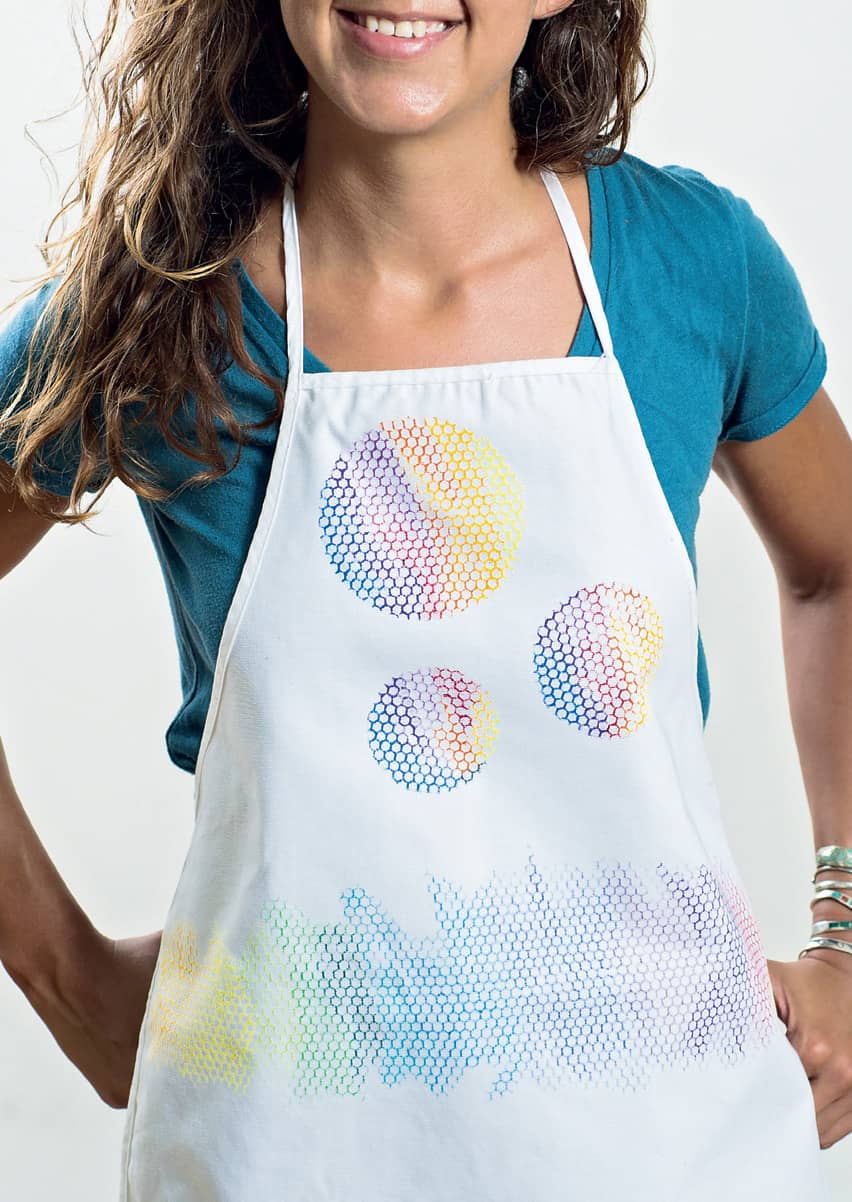
The hexagonal shape of beeswax comb lends itself to artistic creation. Unlike actual beeswax comb, plastic foundation is durable, easy to clean, and a consistent height, making it perfect for fabric rubbings. An apron is used for this project.
 BEE BUZZ
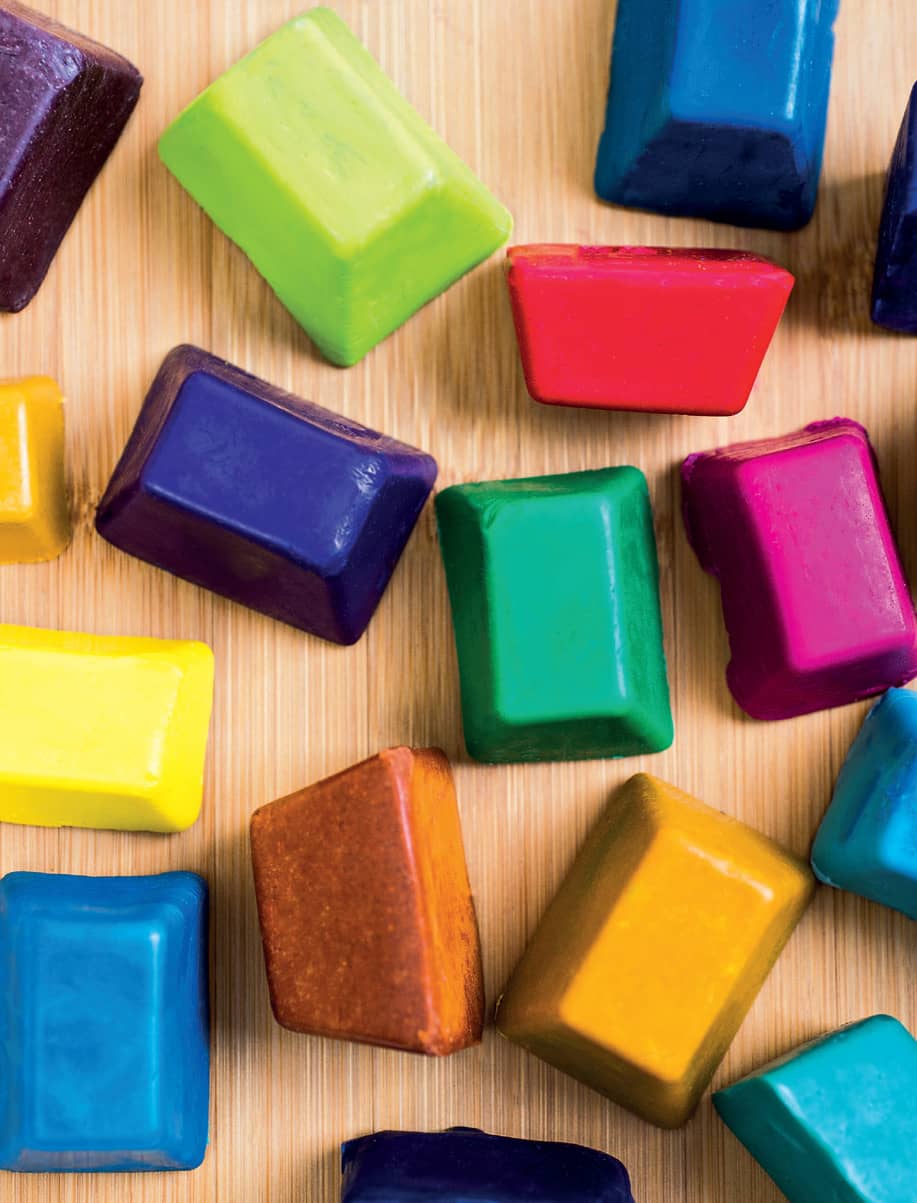
One pound (454 g) of beeswax can make 35,000 wax cells.
YOU WILL NEED
 cotton fabric (apron, tote bag, or napkins)
plastic foundation
clipboard
beeswax art blocks (Lab 44) or crayons
iron and ironing board
paper towels
DIRECTIONS
1. Practice the process using a piece of scrap fabric before beginning the actual project.
2. Prewash the fabric to be used.
3. Place the section of fabric to be colored on top of the plastic foundation. (Fig. 1)
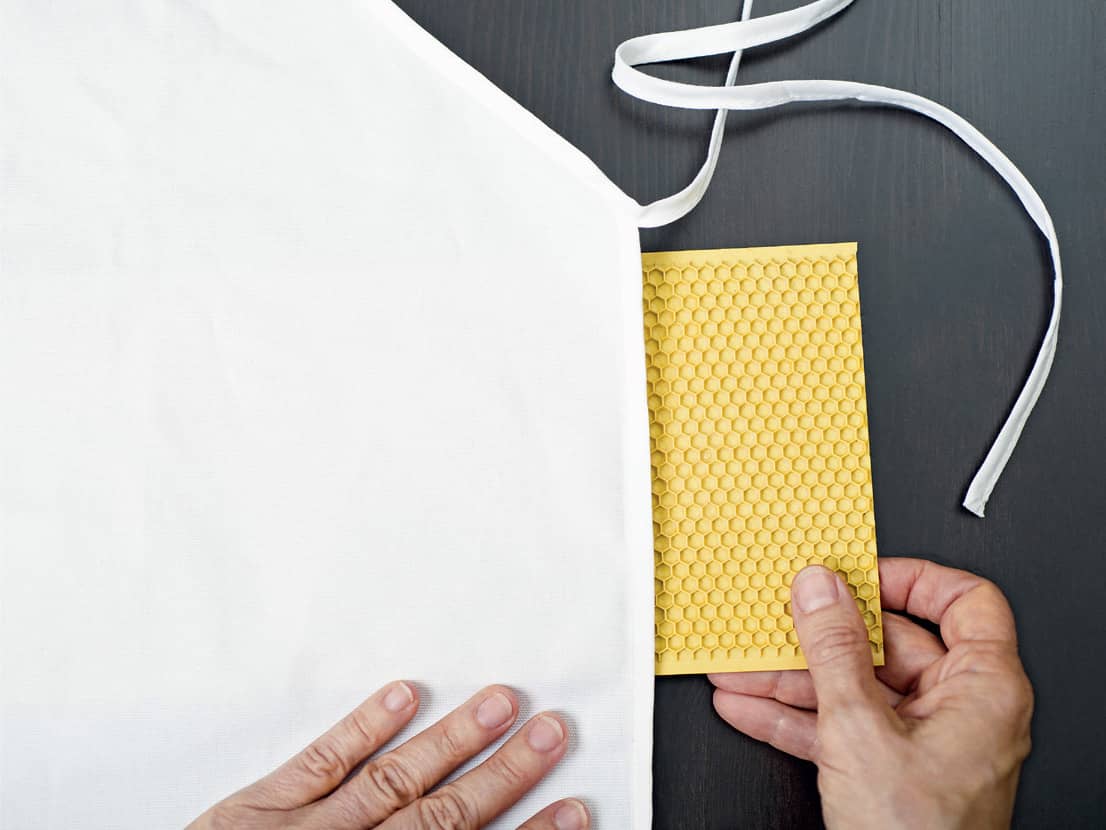
Fig. 1: Place a section of fabric on top of the plastic foundation.
4. Slide the fabric and the plastic foundation under the clip of the clipboard to help anchor the fabric. (Fig. 2)
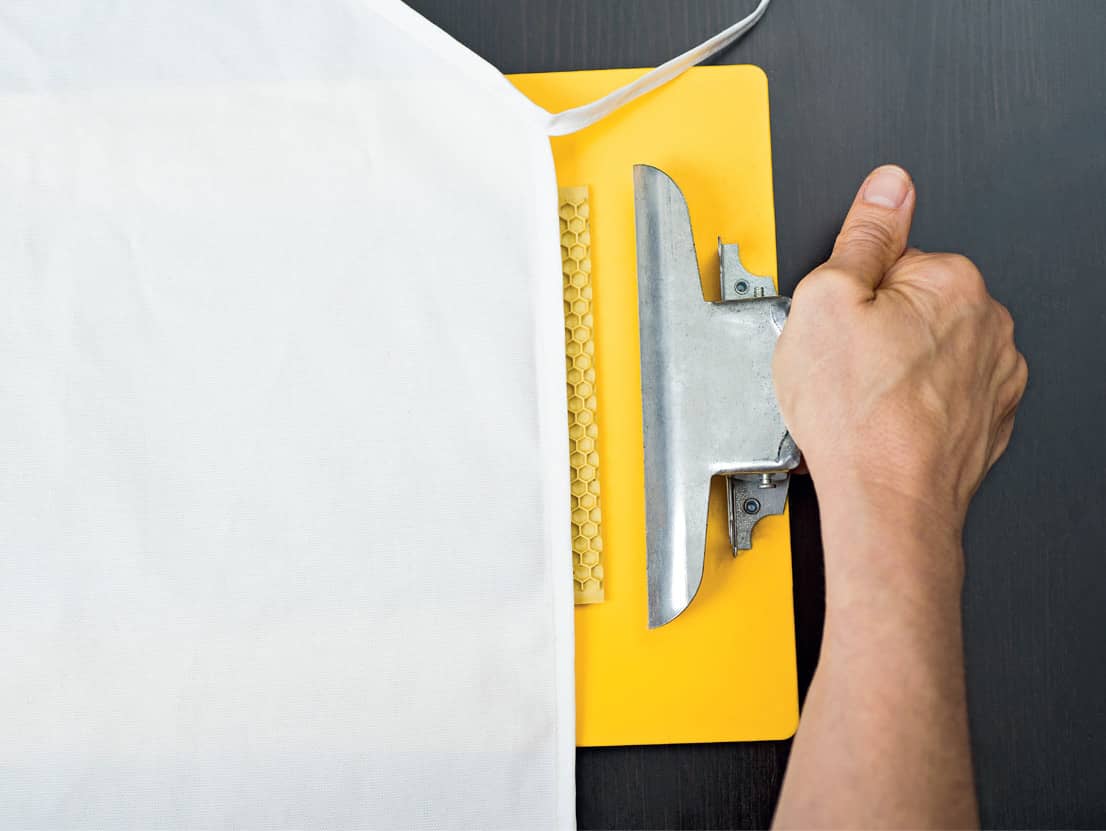
Fig. 2: Hold the fabric and plastic foundation in place with the clip of a clipboard.
5. Use a beeswax art block or crayon to apply color to the fabric using firm, one-way strokes while holding the fabric in place. Avoid back-and-forth strokes, as this can sometimes shift the fabric. (Fig. 3)
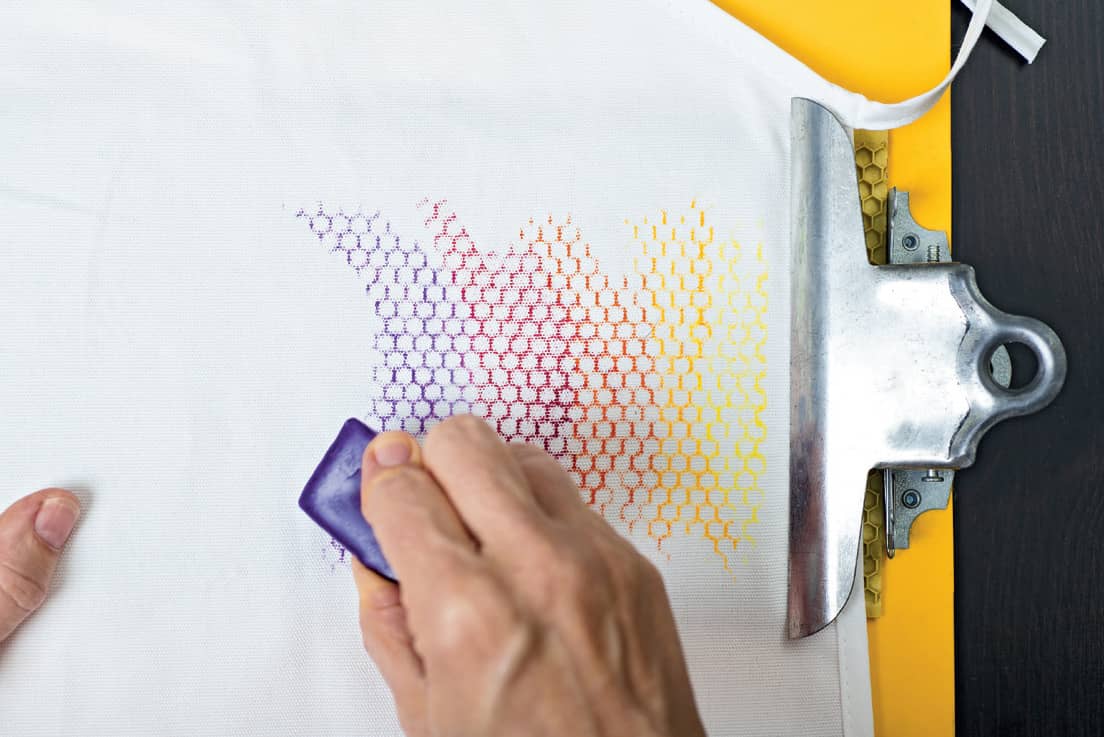
Fig. 3: Apply color in one direction using a beeswax art block or crayon.
6. Unclip and arrange an additional section of fabric to color on the plastic foundation. Another option is to slightly move the colored fabric and add a different colored layer on top of the first layer. The distinct hexagonal shapes will no longer be visible, but the effect can add interest.
7. After you have finished coloring all sections of fabric, sandwich the colored fabric between a few layers of paper towels. Iron the colored fabric to remove the wax while retaining the pigment. (Fig. 4)

Fig. 4: Iron between paper towels to remove the beeswax but leave the pigment.
8. Depending on the fabric and the crayons used, finer woven fabric often retains the color better. Some colors on coarser fabrics may wash out. If possible, test a small piece of the fabric before hand washing in cold water.
 TAKE IT FURTHER
• Make a stencil by cutting out a shape in the middle of a piece of card stock. Make the rubbing inside the stencil.
• After applying the crayon color, use acrylic paint to add contrasting images and details to your creation.
LAB 44 |
BEESWAX ART BLOCKS |
Make your own art blocks using a mixture of beeswax, carnauba wax, and powdered pigment. You will need about 1 ounce (28 g) total wax for each art block.
BEE BUZZ
The optimum temperature inside the hive for bees to secrete wax is 91°F to 97°F (33°C to 36°C).
 SAFETY NOTE
Keep wax away from open flames. Unplug heating source when not in use.
YOU WILL NEED
newsprint or cardboard
double boiler
carnauba wax (1 part)
white beeswax (3 parts)
measuring spoons
powdered pigments
small (3 ounce, or 84 g) paper cups
wooden craft sticks
ice cube tray (optional)
ruler
marker
DIRECTIONS
1. Set up a workstation with newsprint or cardboard to protect your work surface. Set up a double boiler (a clean can in a saucepan works well). Melt the carnauba wax and beeswax in the can in a ratio of one part carnauba wax to three parts beeswax.
2. Measure 2 teaspoons of powdered pigment into a small paper cup. (Fig. 1)
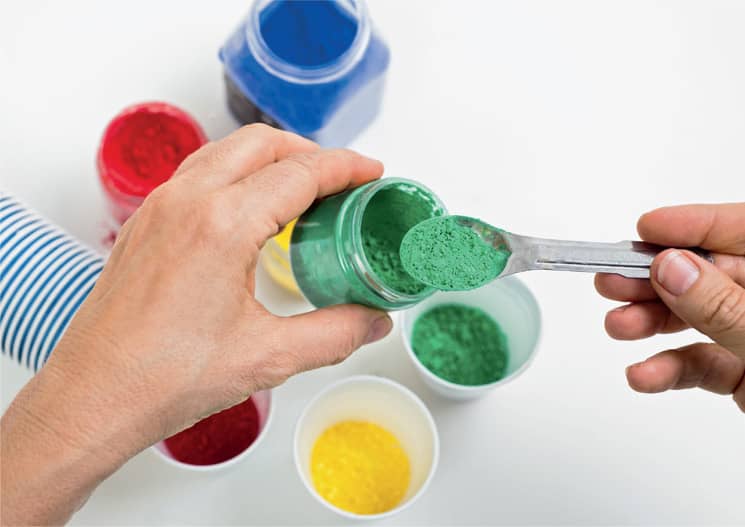
Fig. 1: Measure 2 teaspoons of powdered pigment into a paper cup.
3. Pour the melted wax mixture into the cup until it is half to three-quarters full. The ratio is 2 teaspoons of pigment to 2 tablespoons (1 ounce, or 24 g) wax. The more pigment, the more concentrated the color. Earth pigments work very well. (Fig. 2)
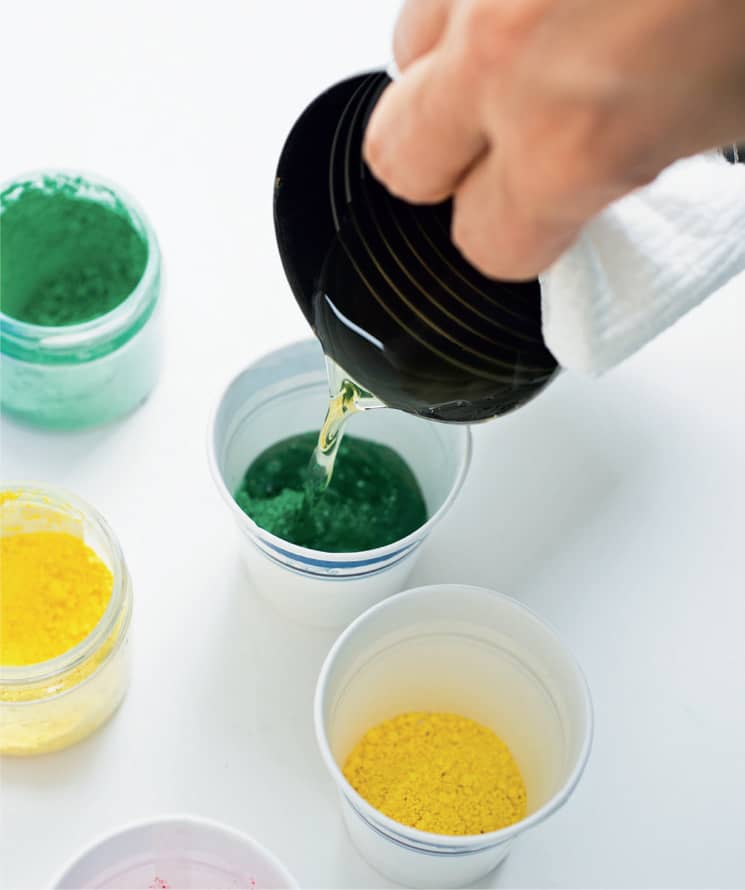
Fig. 2: Cover the powdered pigment with the melted wax mixture.
4. Place the wax back on the heat source and reserve.
5. Immediately stir the mixture using a wooden craft stick until blended.
6. For square art blocks, pour the mixture into an ice cube tray. Square corners allow for greater versatility. Or you may want to keep it simple by allowing the wax to harden in the paper cups. (Fig. 3)
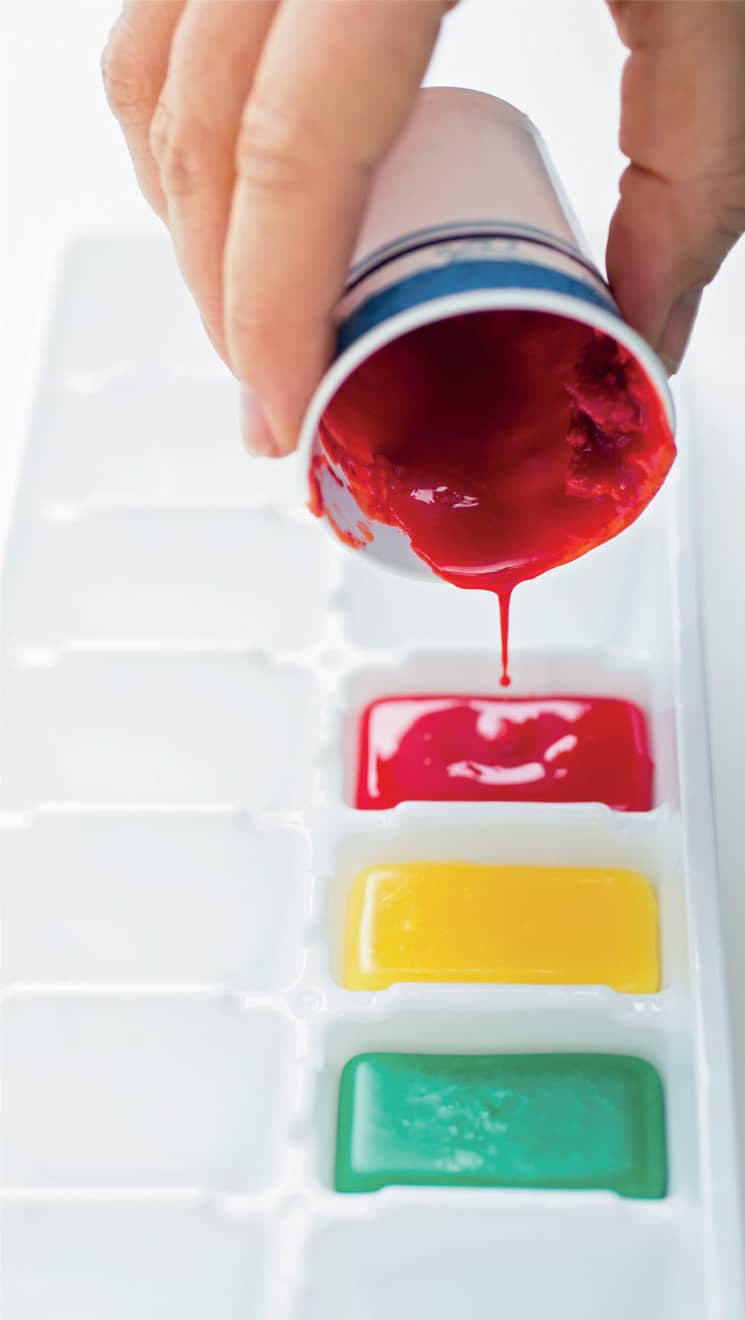
Fig. 3: After stirring the mixture, pour into an ice cube tray, if desired.
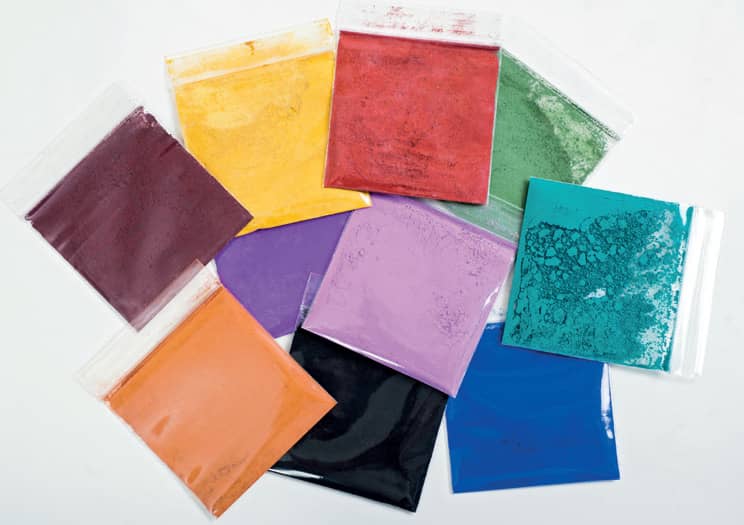
Sample packets of cosmetic colors offer an inexpensive way to make a variety of colors.
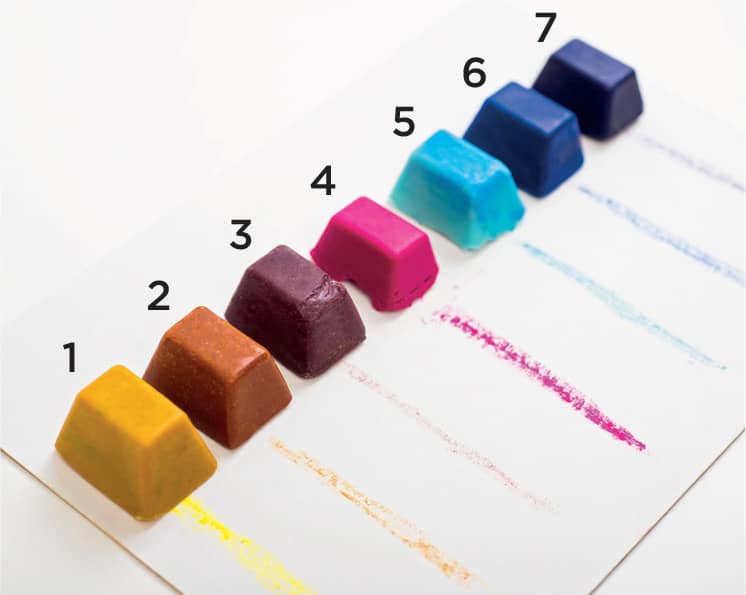
Experiment with different pigments. 1) turmeric, 2) paprika, 3) beet powder, 4) water oil colors, 5) pastels, 6) earth pigment, 7) cosmetic pigment
7. Repeat steps 2 through 6 for each different colored art block.
8. Once completely cooled, snap the art blocks out of the ice tray or peel the paper cup off the hardened art block. If you are having difficulty removing the art blocks, place the ice cube tray in the freezer for a few hours and try again.
9. Let the artwork begin!
TAKE IT FURTHER
• These beeswax art blocks are perfect for making comb rubbings (Lab 43) or encaustic cards (Lab 45).
• Make quilt squares with beeswax art blocks. Draw a picture on cotton fabric, pressing as hard as possible with the beeswax art blocks. A piece of freezer paper (wax side up) or sandpaper under the fabric will prevent slipping and provide texture to the artwork. Remove the wax but leave the pigment by ironing between layers of paper towels.
• Experiment with changing the ratios of beeswax and carnauba wax. Try adding talc or white powdered clay to the mixture.
LAB 45 |
ENCAUSTIC CARDS |
If you tend to be intimidated by the visual arts, this is the project for you. Everyone can create beautiful artwork with this simple encaustic monotype technique.
BEE BUZZ
Bees twelve to eighteen days old have the best developed and most productive wax glands.
SAFETY NOTE
If using a heat source that is hotter than a warm setting, take great care to protect your hands.
YOU WILL NEED
newsprint or cardboard
electric griddle with low heat setting or warming tray
aluminum foil
tape
garden gloves
colored beeswax blocks
white 4" × 6" (10 × 15 cm) index cards
paper towels
scissors or paper cutter
glue stick
colored paper or card stock
DIRECTIONS
1. Set up a workstation with newsprint or cardboard to protect your work surface. Cover an electric griddle or warming tray with aluminum foil. Secure with tape. Turn to the very lowest heat setting available.
2. Put on a pair of garden gloves to protect your hands from the heat. Hold the beeswax blocks on the griddle surface to melt small pools of colored wax onto the foil. (Fig. 1)
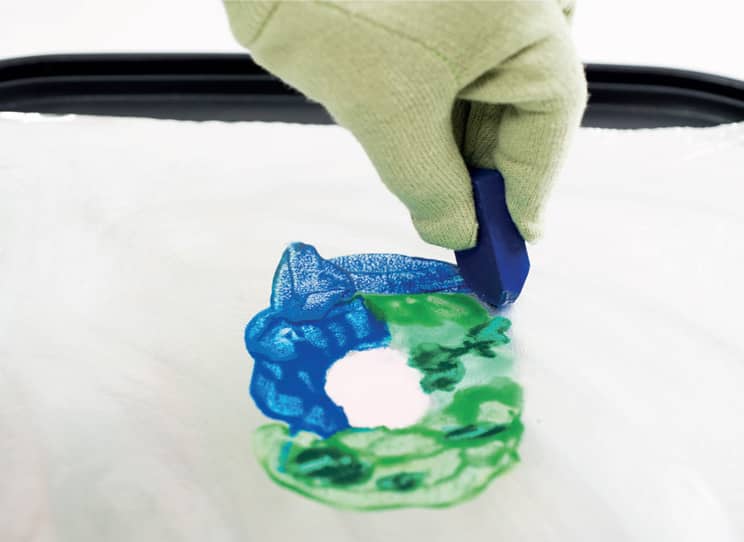
Fig. 1: Melt beeswax blocks on aluminum foil placed on the surface of a griddle turned to the lowest setting.
3. Place an index card on the melted wax. Rub the paper with your gloved fingers or a folded-up paper towel to allow the index card to have full contact with the wax. (Fig. 2)
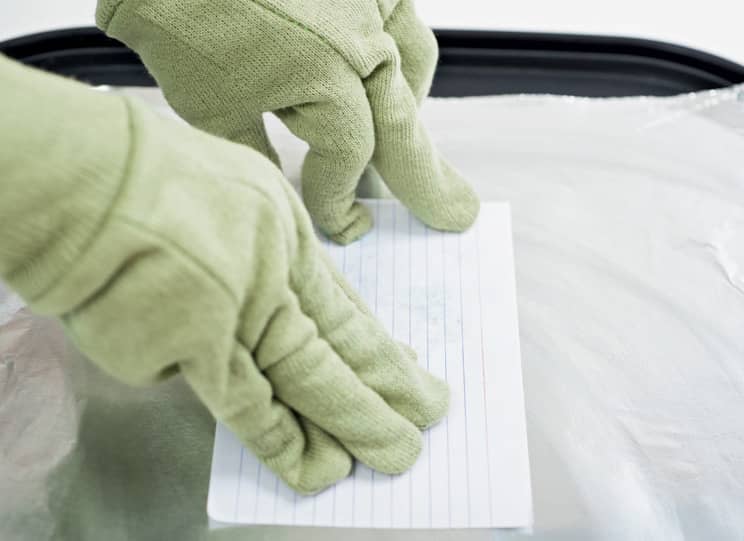
Fig. 2: Press an index card onto the melted wax.
4. Either lift or peel the paper away from the griddle. It is difficult to plan the end result, but the random beauty is sure to delight. (Fig. 3)
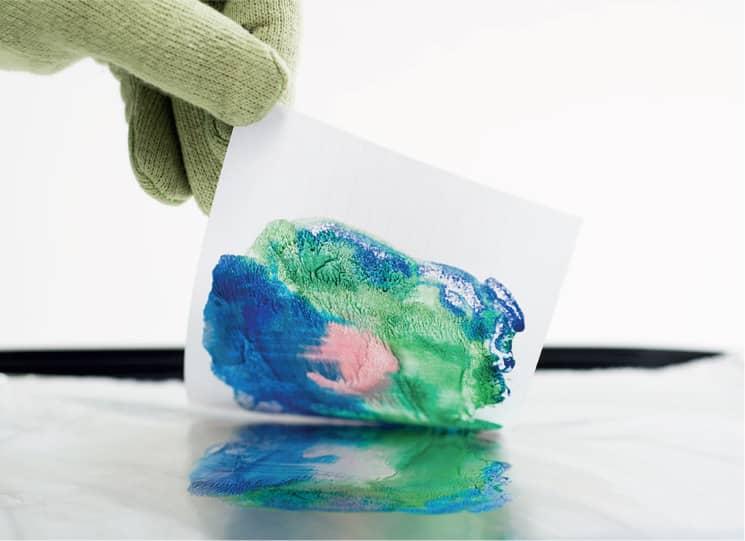
Fig. 3: Peel the index card off the griddle.
5. Repeat with another piece of paper for a lighter print. Clean the foil with a paper towel before beginning the next print. Replace the foil when it becomes “muddy.”
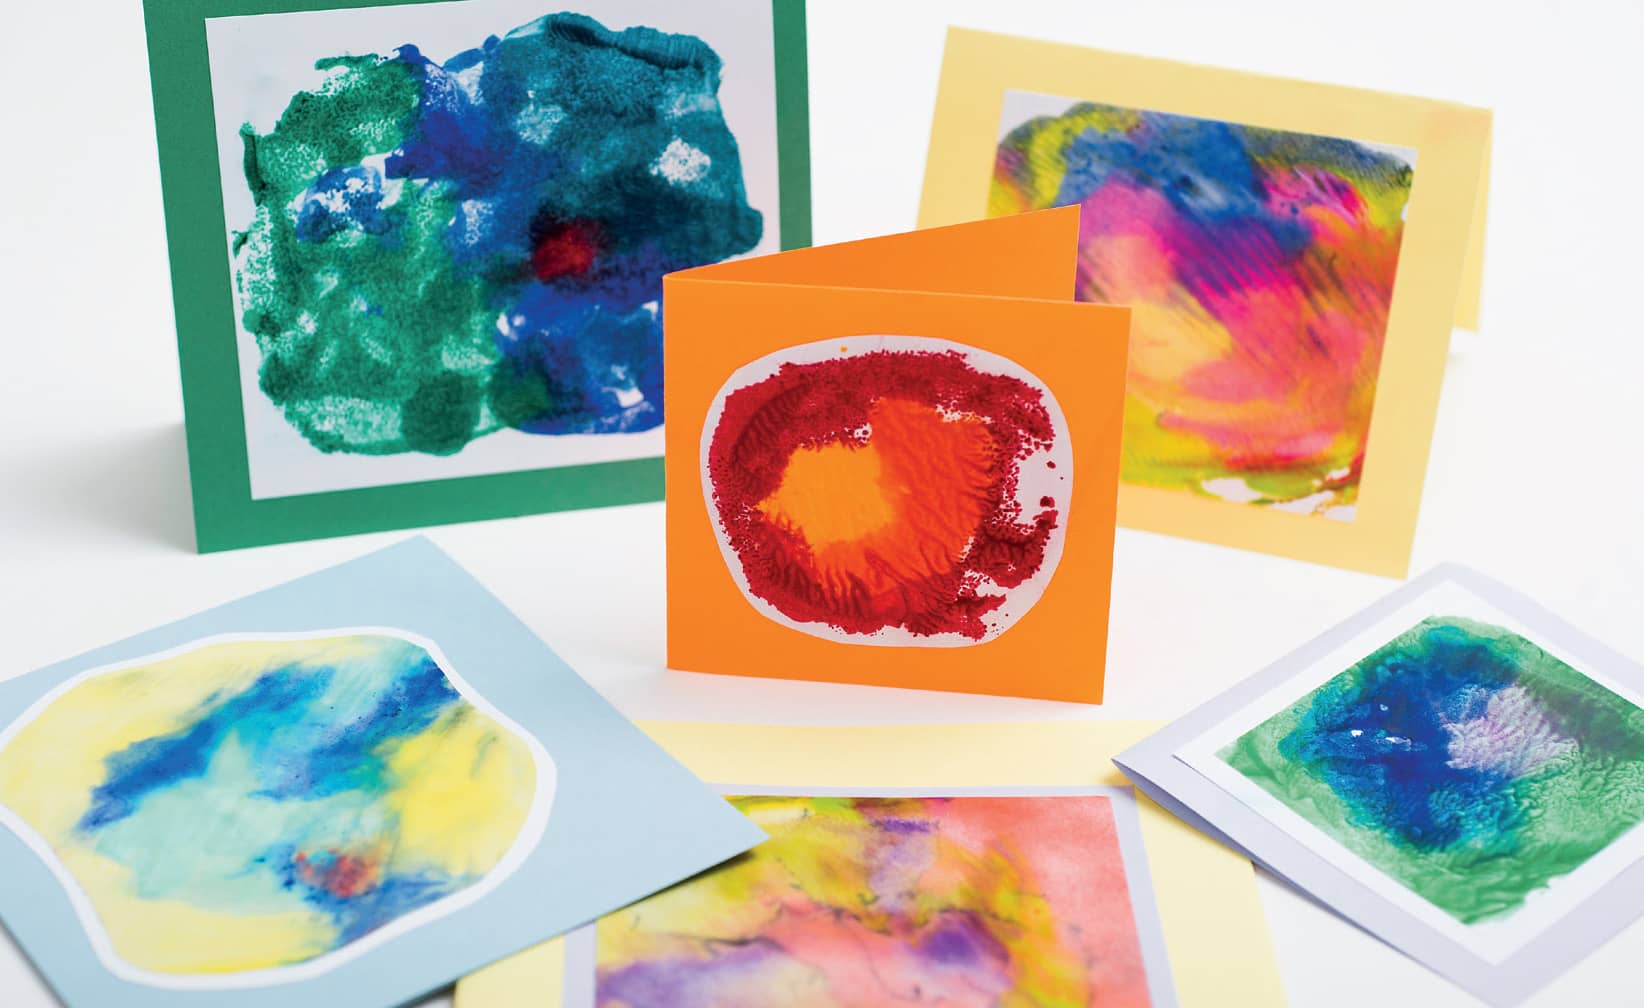
6. Trim the edges of the paper to the desired shape and size. Glue to a folded piece of card stock to make a unique and colorful card. (Fig. 4)

Fig. 4: Create a card by gluing onto folded card stock or paper.
TAKE IT FURTHER
• Make your own colored beeswax blocks (Lab 44) or purchase encaustic medium blocks at an art supply store.
• Place the card stock or paper on the griddle first. Melt the wax directly on the paper.
• Instead of paper, press or roll other items onto the melted wax. Try using white fabric, canvas, cardboard, corrugated plastic, or glass.
• Make simple encaustic medium directly on the griddle using repurposed mint tins to mix pigment and white wax. Shorten the handles of small paintbrushes to better fit in the tins. (Fig. 5)
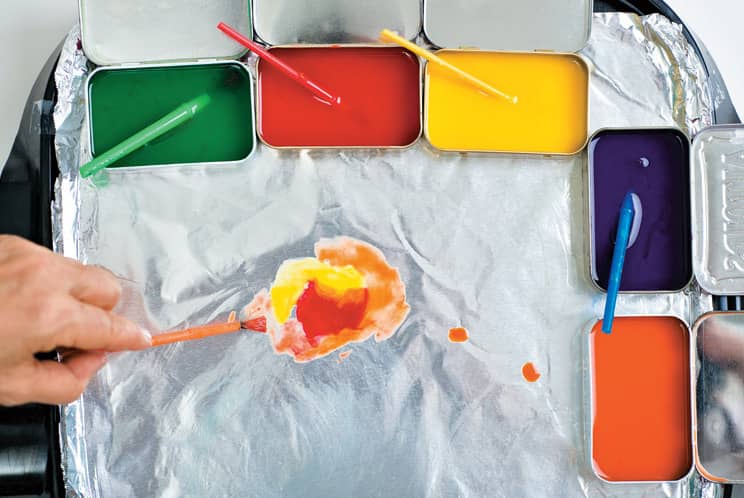
Fig. 5: Use mint tins to mix pigment and wax.
• If you would like to try a more traditional encaustic technique of layered beeswax on wood, melt eight parts beeswax and then add one part damar resin to increase hardness and luster. Do not heat above 220°F (104°C).
LAB 46 |
BEES AS ARTISTS |

A colored copy of a paper mosaic created by Doris Bickley was glued onto a beekeeping frame. The bees built comb on the bottom of this medium frame placed in a deep super. Previously built comb was then attached to the frame using hot wax.
Collaborate with the bees to create unusual works of art. You provide the artwork, bees add the comb. This project needs to be done in the early springtime or during a honey flow when bees are building comb.
BEE BUZZ
Hundreds of honeybees contribute to the construction of a single cell of the comb.
YOU WILL NEED
a hive of bees
base material such as plastic foundation, plywood, corrugated plastic, Plexiglas, Lucite, or Masonite
tools to cut the base material
beehive frames
card stock
art supplies
glue
beeswax
double boiler
brush or sponge
DIRECTIONS
1. First you will need a base for your artwork that will withstand the humidity in the hive. You can use plastic foundation or cut the base material to fit into a deep, medium, or shallow hive frame.
2. Create your artwork on card stock using markers, paints, pens, crayons, charcoal, or collage materials. You can place your original work in the hive or use colored copies of the artwork.
3. Glue your piece onto the base material. Leave the other side blank to add artwork once the bees have done their part. (Fig. 1)
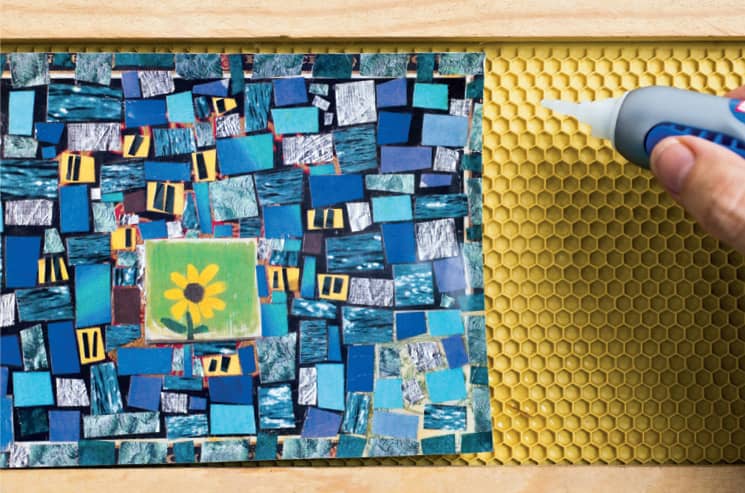
Fig. 1: Glue artwork onto the base.
4. Melt the wax in a double boiler. Brush the entire surface of both sides with a very thin coat of melted wax (Lab 3). (Fig. 2)
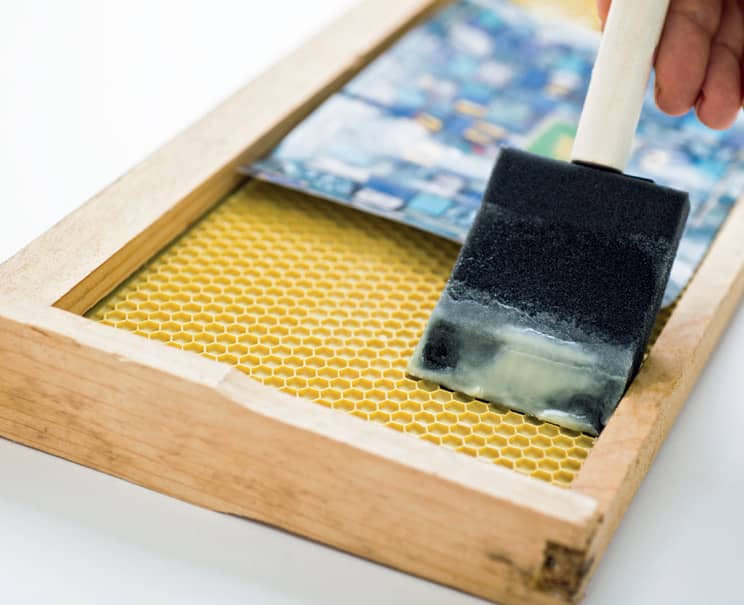
Fig. 2: Cover both sides with a thin layer of beeswax.
5. Scrape off some of the wax if it is obscuring the artwork.
6. Place the frame in the middle of a super.
7. Check every few days to see what the bees are up to. Sometimes they will build wax quickly, other times it may take weeks before the bees venture into comb building on the frame.
8. Experiment with different techniques and ideas to create with the bees.

Ladislav Hanka created Bee Eater, an etching with aquatint and drypoint. The wood engraving of a bee was glued down into a beekeeping frame along with an etching of a bee eater and inserted into a living beehive. There the bees chewed out parts of the paper and added their own contributions of wax done in patterns of their own choosing.

While relocating a swarm of bees found in an owl nesting box, Anna Gieselman discovered this unique piece of art entirely crafted by honeybees.
TAKE IT FURTHER
• Take a closer look at your beekeeping equipment. Has beeswax comb transformed your inner cover into a piece of art?
• Create a collage using photographs, artwork, burr comb, pollen, and beeswax.
LAB 47 |
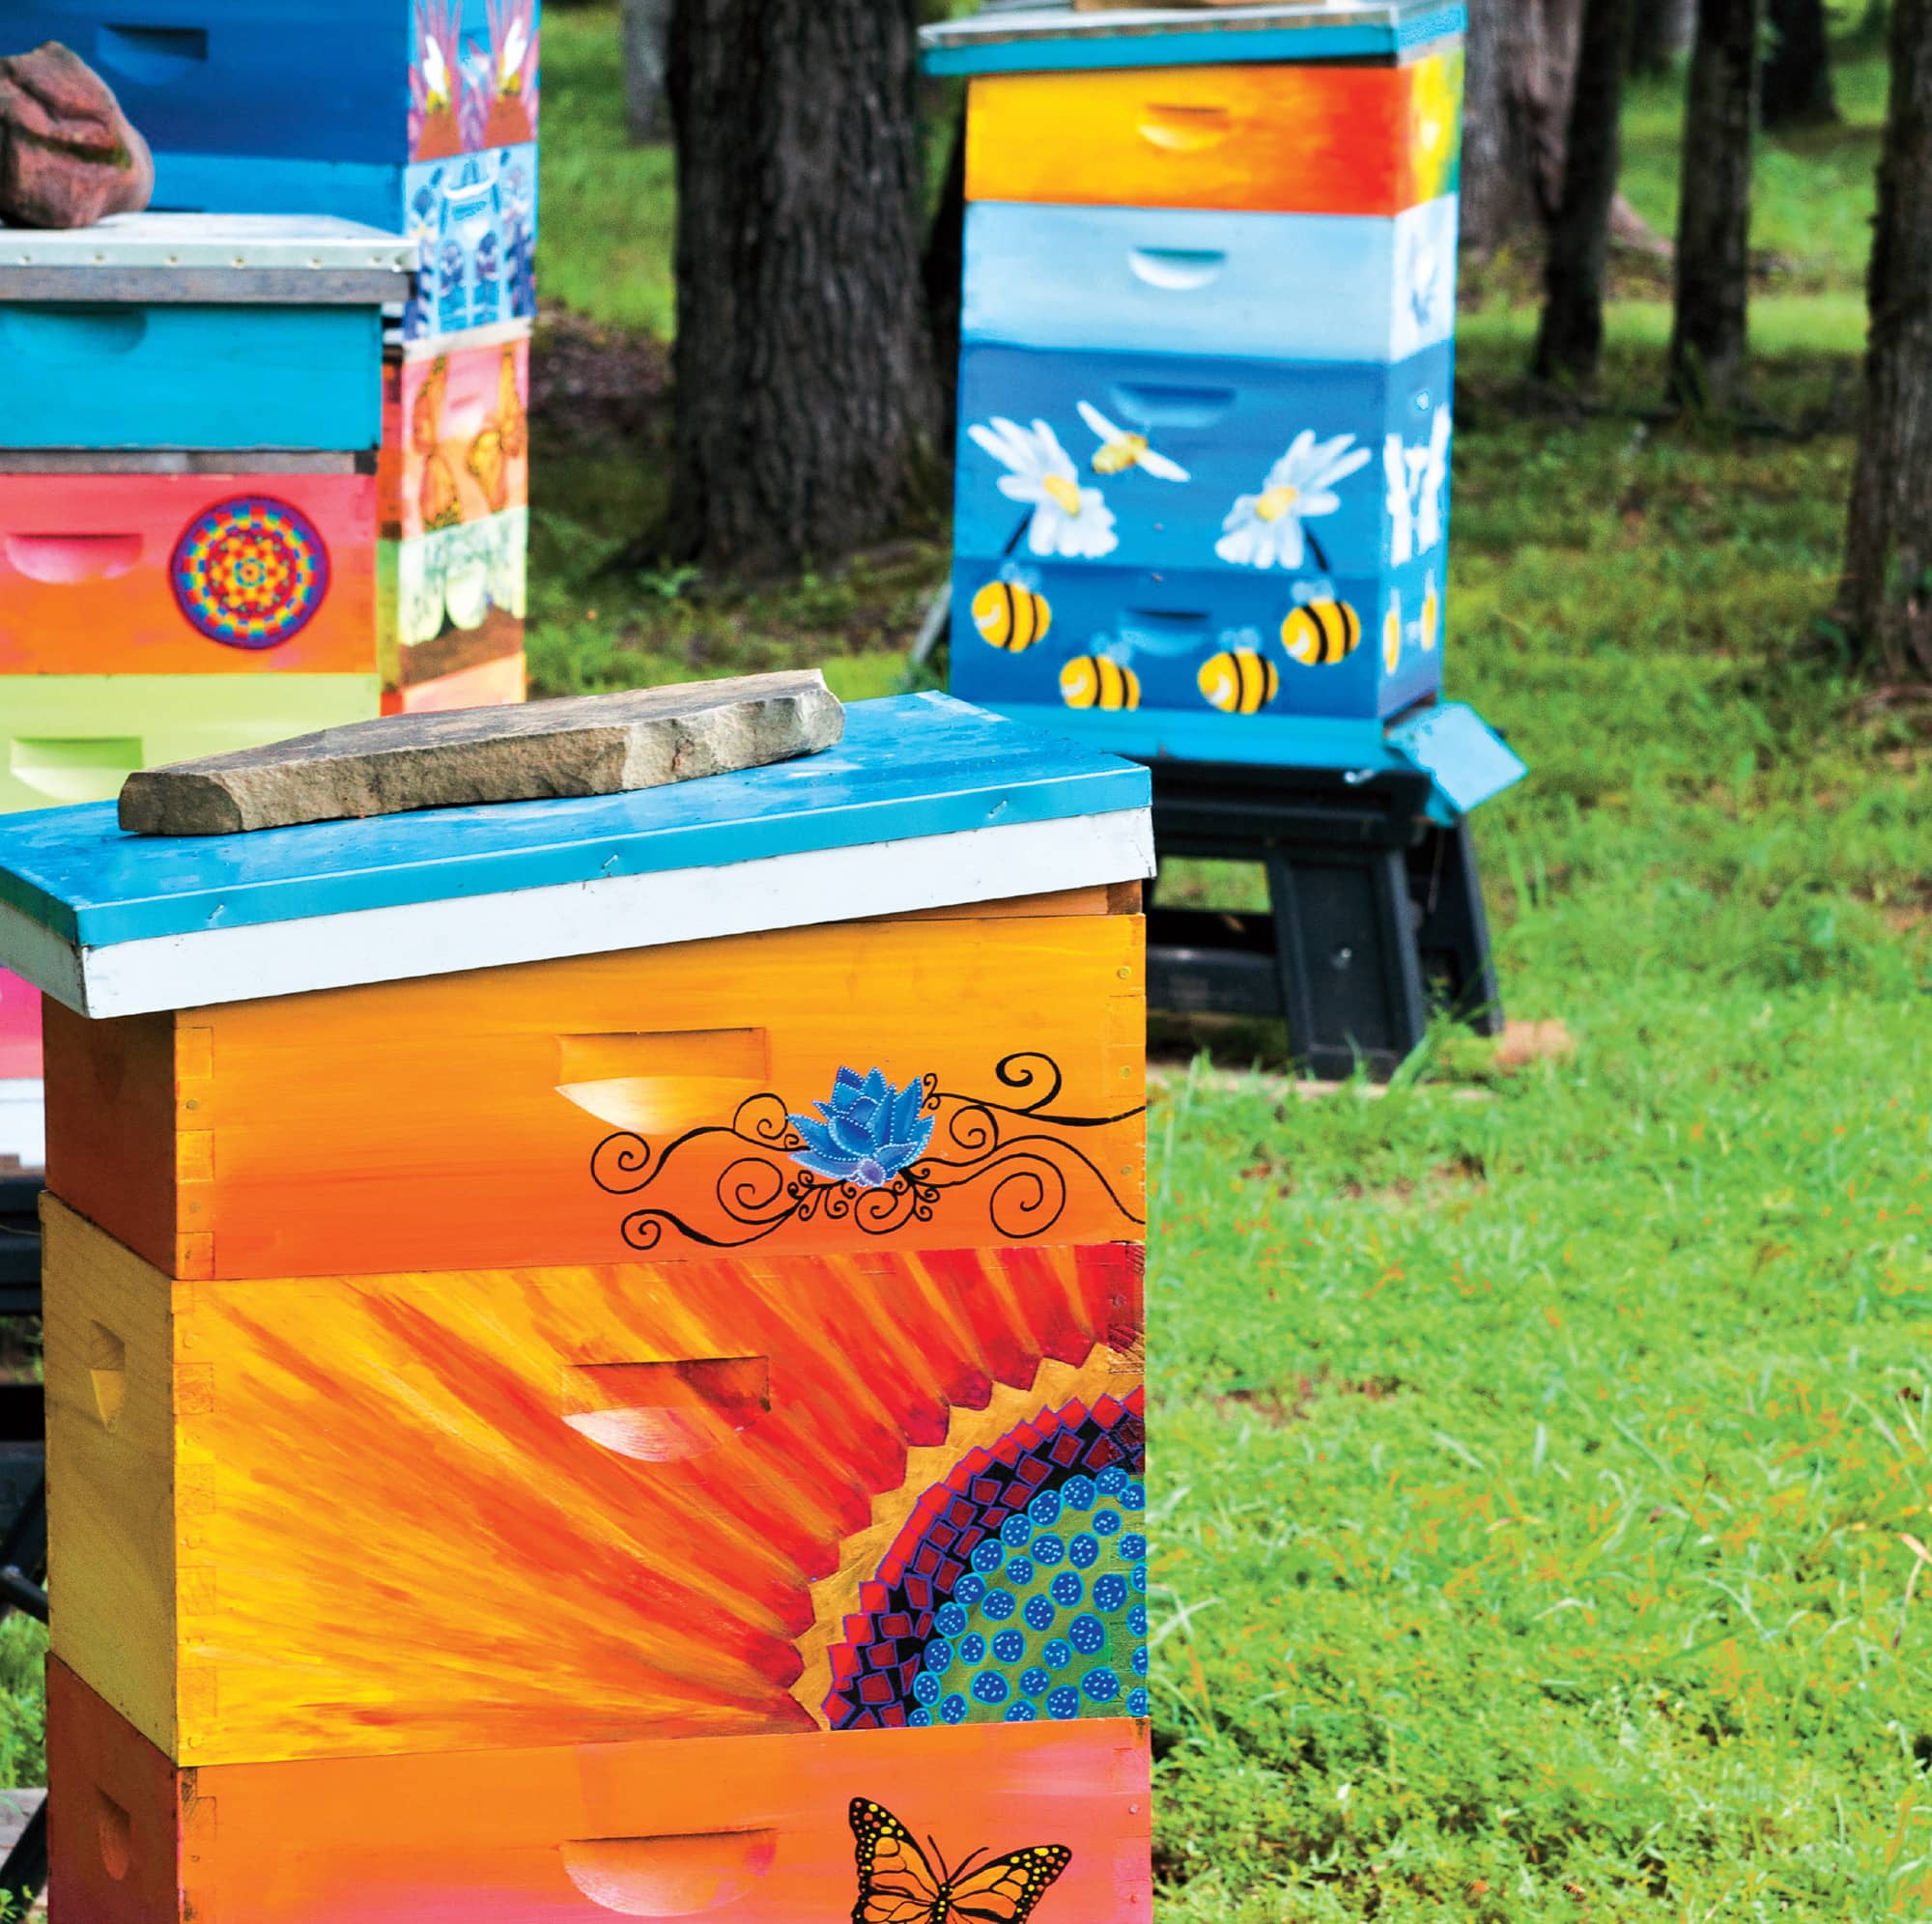
PAINTED HIVES |

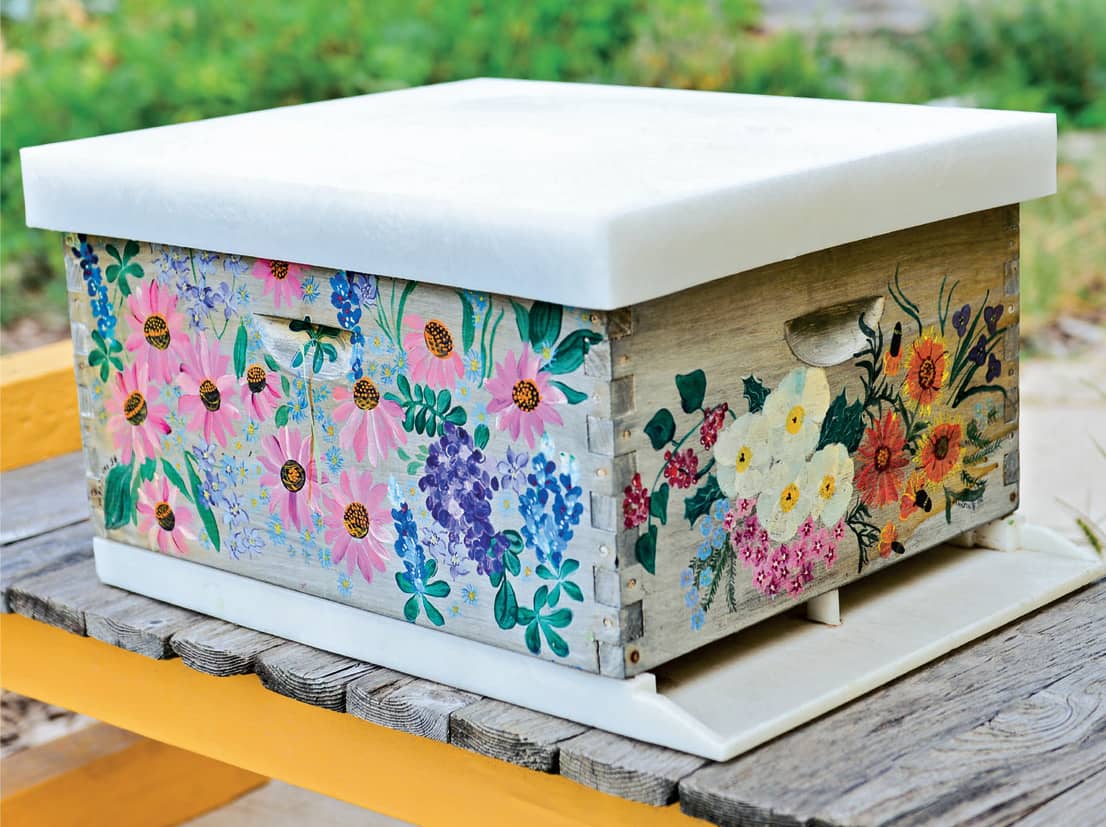
Beekeeper and bee-centric jewelry artist Anna Gieselman created this hive to celebrate the flower–bee connection.
Beehives are a blank canvas just waiting for inspiration to strike. Pick up a paintbrush and jazz up your apiary with one-of-a-kind creations.
BEE BUZZ
Beekeepers in Slovenia have a long history of beautifully painted hives going back over 250 years.
YOU WILL NEED
pencil
paper
exterior latex or acrylic paints
paintbrushes in a variety of sizes
polyurethane (optional)
DIRECTIONS
1. Design. Brainstorm design concepts for your hive. Things to consider:
• Will your hive have a theme?
• What images or subjects would you like to work with?
• Do you want to make a statement or express a thought or an opinion?
• Would you like realistic artwork or an abstract design?
• Do you prefer to paint random and spontaneous shapes, colors, and patterns?
• Will it be a group or family project, with each person designing and painting one panel of the hive?
2. Planning.
• Be bold, big, and colorful with your design. Details are difficult to see from a distance.
• Sketch many different designs for the art hive on paper. Do not spend time on details. Pick out your favorites to further develop.
• Choose the colors you will need. Black is great for outlines. Primaries (red, blue, and yellow) make it possible to mix your own colors.
3. Do it!
• Completely cover the hive with a base layer of exterior latex paint.
• Lightly sketch the design on the hive using a pencil. Do not worry about putting the lines on perfectly. (Fig. 1)
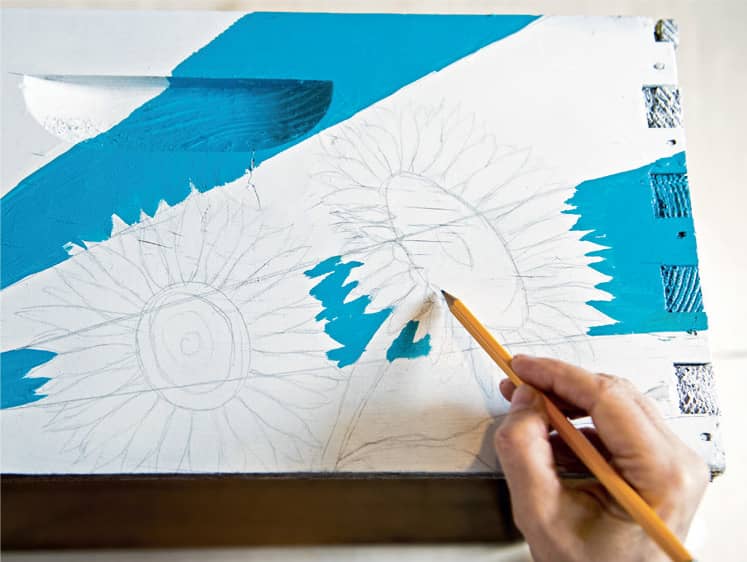
Fig. 1: Use a pencil to sketch your design onto the bee super.
• Draw with your full arm, not just with your fingers.
• If you are painting the outlines in black, do that first. Allow the paint to dry. Go back and fill in with color. Acrylic paints dry a little slower and contain more pigment for better coverage. Exterior latex is much cheaper.
• Paint away! If using acrylics, apply a protective polyurethane coat to the finished painting. (Fig. 2)
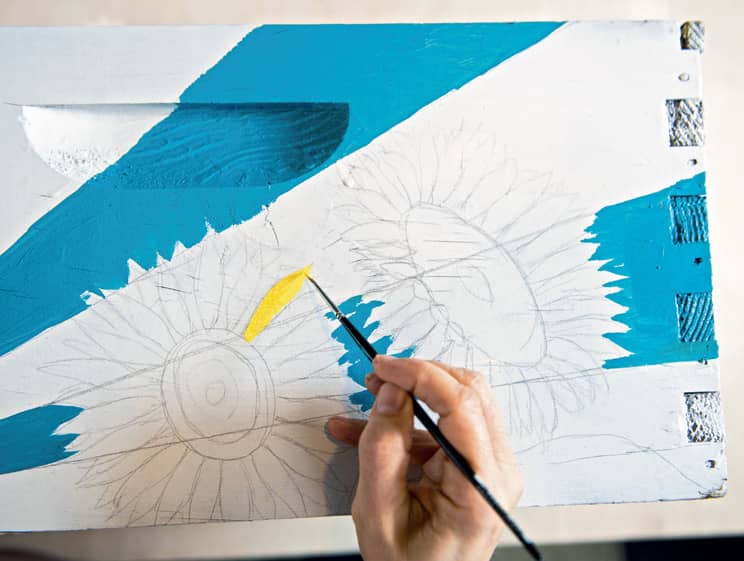
Fig. 2: Apply paint to the hive.
This hive, painted by Marjorie Molnar, is inspired by Bauernmalerei, a decorative painting style often referred to as Bavarian folk art.
TAKE IT FURTHER
• Make a collage by gluing photos and pictures onto the hive. Cover with a protective polyurethane finish.
• Promote artistic expression and honeybee awareness at a public event. Supply permanent markers for people to decorate a hive or write a message of gratitude to the bees or a beekeeping advocate.
• Have a “Wild and Wonderful Beehive Tour” by displaying hives painted by local artists in public places, such as the library, city hall, grocery store, farmers’ market, or other local businesses. Auction off the hives or cast monetary votes as a fundraiser.