Chapter 2
Wrestling with the Text
IN THIS CHAPTER
 Selecting, moving, copying, and deleting text
Changing the appearance, size, and color of text
Entering words by speaking, not typing
Hyperlinking to web pages and other places in a file
To enter text, you wiggle your fingers over the keyboard. Everybody knows that. Did you know you can also dictate words to PowerPoint, Word, and Outlook? This chapter explains how to enter words as well as change the look and size of text in an Office 365 file. It explains how to move, copy, and delete text. You find out how to quickly change a letter’s case and enter a symbol or foreign character. Finally, I show you how to link your files to the Internet by fashioning a hyperlink.
Manipulating the Text
This short but important part of Chapter 2 describes the many techniques for selecting, deleting, copying, and moving text. You find an inordinate number of tips on these pages because so many shortcuts for manipulating text are available. Master the many shortcuts and you cut down considerably on the time you spend editing text.
Selecting text
Before you can do anything to text — move it, boldface it, delete it, translate it — you have to select it. Here are speed techniques for selecting text:
To Select |
Do This |
A word |
Double-click the word. |
A few words |
Drag over the words. |
A paragraph |
Triple-click inside the paragraph (in Word, PowerPoint, and Outlook messages). |
A block of text |
Click the start of the text, hold down the Shift key, and click the end of the text. In Word you can also click the start of the text, press F8, and click at the end of the text. |
All text |
Press Ctrl+A. |
 Word offers a special command for selecting text with similar formats throughout a document. You can use this command to make wholesale changes to text. Select an example of the text that needs changing, and on the Home tab, click the Select button and choose Select All Text with Similar Formatting (you may have to click the Editing button first). Then choose formatting commands to change all instances of the text that you selected.
Moving and copying text
Office offers a number of different ways to move and copy text from place to place. Drum roll, please…. Select the text you want to move or copy and then use one of these techniques to move or copy it:
- Dragging and dropping: Move the mouse over the text and then click and drag the text to a new location. Drag means to hold down the mouse button while you move the pointer onscreen. If you want to copy rather than move the text, hold down the Ctrl key while you drag.
- Using the Clipboard: Move or copy the text to the Clipboard by clicking the Cut or Copy button, pressing Ctrl+X or Ctrl+C, or right-clicking and choosing Cut or Copy on the shortcut menu. The text is moved or copied to an electronic holding tank called the Clipboard. Paste the text by clicking the Paste button, pressing Ctrl+V, or right-clicking and choosing Paste. You can find the Paste, Cut, and Copy buttons on the Home tab.
Taking advantage of the Clipboard task pane
The Windows Clipboard is a piece of work. After you copy or cut text with the Cut or Copy command, the text is placed on the Clipboard. The Clipboard holds the last 24 items that you cut or copied. You can open the Clipboard task pane and view the last 24 items you cut or copied to the Clipboard and cut or copy them anew, as shown in Figure 2-1.
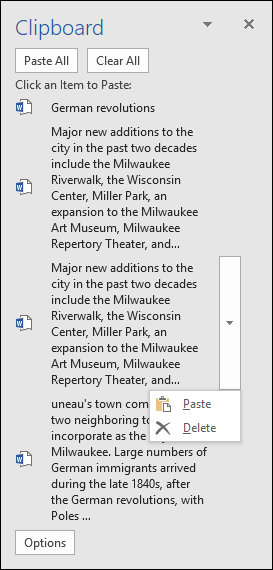
FIGURE 2-1: The Clipboard task pane in action.
To open the Clipboard task pane, go to the Home tab and click the Clipboard group button (it’s to the right of the word Clipboard in the upper-left corner of the screen). Icons next to the items tell you where they came from. To copy an item, click it or open its drop-down list and choose Paste. The Clipboard, which is available to all Office applications, is especially useful for copying text and graphics from one Office application to another.
Deleting text
To delete text, select it and press the Delete key. By the way, you can kill two birds with one stone by selecting text and then starting to type. The letters you type immediately take the place of and delete the text you selected.
 You can always click the Undo button (or press Ctrl+Z) if you regret deleting text. This button is located on the Quick Access toolbar.
Speaking, not Typing, the Words
Where Word, PowerPoint, and Outlook are concerned, you can be a dictator. You can dictate words rather than type them. As long as you speak slowly, and as long as the microphone on your computer works, Office can understand the words (most of them, anyway) and enter them for you.
Start by making sure that Office knows which language you want to speak. On the Home tab, click the down-arrow on the Dictate button and select a language or regional language from the drop-down list.
Place the cursor where you want the words to appear and follow these steps to dictate to Word, PowerPoint, or Outlook:
On the Home tab (or the Message tab in Outlook), click the Dictate button.
If the “Use Intelligent Services” dialog box appears, click the Turn On button and then click the Dictate button a second time.
Wait for a red circle to appear on the Dictate button.
Figure 2-2 shows what the red circle looks like.
Start talking slowly and clearly.
To enter a punctuation mark, say its name. For example, to enter a period, say “period.”
To start a new paragraph, say “new paragraph.”
Don’t use your keyboard while dictating. Using your keyboard tells Office that you want to type the words, not speak them.Click the Dictate button to stop dictating.
The red circle no longer appears on the Dictate button.

FIGURE 2-2: Dictating to Microsoft Word.
Dictation is one of Office’s “intelligent services.” In theory, dictation works better the more you use it as Office learns to recognize your speech inflections. For dictation to work, you have to trust Microsoft with your private data. Chapter 1 of this minibook explains how to trust (or not trust) Microsoft.
Changing the Look of Text
What text looks like is determined by its font, the size of the letters, the color of the letters, and whether text effects or font styles such as italic or boldface are in the text. What text looks like really matters in Word and PowerPoint because files you create in those applications are meant to be read by all and sundry. Even in Excel, Access, and Outlook messages, however, font choices matter because the choices you make determine whether your work is easy to read and understand.
A font is a collection of letters, numbers, and symbols in a particular typeface, including all italic and boldface variations of the letters, numbers, and symbols. Fonts have beautiful names, and some of them are many centuries old. Most computers come with these fonts: Arial, Tahoma, Times New Roman, and Verdana. By default, Office often applies the Calibri font to text.
Font styles include boldface, italic, and underline. By convention, headings are boldface. Italic is used for emphasis and to mark foreign words in text. Office provides a number of text effects. Text effects, also known as text attributes, include strikethrough and superscript. Use text effects sparingly.
The following pages look at the different ways to change the font, font size, and color of text, as well as how to assign font styles and text effects to text.
Choosing fonts for text
If you aren’t happy with the fonts you choose, select the text that needs a font change and change fonts with one of these techniques:
- Mini-toolbar: Move the pointer over the selected text. You see the mini-toolbar. Move the pointer over this toolbar and choose a font in the Font drop-down list, as shown in Figure 2-3.
- Shortcut menu: Right-click the selected text, choose Font to open the Font dialog box, and choose a font.
- Font drop-down list: On the Home tab, open the Font drop-down list and choose a font.
- Font dialog box: On the Home tab, click the Font group button (or press Ctrl+D). You see the Font dialog box. Choose a font and click OK.
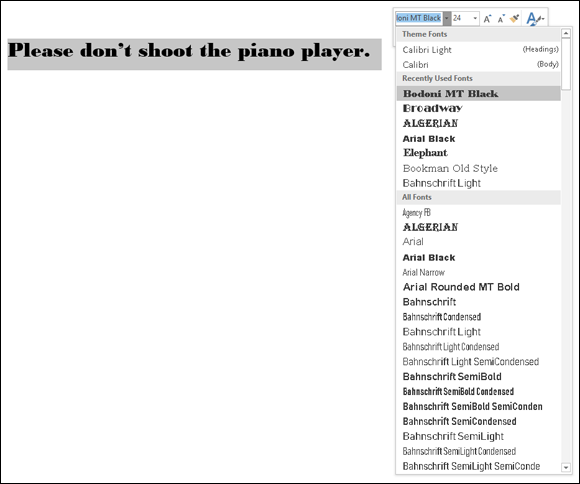
FIGURE 2-3: Changing fonts by way of the mini-toolbar.
Avoid using too many different fonts because a file with too many fonts looks like alphabet soup. The object is to choose a font that helps set the tone. An aggressive sales pitch calls for a strong, bold font; a technical presentation calls for a font that is clean and unobtrusive. Make sure that the fonts you select help communicate your message.
Changing the font size of text
Font size is measured in points; a point is  of an inch. The golden rule of font sizes goes something like this: the larger the font size, the more important the text. This is why headings are larger than footnotes. Select your text and use one of these techniques to change the font size of the letters:
- Mini-toolbar: Move the pointer over the text, and when you see the mini-toolbar, move the pointer over the toolbar and choose a font size on the Font Size drop-down list (refer to Figure 2-3).
- Font Size drop-down list: On the Home tab, open the Font Size drop-down list and choose a font size. You can live-preview font sizes this way.
- Font dialog box: On the Home tab, click the Font group button (or press Ctrl+D), and in the Font dialog box, choose a font size and click OK.
- Increase Font Size and Decrease Font Size buttons: Click these buttons (or press Ctrl+] or Ctrl+[) to increase or decrease the point size by the next interval on the Font Size drop-down list. You can find the Increase Font Size and Decrease Font Size buttons on the Home tab and the mini-toolbar. Watch the Font Size list or your text and note how the text changes size. This is an excellent technique when you want to “eyeball it” and you don’t care to fool with the Font Size drop-down list or Font dialog box.
Click the Increase Font Size and Decrease Font Size buttons when you’re dealing with fonts of different sizes and you want to proportionally change the size of all the letters. Drag the pointer over the text to select it before clicking one of the buttons.
If the font size you want isn’t on the Font Size drop-down list, enter the size. For example, to change the font size to 13.5 points, type 13.5 in the Font Size box and press Enter.
Applying font styles to text
There are four — count ’em, four — font styles: regular, bold, italic, and underline:
- Regular: This style is just Office’s way of denoting an absence of any font style.
- Italic: Italic is used for emphasis, when introducing a new term, and to mark foreign words such as violà, gung hay fat choy, and Qué magnifico! You can also italicize titles to make them a little more elegant.
- Bold: Bold text calls attention to itself.
- Underline: Underlined text also calls attention to itself, but use underlining sparingly. Later in this chapter, “Underlining text” looks at all the ways to underline text.
Select text and use one of these techniques to apply a font style to it:
- Home tab: Click the Bold, Italic, or Underline button.
- Keyboard: Press Ctrl+B to boldface text, Ctrl+I to italicize it, or Ctrl+U to underline it.
- Mini-toolbar: The mini-toolbar offers the Bold, Italic, and Underline buttons.
- Font dialog box: Select a Font Style option in the Font dialog box. To open this dialog box, visit the Home tab and click the Font group button (or press Ctrl+D).
To remove a font style, click the Bold, Italic, or Underline button a second time. You can also select text and then click the Clear Formatting button on the Home tab (in Word, PowerPoint, and Publisher).
Applying text effects to text
Text effects have various uses, some utilitarian and some strictly for yucks. Be careful with text effects. Use them sparingly and to good purpose. To apply a text effect, start on the Home tab (or the Format Text tab in Outlook messages) and do one of the following:
- Click a text effect button on the Home tab.
- Click the Font group button (or press Ctrl+D) and choose a text effect in the bottom half of the Font dialog box, as shown in Figure 2-4.
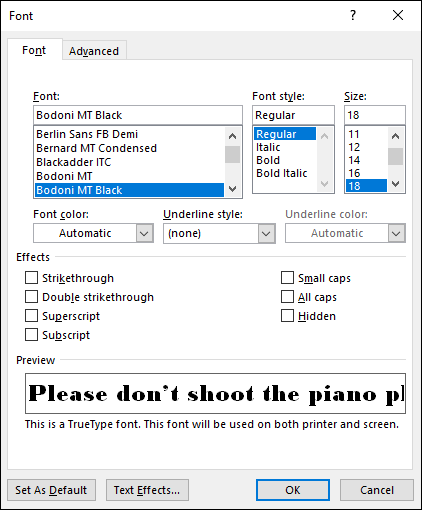
FIGURE 2-4: Text effects in the Font dialog box (Word).
Here’s a rundown of the different text effects (not all these effects are available in PowerPoint, Excel, Publisher, and Outlook):
- Strikethrough and double strikethrough: By convention, strikethrough is used to show where passages are struck from a contract or other important document. Double strikethrough, for all I know, is used to show where passages are struck out forcefully. Use these text effects to demonstrate ideas that you reject.
- Subscript: A subscripted letter is lowered in the text. In the following chemical formula, the 2 is lowered to show that two atoms of hydrogen are needed along with one atom of oxygen to form a molecule of water: H2O. (Press Ctrl+=.)
- Superscript: A superscripted letter or number is one that is raised in the text. Superscript is used in mathematical and scientific formulas, in ordinal numbers (1st, 2nd, 3rd), and to mark footnotes. In the theory of relativity, the 2 is superscripted: E = mc2. (Press Ctrl+Shift+plus sign.)
- Small Caps: A small cap is a small capital letter. You can find many creative uses for small caps. An all-small-cap title looks elegant. Be sure to type lowercase letters in order to create small caps. Type an uppercase letter, and Office refuses to turn it into a small cap. Not all fonts can produce small capital letters.
- All Caps: The All Caps text effect merely capitalizes all letters. Use it in styles to make sure that you enter text in all capital letters.
- Equalize Character Height (PowerPoint only): This effect makes all characters the same height and stretches the characters in text. You can use it to produce interesting effects in text box announcements.
Underlining text
You can choose among 17 ways to underline text, with styles ranging from Words Only to Wavy Line, and you can select a color for the underline in Word, PowerPoint, and Outlook. If you decide to underline titles, do it consistently. To underline text, select the text that you want to underline, go to the Home tab, and pick your poison:
- On the Home tab, click the Underline button. A single line runs under all the words you selected. In Word, you can open the drop-down list on the Underline button and choose from several ways to underline text.
- Click the Font group button (or press Ctrl+D) to open the Font dialog box (refer to Figure 2-4) and then choose an underline style from the drop-down list. You can also choose an underline color from the Underline Color drop-down list (in Word, PowerPoint, and Outlook). The color you select applies to the underline, not to the words being underlined.
To remove an underline from text, select the text and then click the Underline button on the Home tab.
Changing the color of text
Before you change the color of text, peer at your computer screen and examine the background theme or color you chose. Unless the color of the text is different from the theme or color, you can’t read the text. Besides choosing a color that contributes to the overall tone, choose a color that is easy to read.
Select the text that needs touching up and then use one of these techniques to change its color:
- Right-click to see the mini-toolbar, open the drop-down list on the Font Color button, and choose a color, as shown in Figure 2-5.
- On the Home tab, open the drop-down list on the Font Color button and choose a color.
- On the Home tab, click the Font group button (or press Ctrl+D) to open the Font dialog box, open the Font Color drop-down list, and choose a color.
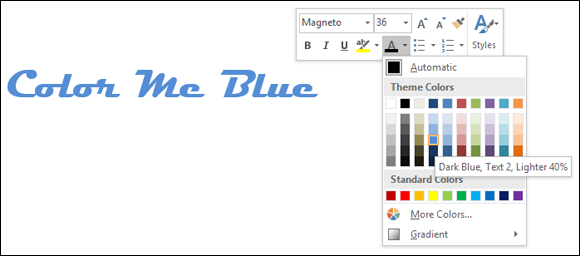
FIGURE 2-5: Choosing a font color on the mini-toolbar.
The Font Color drop-down list offers theme colors and standard colors. You are well advised to choose a theme color. These colors are deemed theme colors because they jibe with the theme you chose for your file.
Quick Ways to Handle Case, or Capitalization
Case refers to how letters are capitalized in words and sentences. Table 2-1 explains the different cases, and Figure 2-6 demonstrates why paying attention to case matters. In the figure, the PowerPoint slide titles are presented using different cases, and the titles are inconsistent with one another. In one slide, only the first letter in the title is capitalized (sentence case); in another slide, the first letter in each word is capitalized (capitalize each word); in another, none of the letters is capitalized (lowercase); and in another, all the letters are capitalized (uppercase). In your titles and headings, decide on a capitalization scheme and stick with it for consistency’s sake.
TABLE 2-1 Cases for Headings and Titles
Case |
Description |
Example |
Sentence case |
The first letter in the first word is capitalized; all other words are lowercase unless they are proper names. |
Man bites dog in January |
Lowercase |
All letters are lowercase unless they are proper names. |
man bites dog in January |
Uppercase |
All letters are uppercase no matter what. |
MAN BITES DOG IN JANUARY |
Capitalize each word |
The first letter in each word is capitalized. |
Man Bites Dog In January |
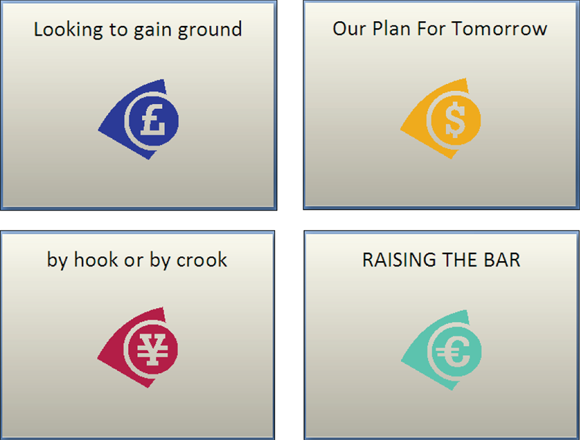
FIGURE 2-6: Capitalization schemes (clockwise from upper-left): sentence case; capitalize each word; uppercase; lowercase.
To change case in Word and PowerPoint, all you have to do is select the text, go to the Home tab, click the Change Case button, and choose an option on the drop-down list:
- Sentence case: Renders the letters in sentence case.
- lowercase: Makes all the letters lowercase.
- UPPERCASE: Renders all the letters as capital letters.
- Capitalize Each Word: Capitalizes the first letter in each word. If you choose this option for a title or heading, go into the title and lowercase the first letter of articles (the, a, an), coordinate conjunctions (and, or, for, nor), and prepositions unless they’re the first or last word in the title.
- tOGGLE cASE: Choose this option if you accidentally enter letters with the Caps Lock key pressed.
You can also change case by pressing Shift+F3. Pressing this key combination in Word and PowerPoint changes characters to uppercase, lowercase, each word capitalized, and back to uppercase again.
Entering Symbols and Foreign Characters
Don’t panic if you need to enter an umlaut, grave accent, or cedilla because you can do it by way of the Symbol dialog box, shown in Figure 2-7. You can enter just about any symbol and foreign character by way of this dialog box. Click where you want to enter a symbol or foreign character and follow these steps to enter it:
On the Insert tab, click the Symbol button. (You may have to click the Symbols button first, depending on the size of your screen.)
In Word, Outlook, and Publisher, click More Symbols after you click the Symbol button if no symbol on the drop-down list does the job for you. You see the Symbol dialog box (refer to Figure 2-7).
If you’re looking to insert a symbol, not a foreign character, choose Webdings or Wingdings 1, 2, or 3 in the Font drop-down list.
Webdings and the Wingdings fonts offer all kinds of weird and wacky symbols.
Select a symbol or foreign character.
You may have to scroll to find the one you want.
Click the Insert button to enter the symbol and then click Close to close the dialog box.
The Symbol dialog box lists the last several symbols or foreign characters you entered under Recently Used Symbols. See whether the symbol you need is listed there. It spares you the trouble of rummaging in the Symbol dialog box. In Word, Outlook, and Publisher, you see the last several symbols or foreign characters you entered on a drop-down list after you click the Symbol button.
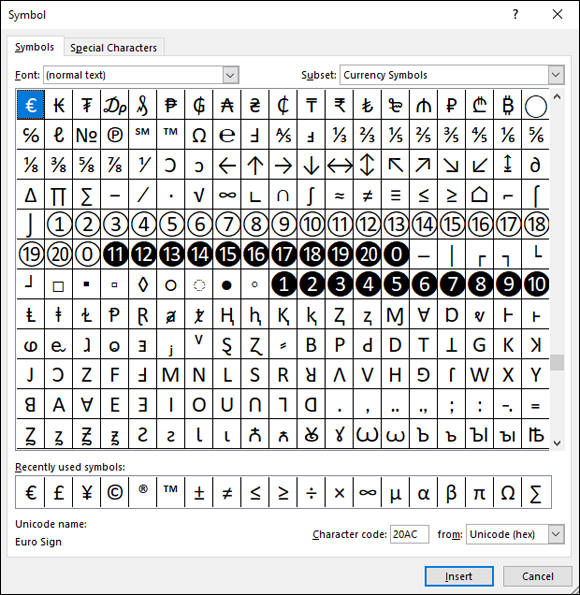
FIGURE 2-7: To enter a symbol or foreign character, select it and click the Insert button.
Creating Hyperlinks
A hyperlink is an electronic shortcut from one place to another. If you’ve spent any time on the Internet, you know what a hyperlink is. Clicking hyperlinks on the Internet takes you to different web pages or different places on the same web page. In the Office applications, you can use hyperlinks to connect readers to your favorite web pages or to a different page, slide, or file. You can fashion a link out of a word or phrase as well as any object — a graphic image, text box, shape, or picture.
These pages explain how to insert a hyperlink to another place in your file as well as create links to web pages. You also discover how to enter an email hyperlink that makes it easy for others to email you. By the way, the Office applications create a hyperlink for you automatically when you type a word that begins with www. and ends with .com or .net. The programs create an automatic email hyperlink when you enter letters that include the at symbol (@) and end in .com or .net.
Linking a hyperlink to a web page
It could well be that a web page on the Internet has all the information your readers need. In that case, you can link to the web page so that viewers can visit it in the course of viewing your file. When a viewer clicks the link, a web browser opens and the web page appears.
Follow these steps to hyperlink your file to a web page on the Internet:
Select the text or object that will form the hyperlink.
For example, select a line of text or phrase if you want viewers to be able to click it to go to a web page.
On the Insert tab, click the Link button (or press Ctrl+K).
You see the Insert Hyperlink dialog box, as shown in Figure 2-8. (Depending on the size of your screen, you may have to click the Links button before you can get to the Hyperlink button.) You can also open the dialog box by right-clicking an object or text and choosing Link on the shortcut menu.
- Under Link To, select Existing File or Web Page.
In the Address text box, enter the address of the web page to which you want to link, as shown in Figure 2-8.
From easiest to hardest, here are techniques for entering web page addresses:
- Click the Browse the Web button: Your web browser opens after you click this button. Go to the web page you want to link to, copy the page’s address in your web browser, and paste the address in the Address text box.
- Click Browsed Pages: The dialog box lists web pages you recently visited after you click this button. Choose a web page.
- Type (or copy) a web page address into the Address text box: Enter the address of the web page. You can right-click the text box and choose Paste to copy a web page address into the text box.
Click the ScreenTip button, enter a ScreenTip in the Set Hyperlink ScreenTip dialog box, and click OK.
Viewers can read the ScreenTip you enter when they move their pointers over the hyperlink.
Click OK in the Insert Hyperlink dialog box.
I would test the hyperlink if I were you to make sure that it takes viewers to the right web page. To test a hyperlink, Ctrl+click it or right-click it and choose Open Hyperlink on the shortcut menu.
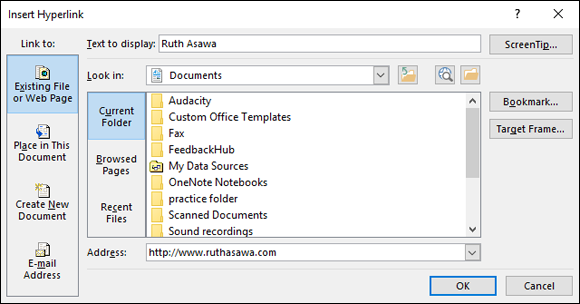
FIGURE 2-8: Enter the web page target in the Address text box to create a hyperlink to a web page.
Creating a hyperlink to another place in your file
Follow these steps to create a hyperlink to another place in your file:
- Select the text or object that will form the hyperlink.
On the Insert tab, click the Link button (or press Ctrl+K).
You see the Insert Hyperlink dialog box. (Depending on the size of your screen, you may have to click the Links button before you see the Hyperlink button.) Another way to open this dialog box is to right-click and choose Link in the shortcut menu.
Under Link To, select Place in This Document.
What you see in the dialog box depends on which program you’re working in:
- Word: You see bookmarks and headings to which you’ve assigned a heading style.
- PowerPoint: You see a list of slides in your presentation, as well as links to the first, last, next, and previous slide, as shown in Figure 2-9.
- Excel: You see boxes for entering cell references and defined cell names.
- Select the target of the hyperlink.
Click the ScreenTip button.
You see the Set Hyperlink ScreenTip dialog box, as shown in Figure 2-9.
Enter a ScreenTip and click OK.
When viewers move their pointers over the link, they see the words you enter. Enter a description of where the hyperlink takes you.
Click OK in the Insert Hyperlink dialog box.
To test your hyperlink, move the pointer over it. You should see the ScreenTip description you wrote. Ctrl+click the link to see whether it takes you to the right place.
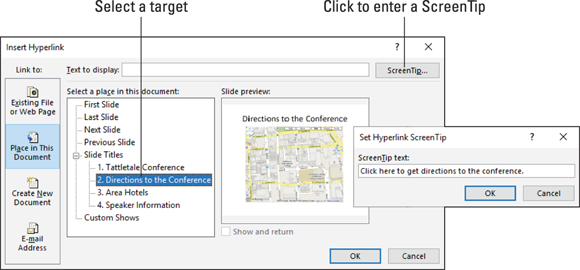
FIGURE 2-9: You can also create a hyperlink to a different place in a file.
Creating an email hyperlink
An email hyperlink is one that opens an email program. These links are sometimes found on web pages so that anyone visiting a web page can conveniently send an email message to the person who manages the web page. When you click an email hyperlink, your default email program opens. And if the person who set up the link was thorough about it, the email message is already addressed and given a subject line.
Include an email hyperlink in a file if you’re distributing the file to others and would like them to be able to comment on your work and send the comments to you.
Follow these steps to put an email hyperlink in a file:
- Select the words or object that will constitute the link.
On the Insert tab, click the Link button (or press Ctrl+K).
The Insert Hyperlink dialog box appears.
Under Link To, click E-Mail Address.
Text boxes appear for entering an email address and a subject message.
Enter your email address and a subject for the messages that others will send you.
Office inserts the word mailto: before your email address as you enter it.
Click OK.
Test the link by Ctrl+clicking it. Your default email program opens. The email message is already addressed and given a subject.
Repairing and removing hyperlinks
From time to time, check the hyperlinks in your file to make sure that they still work. Clicking a hyperlink and having nothing happen is disappointing. Hyperlinks get broken when web pages and parts of files are deleted.
To repair or remove a hyperlink, right-click the link and choose Edit Hyperlink on the shortcut menu (or click in the link and then click the Link button on the Insert tab). You see the Edit Hyperlink dialog box. This dialog box looks and works just like the Insert Hyperlink dialog box. Sometimes you can repair a link simply by editing it in this dialog box.
- Repairing a link: Select a target in your file or a web page and click OK.
- Removing a link: Click the Remove Link button. You can also remove a hyperlink by right-clicking the link and choosing Remove Hyperlink on the shortcut menu.