Chapter 3
Speed Techniques Worth Knowing About
IN THIS CHAPTER
 Undoing mistakes and repeating actions
 Zooming to get a better view of your work
 Working with two different files at the same time
 Entering hard-to-type text with the AutoCorrect command
This brief chapter takes you on a whirlwind tour of shortcut commands that can save you time and effort no matter which Office application you’re working in. This chapter is devoted to people who want to get a task done quickly and get away from their computers. It explains the Undo and Repeat commands, zooming in and out, and opening more than one window on the same file. You also discover how to display windows in different ways, correct your typos automatically, and enter hard-to-type terminology with a simple flick of the wrist.
Undoing and Repeating Commands
If I were to choose two commands for the Hall of Fame, they would be the Undo command and the Repeat command. One allows you to reverse actions you regret doing, and the other repeats a previous action without your having to choose the same commands all over again. Undo and Repeat are explained forthwith.
Undoing a mistake
Fortunately for you, all is not lost if you make a big blunder because Office has a marvelous little tool called the Undo command. This command “remembers” your previous editorial and formatting changes. As long as you catch your error in time, you can undo your mistake.
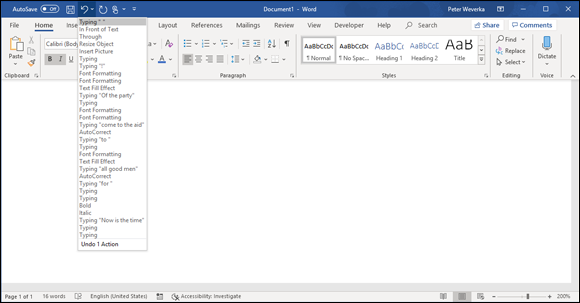
Click the Undo button on the Quick Access toolbar (or press Ctrl+Z) to undo your most recent change. If you made your error and went on to do something else before you caught it, open the drop-down list on the Undo button. It lists your previous actions, as shown in Figure 3-1. Click the action you want to undo, or if it isn't on the list, scroll until you find the error and then click it.

FIGURE 3-1: Fixing a mistake with the Undo drop-down list.
Repeating an action — and quicker this time
The Quick Access toolbar offers a button called Repeat that you can click to repeat your last action. This button can be a mighty, mighty timesaver. For example, if you just changed fonts in one heading and you want to change another heading in the same way, select the heading and click the Repeat button (or press F4 or Ctrl+Y). Move the pointer over the Repeat button to see, in a pop-up box, what clicking it does.
After you click the Undo button, the Repeat button changes names and becomes the Redo button. Click the Redo button to “redo” the command you “undid.” In other words, if you regret clicking the Undo button, you can turn back the clock by clicking Redo.
Zooming In, Zooming Out
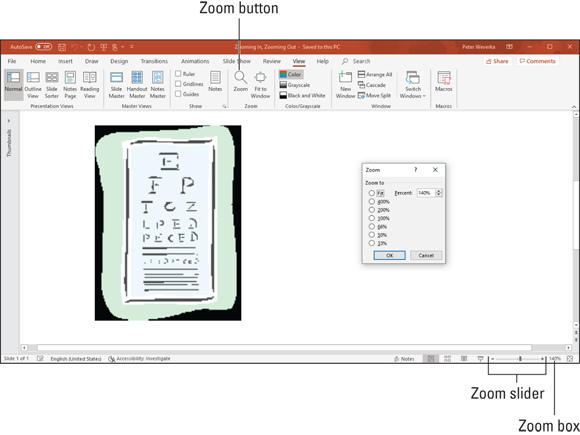
Eyes weren’t meant to stare at the computer screen all day, which makes the Zoom controls all the more valuable. You can find these controls on the View tab and in the lower-right corner of the window, as shown in Figure 3-2. Use them freely and often to enlarge or shrink what is on the screen and preserve your eyes for important things, such as gazing at the sunset.

FIGURE 3-2: The Zoom controls.
Meet the Zoom controls:
- Zoom dialog box: Click the Zoom button on the View tab or the Zoom box (the % listing) to display the Zoom dialog box, as shown in Figure 3-2. From there, you can select an option button or enter a Percent measurement.
- Zoom buttons: Click the Zoom In or Zoom Out button on the Zoom slider to zoom in or out in 10-percent increments.
- Zoom slider: Drag the Zoom slider left to shrink or right to enlarge what is on your screen.
- Mouse wheel: If your mouse has a wheel, you can hold down the Ctrl key and spin the wheel to quickly zoom in or out.
Viewing a File through More than One Window
By way of the commands in the Window group in the View tab, you can be two places simultaneously, at least where Office is concerned. You can work on two files at one time. You can place files side by side on the screen and do a number of other things to make your work a little easier.
On the View tab, Word, Excel, and PowerPoint offer these buttons in the Window group:
- New Window: Opens another window on your file so that you can be two places simultaneously in the same file. To go back and forth between windows, click a taskbar button or click the Switch Windows button and choose a window name on the drop-down list. Click a window’s Close button when you finish looking at it.
- Arrange All: Arranges open windows onscreen so that all are visible. Similar to Arrange All, the Cascade command in PowerPoint displays open windows so that they overlap.
- Switch Windows: Opens a drop-down list with open windows so that you can travel between windows.
You can also take advantage of these Window buttons in Word and Excel to compare files:
- View Side by Side: Displays files side by side so that you can compare and contrast them.
- Synchronous Scrolling: Permits you to scroll two files at the same rate so that you can proofread one against the other. To use this command, start by clicking the View Side by Side button. After you click the Synchronous Scrolling button, click the Reset Window Position button so that both files are displayed at the same size onscreen.
- Reset Window Position: Makes files being shown side by side the same size onscreen to make them easier to compare.
Correcting Typos on the Fly
The unseen hand of Office 365 corrects some typos and misspellings automatically. For example, try typing accomodate with one m — Office corrects the misspelling and inserts the second m for you. Try typing perminent with an i instead of an a — the invisible hand of Office corrects the misspelling, and you get permanent. While you’re at it, type a colon and a close parenthesis :) — you get a smiley face.
As good as the AutoCorrect feature is, you can make it even better. You can also add the typos and misspellings you often make to the list of words that are corrected automatically.
Office corrects common spelling errors and turns punctuation mark combinations into symbols as part of its AutoCorrect feature. To see which typos are corrected and which punctuation marks are turned into symbols, open the AutoCorrect dialog box by following these steps:
On the File tab, choose Options.
You see the Options dialog box.
- Go to the Proofing category.
Click the AutoCorrect Options button.
The AutoCorrect dialog box opens.
Go to the AutoCorrect tab.
As shown in Figure 3-3, the AutoCorrect tab lists words that are corrected automatically. Scroll down the Replace list and have a look around. Go ahead. Make yourself at home.

FIGURE 3-3: As you type, words in the Replace column are replaced automatically with words in the With column.
No doubt, you make the same typing errors and spelling errors time and time again. To keep from making these errors, you can tell Office to correct them for you automatically. You do that by entering the misspelling and its corrected spelling in the AutoCorrect dialog box (see Figure 3-3).
Entering Text Quickly with the AutoCorrect Command

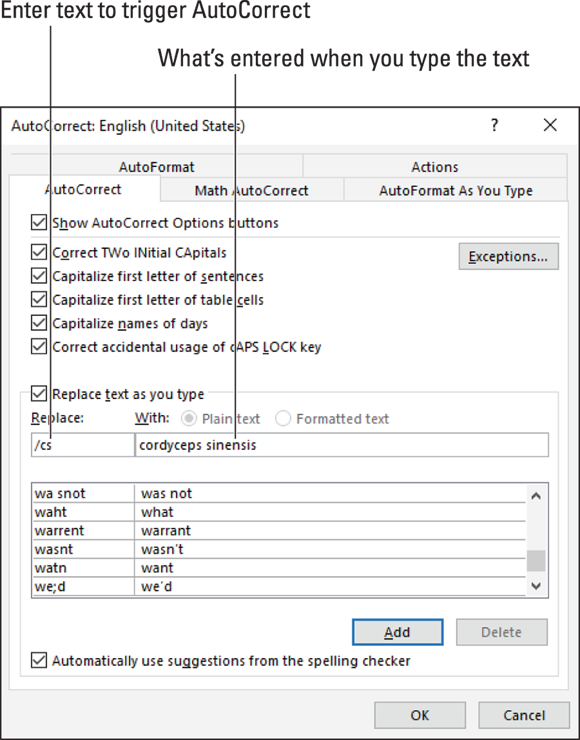
FIGURE 3-4: With a little cunning, you can use AutoCorrect to enter hard-to-type text.
In the Replace column in the AutoCorrect tab are hundreds of common typing errors and codes that Office corrects automatically. The program corrects the errors by entering text in the With column whenever you mistakenly type the letters in the Replace column. However, you can also use this dialog box for the secondary purpose of quickly entering text.
To make AutoCorrect work as a means of entering text, you tell Office to enter the text whenever you type three or four specific characters. In Figure 3-4, for example, Office is instructed to insert the words cordyceps sinensis (a mushroom genus) whenever I enter the characters /cs (and press the spacebar). Follow these steps to use AutoCorrect to enter text:
- Open the AutoCorrect tab of the AutoCorrect dialog box (see Figure 3-4).
In the Replace text box, enter the three or four characters that will trigger the AutoCorrect mechanism and make it enter your text.
 Don’t enter a word, or characters that you might really type someday, in the Replace box. If you do, the AutoCorrect mechanism might kick in when you least expect it. Enter three or four characters that never appear together. Also, start all AutoCorrect entries with a slash (/). You might forget which characters trigger the AutoText entry or decide to delete your AutoCorrect entry someday. By starting it with a slash, you can find it easily in the AutoCorrect dialog box at the top of the Replace list.
- In the With text box, enter the hard-to-type name or word(s) that will appear when you enter the Replace text.
- Click the Add button.
Click OK.
Test your AutoCorrect entry by typing the Replace text you entered in Step 2 (which, of course, includes the slash I recommended) and pressing the spacebar. (AutoCorrect doesn’t do its work until you press the spacebar.)
To delete an AutoCorrect entry, open the AutoCorrect dialog box, select the entry, and click the Delete button.
 Remember, however, that choosing an action far down the Undo list also reverses the actions before it on the list. For example, if you undo the 19th action on the list, you also undo the 18 more recent actions above it.
 Each Office program offers its own special Zoom commands in the Zoom group on the View tab. In Word, for example, you can display one page or two pages; in Excel, you can click the Zoom to Selection button to enlarge a handful of cells. Make friends with the Zoom commands. They never let you down.