Chapter 8
Tools for Reports and Scholarly Papers
IN THIS CHAPTER
 Working in Outline view
Creating a table of contents
Indexing and cross-referencing your work
Managing footnotes and endnotes
This chapter is hereby dedicated to everyone who has had to delve into the unknown and write a report about it. Writing reports, manuals, and scholarly papers is not easy. You have to explore uncharted territory. You have to contemplate the ineffable. And you have to write bibliographies and footnotes and maybe an index, too. Word cannot take you directly to uncharted territory, but it can take some of the sting out of it.
This chapter explains how to construct an outline, handle footnotes and endnotes, generate a table of contents, index a document, include cross-references in documents, and stitch together a bibliography.
Alphabetizing a List
Which comes first in an alphabetical list, “San Jose, California” or “San José, Costa Rica”? You could research the matter on your own, delving into various dictionaries and online references, or you could rely on the Sort button for the answer. Follow these steps to quickly alphabetize a list:
- Select the list.
On the Home tab, click the Sort button.
You see the Sort Text dialog box. The Then By options are for sorting tables; they don’t concern you, because you’re sorting a list.
Click OK.
That was easy.
Outlines for Organizing Your Work
Outline view is a great way to see at a glance how your document is organized and whether you need to organize it differently. To take advantage of this feature, you must have assigned heading styles to the headings in your document (Chapter 3 of this minibook explains styles). In Outline view, you can see all the headings in your document. If a section is in the wrong place, you can move it simply by dragging an icon or by clicking one of the buttons on the Outlining tab. To change the rank of a heading, simply click a button to promote or demote it.
To switch to Outline view, go to the View tab and click the Outline button (or press Alt+Ctrl+O). You see the Outlining tab, as shown in Figure 8-1. Rather than see text, you see the headings in your document, as well as the first line underneath each heading. Now you get a sense of what is in your document and whether it is organized well. By choosing an option from the Show Level drop-down list, you can decide which headings to see onscreen.
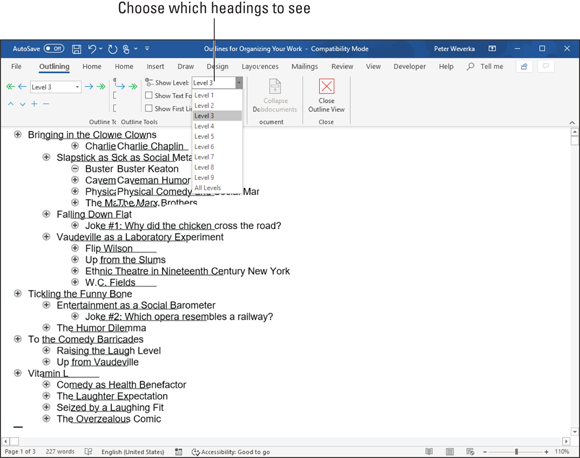
FIGURE 8-1: A document in Outline view.
To leave Outline view when you’re done reorganizing your document, click the Close Outline View button or a view button apart from Outline.
Viewing the outline in different ways
Before you start rearranging your document in Outline view, get a good look at it:
- View some or all headings. Choose an option from the Show Level drop-down list (refer to Figure 8-1). To see only first-level headings, for example, choose Level 1. To see first-, second-, and third-level headings, choose Level 3. Choose All Levels to see all the headings.
- View heading formats. Click the Show Text Formatting check box. When this check box is selected, you can see how headings were formatted and get a better idea of their ranking in your document.
- View or hide the subheadings in one section. To see or hide the subheadings and text in one section of a document, select that section by clicking the plus sign beside its heading; then, click the Expand button (or press Alt+Shift+plus sign) to see the subheadings, or click the Collapse button (or press Alt+Shift+minus sign) to hide the subheadings. You can also double-click the plus sign beside a heading to view or hide its subheadings. (Later in this chapter, “Collapsing and Expanding Parts of a Document” explains how to view or hide subheadings in Print Layout view.)
- View or hide paragraph text. Click the Show First Line Only check box (or press Alt+Shift+L). When this check box is selected, you see only the first line in each paragraph. First lines are followed by an ellipsis (…) so you know that more text follows.
 Notice the plus and minus icons next to the headings and the text. A plus icon means that the item has subheadings and text under it. For example, headings almost always have plus icons because text comes after them. A minus icon means that nothing is found below the item in question. For example, body text usually has a minus icon because body text is lowest on the Outline totem pole.
Rearranging document sections in Outline view
Outline view is mighty convenient for moving sections in a document and for promoting and demoting sections. Use these techniques to rearrange and reorganize your document:
- Move a section. To move a section up or down in the document, select it and click the Move Up or Move Down button (or press Alt+Shift+↑ or Alt+Shift+↓). You can also drag the plus sign to a new location. If you want to move the subheadings and subordinate text along with the section, be sure to click the Collapse button to tuck all the subheadings and subtext into the heading before you move it.
- Promote and demote headings. Click the heading and then click the Promote button or Demote button (or press Alt+Shift+← or Alt+Shift+→). For example, you can promote a Level 3 heading to Level 2 by clicking the Promote button. Click the Promote To Heading 1 button to promote any heading to a first-level heading; click the Demote To Body text button to turn a heading into prose.
- Choose a new level for a heading. Click the heading and choose a new heading level from the Outline Level drop-down list.
Collapsing and Expanding Parts of a Document
As long as you apply heading styles (Heading 1, Heading 2, and so on) to headings, you can collapse and expand parts of a document. Click the Collapse button next to a heading to conceal its subheadings and subtext. Collapsing clears the screen of material that doesn’t require your attention. Click the Expand button next to a heading to display its subheadings and subtext.
Figure 8-2 demonstrates expanding and collapsing. Use these techniques to collapse or expand the subheadings and subtext under a heading:
- Collapsing: Click the Collapse button to the left of a heading.
- Expanding: Move the pointer over a heading to display its Expand button; then click the Expand button.

FIGURE 8-2: Collapse subheadings and subtext under a heading to keep the screen from getting crowded.
 You can collapse headings by default. On the Home tab, click the Paragraph group button to open the Paragraph dialog box. On the Indents and Spacing tab, choose an outline level and select the Collapsed by Default check box.
Generating a Table of Contents
A book-size document or long report isn’t worth very much without a table of contents (TOC). How else can readers find what they’re looking for? Generating a table of contents with Word is easy, as long as you give the headings in the document different styles — Heading 1, Heading 2, and so on (Chapter 3 of this minibook explains styles). The beautiful thing about Word TOCs is the way they can be updated nearly instantly. If you add a new heading or erase a heading, you can update the TOC with a snap of your fingers. Moreover, you can quickly go from a TOC entry to its corresponding heading in a document by Ctrl+clicking the entry.
Before you create your TOC, create a new section in which to put it and number the pages in the new section with Roman numerals (Chapter 2 of this minibook explains sections and how to number pages). TOCs, including the TOC in this book, are usually numbered in this way. The first entry in the TOC should cite page number 1. If you don’t heed my advice and create a new section, the TOC will occupy the first few numbered pages of your document, and the numbering scheme will be thrown off.
Creating a TOC
To create a table of contents, place the cursor where you want the TOC to go, visit the References tab, and click the Table of Contents button. On the drop-down list, choose one of Word’s automatic TOC options or choose Custom Table of Contents to fashion a TOC on your own in the Table of Contents dialog box. (See “Customizing a TOC,” later in this chapter, for information about fashioning a TOC in the Table of Contents dialog box.)
Suppose that you want to copy a TOC to another document? To copy a TOC, drag the pointer down its left margin to select it, and then press Ctrl+Shift+F9. Next, use the Copy and Paste commands to copy the TOC to the other document. Because Word gives the text of TOCs the Hyperlink character style, you have to change the color of the text in the TOC (it’s blue) and remove the underlines. As for the original TOC, you “disconnected” it from the headings in your document when you pressed Ctrl+Shift+F9. Press the Undo button to undo the effects of pressing Ctrl+Shift+F9 and “disconnecting” your TOC from the headers to which it refers.
Updating and removing a TOC
Follow these instructions to update and remove a TOC:
- Updating a TOC: If you add, remove, or edit a heading in your document, your TOC needs updating. To update it, go to the References tab and click the Update Table button, or click in the TOC and press F9. A dialog box asks how to update the TOC. Either update the page numbers only or update the entire table, including all TOC entries and page numbers.
- Removing a TOC: On the References tab, click the Table of Contents button and choose Remove Table of Contents on the drop-down list.
Customizing a TOC
Want to tinker with your TOC? You can number the headings in different ways and tell Word to include or exclude certain headings.
To change around a TOC, click inside it, go to the References tab, click the Table of Contents button, and choose Custom Table of Contents on the drop-down list. You see the Table of Contents dialog box shown in Figure 8-3. Choose options to declare which headings you want for your TOC and how you want to format it:
- Showing page numbers: Deselect the Show Page Numbers box if you want your TOC to be a simple list that doesn’t refer to headings by page.
- Aligning the page numbers: Select the Right Align Page Numbers check box if you want page numbers to line up along the right side of the TOC so that the ones and tens line up under each other.
- Choosing a tab leader: A leader is the punctuation mark that appears between the heading and the page number the heading is on. If you don’t want periods as the leader, choose another leader or choose (None).
- Choosing a format: Choose a format from the Formats drop-down list if you don't care to use the one from the template. Just be sure to watch the Print Preview and Web Preview boxes to see the results of your choice.
 Choosing a TOC depth: The Show Levels box determines how many heading levels are included in the TOC. Unless your document is a legal contract or other formal paper, enter a 2 or 3 here. A TOC is supposed to help readers find information quickly. Including lots of headings that take a long time to read through defeats the purpose of having a TOC.
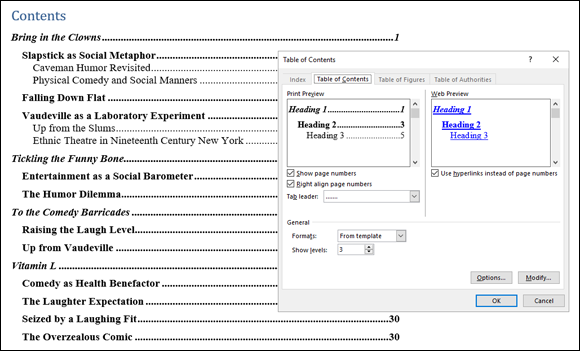
FIGURE 8-3: You can decide for yourself which headings go in a TOC and how it’s numbered.
Changing the structure of a TOC
Sometimes the conventional TOC that Word generates doesn’t do the trick. Just because a heading has been given the Heading 1 style doesn’t mean that it should receive first priority in the TOC. Suppose that you created another style called Chapter Title that should stand taller in the hierarchy than Heading 1. In that case, you need to rearrange the TOC so that Heading 1 headings rank second, not first, in the TOC hierarchy.
Use the Table of Contents Options and Style dialog boxes to tinker with a TOC. These dialog boxes are shown in Figure 8-4. To open them, click, respectively, the Options button or Modify button in the Table of Contents dialog box (refer to Figure 8-3).
- Assigning TOC levels to paragraph styles: The Table of Contents Options dialog box lists each paragraph style in the document you’re working in. For headings you want to appear in the TOC, enter a number in the TOC Level text box to determine the headings’ rank. If headings assigned the Heading 1 style are to rank second in the TOC, for example, enter a 2 in Heading 1’s TOC Level text box. You can exclude headings from a TOC by deleting a number in a TOC Level box.
- Including table entry fields: To include text you marked for entry in the TOC, select the Table Entry Fields check box in the Table of Contents Options dialog box (later in this chapter, the sidebar “Marking oddball text for inclusion in the TOC” explains how TOC fields work).
- Changing the look of TOC entries: The Style dialog box you see when you click the Modify button gives you the chance to choose new fonts, character styles, and font sizes for TOC entries if you generated your TOC from a template. Click the Modify button. Then, in the Style dialog box, choose options to format the TOC style. For example, click the Bold button to boldface TOC entries. (Chapter 3 of this minibook explains modifying styles.)
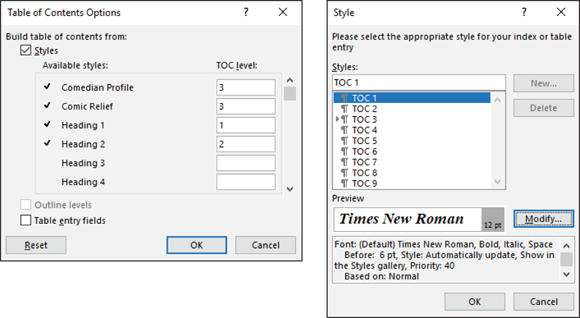
FIGURE 8-4: Changing a TOC’s structure and formatting.
Indexing a Document
A good index is a thing of beauty. User manuals, reference works of any length, and reports that readers will refer to all require indexes. Except for the table of contents, the only way to find information in a long document is to look in the index. An index at the end of a company report reflects well on the person who wrote the report. It gives the appearance that the author put in a fair amount of time to complete the work, even if he or she didn’t really do that.
An index entry can be formatted in many ways. You can cross-reference index entries, list a page range in an index entry, and break out an index entry into subentries and sub-subentries. To help you with your index, Figure 8-5 explains indexing terminology.
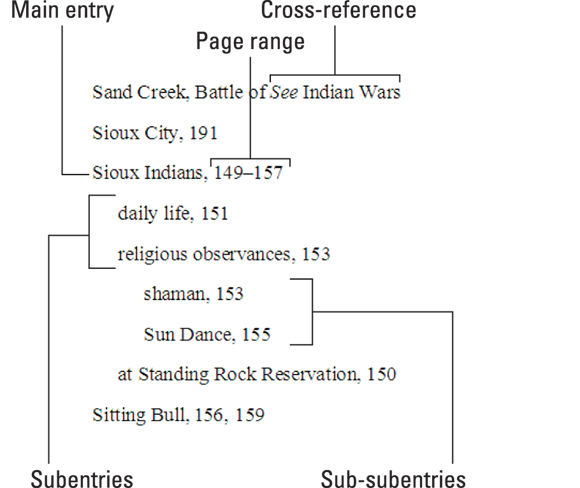
FIGURE 8-5: Different ways of handling index entries.
Writing a good index entry is as hard as writing a good, descriptive heading. As you enter index entries in your document, ask yourself how you would look up information in the index, and enter your index entries accordingly.
Marking index items in the document
The first step in constructing an index is to mark index entries in your document. Marking index items yourself is easier than it seems. After you open the Mark Index Entry dialog box, it stays open so that you can scroll through your document and make entries.
If you see a word or phrase in your document that you can use as a main, top-level entry, select it; otherwise, place the cursor in the paragraph or heading whose topic you want to include in the index.
You can save a little time by selecting a word, as I describe shortly.
On the References tab, click the Mark Entry button (or press Alt+Shift+X).
The Mark Index Entry dialog box appears, as shown in Figure 8-6. If you selected a word or phrase, it appears in the Main Entry box.
Choose how you want to handle this index entry (refer to Figure 8-5 to see the various ways to make index entries).
When you enter the text, don’t put a comma or period after it. Word does that when it generates the index. The text that you enter appears in your index. - Main Entry: If you’re entering a main, top-level entry, leave the text in the Main Entry box (if it’s already there), type new text to describe this entry, or edit the text that’s already there. Leave the Subentry box blank.
- Subentry: To create a subentry, enter text in the Subentry box. The subentry text will appear in the index below the main entry text, so make sure that some text is in the Main Entry box and that the subentry text fits under the main entry.
- Sub-subentry: A sub-subentry is the third level in the hierarchy. To create a sub-subentry, type the subentry in the Subentry box, enter a colon (:), and type the sub-subentry without entering a space, like so: religious observances:shaman.
Decide how to handle the page reference in the entry.
Again, your choices are many:
- Cross-reference: To go without a page reference and refer the reader to another index entry, click the Cross-Reference option button and type the other entry in the text box after the word See. What you type here appears in your index, so be sure that the topic you refer the reader to is really named in your index.
- Current Page: Click this option to enter a single page number after the entry.
- Page Range: Click this option if you’re indexing a subject that covers several pages in your document. A page range index entry looks something like this: “Sioux Indians, 149–157.” To make a page range entry, you must create a bookmark first. Leave the Mark Index Entry dialog box, select the text in the page range, and press Ctrl+Shift+F5 or click the Bookmark button on the Insert tab. In the Bookmark dialog box, enter a name in the Bookmark Name box, and click the Add button. (Chapter 1 of this minibook explains bookmarks.)
You can boldface or italicize a page number or page range by clicking a Page Number Format check box.
In some indexes, the page or page range where the topic is explained in the most depth is italicized or boldfaced so that readers can get to the juiciest parts first.
If you selected a single word or phrase in Step 1, you can click the Mark All button to have Word go through the document and mark all words that are identical to the one in the Main Entry box; click Mark to put this single entry in the index.
Click outside the Mark Index Entry dialog box and find the next topic or word that you want to mark for the index. Then click the Mark Entry button on the References tab and make another entry.

FIGURE 8-6: Marking an index entry.
A bunch of ugly field codes appear in your document after you mark an index entry. You can render them invisible by clicking the Show/Hide ¶ button on the Home tab (or pressing Ctrl+Shift+8).
Generating the index
After you mark all the index entries, it’s time to generate the index:
Place the cursor where you want the index to go, most likely at the end of the document.
You might type the word Index at the top of the page and format the word in a decorative way.
On the References tab, click the Insert Index button.
You see the Index dialog box shown in Figure 8-7.
Choose options in the dialog box and click OK.
As you make your choices, watch the Print Preview box to see what happens.
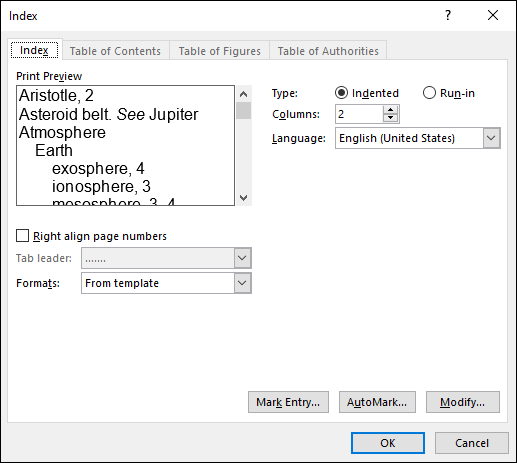
FIGURE 8-7: Generating an index.
Here are the options in the Index dialog box:
- Type: Choose Run-in if you want subentries and sub-subentries to run together; choose Indented to indent subentries and sub-subentries below main entries (refer to Figure 8-5).
- Columns: Stick with 2, unless you don’t have subentries or sub-subentries and you can squeeze three columns on the page or you are working on a landscape document.
- Language: Choose a language for the table, if necessary and if you have installed a foreign language dictionary. If you have installed the dictionary, you can run the spell checker over your index and make sure that the entries are spelled correctly. (Chapter 5 of this minibook explains foreign language dictionaries.)
- Right Align Page Numbers: Normally, page numbers appear right after entries and are separated from entries by a comma, but you can right-align the entries so that they line up under one another with this option.
- Tab Leader: Some index formats place a leader between the entry and the page number. A leader is a series of dots or dashes. If you’re working with a format that has a leader, you can choose a leader from the drop-down list.
- Formats: Word offers a number of attractive index layouts. You can choose one from the list.
- Modify: Click this button if you’re adventurous and want to create an index style of your own (Chapter 3 explains styles).
To update an index after you create or delete entries, click it and then click the Update Index button on the References tab or right-click the index and then choose Update Field on the shortcut menu.
Editing an index
After you generate an index, read it carefully to make sure that all entries are useful to readers. Inevitably, something doesn’t come out right, but you can edit index entries as you would the text in a document. Index field markers are enclosed in curly brackets with the letters XE and the text of the index entry in quotation marks, like so: { XE: “Wovoka: Ghost Dance” }. To edit an index marker, click the Show/Hide ¶ button on the Home tab (or press Ctrl+Shift+8) to see the field markers and find the one you need to edit. Then delete letters or type letters as you would do normal text.
Here's a quick way to find index field markers: After clicking the Show/Hide ¶ button, with the index fields showing, press Ctrl+G to open the Go To tab of the Find and Replace dialog box. In the Go To menu, choose Field; type XE in the Enter Field Name box, and click the Next button until you find the marker you want to edit. You can also use the Find command on the Home tab to look for index entries. Word finds index entries as well as text as long as you click the Show/Hide ¶ button to display index fields in your document.
Putting Cross-References in a Document
Cross-references are very handy indeed. They tell readers where to go to find more information about a topic. The problem with cross-references, however, is that the thing being cross-referenced really has to be there. If you tell readers to go to a heading called “The Cat's Pajamas” on page 93, and neither the heading nor the page is really there, readers curse and tell you where to go, instead of the other way around.
Fortunately for you, Word lets you know when you make errant cross-references. You can refer readers to headings, page numbers, footnotes, endnotes, and plain-old paragraphs. And as long you create captions for your cross-references with the Insert Caption button on the References tab, you can also make cross-references to equations, figures, graphs, listings, programs, and tables. If you delete the thing that a cross-reference refers to and render the cross-reference invalid, Word tells you about it the next time you update your cross-references. Best of all, if the page number, numbered item, or text that a cross-reference refers to changes, so does the cross-reference.
Follow these steps to create a cross-reference:
Write the first part of the cross-reference text.
For example, you could write To learn more about these cowboys of the pampas, see page and then type a blank space. The blank space separates the word page from the page number in the cross-reference. If you are referring to a heading, write something like For more information, see “. Don’t type a blank space this time because the cross-reference heading text will appear right after the double quotation mark.
On the References tab, click the Cross-Reference button.
The Cross-Reference dialog box appears, as shown in Figure 8-8.
Choose what type of item you’re referring to in the Reference Type drop-down list.
If you’re referring to a plain old paragraph, choose Bookmark. Then click outside the dialog box, scroll to the paragraph you’re referring to, and place a bookmark there. (Chapter 1 of this minibook explains bookmarks.)
Make a choice in the Insert Reference To box to refer to text, a page number, or a numbered item.
The options in this box are different, depending on your choice in Step 3.
- Text: Choose this option (Heading Text, Entire Caption, and so on) to include text in the cross-reference. For example, choose Heading Text if your cross-reference is to a heading.
- Number: Choose this option to insert a page number or other kind of number, such as a table number, in the cross-reference.
- Include Above/Below: Check this box to include the word above or below to tell readers where, in relation to the cross-reference, the thing being referred to is located in your document.
If you wish, leave the check mark in the Insert as Hyperlink check box to create a hyperlink as well as a cross-reference.
With a hyperlink, someone reading the document onscreen can Ctrl+click the cross-reference and go directly to what it refers to.
In the For Which box, tell Word where the thing you’re referring to is located.
To do so, select a heading, bookmark, footnote, endnote, equation, figure, graph, or whatnot. In long documents, you almost certainly have to click the scroll bar to find the one you want.
- Click the Insert button and then click the Close button.
- Back in your document, enter the rest of the cross-reference text, if necessary.

FIGURE 8-8: Entering a cross-reference.
When you finish creating your document, update all the cross-references. To do that, press Ctrl+A to select the entire document. Then press F9 or right-click in the document and choose Update Field on the shortcut menu.
If the thing referred to in a cross-reference is no longer in your document, you see Error! Reference source not found where the cross-reference should be. To find cross-reference errors in long documents, look for the word Error! with the Find command (press Ctrl+F). Investigate what went wrong, and repair or delete errant cross-references.
Putting Footnotes and Endnotes in Documents
A footnote is a bit of explanation, a comment, or a reference that appears at the bottom of the page and is referred to by a number or symbol in the text. An endnote is the same thing, except that it appears at the end of the section, chapter, or document. If you’ve written a scholarly paper of any kind, you know what a drag footnotes and endnotes are.
You will be glad to know that Word takes some of the drudgery out of footnotes and endnotes. For example, if you delete or add a note, all notes after the one you added or deleted are renumbered. And you don’t have to worry about long footnotes because Word adjusts the page layout to make room for them. You can change the numbering scheme of footnotes and endnotes at will. When you are reviewing a document, all you have to do is move the pointer over a footnote or endnote citation. The note icon appears, as does a pop-up box with the text of the note.
Entering a footnote or endnote
To enter a footnote or endnote in a document:
- Place the cursor in the text where you want the note’s number or symbol to appear.
On the References tab, click the Insert Footnote button (or press Ctrl+Alt+F) or the Insert Endnote button (or press Ctrl+Alt+D).
In Print Layout view, Word scrolls to the bottom of the page or the end of the document or section so that you can enter the note, as shown in Figure 8-9. If you are in Draft view, the Notes pane opens at the bottom of the screen with the cursor beside the number of the note you’re about to enter.
- Enter your footnote or endnote.
- In Print Layout view, scroll upward to return to the main text; click the Close button in the Notes pane if you’re in Draft view.
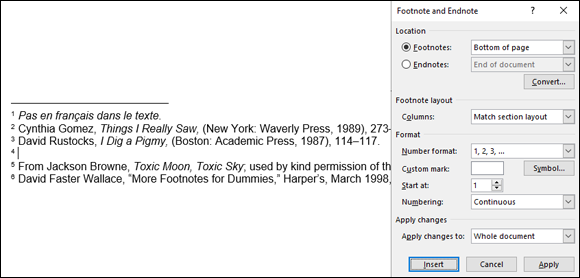
FIGURE 8-9: Entering a footnote in Print Layout view (left); the Footnote and Endnote dialog box (right).
Click the Show Notes button at any time to see your notes in the Notes pane, at the bottom of the page, or at the end of the section or document.
To quickly return from writing a note to the place in your document where the footnote or endnote number citation is located, double-click the number citation at the bottom of the page (in Print Layout view) or the Notes pane (in Draft view). For example, if you just finished entering footnote 3, double-click the number 3.
Choosing the numbering scheme and position of notes
Choosing the numbering scheme and positioning of endnotes and footnotes is quite easy. On the References tab, click the Footnotes group button. The Footnote and Endnote dialog box appears (refer to Figure 8-9). Tell Word where to place your notes:
- Footnotes: Choose Bottom of Page to put footnotes at the bottom of the page no matter where the text ends; choose Below Text to put footnotes directly below the last line of text on the page.
- Endnotes: Choose End of Section if your document is divided into sections (such as chapters) and you want endnotes to appear at the back of sections; choose End of Document to put all endnotes at the very back of the document.
- Columns: If you want to run footnotes or endnotes into columns, choose the number of columns you want.
In the Format area, tell Word how to number the notes:
- Number Format: Choose A B C, i ii iii, or another numbering scheme, if you want. You can also enter symbols by choosing the last option on this drop-down list.
- Custom Mark: You can mark the note with a symbol by clicking the Symbol button and choosing a symbol in the Symbol dialog box. If you go this route, you have to enter a symbol each time you insert a note. Not only that, you may have to enter two or three symbols for the second and third notes on each page or document because Word can’t renumber symbols.
- Start At: To start numbering the notes at a place other than 1, A, or i, enter 2, B, ii, or whatever in this box.
- Numbering: To number the notes continuously from the start of your document to the end, choose Continuous. Choose Restart Each Section to begin anew at each section of your document. For footnotes, you can begin anew on each page by choosing Restart Each Page.
By the way, the Convert button in the Footnote and Endnote dialog box is for fickle scholars who suddenly decide that their endnotes should be footnotes or vice versa. Click it and choose an option in the Convert Notes dialog box to turn footnotes into endnotes, turn endnotes into footnotes, or — in documents with both endnotes and footnotes — make the endnotes footnotes and the footnotes endnotes.
Deleting, moving, and editing notes
If a devious editor tells you that a footnote or endnote is in the wrong place, that you don’t need a note, or that you need to change the text in a note, all is not lost:
- Editing: To edit a note, double-click its number or symbol in the text. You see the note onscreen. Edit the note at this point.
- Moving: To move a note, select its number or symbol in the text and drag it to a new location, or cut and paste it to a new location.
- Deleting: To delete a note, select its number or symbol and press the Delete key.
Footnotes and endnotes are renumbered when you move or delete one of them.
Compiling a Bibliography
A bibliography is a list, usually in alphabetical order by author name, of all the books, journal articles, websites, interviews, and other sources used in the writing of an article, report, or book. Writing a good bibliography is a chore. Besides keeping careful track of sources, you have to list them correctly. Does the author’s name or work’s name come first in the citation? How do you list a website or magazine article without an author’s name?
Word’s Bibliography feature is very nice in this regard: It solves the problem of how to enter citations for a bibliography. All you have to do is enter the bare facts about the citation — the author’s name, title, publication date, publisher, and so on — and Word presents this information correctly in the bibliography. You can choose among several popular bibliographical styles (APA, Chicago, and others) from the Style drop-down list, as shown in Figure 8-10. After you make your choice, Word reformats all bibliography citations. You don’t have to worry about whether titles should be underlined or italicized, or how authors’ names should be listed in the bibliography.
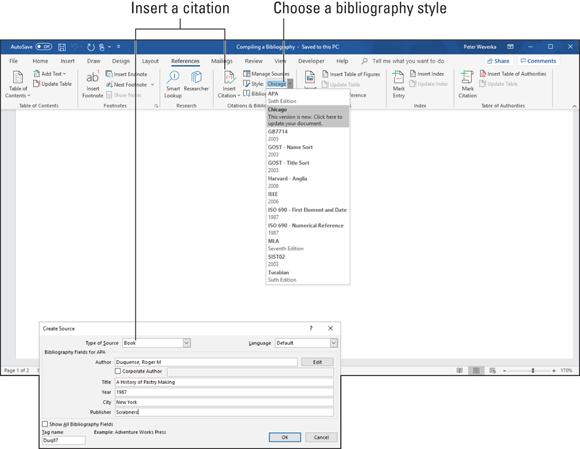
FIGURE 8-10: Adding a citation (left) and formatting citations (right) for a bibliography.
Inserting a citation for your bibliography
An abbreviated citation appears in the text of your document in between parentheses where you enter a citation; the complete citation appears in the bibliography. After you enter the information about a citation, entering it a second time is easy because Word keeps a master list of all citations you have used in your work, both in the document you’re working on and your other documents. To enter a citation, click in your document at the place that refers to the source, go to the References tab, and use one of these techniques to enter the citation:
- Entering a citation you’ve already entered in your document: Click the Insert Citation button and choose the citation on the drop-down list. The top of the drop-down list presents citations you’ve already entered.
- Creating a new citation: Click the Insert Citation button and choose Add New Source. You see the Create Source dialog box shown in Figure 8-10. Choose an option on the Type of Source drop-down list and enter particulars about the source. You can click the Show All Bibliography Fields check box to enlarge the dialog box and enter all kinds of information about the source. Whether clicking the check box is necessary depends on how detailed you want your bibliography to be.
- Inserting a citation placeholder: Click the Insert Citation button and choose Add New Placeholder if you’re in a hurry and you don’t currently have all the information you need to describe the source. The Placeholder Name dialog box appears. Enter a placeholder name for the source and click OK. Later, when you have the information for the source, either click the citation in the text and choose Edit Source on its drop-down list or click the Manage Sources button, and in the Source Manager dialog box, select the placeholder name (it has a question mark next to it) and click the Edit button. You see the Edit Source dialog box. Enter the information and click OK.
- Inserting a citation you’ve entered in another document: Click the Manage Sources button. You see the Source Manager dialog box. In the Master List, select the source you need if the source is listed; otherwise, click the Browse button, select the document with the source in the Open Source List dialog box, and click Open. Next, click the Copy button to copy sources from the Master List into your document. Then click Close and enter the citation by clicking the Insert Citation button and choosing the name of the citation you copied.
Your citation appears in text in parentheses. Move the pointer over the citation and click it to see an inline drop-down menu. From this menu, you can edit the citation as it appears in-text as well as edit it in the bibliography, as shown in Figure 8-11.

FIGURE 8-11: In-text citations have inline drop-down lists.
Editing a citation
Use one of these techniques to edit a citation:
- Open the citation’s inline drop-down menu (refer to Figure 8-11) and choose Edit Source. You see the Edit Source dialog box, where you can edit the citation.
- Click the Manage Sources button on the References tab. The Source Manager dialog box appears. Select the citation, click the Edit button, and change around the citation in the Edit Source dialog box.
Changing how citations appear in text
Citations appear in text enclosed in parentheses. Use one of these techniques to change how a citation appears in the text of your document:
- Changing what’s in parentheses: Open the citation’s drop-down menu and choose Edit Citation. You see the Edit Citation dialog box (refer to Figure 8-11). To suppress the author’s name, year, or title from appearing inside parentheses, select the Author, Year, or Title check box (whether the citation in parentheses lists the author, year, or title depends on which citation style you choose). To make page numbers appear with the citation, enter page numbers in the Pages box.
- Removing the in-text citation: Swipe over the citation to select it and press Delete. Removing an in-text citation this way does not prevent the citation from appearing in the bibliography.
Generating the bibliography
Go to the References tab and follow these steps to generate your bibliography:
Click in your document where you want the bibliography to appear.
Probably that place is toward the end of the document.
On the References tab, open the Style drop-down list and choose a style.
If you’re generating your bibliography for a paper you will submit to a journal or institution, ask the editors which style they prefer for bibliographies and choose that style from the list.
Click the Manage Sources button.
You see the Source Manager dialog box. Citations in the Current List box will appear in your bibliography.
If necessary, address citations in the Current List box.
If you entered any citation placeholders, their names appear in the list next to question marks. Select these placeholders, click the Edit button, and enter information in the Edit Source dialog box.
To keep a citation from appearing in the bibliography, select it and click the Delete button.
- Click the Close button in the Source Manager dialog box.
- Click the Bibliography button and choose a built-in bibliography or the Insert Bibliography command on the drop-down list.
There it is — your bibliography.