Chapter 3
Putting on the Finishing Touches
IN THIS CHAPTER
 Using horizontal rules and drop caps
 Putting a background on a page
 Putting objects and frames on the master page
 Preparing publications so that they can be printed commercially
This final chapter in Book 7 is devoted to the Project to Beautify Publications, a joint effort of the publisher and the author to try to make publications less bland and more original. The author has noticed, on the bulletin boards and lampposts in his neighborhood, that the rummage sale and lost-pet notices look a little rough around the edges. The neighbors are using sophisticated software to produce their notices, but they’re not using it well. They are relying solely on templates, which make the publications look alike. These pages explain a few simple tricks for making publications more sophisticated.
This chapter explores drop caps and horizontal rules, page backgrounds and borders, borders and backgrounds for frames, and how to place a logo in the same place on each page in a publication. It shows you Publisher’s excellent Design Checker. Finally, this chapter offers advice for printing publications at a commercial print shop.
Decorating the Text
Here are a couple of tricks to amaze your friends and intimidate your enemies. These pages explain how horizontal rules and drop caps can make a publication a little livelier. Don’t worry — horizontal rules have nothing to do with which side of the bed to sleep on, and drop caps don’t explode when you unroll them on the sidewalk and strike them with a hammer.
Drawing a horizontal rule on a frame
A horizontal rule is a horizontal line that divides one part of a page from another and directs the reader’s eye on the page. There are two horizontal rules in Figure 3-1. By varying the width of the lines and placing lines in strategic places, you can make a publication look more elegant and graceful.
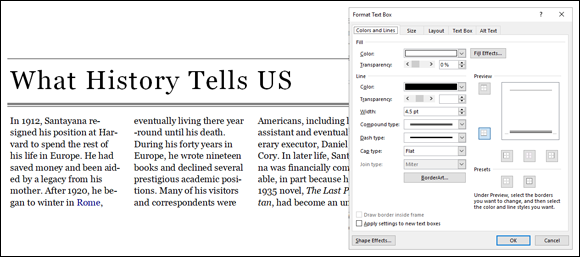
FIGURE 3-1: Examples of horizontal rules.
Select the frame and follow these steps to draw a horizontal rule on a frame:
On the Format tab, click the Text or Size group button.
You can also select the frame, right-click it, and choose Format (the Format command has different names depending on what type of frame or object you’re working with). You see the Format dialog box (refer to Figure 3-1).
- Visit the Color and Lines tab.
In the Preview box, click the top of the box to draw a rule above the frame or the bottom of the box to draw a rule below.
By clicking part of the Preview box, you tell Publisher where you want to draw the rule.
On the Width menu, enter how wide you want the line to be in points.
Watch the Preview box to see how wide the line is.
On the Compound Type menu, choose the kind of line you want.
If you want a dashed line, select it from the Dashed drop-down list. You can adjust the thickness of the line in the Weight text box.
- To draw a second rule on the frame, click again in the Preview box and repeat Steps 4 and 5.
- Click OK.
To remove a horizontal rule from a frame, select the frame, open the Format dialog box, open the Color drop-down list, and choose No Line.
Dropping in a drop cap
A drop cap is a large capital letter that “drops” into the text. Drop caps are usually found in the first paragraph of an article or chapter. Pound for pound, considering how little effort is required, a drop cap yields the most reward for the least amount of work. Follow these steps to place a drop cap in a publication:
- Click the paragraph that is to receive the drop cap.
On the (Text Box Tools) Format tab, click the Drop Cap button and choose a drop cap on the drop-down list or choose Custom Drop cap to open the Drop Cap dialog box.
Figure 3-2 shows the Drop Cap dialog box. From here, you can choose how far to drop the capital letter or select a font and color for the letter.
To remove a drop cap, click the Drop Cap button and choose No Drop Cap (the first option on the drop-down list).
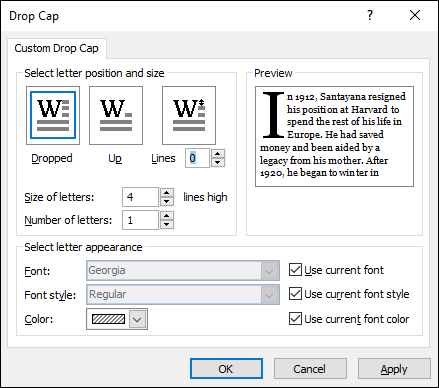
FIGURE 3-2: Fashioning a drop cap.
Techniques for Decorating Pages
No one likes a dull publication. Following are some simple techniques to make pages a little bit livelier. Read on to find out how to take advantage of page parts, borders, accents, and advertisements. You also find instructions for painting an entire page with a background color or gray shade.
Plugging in a page part
“Page part” is Publisher’s word for a page element that you can quickly plug into a page. Use a page part to fill in empty space on a page or get a head start in formatting part of a page. As shown in Figure 3-3, page parts include the following:
- Headings: A ready-made title for a page or story. Headings often include a subheading.
- Pull quotes: A preformatted text-box frame for displaying a quotation from a story.
- Sidebars: A preformatted text-box frame for a companion story. Sidebars usually appear on a side of the page in a smaller font.
- Stories: A preformatted story, including a heading and a subheading.
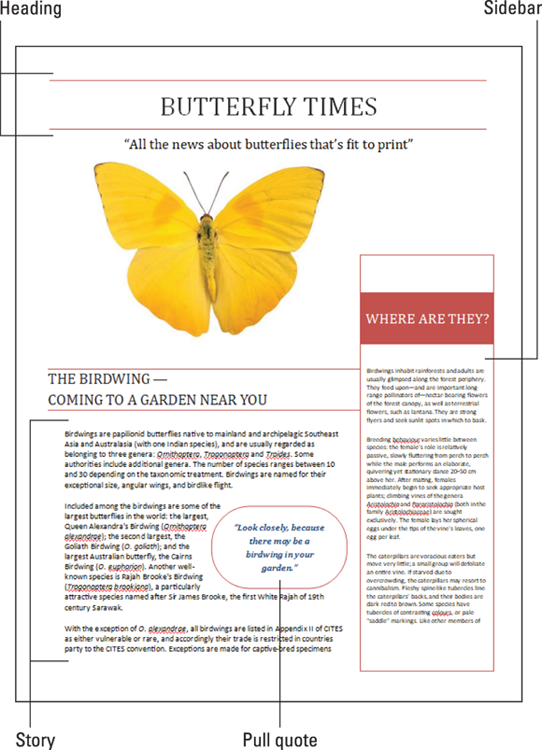
FIGURE 3-3: Examples of page parts.
Follow these steps to put a page part on a page:
- On the Insert tab, click the Page Parts button.
Choose a heading, pull quote, sidebar, or story on the drop-down list.
Choose More Page Parts to open the Building Block Library and choose from many more page parts.
After the element lands on the page, you can change its size or shift its position by using the same techniques you use with other objects. (Book 8, Chapter 4 explains how to manipulate objects.)
Experimenting with borders and accents
Publisher offers what it calls “borders and accents” to make pages a little livelier. Borders and accents are page decorations that also serve a purpose:
- Bars: Decorative patterns for filling empty page space
- Emphasis: Two-sided text-box frames to make text boxes stand out on the page
- Frames: Four-sided text-box frames to make text boxes stand out
- Lines: Unusual lines
- Patterns: Checkerboard and other patterns for filling empty page space
Follow these steps to place a border or accent on a publication page:
- On the Insert tab, click the Borders & Accents button.
Choose a border or accent on the drop-down list.
Choose More Borders and Accents and make a selection in the Building Block Library if you want to place a line or pattern on a page.
The border or accent lands on the page. (Book 8, Chapter 4 explains how to manipulate objects such as borders and accents.)
Taking advantage of attention getters
If your goal in Publisher is to create an advertisement, you can get a head start on the task by sprinkling an “attention getter” or advertisement in your publication. Figure 3-4 shows examples of attention getters.
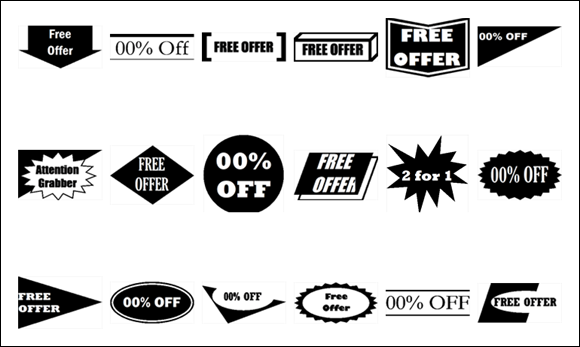
FIGURE 3-4: Examples of “attention getters.”
To use an attention getter or advertisement in your publication, go to the Insert tab, click the Advertisements button, and choose an ad or attention getter on the drop-down list. Choose More Advertisements on the drop-down list to open a dialog box with many, many advertisements and attention getters. (Book 8, Chapter 4 explains how to change the size and position of objects such as advertisements and attention getters.)
Backgrounds for pages
Yet another nifty trick is to put a color, gray-shade, or other type of background on the page. Be sure to choose a background that doesn’t get in the way of your publication or render it impossible to read. Shrink the publication to 40 percent so that you can see what backgrounds really look like; then follow these steps to give a page or all the pages in your publication a background:
On the Page Design tab, click the Background button.
A drop-down list opens.
Move the pointer over the options on the drop-down list to “live-preview” the choices.
You can choose More Backgrounds on the drop-down list to open the Format Background dialog box and choose or create a page background there. The dialog box gives you the opportunity to use a gradient, texture, pattern, or picture for a page background.
Apply your choice to a single page or all pages in your publication.
You have the option of changing the page background on one page or all the pages:
- One page: On the Background button drop-down list, right-click your choice and choose Apply to Current Page.
- All pages: On the Background button drop-down list, right-click your choice and choose Apply to All Pages.
To remove the background from a page, click the Background button and choose No Background on the drop-down list.
Master Pages for Handling Page Backgrounds
In a publication with many pages, the same object sometimes goes on every page. A company logo on the corner of each page looks mighty elegant. Page numbers and copyright information are also found on all the pages of some publications. The good news is that you don’t have to place the objects on each page individually. Instead, you can place the objects on the master page. Whatever is on the master page appears on all pages in a publication (unless you decide that the master page shouldn’t apply to a particular page). Forthwith are instructions for handling master pages.
Switching to Master Page view
To change the appearance of the master page, place an object on the master page, or see precisely what is on the master page, start by switching to Master Page view:
- On the View tab, click the Master Page button.
- On the Page Design tab, click the Master Pages button and choose Edit Master Pages on the drop-down list.
To leave Master Page view, go to the Master Page tab and click the Close Master Page button.
Changing the look of a master page
All commands for changing the look of run-of-the-mill pages also apply to master pages. Place objects and frames on the master page as if you were putting them on run-of-the-mill pages. Change the page background as if you were changing the background of a normal page.
To edit a master page, switch to Master Page, select the master page you want to work with in the Pages pane (if you’ve created more than one master page), and get to work.
Applying (or unapplying) a master page to publication pages
By default, the master page applies to all pages, but sometimes unapplying a master page is necessary because objects on the master page get in the way. And if you created more than one master page, you have to tell Publisher which master page to apply to which publication page.
Follow these instructions to unapply or apply master pages to pages in a publication:
- Unapplying a master page: In Normal view, go to the Page Design tab, display the page you want to unattach from the master page, click the Master Pages button, and choose None on the drop-down list.
- Applying a different master page: Use one of these techniques to apply a different master page to pages in your publication:
- In Normal view, display a page, go to the Page Design tab, click the Master Pages button, and choose a different master page on the drop-down list.
- In Master Page view, go to the Master Page tab, select a master page in the Pages pane, and click the Apply To button. On the Apply To drop-down list, choose Apply to All Pages to apply a different master page to all the pages in your publication. Choose Apply Master Page on the drop-down list and enter page-range numbers in the Apply Master Page dialog box to apply the master page to a select group of pages.
Running the Design Checker
When at last your publication is ready for printing, be sure to run the Design Checker. This helpful tool can alert you to frames that fall on nonprinting parts of the page, stories that “overflow” without finding a text frame to go to, invisible objects, and a host of other problems.
On the File tab, choose Info, and click the Run Design Checker button to run the Design Checker. As shown in Figure 3-5, the Design Checker task pane opens and lists items that need your attention. Open an item’s drop-down list and choose Go to This Item to locate it in your publication. Sometimes the drop-down list offers a quick fix as well.
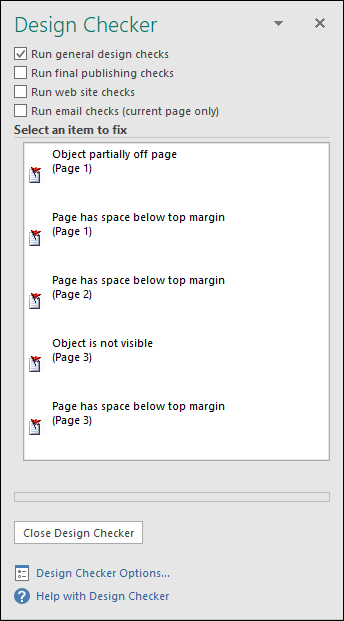
FIGURE 3-5: Running the Design Checker.
Commercially Printing a Publication
You know the routine for printing a publication on your computer: Go to the File tab, choose Print, negotiate the Print window, and click the Print button. To print a publication with a commercial printer, Publisher offers the Save for a Commercial Printer command. This command creates a PDF file for use by print shops. PDF is now the standard file format for print shops.
Follow these steps to save your publication as a PDF that you can hand off to a printer:
On the File tab, choose Export.
The Export window opens.
- Choose Save for a Commercial Printer.
- On the first drop-down list, choose Commercial Press.
- On the second drop-down list, choose Both PDF and Publisher
.pubFiles. Click the Pack and Go Wizard button.
The Pack and Go Wizard dialog box opens.
- Choose a location for your publication file or choose to burn it to a CD.
- Click Next and follow the instructions for creating the PDF and
.pubfile.
 Usually where horizontal rules come in pairs, the bottommost rule is thicker than its twin. The thicker bottom line encourages the reader’s eye to move down the page and find an article to read.
 You can tell when you’re looking at a master page because you see the Master Page tab on the Ribbon, and the page thumbnails in the Pages pane show letters instead of numbers.