Chapter 1
Customizing an Office Program
IN THIS CHAPTER
 Personalizing the Ribbon
 Changing around the Quick Access toolbar
 Choosing what appears on the status bar
 Choosing a new screen background and Office theme
This short chapter describes a handful of things you can do to customize Office 365 programs. Don’t be afraid to make like a software developer and change a program to your liking. Many people are wary of retooling Office programs, but you can always reverse the changes you make if you don’t like them, as I explain throughout this chapter.
This chapter shows how to put your favorite button commands on the Ribbon and Quick Access toolbar. Instead of fishing around for your favorite commands, you can assemble them on the Ribbon or Quick Access toolbar and locate them right away. You also discover how to change around the status bar, dress up an Office program in a new set of clothes, and designate your own keyboard shortcuts in Word.
Customizing the Ribbon
As you surely know by now, the Ribbon is the stretch of ground across the top of all Office programs. The Ribbon is composed of tabs. On each tab, commands are arranged by group. To undertake a task, you visit a tab on the Ribbon, find the group with the command you want, and choose the command. If you are so inclined, you can customize the Ribbon. You can place the tabs and commands you know and love where you want to find them on the Ribbon. And you can remove tabs and commands that aren’t useful to you.
To customize the Ribbon, open the Customize Ribbon tab of the Options dialog box with one of these techniques:
- On the File tab, choose Options, and select the Customize Ribbon category in the Options dialog box.
- Right-click a tab or button and choose Customize the Ribbon.
You see commands for customizing the Ribbon, as shown in Figure 1-1. The right side of the dialog box (“Customize the Ribbon”) lists the names of tabs, groups within tabs, and commands within groups that are currently on the Ribbon. To customize the Ribbon, you arrange the right side of the dialog box to your liking. You list the tabs, groups, and commands that you want for the Ribbon on the right side of the dialog box.
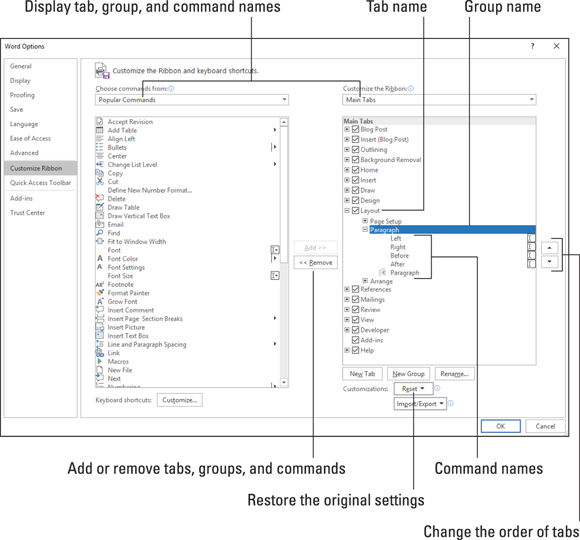
FIGURE 1-1: Starting in the Customize Ribbon category of the Options dialog box, you can customize the Ribbon.
The left side of the dialog box (“Choose Commands From”) presents every tab, group, and command in your Office program. To customize the Ribbon, you select a tab, group, or command on the left side of the dialog box and move it to the right side by clicking the Add button.
Keep reading to find out how to display tabs, groups, and commands in the Options dialog box and how to do all else that pertains to customizing the Ribbon. In case you make a hash of the Ribbon, you also find instructions for restoring the Ribbon to its original state.
Displaying and selecting tab, group, and command names
To customize the Ribbon, you need to display and select tab names, group names, and command names in the Options dialog box (refer to Figure 1-1). Start by opening the drop-down lists and choosing a display option:
- Choose Commands From: Choose an option to locate the tab, group, or command you want to add to the Ribbon. For example, choose All Commands to see an alphabetical list of all the commands in the Office program you’re working in; choose Main Tabs to see a list of tabs.
- Customize the Ribbon: Choose an option to display the names of all tabs, main tabs, or tool tabs. Tool tabs are the context-sensitive tabs that appear after you insert or click something. For example, the Table Tools tabs appear when you construct tables in Word.
After you choose display options on the drop-down lists, you can display the names of groups and commands (refer to Figure 1-1):
- Displaying group names: Click a plus sign icon next to a tab name to see the names of its groups. You can click the minus sign icon to fold group names back into a tab name.
- Displaying command names in groups: Click the plus sign icon next to a group name to see the names of its commands. You can click the minus sign icon to collapse command names.
After you display the tab, group, or command name, click to select it.
Moving tabs and groups on the Ribbon
To change the order of tabs on the Ribbon or groups on a tab, go to the Customize Ribbon category of the Options dialog box (refer to Figure 1-1) and select the name of a tab or group on the right side of the dialog box. Then click the Move Up or Move Down button (the arrow buttons located on the right side of the dialog box). Click these buttons as necessary until tabs or groups are in the order that you see fit.
Adding, removing, and renaming tabs, groups, and commands
In the Options dialog box (refer to Figure 1-1), display and select the tab, group, or command you want to add, remove, or rename. Then proceed to add, remove, or rename it. (Earlier in this chapter, “Displaying and selecting tab, group, and command names” explains how to display items in the Options dialog box.)
Adding items to the Ribbon
Follow these steps to add a tab, group, or command to the Ribbon:
On the left side of the Customize Ribbon category of the Options dialog box, select the tab, group, or command you want to add.
For example, to add the Tables group to the Home tab, select the Tables group.
 Commands can be added only to custom groups. To add a command to the Ribbon, create a new group for the command (see “Creating new tabs and groups,” later in this chapter).
On the right side of the dialog box, select the tab or custom group where you want to place the item.
If you’re adding a tab to the Ribbon, select a tab. The tab you add will go after the tab you select.
- Click the Add button.
Removing items from the Ribbon
Follow these steps to remove a tab, group, or command from the Ribbon:
- On the right side of the Customize Ribbon category of the Options dialog box, select the tab, group, or command you want to remove.
Click the Remove button.
 Except for tabs you create yourself, you can’t remove tabs from the Ribbon. And you can’t remove a command unless you remove it from a group you created yourself.
Renaming tabs and groups
Sorry, you can’t rename a command. Follow these steps to rename a tab or group:
- On the right side of the Customize Ribbon category of the Options dialog box, select the tab or group you want to rename.
Click the Rename button.
You see the Rename dialog box, as shown in Figure 1-2.
Enter a new name and click OK.
When renaming a group that you created yourself, you can choose a symbol for the group in the Rename dialog box (see Figure 1-2).
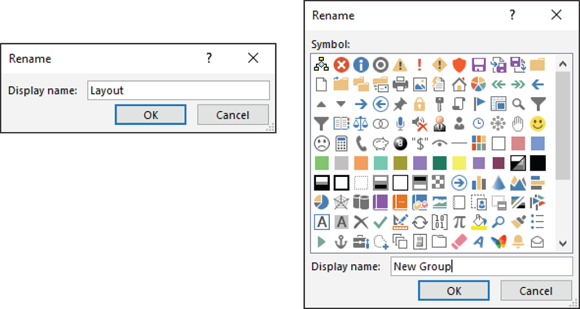
FIGURE 1-2: Renaming a tab (left) and a group (right).
Creating new tabs and groups
Create new tabs and groups on the Ribbon for commands that are especially useful to you. Follow these steps on the Customize Ribbon category of the Options dialog box (refer to Figure 1-1) to create a new tab or group:
On the right side of the dialog box, display and select the name of a tab or group.
Earlier in this chapter, “Displaying and selecting tab, group, and command names” explains how to select items in the Options dialog box.
- Tab: If you’re creating a tab, select a tab name. The tab you create will appear after the tab you select.
- Group: If you’re creating a group, select a group name. The group you create will appear after the group you select.
Click the New Tab or New Group button.
Your Office program creates a new tab or group called “New Tab (Custom)” or “New Group (Custom).” If you created a tab, Office also creates a new group inside your new tab.
Click the Rename button to give the tab, group, or both a name.
In the Rename dialog box, enter a descriptive name and click OK. If you’re naming a group, the Rename dialog box gives you the opportunity to select an icon to help identify the group (see Figure 1-2).
Add groups, commands, or both to your newly made tab or group.
For instructions, see “Adding items to the Ribbon,” earlier in this chapter.
Resetting your Ribbon customizations
If you make a hash of the Ribbon, all is not lost because you can restore the original settings. In the Options dialog box, click the Reset button (refer to Figure 1-1) and choose one of these commands on the drop-down list:
- Reset Only Selected Ribbon Tab: Select a tab name on the right side of the Options dialog box and choose this command to restore a tab to its original state.
- Reset All Customizations: Choose this command to restore the Ribbon in its entirety. All changes you made are reversed.
You can also remove tabs and groups you created if you discover you don’t need them. See “Removing items from the Ribbon,” earlier in this chapter.
Customizing the Quick Access Toolbar
No matter where you go in Office, you see the Quick Access toolbar in the upper-left corner of the screen. This toolbar offers the AutoSave, Save, Undo, and Redo buttons, as well as the Touch/Mouse Mode button if your computer has a touchscreen. However, which buttons appear on the Quick Access toolbar is entirely up to you. You can put your favorite buttons on the toolbar to keep them within reach. And if the Quick Access toolbar gets too big, you can move it below the Ribbon, as shown in Figure 1-3. Adding buttons to and removing buttons from the Quick Access toolbar is, I’m happy to report, a piece of cake. And moving the toolbar below the Ribbon is as easy as pie.
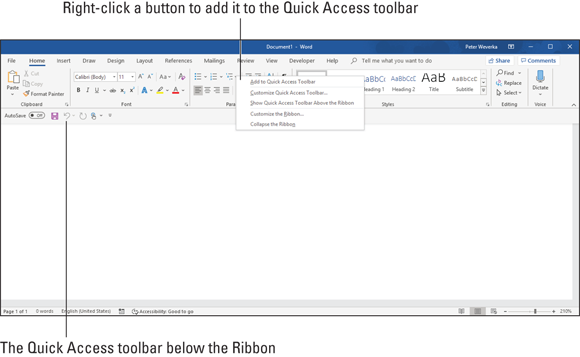
FIGURE 1-3: Merely by right-clicking, you can add a button to the Quick Access toolbar.
Adding buttons to the Quick Access toolbar
Use one of these techniques to add buttons to the Quick Access toolbar:
- Right-click a button you want to see on the toolbar and choose Add to Quick Access toolbar on the shortcut menu (refer to Figure 1-3). You can add all the commands in a group to the Quick Access toolbar by right-clicking the group name and choosing Add to Quick Access toolbar.
- Click the Customize Quick Access toolbar button (located to the right of the Quick Access toolbar) and choose a button on the drop-down list. The list offers buttons deemed most likely to be placed on the Quick Access toolbar by the makers of Office.
- On the File tab, choose Options, and go to the Quick Access toolbar category in the Options dialog box (or right-click any button or tab and choose Customize Quick Access toolbar on the shortcut menu). You see the Quick Access toolbar category of the Options dialog box, as shown in Figure 1-4. On the Choose Commands From drop-down list, select the name of the button you want to add to the Quick Access toolbar. Then click the Add button.

FIGURE 1-4: Add, remove, and reorder Quick Access toolbar buttons in the Options dialog box.
Changing the order of buttons on the Quick Access toolbar
Follow these steps to change the order of buttons on the Quick Access toolbar:
Click the Customize Quick Access toolbar button and choose More Commands on the drop-down list.
The Quick Access toolbar category of the Options dialog box appears (refer to Figure 1-4). You can also open this dialog box by right-clicking any button or tab and choosing Customize Quick Access toolbar.
Select the name of a button on the right side of the dialog box and click the Move Up or Move Down button.
These arrow buttons are located on the right side of the dialog box.
- Repeat Step 2 until the buttons are in the right order.
- Click OK.
Removing buttons from the Quick Access toolbar
Use one of these techniques to remove buttons from the Quick Access toolbar:
- Right-click a button and choose Remove from Quick Access toolbar on the shortcut menu.
- Right-click any button or tab and choose Customize Quick Access toolbar. You see the Quick Access toolbar category of the Options dialog box (refer to Figure 1-4). Select the button you want to remove on the right side of the dialog box and click the Remove button.
Placing the Quick Access toolbar above or below the Ribbon
The Ribbon is the stretch of ground along the top of the screen where the tabs and buttons are found. If your Quick Access toolbar contains many buttons, consider placing it below the Ribbon, not above it (refer to Figure 1-3). Follow these instructions to place the Quick Access toolbar above or below the Ribbon:
- Quick Access toolbar below the Ribbon: Right-click the toolbar, and on the shortcut menu, choose Show Quick Access Toolbar Below the Ribbon.
- Quick Access toolbar above the Ribbon: Right-click the toolbar, and on the shortcut menu, choose Show Quick Access Toolbar Above the Ribbon.
The Options dialog box offers a check box called Show Quick Access Toolbar Below the Ribbon (refer to Figure 1-4). You can select this check box as well to move the toolbar below the Ribbon.
Customizing the Status Bar
The status bar along the bottom of the window gives you information about the file you’re working on. The Word status bar, for example, tells you which page you’re on, how many pages are in your document, and several other things. In PowerPoint, the status bar tells you which slide you’re looking at. It also presents the view buttons and Zoom controls.
To choose what appears on the status bar, right-click the status bar. You see a drop-down list similar to the one in Figure 1-5. By selecting and deselecting items in this list, you can decide what appears on the status bar.
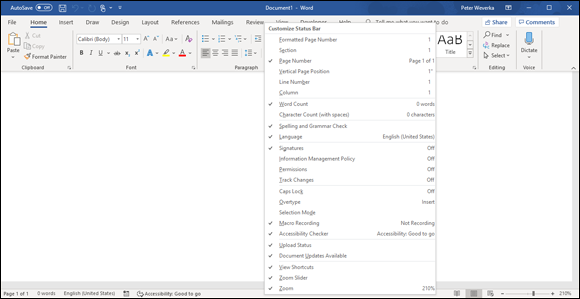
FIGURE 1-5: Right-click the status bar to customize it.
Changing the Screen Background and Office Theme
Starting on the Accounts screen, you can change the screen background and Office theme. The screen background is the fluff that appears along the top of Office application windows. The Office theme is the color (or lack thereof) that appears around the perimeter of Office application windows. You are encouraged to experiment with screen backgrounds and Office themes until you find a combination that works for you.
Follow these steps to choose a screen background and Office theme:
On the File tab, choose Account.
You see the Account screen, as shown in Figure 1-6.
- Open the Office Background drop-down list and choose an option.
- Open the Office Theme drop-down menu and choose an option.
Save your changes.
How do you like your new get-up? If you don’t like it, repeat these steps until you get it right.

FIGURE 1-6: Changing the screen background (top) and Office theme (bottom).
Customizing Keyboard Shortcuts in Word
In Microsoft Word, you can change the keyboard shortcuts. A keyboard shortcut is a combination of keys that you press to give a command. For example, pressing Ctrl+P opens the Print window; pressing Ctrl+S gives the Save command. If you don’t like a keyboard shortcut in Word, you can change it and invent a keyboard shortcut of your own. You can also assign keyboard shortcuts to symbols, macros, fonts, building blocks, and styles.
Follow these steps to choose keyboard shortcuts of your own in Microsoft Word:
On the File tab, choose Options.
You see the Word Options dialog box.
- Go to the Customize Ribbon category.
Click the Customize button (you can find it at the bottom of the dialog box next to the words “Keyboard Shortcuts”).
You see the Customize Keyboard dialog box, as shown in Figure 1-7.
In the Categories list, choose the category with the command to which you want to assign the keyboard shortcut.
At the bottom of the list are the Macros, Fonts, Building Blocks, Styles, and Common Symbols categories.
- Choose the command name, macro, font, building block, style, or symbol name in the Commands list.
In the Press New Shortcut Key box, type the keyboard shortcut.
Press the actual keys. For example, if the shortcut is Ctrl+8, press the Ctrl key and the 8 key — don’t type C-t-r-l-+8.
If you try to assign a shortcut that has already been assigned, the words “Currently assigned to” and a command name appear below the Current Keys box. You can override the preassigned keyboard assignment by entering a keyboard assignment of your own.
- If you want the keyboard shortcut changes you make to apply to the document you’re working on, not to all documents created with the template you’re working with, open the Save Changes In drop-down list and choose your document’s name.
- Click the Assign button.
- When you finish assigning keyboard shortcuts, close the Customize Keyboard dialog box.
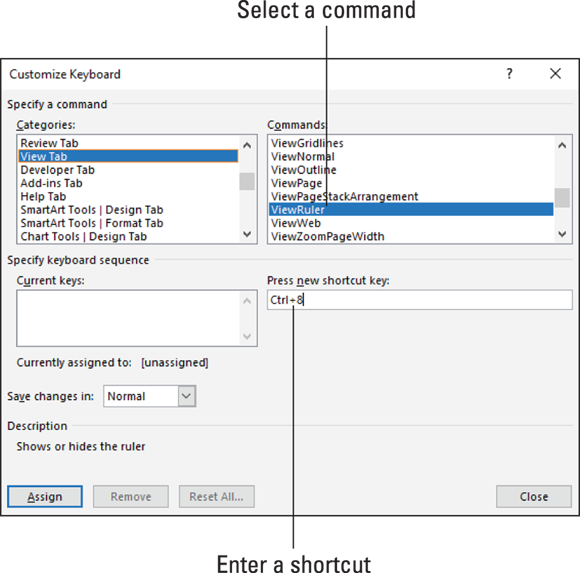
FIGURE 1-7: Assigning keyboard shortcuts to Word commands.
To delete a keyboard shortcut, display it in the Current Keys box, select it, and click the Remove button.
 To restore the Quick Access toolbar to its original buttons, click the Reset button in the Options dialog box (refer to
  You can click the Reset button in the Options dialog box (refer to