Chapter 4
Working Together in Teams
IN THIS CHAPTER
 Setting your status
Engaging in conversations
Co-editing files
Holding audio, video, and in-person meetings
The purpose of Teams is to help colleagues work collaboratively by sharing files, having chats, and even participating in voice and video calls.
Whereas SharePoint document libraries and task lists (covered in Chapter 3 of this minibook) represent more or less permanent data repositories, Microsoft Teams is meant to serve the ever-changing modern workplace. In the course of a year, you may find yourself on several different teams. Within the same team, you may find yourself participating in several channels.
This chapter explains what teams and channels are. It shows how to tell coworkers when you are busy or available for collaborations, how to engage in a conversation, and how to chat privately. You also discover how to conduct searches, share and co-edit files, and have in-person meetings, audio meetings, and video meetings.
Introducing Microsoft Teams and Channels
How you run the Teams application is up to you. Run it as a desktop application, a web browser app, on a Macintosh computer, or on a mobile phone. The Teams interface is nearly the same across all formats, which is one reason that businesses like Teams.
In most instances, a systems administrator or manager assigns individuals to teams. If you have the proper privileges, however, you can create a team of your own. Each team can have one or more channels. A channel is a workspace devoted to a specific project or a specific group of employees. Typically, administrators invite coworkers to participate in previously created channels. Depending on the privileges assigned by the administrator, individuals can sometimes create and archive channels on their own.
These pages explain how to visit teams and channels and declare a team or channel a “favorite” so that you can revisit it easily.
Opening a team and viewing its channels
Follow these steps to go to a team and visit its channels:
Click Teams on the Navigation bar.
The Teams tab appears, as shown in Figure 4-1. You see the names of teams to which you've been assigned. Starting on this tab, you can create a team (if you have permission to do so) and join a team by entering the team’s redemption code.
Select the name of a team to which you’re assigned.
Each team consists of one or more channels. Channel creators choose the name and purpose of each channel. You can create a channel if you have permission to do so.
Select a channel and browse its content.
Channels offer the following tabs:
- Conversations: Discuss topics online with coworkers.
- Files: Upload and edit files for a project.
- Meeting Notes: Track meeting notes in a collaborative, multi-editing environment.
- Add a Tab: Add new tabs to the channel if you have permission.
- Click Teams to go back to the Teams list.
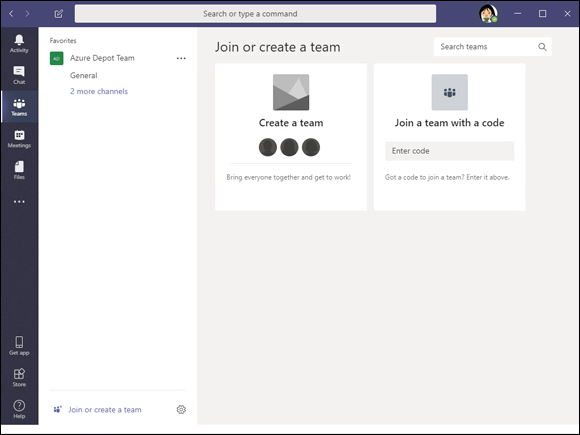
FIGURE 4-1: The Teams tab lists teams to which you belong.
Putting a team or channel on the Favorites list
Put the name of a team or channel on the Favorites list so you can revisit it in a hurry. Figure 4-2 shows the Favorites list. To see this list, all you have to do is click Teams on the Navigation bar. From the list, you can click the name of a team or channel and go there directly. Follow these steps to bookmark a favorite team or channel you intend to revisit often:
Click the Teams tab on the Navigation bar.
You see the lists of teams you belong to.
- Select a team.
Click the ellipsis link next to a team to add a team to the Favorites list.
The team you made a favorite appears first in your team list.
- Browse to a channel you visit often.
Click the star icon to the right of the channel's name to add your channel to the Favorites list.
As shown in Figure 4-2, the start icon is filled in to show that the channel is a favorite. Favorite teams and channels are listed first on the Favorites list to make it easier to find the teams and channels you need.
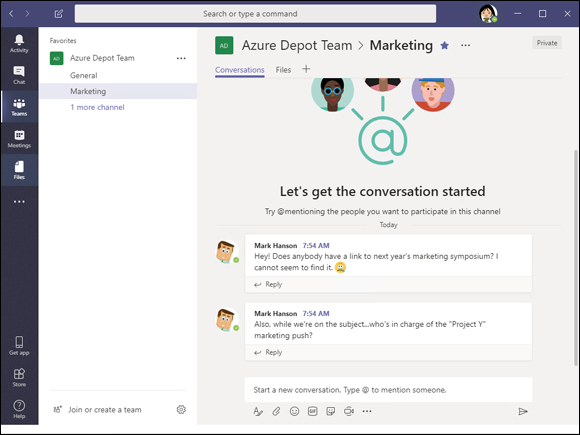
FIGURE 4-2: Put teams and channels you visit often on the Favorites list.
Setting Your Status
Indicating your status makes it easier for colleagues to check your availability for communication. Get in the habit of setting your status so that team members know whether and how they can reach you. Follow these steps to manage your status in Teams:
Open your user menu.
This menu is located in the upper-right corner of the screen. When you open it, you see a drop-down menu similar to the one in Figure 4-3.
Move the pointer over the status option, the first option on the menu, to see a drop-down list of status options.
Figure 4-3 shows the status list. Choose Available, Busy, or another option.
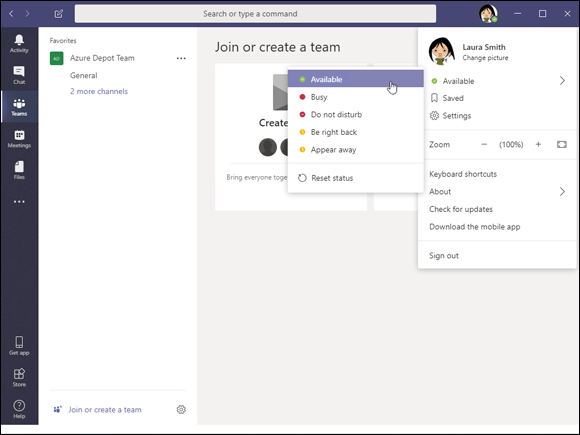
FIGURE 4-3: Declare your status so that coworkers know whether you’re available.
 Suppose you want to find out whether a colleague is available, busy, or away. Place your cursor in the Search bar at the top of the screen and start typing your colleague’s name. The name of your colleague should appear on a drop-down list. Select your colleague’s name to go to his or her conversation page.
All about Conversations
If you know your way around Facebook or LinkedIn, you know what conversations are. You can post to a conversation, respond to others’ posts, and like a post.
Conversations are more than a way for coworkers to discuss a topic. A conversation can also be an important record of a topic, its history, and its background. Newcomers to a channel can browse a conversation and thereby get up to speed on a project. Coworkers can examine a conversation to see how a project is progressing, find out what questions were asked in the past, and look into the history of a project to see how it evolved.
These pages explain how to bookmark a conversation, like a conversation, and create and reply to conversations.
Liking and bookmarking conversations
Follow these steps to like and bookmark a conversation in Teams:
Browse to the Conversations page of a channel.
Within a channel, the Conversations page appears first.
Hover your mouse over a post.
As shown in Figure 4-4, you see three buttons:
- More Options: Opens a drop-down list with options for marking a post as unread, copying a link to the post to the Clipboard, or opening the post in Immersive Reader. Immersive Reader is a separate view in Microsoft Teams that makes reading long conversations easier.
- Save This Message: Saves the post so that you can review it later. To view saved posts, open the user menu and choose Saved.
- Like This Message: Likes the post. Other team members can see posts you liked.
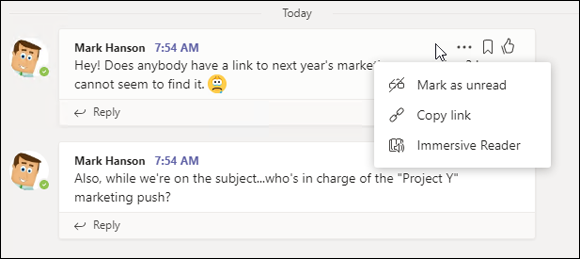
FIGURE 4-4: You can perform many actions on channel posts, including liking and saving them for future reference.
Starting a conversation
Follow these steps to start a conversation:
- Browse to the Conversations page of a channel.
In the text box, enter a message.
Below the text box are tools for entering emoji, hyperlinks, and other goodies, as shown in Figure 4-5. To notify a colleague about the conversation you plan to start, type the at (@) symbol followed by the colleague’s name in the text box.
Besides notifying colleagues, you can link the conversation to other channels. Type the at (@) symbol followed by a channel name.Press Enter or click the Send button.
Your conversation is visible to all team members.
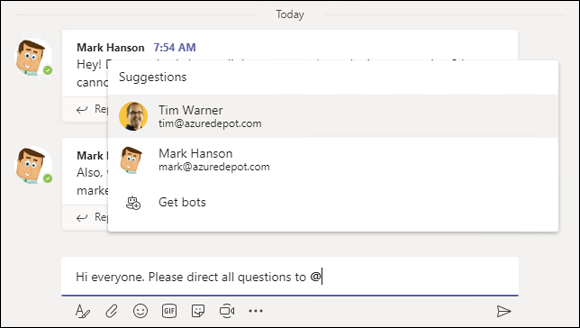
FIGURE 4-5: Enter a message in the text box to start a conversation.
Posting to a conversation
Follow these steps to post a reply to a conversation:
- Browse to the Conversations page of a channel.
- In the message to which you want to reply, click the Reply button.
- Type your message and press Enter or click the Send button.
Chatting Privately with a Colleague
Sometimes questions, comments, and concerns are not appropriate for all members of a team. Sometimes what goes on in a conversation is better left to two people or a handful of select coworkers. Use the Chat feature to conduct conversations in private.
 Never enter a comment in Teams that you wouldn’t want your boss or IT manager to see. Even a chat message that is supposed to be meant for a select few isn’t really private. For security and regulatory compliance reasons, Teams administrators can audit and view all content within a Teams workspace.
Follow these steps to initiate and participate in a private chat with one or two people of your choosing:
Click the New Chat button on the Navigation bar along the top of the screen.
To find the New Chat button, look for the pen-and-paper icon to the left of the Search box.
As you start and participate in chats, a list of recent users appears in the Chat page. You can select a name if you want to pick up on a previous conversation.
Type your message and press Enter.
You see a Chat window similar to Figure 4-6.
 A notification pops up in the lower-right corner of the screen when someone wants to chat with you (refer to Figure 4-6). Click this notification to open the Chat window and start chatting.
- In the Type a New Message box, enter a message and press Enter or click the Send button.
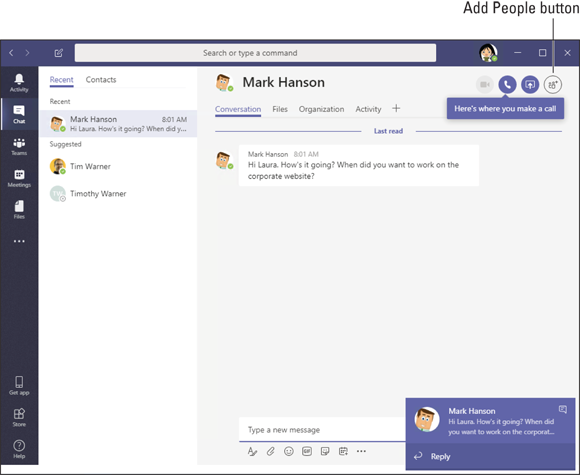
FIGURE 4-6: Conducting a chat.
Click the Add People button to include more people in a chat. This button is located in the upper-right corner of the screen.
Filtering and Searching
Sometimes it pays to cut down on “noise” and drill into content that is relevant to your professional interests. Starting on the Activity tab, you can filter team activity to see only what interests you. You can also conduct powerful searches. The Activity tab is a one-stop shop for pinpointing what is pertinent to you — channels, conversations, chats, files, and so on.
Filtering your activity feed
The activity feed presents actions you can take in the channels to which you participate. Many people start their workday by seeing what’s up on the activity feed, where you find mentions, replies, and other notifications.
Follow these steps to filter your activity feed to focus on the information you need:
- Click Activity in the Navigation bar.
On the Activity selector, choose Feed (if it isn’t already selected).
The Activity selector is located at the top of the Activity pane, as shown in Figure 4-7. The selector offers two choices:
- Feed: Shows all your mentions and post replies.
- My Activity: Shows posts you initiated.
Click the Filter button and select an option on the drop-down menu.
You can filter your activity feed using different criteria, as shown in Figure 4-7.
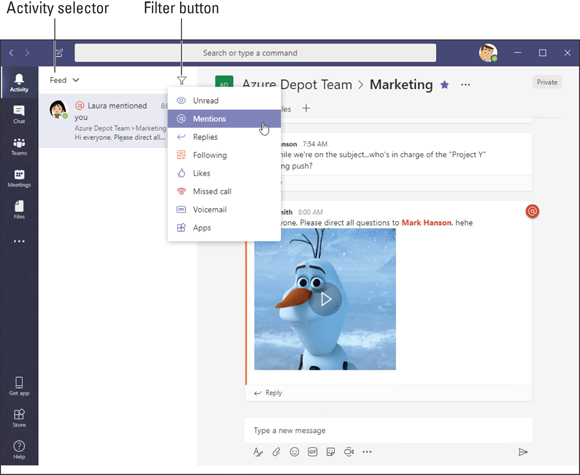
FIGURE 4-7: Filter the Teams activity feed to see only the events that interest you.
Searching for content
How do you find the file your manager mentioned in passing last week? Or recall the name of the movie a colleague suggested during a private chat three months ago? Here’s how to search Teams for a specific post, message, or file:
From any page in Teams, place the cursor in the Search or Type a Command box.
This text box is located across the top of the screen.
Type a search term or, alternatively, enter a forward slash (/) command followed by a search term.
An example of a search term might be “Sales department reports” or simply “reports.” Use forward-slash commands to combine a search for a person, channel, group, or file with a concrete action. When you enter the forward slash, a drop-down list of commands appears. Choose a command and enter a search term. For example, choose /chat and send Mark a chat message.Press Enter.
Search results appear on three tabs: Messages, People, and Files.
Select a tab to steer your search in the right direction.
I hope you find what you’re searching for.
Choosing Notification Settings
Teams can notify you when a coworker mentions your name, posts a particular file type, or does a handful of other things worth knowing about. Follow these steps to tell Teams what you want to be notified about:
Open the user menu and select Settings.
The user menu is located in the upper-right corner of the screen, as shown in Chapter 3 of this minibook. The Settings window appears.
Select Notifications.
Notifications options appear, as shown in Figure 4-8.
Choose notification preferences.
Close the Settings window when you finish. Teams saves your settings as soon as you make them.
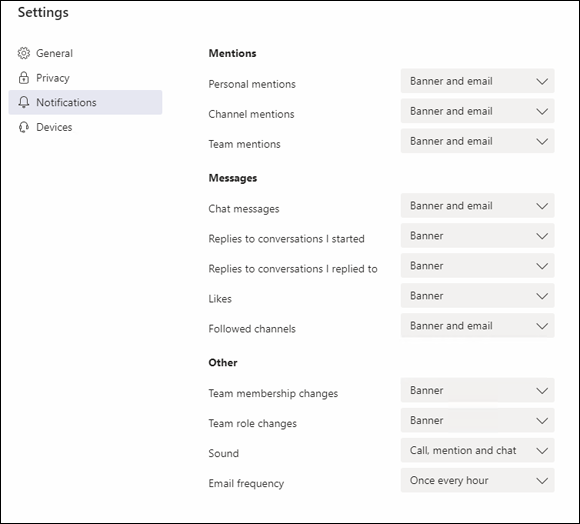
FIGURE 4-8: Choosing how you want to be notified.
Sharing and Editing Files with Coworkers
Conversations and chats are well and good, but they usually involve dealing with files: sharing them and working on them collaboratively. Herewith are instructions for uploading files to a channel and working together on a file with coworkers. One of the cool things about Teams is that you can edit Office 365 documents inside the Teams interface.
Uploading a file to a channel
Follow these steps to upload a file from your computer to a channel:
Visit the Files tab of a Teams channel.
The names of files that were uploaded to the channel appear in a list, as shown in Figure 4-9.
You can click column headers on the file list to sort the list by file type, name, or modification date.Select a file repository.
A file repository is simply a collection of files that are accessible to you. The Files menu offers a Recent list, a Microsoft Teams entry, and possibly more file location destinations, as configured by the network administrator.
- Click Microsoft Teams.
Click Upload.
The Open dialog box appears.
Select the file you want to upload and click Open.
You can upload more than one file at a time by selecting more than one file.
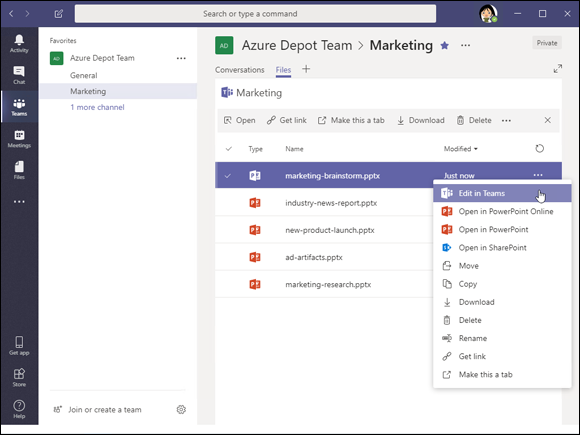
FIGURE 4-9: A channel’s file list.
Move the mouse over a filename to see options for handling the file (refer to Figure 4-9). You can open, move, copy, and download files, among other tasks.
Collaborating on a file
Follow these steps to open an Office 365 file and work on it collaboratively:
In a document library, click the More button next to the name of the file you want to open.
The button doesn't say “More”; instead, it appears with an ellipsis (three dots.) A pop-up menu appears.
- Select Edit in Teams.
Edit or co-edit the file.
Coworkers can edit a file at the same time. A name badge and icon shows where others are working on a file.
Click the Close button when you finish editing.
As well as clicking the Close button, you can click a tab on the Teams sidebar.
If you look for a Save button in an Office Web application, you will look in vain. Edits are saved automatically as you make them in Web apps.
Holding Meetings with Coworkers
Teams offers two ways to hold a meeting. You can conduct an audio or video meeting with a colleague, or do it the old-fashioned way by scheduling a person-to-person meeting on a specific day at a specific time. Keep reading. (Book 5, Chapter 4 describes how to schedule in-person meetings with Outlook.)
Conducting a video or audio meeting
Follow these steps to conduct a video or audio meeting:
Locate the person you want to meet.
Perform a global search or find the person’s user icon in your Chat or conversation history.
Click the person's name to open that person’s user card.
Figure 4-10 shows a user card. The card lists a person’s name and shows his or her image.
In the user card, click the Video Call or Audio Call button.
The person to whom you made the call gets a notification. At that point, the person can decline or accept the call.
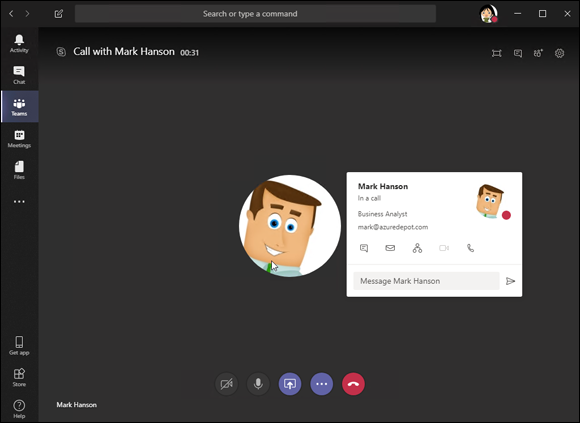
FIGURE 4-10: Initiate a call by clicking a button in the user card.
Use the buttons at the bottom of the Call window to conduct or terminate the conversation:
- Webcam: Turns the webcam on or off
- Microphone: Mutes or unmutes microphone
- Sharing: Shares your screen with participants
- More Options: Opens a menu for putting the call on hold, transferring, and invoking the keypad
- Hang Up: Hangs up the call
Scheduling a meeting and inviting attendees
Follow these steps to schedule an in-person meeting with a coworker:
- Click the Meetings tab on the Navigation bar.
Click Schedule a Meeting.
The New Meeting window appears, as shown in Figure 4-11.
In the New Meeting window, describe the meeting and invite others to attend.
Give the meeting a name, provide a location, declare when it is to occur, and invite coworkers.
Click the Schedule button.
The meeting is entered on your Calendar.

FIGURE 4-11: Organizing a meeting.
Coworkers receive a meeting request in the form of a message. The message includes an Accept, Tentative, and Decline button for invitees to click to RSVP. A meeting that is accepted is entered immediately on the Calendar.