Now that you have learned to get the content from a camera, we can proceed with extending the C++ code and adding the face detection functionality. We will learn how to draw the bounding boxes, get the coordinates, and crop the face:

We start by initializing the Julia packages:
ENV["PKG_CONFIG_PATH"] = "/Users/dc/anaconda/envs/python35/lib/pkgconfig"

using OpenCV
using Images, ImageView
using Cxx
The moment packages are loaded, we proceed to defining C++ code. C++ code is defined within the cxx""" <<C++ code>> """ tag and then executed in REPL.
The first thing to do in the C++ code is defining and including the libraries. We include both standard C++ and Open CV libraries:
#include "opencv2/objdetect.hpp"
#include "opencv2/highgui.hpp"
#include "opencv2/imgproc.hpp"

#include <iostream>
#include <stdio.h>

using namespace std;
using namespace cv;
Now, we are ready to proceed with developing the functions. Open CV supports different types of classifiers to detect an object. We will be using the Haar classifier and preloading its definition from .xml. It will be responsible for finding faces on a photo. Consider the following code:
/// Load cascade file
CascadeClassifier load_face_cascade(String face_cascade_name) {

    CascadeClassifier face_cascade;
    face_cascade.load(face_cascade_name);

    return face_cascade;
}
Next, we proceed with defining a function that will execute the classifier and draw a bounding box around the face. In order to achieve the goals, we will first convert the image to grayscale, equalize its histogram, and run the cascade classifier to detect the faces.
The moment faces are found, we will draw bounding boxes around each of them. This function is capable of finding multiple faces:
/// detect and draw a bounding box on the image
void detect_face(cv::Mat frame, CascadeClassifier face_cascade) {

    std::vector<Rect> faces;
    cv::Mat frame_gray;

    cvtColor( frame, frame_gray, COLOR_BGR2GRAY );
    equalizeHist( frame_gray, frame_gray );

    face_cascade.detectMultiScale( frame_gray, faces, 1.1, 2,
     0|CASCADE_SCALE_IMAGE, Size(30, 30) );

    for( size_t i = 0; i < faces.size(); i++ ) {
        Point center( faces[i].x + faces[i].width/2, faces[i].y +
        faces[i].height/2 );
        ellipse( frame, center, Size( faces[i].width/2,
        faces[i].height/2), 0, 0, 360, Scalar( 255, 0, 255 ),
        4, 8, 0 );
    }
}
The other function we will develop is responsible for returning the actual coordinates of a bounding box. It accepts an image and cascade classifier as an input and does a job similar to the function drawing the bounding boxes, but instead of drawing the boxes, it returns values for the x and y axes, and width and height.
You can try extending the function to accept face_id as a parameter, because, for now, it will only return coordinates for the first face:
/// detect and return bounding box coordinates
std::vector<int> detect_face_coords(cv::Mat frame, CascadeClassifier face_cascade) {

    std::vector<Rect> faces;
    cv::Mat frame_gray;
    std::vector<int>vec(4);

    cvtColor( frame, frame_gray, COLOR_BGR2GRAY );
    equalizeHist( frame_gray, frame_gray );

    face_cascade.detectMultiScale( frame_gray, faces, 1.1, 2,
     0|CASCADE_SCALE_IMAGE, Size(30, 30) );

    if (faces.size() > 0) {
        vec[0] = faces[0].x;
        vec[1] = faces[0].width;
        vec[2] = faces[0].y;
        vec[3] = faces[0].height;
    }
    else {
        vec[0] = 0; vec[1] = 0;
        vec[2] = 0; vec[3] = 0;
    }

    return vec;
}
We are done defining C++ code and are ready to proceed to Julia with pure Julia syntax. First, we download the cascade classifier from Open CV GitHub page and pass it to the load_face_cascaade function:
cascade_path = download("https://raw.githubusercontent.com/opencv/opencv/master/data/haarcascades/haarcascade_frontalface_alt.xml")
face_cascade = @cxx load_face_cascade(pointer(cascade_path));
Next, we will try different scenarios:
- Draw the bounding boxes around image and save it to disk
- Retrieve the bounding box coordinates and crop the image to only keep the face
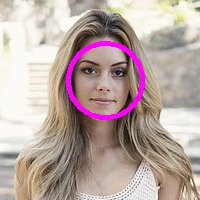
Drawing bounding boxes and saving the image to disk is fairly simple. We will use the imread function from Open CV package to read the image from disk and pass it to the detect_face function; detect_function does not return any results and modifies an existing object in img_opencv. Next, we will save the image to disk using the imwrite function from Open CV package, as follows:
filename = joinpath(pwd(), "sample-images", "beautiful-1274051_640_100_1.jpg");
img_opencv = imread(filename);
@cxx detect_face(img_opencv, face_cascade);
imwrite(joinpath(pwd(), "detect-faces.jpg"), img_opencv)
You should find the result in your project folder under detect-faces.jpg:

In the second example, we are retrieving actual bounding boxes and cropping the image. We will not overcomplicate the task and preload image in both Open CV and Julia formats, and we will use Open CV image to identify the coordinates and apply them to Julia image:
filename = joinpath(pwd(), "sample-images", "beautiful-1274051_640_100_1.jpg");
img_opencv = imread(filename);
img_images = load(filename);

coords_cxx = @cxx detect_face_coords(img_opencv, face_cascade);
coords = map(x -> Int(at(coords, x)), 0:3);

face = img_images[coords[3]:coords[3] + coords[4], coords[1]:coords[1] + coords[2]]
imshow(face)
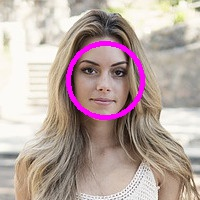
In the preceding example, we used the map function to iterate over the array returned by Open CV and create an area of interest. All this results in the face being cropped very precisely:

Done! Now you know how to identify people in an image. As for the previous example, I encourage you to browse through the GitHub code.