
A knot can reduce the breaking load of a rope by half, while a splice reduces it by only 5–10%. It is useful if you can splice your own ropes because it is the weakest link that counts. The key to splicing in a braided rope is taking it far enough back into itself; this causes friction and the rope tightens itself. Splicing will work only in new ropes since the fibres will still be flexible.
Depending on the type of splice and rope, there is a variety of splicing tools available, such as Selma fids, D-Splicer pulling needles and traditional splicing fids. You’ll probably also need a hot knife, scissors (both normal ones and ones specifically for Dyneema), tape, a marker pen, measuring tape, a needle, whipping thread, a knife and a cutting board.
Make sure you have enough space to work and an anchoring point for your rope. If you’re on board you can use a winch in case you need extra force.
Use splicing tape to keep the ends of a rope together. You could also tape the end of the rope to the fid. There are various brands of specialised smooth, thin and strong splicing tape. Choose a fid that matches the diameter of the rope, or even one that is slightly thinner. Always use the same fid to measure distances to make sure the ratios are correct.
Make sure the smooth side of the fid is the one sliding along the rope. The other side has an indentation with which you might accidentally pull out some fibre – especially if you need to pass along another core into the cover. The same can happen with the point of the fid.
Use a soft needle (see Chapter 14) or a pulling needle in case the rope is too tight to slide a fid in. These are thinner and you can apply more force.
Never use pliers to pull out a fid from the rope – you will damage it!
SPLICING TECHNIQUE AND CORE MATERIALS
There are two splicing methods for double braid ropes: one in which you need the cover of the rope to strengthen the eye splice (for ropes with polyester and polyamide cores), and another where you don’t (for example in high-performance fibre ropes). It’s very important to understand why this distinction is made.
The core provides almost the full strength of a rope with a high-performance fibre core such as Dyneema. You therefore don’t need the cover in the splice to provide strength. You will need the cover to splice ropes with polyester (or polyamide) cores because the cover contributes about one third of the breaking load.
If you have a core made of high-performance fibres, you don’t need the cover to strengthen the eye splice, but in some fibres (such as Vectran) it is needed for UV protection. Dyneema is very UV resistant so it can always be used without the cover.

Make sure the ‘neck’ of an eye splice is no wider than 30 degrees when there is a workload on it. (There are even stricter requirements for high performance fibre ropes such as Dyneema, where an eye splice should not be wider than 15 degrees and the length of the eye should therefore be at least five times the diameter of the object around which it goes.)
As a rule of thumb, the length of the eye should be at least 2.7 times the diameter of the object. This is less critical for halyards with a stainless steel lock. For example, if you’re using a shackle with a diameter of 5mm, you need the spliced eye to be at least 1.3cm in length. However, the rule is important for mooring lines that are used over a cleat. If your cleats on board have a diameter of 9cm, every mooring line eye needs to be at least 24cm long.
HOW TO REMOVE A CORE FROM THE COVER
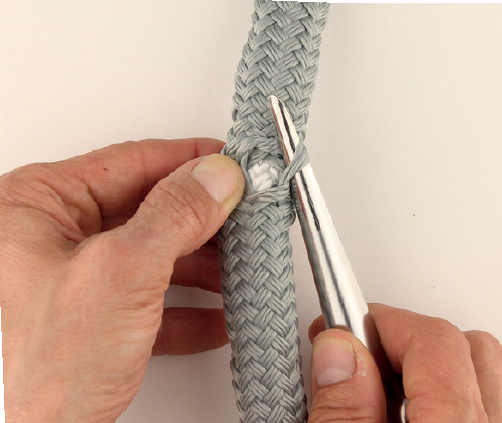
Pull the strands aside with a thin or hollow fid until you see the core.

Take the core out of the cover.

Pull the core further out.
If the differences in diameter in a splice are large, you get localised tension, which weakens the rope, especially high-performance fibre ropes such as Dyneema. You should therefore try to achieve a gradual decrease in thickness of the rope you tuck in. This is done by cutting one end diagonally along the final third of the splice length, as shown in the images below:


If you want to taper the end while losing less of the construction – to prevent loss of strength – you can slim a core or cover down more systematically. This usually happens when you splice two ropes together, like in the method for making continuous loops (see Continuous Loops). After slimming the rope you can still splice it because the structure is preserved.

Here, the strands on both ends have been thinned by half, from the second mark on. The structure is preserved and the rope can still be spliced.
The next example is a 16-strand braided cover with eight pairs of strands braided to the left and eight pairs braided to the right.

Tape the end of the cover and cut off a short piece. Remove one strand of each pair.

Pull the strands out from the cover with a splicing fid and cut them.

The structure is preserved, but the rope is slimmed down with fewer strands.
Sliding back the cover is also called ‘milking’. Sometimes the last bit can be difficult. Attach the rope about two metres from the eye to an eye or cleat, and slide the cover back through your fist while you pull the loop back. For the final step, add some more tension on the rope and/or use a hammer.

Slide the cover towards the eye.
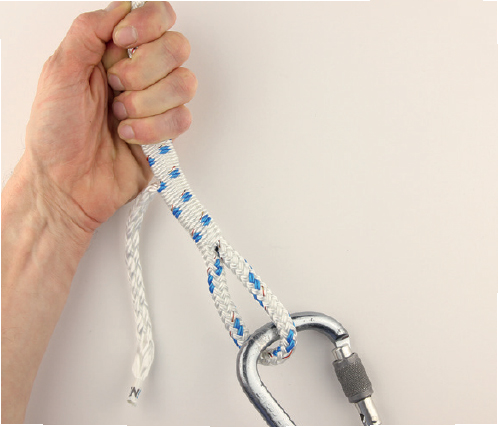
Add tension with a winch or use your weight (I often wear a climbing harness and attach it to the rope) if the milking is too difficult.
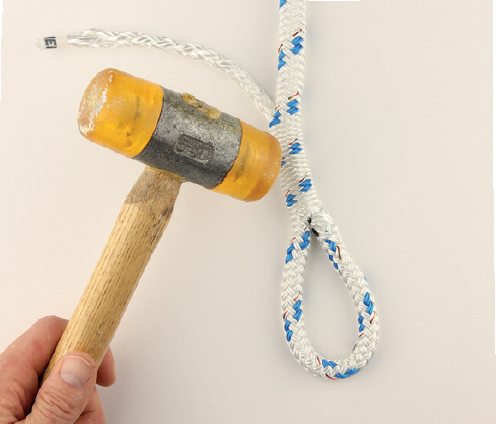
Use a hammer if the last bit is too hard. This loosens the fibres, which will allow you to slide the cover slightly further. Repeat this until the eye is finished.
If a rope has to disappear into itself or into another rope, make sure you have enough room. The rule of thumb is to take about one third extra length: if the rope to be hidden is 20cm long, you have to let it come out at 26cm. The rope into which the fid is inserted will ride up. Once the rope has gone through, taper it by cutting it diagonally. Slide back the cover and the buried rope disappears.
