The steps you need to follow to complete this recipe are as shown:
- Inspect the structure of the CSV file, firenews.csv, which you can find within the book dataset (if you are on Windows, open the CSV file with an editor such as Notepad).
      $ cd ~/postgis_cookbook/data/chp01/
      $ head -n 5 firenews.csv
The output of the preceding command is as shown:

- Connect to PostgreSQL, create the chp01 SCHEMA, and create the following table:
      $ psql -U me -d postgis_cookbook
      postgis_cookbook=> CREATE EXTENSION postgis;
      postgis_cookbook=> CREATE SCHEMA chp01;
      postgis_cookbook=> CREATE TABLE chp01.firenews
      (
        x float8,
        y float8,
        place varchar(100),
        size float8,
        update date,
        startdate date,
        enddate date,
        title varchar(255),
        url varchar(255),
        the_geom geometry(POINT, 4326)
      );
We are using the psql client for connecting to PostgreSQL, but you can use your favorite one, for example, pgAdmin.
Using the psql client, we will not show the host and port options as we will assume that you are using a local PostgreSQL installation on the standard port.
If that is not the case, please provide those options!
Using the psql client, we will not show the host and port options as we will assume that you are using a local PostgreSQL installation on the standard port.
If that is not the case, please provide those options!
- Copy the records from the CSV file to the PostgreSQL table using the COPY command (if you are on Windows, use an input directory such as c:\temp instead of /tmp) as follows:
      postgis_cookbook=> COPY chp01.firenews (
        x, y, place, size, update, startdate,
        enddate, title, url
      ) FROM '/tmp/firenews.csv' WITH CSV HEADER;
Make sure that the firenews.csv file is in a location accessible from the PostgreSQL process user. For example, in Linux, copy the file to the /tmp directory.
If you are on Windows, you most likely will need to set the encoding to UTF-8 before copying: postgis_cookbook=# set client_encoding to 'UTF-8'; and remember to set the full path, 'c:\\tmp\firenews.csv'.
If you are on Windows, you most likely will need to set the encoding to UTF-8 before copying: postgis_cookbook=# set client_encoding to 'UTF-8'; and remember to set the full path, 'c:\\tmp\firenews.csv'.
- Check all of the records have been imported from the CSV file to the PostgreSQL table:
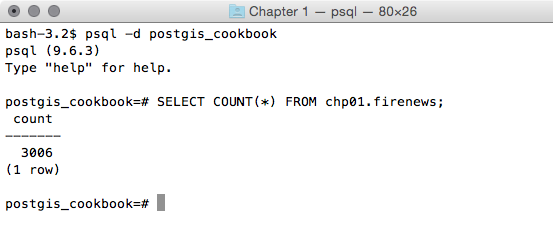
postgis_cookbook=> SELECT COUNT(*) FROM chp01.firenews;
The output of the preceding command is as follows:

- Check a record related to this new table is in the PostGIS geometry_columns metadata view:
     postgis_cookbook=# SELECT f_table_name,
     f_geometry_column, coord_dimension, srid, type
     FROM geometry_columns where f_table_name = 'firenews';
The output of the preceding command is as follows:

Before PostGIS 2.0, you had to create a table containing spatial data in two distinct steps; in fact, the geometry_columns view was a table that needed to be manually updated. For that purpose, you had to use the AddGeometryColumn function to create the column. For example, this is for this recipe:
postgis_cookbook=> CREATE TABLE chp01.firenews(
x float8,
y float8,
place varchar(100),
size float8,
update date,
startdate date,
enddate date,
title varchar(255),
url varchar(255))
WITHOUT OIDS;postgis_cookbook=> SELECT AddGeometryColumn('chp01', 'firenews', 'the_geom', 4326, 'POINT', 2);
chp01.firenews.the_geom SRID:4326 TYPE:POINT DIMS:2
In PostGIS 2.0, you can still use the AddGeometryColumn function if you wish; however, you need to set its use_typmod parameter to false.
- Now, import the points in the geometric column using the ST_MakePoint or ST_PointFromText functions (use one of the following two update commands):
      postgis_cookbook=> UPDATE chp01.firenews
      SET the_geom = ST_SetSRID(ST_MakePoint(x,y), 4326);
      postgis_cookbook=> UPDATE chp01.firenews
      SET the_geom = ST_PointFromText('POINT(' || x || ' ' || y || ')',
                                      4326);
- Check how the geometry field has been updated in some records from the table:
      postgis_cookbook=# SELECT place, ST_AsText(the_geom) AS wkt_geom
      FROM chp01.firenews ORDER BY place LIMIT 5;
The output of the preceding comment is as follows:

- Finally, create a spatial index for the geometric column of the table:
      postgis_cookbook=> CREATE INDEX idx_firenews_geom
      ON chp01.firenews USING GIST (the_geom);