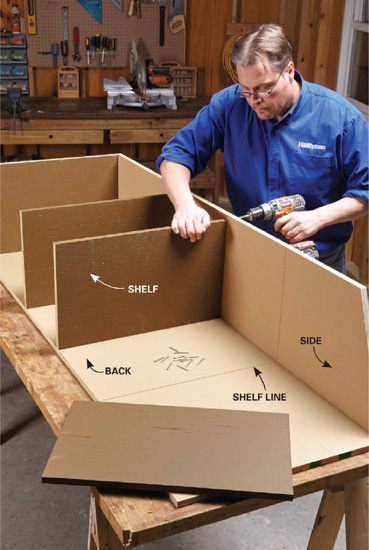
1 Assemble the boxes. Paint all the plywood components, then assemble them with self-tapping, trim head screws. Screw one side to the back, then add the shelves and finally the other side.
Materials list
ITEM |
QTY. |
4' x 8' x 3/4" sanded pine plywood |
4 |
1x6 x 12' cedar |
6 |
2x6 x 8' pressure-treated lumber |
2 |
1/4" x 4" x 8' tongue-and-groove cedar paneling (six-pack) |
3 |
Bundle of cedar shingles |
1 |
1-1/4" exterior-grade trim head screws (100-pack) |
1 |
1-1/2" exterior-grade trim head screws (100-pack) |
1 |
2" exterior-grade screws (1-lb. box) |
1 |
3" exterior-grade screws (1-lb. box) |
1 |
1-1/4" 18-gauge brads (small box) |
1 |
3/4" brads (small box) |
1 |
1-1/4" 6d galvanized nails (1-lb. box) |
1 |
Roll of 15-lb. felt paper |
1 |
Construction adhesive (tube) |
3 |
Polyurethane caulking (tube) |
2 |
Composite shims (small bundle) |
1 |
8" decorative T-hinges |
4 |
Door handles |
2 |
Roller door catches |
4 |
1-1/2" fender washers |
2 |
4" structural screws |
2 |
Wood filler (small container) |
1 |
Paint and/or exterior sealant |
|
KEY |
DIMENSIONS |
QTY. |
NAME |
3/4" BC sanded plywood: |
|||
A |
15-3/4" x 72" |
4 |
Sides |
B |
23-3/4" x 72" |
2 |
Backs |
C |
14-1/4" x 23-3/4" |
3 |
Shelves |
D |
15" x 23-3/4" |
2 |
Bottoms |
E |
17" x 52-1/8" |
1 |
Top* |
F |
2" x 23-3/4" |
2 |
Top braces |
G |
21-1/4" x 62-1/4" |
2 |
Door slabs* |
H |
5-1/4" x 23-1/2" |
4 |
Temporary door brace |
*Cut to fit |
|||
Pressure-treated lumber: |
|||
J |
1-1/2" x 5-1/2" x 25-1/4" |
4 |
Base fronts and backs |
K |
1-1/2" x 5-1/2" x 12-3/4" |
4 |
Base sides |
Cedar (or pressure-treated): |
|||
L |
3/4" x 1-1/4" |
2 |
Door stops* |
M |
3/4" x 3/4" |
2 |
Hinge supports* |
N |
3/4" x 1-1/4" x 4" |
2 |
Door latch blocks |
P |
3/4" x 5-1/2" |
2 |
Side bottom trim boards* |
Q |
3/4" x 2-3/4" |
4 |
Side trim boards* |
R |
3/4" x 2-3/4" |
2 |
Side top trim boards* |
S |
3/4" x 2-3/4" |
2 |
Side center trim boards* |
T |
3/4" x 2-3/4" |
2 |
Front side trim boards* |
U |
3/4" x 5-1/2" |
1 |
Front bottom trim board* |
V |
3/4" x 2-3/4" |
1 |
Front top trim board* |
W |
3/4" x 2-3/4" |
1 |
Front center trim board* |
X |
3/4" x 2-3/4" |
4 |
Door side trim boards* |
Y |
3/4" x 5-1/2" |
4 |
Door top and bottom trim boards* |
Z |
3/4" x 2-3/4" |
2 |
Door center trim boards* |
AA |
3/4" x 1-1/8" |
3 |
Drip edge* |
BB |
1/4" x 3/1/2" |
|
Cedar planks* |
*Cut to fit |
|||

1 Assemble the boxes. Paint all the plywood components, then assemble them with self-tapping, trim head screws. Screw one side to the back, then add the shelves and finally the other side.
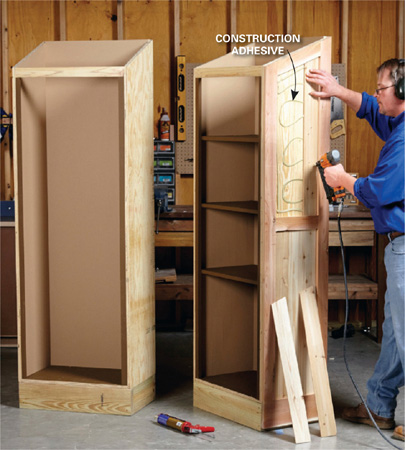
2 Trim the sides. Mount the boxes on their bases, then add trim and siding to the sides that will be exposed. Fasten the trim and siding with construction adhesive, plus a few brads to hold them in place while the adhesive sets.
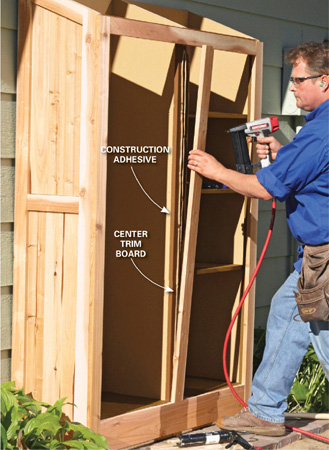
3 Add the front trim. Trim the front after the boxes are attached. Double-check that both door openings are the same size before you permanently attach the center trim board.
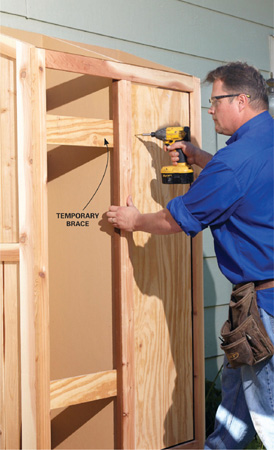
4 Mount the door slabs. Screw the door slabs to temporary braces. This will let you build the doors in place for a perfect fit. Keep the screws at least 4 in. from the edge of the slab so they won’t get covered up by the trim.
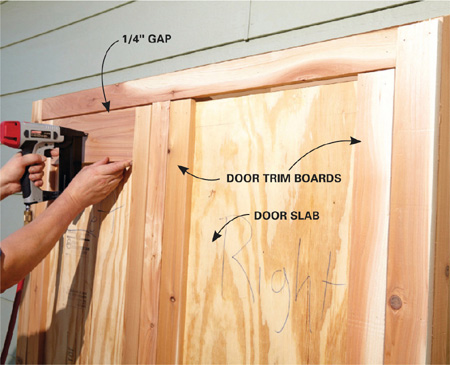
5 Build the doors in place. Nail and glue the trim to the slabs, leaving an even gap around the edges. Then screw on the hinges, remove the temporary screws in the slabs, and install the siding back in your garage.