WHAT IT TAKES
Time: 1 weekend
Skill level: Beginner

WHAT IT TAKES
Time: 1 weekend
Skill level: Beginner
For less than $100, you can transform a room in a single weekend. All it takes is some paint, glaze and masking tape.
The techniques for masking and glazing are easy to learn and don’t require any special skills. However, you will need a good bit of patience since the finish entails multiple layers of glaze and careful applications of masking tape. You only need to paint one wall to achieve a dramatic effect. You could complete a wall in a day, but it’s better to set aside a weekend to allow plenty of drying time between coats of glaze.
The first step is to paint the wall with the base coat color. For this you’ll need typical painting supplies like a stepladder, drop cloth, paintbrush and roller.

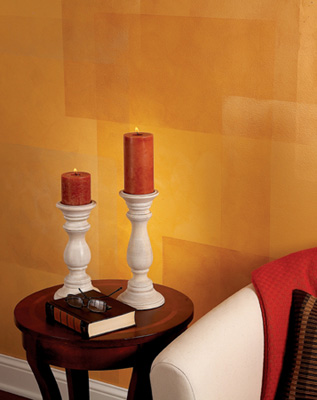
Four layers of glazed boxes overlap to create this contemporary design. Golden hues are used here, but you could produce the same effect using different colors. In general, use a darker or more opaque color for the first layer of boxes, and lighten the color and increase the transparency for each of the three succeeding layers. Where layers overlap, new shades and colors will appear. That’s why it’s essential to create a sample board before you start.
Latex paint thinned with glaze was used for the first layer, and thinned semi-opaque metallic finishes were used for the next two layers. Before you commit to applying the finish to the wall, choose your colors and mix the glazes. Then make a sample board by painting a piece of drywall, hardboard or MDF (medium-density fiberboard) and applying the glaze. Overlap sections of glaze on the board to see the effect. Of course, if you like the way this wall looks, just copy the recipe shown in the box above. When you’re happy with the choice of colors, you can start on the wall.
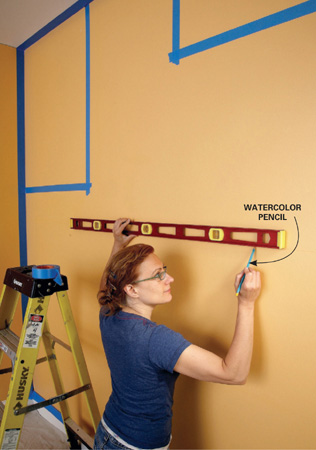
Choosing the size and position of the boxes may seem daunting, but don’t worry. The wall will look better with each layer you apply. Buy a watercolor pencil at an art supply store in a color that matches your color scheme and use it to mark the walls. The watercolor lines will disappear as you apply the glaze to the boxes. Square and rectangular boxes that ranged in size from a 34 x 14-in. rectangle to a 48-in. square were used here. Photos 1 – 3 show the process. Draw the fourth layer of boxes to enclose any base coat color that hasn’t been covered by previous layers.
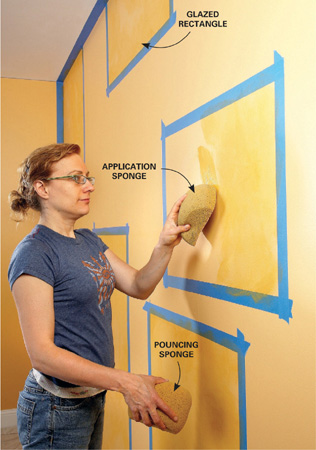
Tape off a series of boxes. Then, using the following steps, you’ll spread a thin layer of glaze within the taped-off boxes to create a cloudy effect. Wet the sponges and wring them out before starting. Then use one sponge to spread a few 6-in.-long swaths of glaze on a small section of a box. “Pounce” the flat side of a second dampened sponge onto the glaze to spread it out. Rinse the pouncing sponge in clean water occasionally to get rid of built-up glaze. Work quickly across the box so that you never have to overlap onto an area of glaze that’s already dry. Complete all the boxes with the first glaze color and let the glaze dry at least a couple of hours before starting on the next layer.
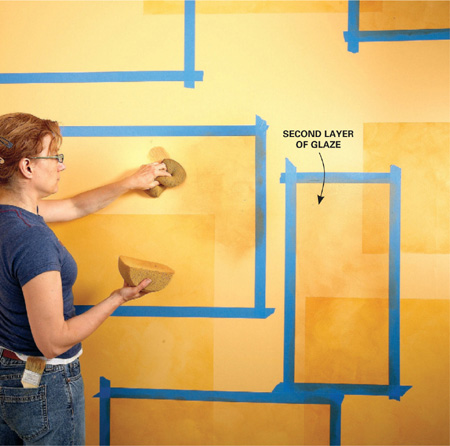
Draw another set of boxes on the wall that overlaps the first set and repeat the glazing process. Repeat these steps for the third layer. Complete the wall by covering any unglazed base coat with the fourth layer of glazed rectangles.

1 Mark rectangles on the wall using a level and a watercolor pencil. Then frame the rectangles with masking tape.

2 Spread random 6-in. swaths of glaze with the end of a sponge. Pounce with the second sponge to spread the glaze.

3 Add a second, third and fourth layer of overlapping boxes, using a lightercolored glaze for each layer. Let the glaze dry at least two hours between layers.