WHAT IT TAKES
Time: 2 hours
Skill level: Beginner

WHAT IT TAKES
Time: 2 hours
Skill level: Beginner
Clean up a messy closet by hanging your ties, belts and scarves on this 3-in-1 closet organizer! All you need is a 2 x 2-ft. piece of 1/2-in. plywood ($10 to $15), a wooden hanger, a hook (the one shown came from the wooden hanger) and a few hours.
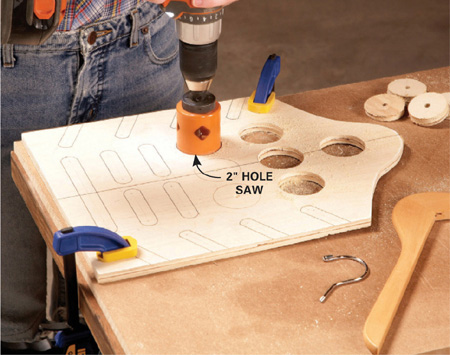
This organizer is 12 in. wide and 16 in. tall, but yours can be taller or narrower. To get a nice curve at the top, use the wooden hanger as a guide. Center it, trace the edge and cut it out with a jigsaw. Make a pattern of holes, slots and notches on a piece of paper and transfer it to your board. Use a 2-in. hole saw to cut the holes, making sure the board is clamped down tightly to keep the veneer from chipping (Photo 1). Use a jigsaw to cut out the side notches. To cut the slots, punch out the ends with a 5/8-in. Forstner drill bit (or a sharp spade bit) to prevent chipping, and then use a jigsaw to finish cutting out the center of each slot (Photo 2).
Sand the hanger and apply several coats of sealer or poly to smooth the edges so your scarves and ties don’t snag (this is the most time-consuming step). Using a 1/4-in. round-over bit with a router makes the sanding go faster. Drill a small hole into the top of the hanger for your hook, squeeze in a bit of epoxy glue to hold it and then screw it in.

1 Drill scarf holes with a 2-in. hole saw. Clamp the plywood tightly against a piece of scrap wood to prevent chipping as the hole saw exits the plywood.

2 Use a 5/8-in. Forstner drill bit or a sharp spade bit to punch out the ends of the slots, and then finish cutting them out with a jigsaw.