Chapter 15
SWEET TREATS
Chocolate Cherry Heart Bread
Panettone
Steamed Chocolate Pudding Cake
Holiday Tart
Maple Pecan Pumpkin Pie
Harvest Pie
Festive Gingerbread People
The Christmas Cookie Box
CHOCOLATE CHERRY HEART BREAD
This heart-shaped loaf was inspired by a Greek Christmas bread, but we actually sell more loaves on Valentine’s Day and Mother’s Day than we do at Christmas. Customers have been asking for this recipe for years, and I offer it now with one warning: The smell of this bread baking will draw a large crowd, so be prepared to share.
Makes 1 loaf
⅓ cup dried tart cherries
1 cup hot water
1 tablespoon brandy
1 tablespoon pure vanilla extract
½ teaspoon pure almond extract
¼ cup whole almonds
I¼ teaspoons anise seeds
I½ teaspoons dried yeast
⅓ cup granulated sugar
¼ cup Natural Sour Starter (page 7), at room temperature
1 egg
2¾ cups unbleached all-purpose flour
½ teaspoon kosher salt
3 tablespoons unsalted butter, at room temperature
2 ounces bittersweet chocolate, coarsely chopped
Egg wash made with 1 egg and 1 teaspoon water
Powdered sugar
• Combine cherries, water, brandy, vanilla extract, and almond extract in a small bowl. Mix with a spoon and set aside to steep for 20 minutes.
• Preheat oven to 350°F.
• Scatter almonds on a rimmed baking sheet and toast on center rack of oven for 10 to 12 minutes, or until golden brown. Let cool, then coarsely chop and set aside.
• Place anise seeds in a small sauté pan and toast over medium heat for 1 to 2 minutes, or until slightly darkened and fragrant. Transfer to a cutting board and let cool, then coarsely chop and add to the chopped almonds. (You can also chop the seeds in a coffee or spice grinder.)
• Drain the marinated cherries, reserving the liquid, and set cherries aside. Pour the marinating liquid into a medium saucepan and warm slightly over low heat. Pour the just-warm liquid into the bowl of your stand mixer and sprinkle yeast over the top. Mix with a whisk to dissolve yeast. Let bowl sit for 5 minutes while yeast blooms.
• Add sugar, Natural Sour Starter, and egg and using the paddle attachment, mix on low speed until ingredients are combined, about 1 minute. Add flour and salt and continue mixing on low for 1 to 2 minutes. Switch to the hook attachment. Increase speed to medium and start adding small pieces of the butter. Continue mixing for a total of 5 to 7 minutes. At this point the dough will have a satiny finish and should stretch easily. Let dough rest in the bowl for 5 minutes to relax the gluten.
• To the bowl of dough, add the anise seeds, almonds, marinated cherries, and chopped chocolate. Mix on low speed just long enough to distribute the new ingredients, 2 to 3 minutes. If the cherries are particularly wet, you may need to add a couple more tablespoons of flour.
• Pull dough from bowl onto a floured work surface and form it into a ball. Place ball in an oiled medium bowl and cover with plastic wrap. Let sit in a warm room, 70 to 75°F, for 2 hours. Dough will almost double in size.
• Line a rimmed baking sheet with parchment paper.
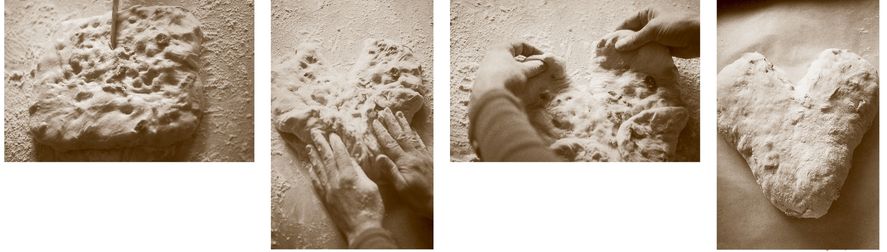
• Remove dough from bowl and place on a floured work surface. Flatten dough with your hands to release excess air bubbles. Form the dough into a 10 x 6-inch rectangle and position it so that a long side is facing you. Now it’s time to form the dough into a heart (see photos, below). Using a sharp paring knife, cut a small slit (about I½ inches) down the center of the far side of the dough, cutting all the way through the dough. This will make it easier to form the heart shape. Slide your hands underneath the bottom corners of the rectangle and fold them up to meet in the center of the dough, creating the lower point of the heart. Gently stretch the upper corners outward and pat them into shape, finishing off the heart. Pinch together any seams
in the dough. Invert the heart onto the prepared baking sheet and cover with plastic wrap. Let proof in a warm room for about 1 hour.
• While loaf is proofing, preheat oven to 350°F.
• The loaf is ready to bake when it has increased 50 percent in size and is pillow-like to touch. Brush the top of the loaf with egg wash and bake on center rack of oven for 25 to 30 minutes. The top of the loaf will have a mahogany color and the base will be deep brown. Let cool for at least 30 minutes on a wire rack, then dust the loaf with powdered sugar. Any leftovers can be wrapped in plastic wrap and stored at room temperature for 2 to 3 days.
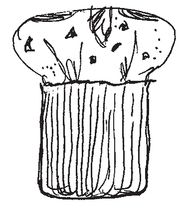
PANETTONE
Macrina’s version of this Italian Christmas bread was inspired by a recipe in Carol Field’s wonderful book The Italian Baker. The loaf is studded with candied citrus and dried fruits and enriched with eggs and butter. It’s irresistible. Nowadays it’s easy to find decorative paper baking molds, but I prefer to bake these loaves in clay flowerpots, which look beautiful and make great holiday gifts. Making this dough is a two-step process that can’t be rushed, but the finished loaves are more than worth the wait. You will need four three-inch clay flowerpots for this recipe.
Makes 4 loaves
FOR THE STARTER DOUGH:
12 tablespoons (I½ sticks) unsalted butter, at room temperature
¾ cup warm filtered water
2 tablespoons dried yeast
⅓ cup granulated sugar
3 eggs
2 tablespoons freshly grated orange zest
1½ tablespoons freshly grated lemon zest
3 tablespoons honey
1 tablespoon pure vanilla extract
2½ cups unbleached all-purpose flour
FOR THE FINAL DOUGH:
1½ cups golden raisins
12 ounces (3 sticks) unsalted butter, at room temperature
3 eggs
4 egg yolks
1¼ cups granulated sugar
2 teaspoons kosher salt
4½ cups unbleached all-purpose flour
¾ cup candied citron, cut into ¼-inch pieces
¾ cup candied orange peel*
Egg wash made with 1 egg and 1 teaspoon water
* available at specialty stores and some supermarkets
PREPARING THE STARTER DOUGH:
• Cut butter into small pieces and set aside.
• Combine warm water, yeast, and sugar in the bowl of your stand mixer. Mix with a whisk to dissolve yeast. Let sit for 5 minutes while yeast blooms.
• Add butter, eggs, orange zest, lemon zest, honey, vanilla extract, and flour. Using the hook attachment, mix on low speed to start bringing the ingredients together. After about 1 minute, increase speed to medium and mix for 5 to 7 minutes. Transfer dough to an oiled medium bowl and cover with plastic wrap. Let sit in a warm room, 70 to 75°F, for 2 hours. The dough will almost double in size.
PREPARING THE FINAL DOUGH:
• While the starter dough is proofing, place raisins in a small bowl and cover with hot water. Let soak for 20 minutes to plump the raisins, then drain the raisins and wrap them in a dishtowel to absorb any excess water. Set aside.
• Cut butter into small pieces and set aside.
• When the starter dough has finished proofing, remove the plastic and punch down the dough with lightly floured hands.
• Combine eggs, yolks, and sugar in the bowl of your stand mixer and mix well with a whisk. Add the starter dough, salt, and flour. Using the hook attachment, mix on low speed until all of the ingredients are combined, 2 to 3 minutes. Scrape down the sides of the bowl with a rubber spatula. Increase speed to medium and start adding small pieces of butter. This will take 3 to 4 minutes. Mix on medium speed for another 10 to 12 minutes. The dough will have a satiny finish and should stretch easily. Let dough rest in the bowl for 5 minutes to relax the gluten.
• Add the soaked raisins, citron, and candied orange peel to the bowl. Mix on low speed until the new ingredients are evenly distributed, scraping down the sides of the bowl frequently with a rubber spatula. If necessary, add 1 or 2 tablespoons of flour to help bring the dough together.
• Transfer the finished dough to an oiled medium bowl and cover with plastic wrap. Let sit in a warm room for 3 to 4 hours. Dough will almost double in size.
• While dough is proofing, prepare 4 (3-inch) clay flowerpots: Thoroughly wash the pots and dry them in a preheated (335°F) oven for 5 minutes. Let the pots cool to room temperature, then brush the insides with canola oil and line the bottom and sides with pieces of parchment paper. The parchment paper should extend 1½ inches above the rims of the pots.
• Line a rimmed baking sheet with parchment paper.
• Pull dough from bowl onto a floured work surface and divide it into 4 equal pieces. Form each piece of dough into a ball by repeatedly pulling the edges of the dough upwards onto the top of the mass. Fit the balls of dough, seam sides down, into the prepared clay pots. Gently press the dough to make sure the bottoms of the pots are filled with dough and that there are no air pockets. Place pots on the prepared baking sheet and cover with plastic wrap. Let proof for 45 minutes to 1 hour. Dough will rise to the top of the parchment papers.
• Position oven rack so that it is second from the bottom rung. Preheat oven to 335°F.
• Using a razor blade or sharp knife, score a shallow cross over the top of each loaf. Brush the loaves with egg wash, then place the baking sheet in the oven. Bake for about 1½ hours, or until loaves are deep golden brown on top. Remove one of the loaves from the oven and gently lift the loaf out of the clay pot to see if the sides are golden brown. If not, return the loaf to the pot and continue baking for a few more minutes. Let finished loaves cool in the pots for at least 45 minutes before serving. Wrapped in plastic, these moist loaves will last for several days at room temperature.
STEAMED CHOCOLATE PUDDING CAKE
This is probably the most delicious cake I have ever tasted. It’s rich with chocolate and butter but is not overly sweet. If you don’t already have one, you’ll need to purchase an eight-cup steamed-pudding mold for this recipe. Make sure you find one with a snug-fitting lid. I recommend serving this cake slightly warm, with generous spoonfuls of whipped cream.
Makes 1 (8-cup) pudding cake
1 pound (4 sticks) unsalted butter
10 ounces unsweetened chocolate, coarsely chopped
1½ cups granulated sugar
¾ cup hot freshly brewed espresso or strong coffee
5 eggs
1½ teaspoons unbleached all-purpose flour
• Prepare an 8-cup steamed-pudding mold by thoroughly brushing the insides with melted butter.
• Place 1 pound of butter in a medium saucepan and start melting it over medium-low heat. Clarify the butter by continuously skimming off all of the white particles that form on the surface. Take care not to over-heat the butter or it will turn brown. When the butter is golden and clear, after about 45 minutes, it is ready to be used. When finished, you should have 1½ cups of clarified butter.
• Combine clarified butter and chocolate in a medium bowl. Place bowl on top of a saucepan filled with 2 inches of simmering water, making sure that the bottom of the bowl does not come into contact with the water. It’s important that the water be just simmering, as the ingredients will scorch if the water is too hot. Stir ingredients with a rubber spatula until all of the chocolate has melted and reached a smooth consistency. Remove bowl from heat and let cool until chocolate is slightly warm.
• Place sugar and hot coffee in a medium bowl and stir with a whisk until sugar is dissolved. Let cool to room temperature.
• Separate eggs, placing whites in a medium bowl. Add yolks to the coffee mixture and mix well with a whisk. Pour coffee mixture into the bowl of melted chocolate and fold the ingredients together with a rubber spatula.
• Using a whisk or hand-held mixer, whip egg whites until medium-stiff peaks form. Add flour in the final minutes of whipping, incorporating it evenly into the whites. Gently fold the egg whites, one third at a time, into the chocolate mixture. Continue folding the batter until there are no visible white streaks. Pour batter into the prepared pudding mold and cover securely with the mold’s lid.
• Place a 1-inch-high trivet or rack in a roasting pan, and pour hot water into the pan until the water is level with the top of the trivet. (An alternative to the trivet would be to mold a 1 x 3-inch disk out of aluminum foil.) Set the pudding mold on top of the trivet, then cover the top of the roasting pan with foil, making sure the edges of the pan are tightly sealed. Poke two small holes in opposite corners of the foil to vent the steam.
• Place roasting pan on top of a burner and turn heat to medium-low. Gently simmer the pudding on the stovetop for 45 minutes. After the first 20 minutes, carefully peel back a corner of the foil to make sure there is still water in the pan. (Be careful not to burn yourself with the steam.)
• Preheat oven to 325°F.
• Add more water to the roasting pan if needed and continue steaming. After a total of 45 minutes, remove the foil from the pan and open the pudding mold. The pudding should be set (not jiggly) on the top and the edges.
• Place pudding, uncovered, on center rack of oven and bake for 10 to 15 minutes. The cake will puff up during the final minutes of baking. Gently remove from the oven and let cool for 45 minutes. The cake will collapse a little, but hopefully it won’t crack. Place a serving plate on top of the pudding mold and carefully invert them both, releasing the pudding cake onto the plate.
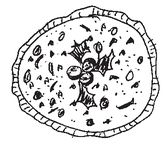
HOLIDAY TART
This pecan-filled Christmas tart is a particular favorite of mine. The fresh orange zest and tangy cranberries are perfectly balanced by the sweet custard filling. It’s easy to prepare and guaranteed to be a hit at any holiday party.
Makes 1 (10-inch) tart
1 cup chopped pecans
3 eggs
⅔ cup light brown sugar
⅔ cup light corn syrup
4 tablespoons unsalted butter, melted and cooled to room temperature
½ teaspoon salt
1 tablespoon brandy
2 teaspoons freshly grated orange zest
1 pre-baked (10-inch) Flaky Pie Dough tart shell (page 129)
1¼ cups fresh cranberries
Powdered sugar
• Preheat oven to 350°F.
• Spread pecans on a rimmed baking sheet and toast in the oven for 5 to 10 minutes, or until golden brown. Let cool and set aside. Reduce oven temperature to 325°F.
• Combine eggs, brown sugar, corn syrup, melted butter, salt, brandy, and orange zest in a medium bowl. Mix with a whisk until ingredients are combined. Set aside.
• Place pre-baked tart shell on a rimmed baking sheet. Scatter toasted pecans and cranberries in the tart shell, then pour in the custard mixture. Place baking sheet on center rack of oven and bake the tart for 35 to 40 minutes. The custard will be set in the center and slightly brown on top. Let cool on a wire rack for 30 minutes, then remove the sides of the pan. I like to dust powdered sugar around the outer edge of the tart before serving.
MAPLE PECAN PUMPKIN PIE
Everyone has his or her favorite Thanksgiving pie, from pumpkin to pecan to all-American apple. For this recipe, I combine puréed pumpkin with butternut squash and finish it off with sweet Maple Pecan Topping. The addition of butternut squash adds a natural sweetness to the pie and gives it a dark, richer color.
Makes 1 (9-inch) pie
½ recipe Flaky Pie Dough (page 127)
1 cup canned pumpkin puree
1 cup Roasted Butternut Squash (page 85)
¼ cup light brown sugar
2 tablespoons honey
2 tablespoons pure maple syrup
1 teaspoon cinnamon
½ teaspoon salt
½ teaspoon ground nutmeg
1 tablespoon peeled and grated ginger
¼ teaspoon ground cloves
¼ cup semolina flour
3 eggs
1 cup buttermilk
1 tablespoon brandy
1 recipe Maple Pecan Topping (recipe follows)
Powdered sugar
• Coat your hands with flour and shape the pie dough into a ball. Working on a floured surface, flatten the ball slightly, then roll out the dough ⅛ inch thick. Fit the rolled dough into a 9-inch pie pan, then trim the edges of the dough to leave a 1-inch overhang around the pan. Fold the overhanging dough under itself, creating a double-thick crust around the edge of the pie shell. Crimp with your fingers (see photos, page 136), then chill in the refrigerator or freezer for at least 30 minutes.
• Preheat oven to 375°F.
• Line the chilled pie shell with an oversized piece of parchment paper and fill it with dried beans or baking weights (page 127). Bake on center rack of oven for 25 to 30 minutes, or until edges are golden brown. Remove the shell from the oven and let it sit for 15 to 20 minutes before removing the paper and beans. Check to see if the bottom of the shell is done. If the bottom still looks wet, return it to the oven for 2 to 3 minutes. If bubbles appear on the bottom of the crust, carefully depress them with a dishtowel, taking care to avoid the escaping steam. The entire pie shell should have a light, golden brown color. Let cool completely before filling.
• Reduce oven temperature to 325°F. Line a rimmed baking sheet with parchment paper.
• Combine pumpkin, squash, brown sugar, honey, maple syrup, cinnamon, salt, nutmeg, ginger, cloves, and semolina flour in a medium bowl. Mix with a whisk or hand-held mixer until ingredients are thoroughly combined, about 1 minute. Add eggs, buttermilk, and brandy and continue mixing until incorporated.
• Place pre-baked pie shell on the prepared baking sheet and pour the filling into the shell. Bake pie on center rack of oven for 55 to 60 minutes, or until the center is just set.
• Remove pie from the oven and spoon Maple Pecan Topping on top. Gently spread topping evenly over the pie, taking care not to push the topping down into the fragile pie filling. Return the pie to the oven and bake for another 20 to 25 minutes. The topping will be set and golden brown. Let pie cool to room temperature, then dust the edges with a little powdered sugar.
MAPLE PECAN TOPPING
This simple topping can be put together at the last minute or it can be made a day in advance and stored, covered, in the refrigerator. Adding this topping transforms a traditional pumpkin pie into something extra special.
Makes enough topping for 1 (9-inch) pie
1 egg
2 tablespoons honey
2 tablespoons light brown sugar
1 tablespoon unsalted butter, melted
3 tablespoons pure maple syrup
1 cup coarsely chopped pecans
1 tablespoon brandy
• Combine all ingredients in a small bowl and mix with a spoon until thoroughly blended.

A Thanksgiving to Remember
Andrew Cleary, the bakery’s General Manager and my assistant on this book, remembers one Thanksgiving that didn’t go the way he had planned.
“Perhaps my fondest Macrina memory is one most people would want to forget. It was Thanksgiving eve 1999, and we had just pulled the last of our pumpkin pies from the ovens. Our entire pastry team had worked overtime to produce a record number of pies, and all that was left was to wait for them to cool and then box them up.
“I volunteered to transport the pies from our kitchen to our retail location next door. After loading eighty steaming desserts onto a baker’s rack, I said my goodbyes and rolled the pies out the door. Everything went well for the first quarter block, then disaster struck. One of the wheels fell into a tiny hole in the concrete, and I watched in horror as the rack tipped over (in slow motion, I swear), spilling Thanksgiving onto the sidewalk. I couldn’t move. This isn’t happening! After thirty seconds I ran into the bakery, yelling for help at the top of my lungs.
“Leslie was the first out the door, followed closely by Karra and Heather, two of the pastry cooks who’d already worked overtime to make the pies. One by one they looked at the pile of pies, then at me, and back again at the wreckage. After a respectful moment of silence we scooped up the mess, wiped our eyes, and got to work. Pie dough was mixed, squash was roasted, more shells were rolled. I stood in the corner grating fresh ginger—my punishment.
“One by one the bakers went home, and Leslie and I were left to finish the job. We baked through the night, accompanied by our favorite CDs and endless cups of coffee. We were actually enjoying ourselves. At 4 a.m., just as the daily papers were being delivered and our morning crew was arriving for work, we once again pulled the last of our pies from the ovens. A few hours later they were carried to homes and tables across the city. We had done it. We had survived.”
HARVEST PIE
We’ve made many versions of this winter pie over the years, but this recipe has become the most popular of the bunch. I like serving it alongside pumpkin pie at Thanksgiving and at family dinners all through the autumn and winter months.
Makes 1 (9-inch) pie
½ recipe Sesame Almond Dough (page 132), chilled
½ cup whole almonds
2 Granny Smith apples
2 ripe Bartlett pears
1 cup fresh cranberries
2 cups granulated sugar
1 tablespoon peeled and grated ginger
1 teaspoon cinnamon
½ teaspoon ground nutmeg
¼ teaspoon ground cloves
1 tablespoon freshly squeezed lemon juice
⅓ cup cornstarch
1 recipe Sesame Almond Streusel Topping (recipe follows)
• Form the chilled dough into a ball and place it on a floured work surface. Roll the dough out to a 13- to 14-inch circle, about ⅛ inch thick. Using a long knife or offset spatula, gently release the rolled dough from the work surface. Fold the dough in half to make it easier to lift and fit it into a 9-inch pie pan, trimming away all but 1 inch of overhanging dough. (This dough is fragile but resilient. If it cracks, simply pinch and press the dough together with your fingers.) Fold the overhanging dough under itself, creating a double-thick crust around the rim of the pan. Next, crimp the dough every inch or so with your fingers, creating a decorative pattern around the edge. Chill in the freezer for ½ hour.
• Preheat oven to 350°F.
• Line the chilled pie shell with a piece of parchment paper and fill it with dried beans or baking weights (see photo, page 127). Bake on center rack of oven for 25 to 30 minutes, or until crust is golden brown. Carefully remove the paper and beans and set pie shell aside to cool. Leave the oven on.
• Scatter almonds on a rimmed baking sheet and toast on center rack of oven for 10 to 12 minutes, or until golden brown. Let cool, then chop coarsely and set aside.
• Peel and core apples and pears and cut them into 1-inch chunks. In a large bowl, combine apples, pears, almonds, cranberries, sugar, ginger, cinnamon, nutmeg, cloves, and lemon juice. Toss well with your hands, then pour the filling into a large colander. Set the colander inside the mixing bowl and let the filling sit at room temperature for 1 hour to drain excess liquid from the fruit.
• Remove the colander from the bowl and pour the drained pie filling back into another large bowl. Pour the collected fruit juices into a small saucepan and cook over medium-low heat until thick and syrupy, 15 to 20 minutes. Transfer to a small bowl and let cool slightly.
• Preheat oven to 350°F.
• Add the cooled, thickened fruit juices and the cornstarch to the bowl of pie filling. Mix well with a spoon, then scoop the filling into the pre-baked pie shell. Mound the filling with your hands, making sure there are no air pockets. Top with an even layer of Sesame Almond Streusel Topping and place pie on a rimmed baking sheet.
• Place baking sheet on center rack of oven and bake for approximately 1½ hours. The topping will be golden brown and the filling will be bubbling around the edges. Let cool on a wire rack for at least 1 hour before serving.
SESAME ALMOND STREUSEL TOPPING
Makes enough topping for 1 (9-inch) pie
¼ cup whole almonds
¼ cup sesame seeds
8 tablespoons (1 stick) unsalted butter, chilled and cut into ½-inch pieces
1 cup unbleached all-purpose flour
½ cup rolled oats
¾ cup granulated sugar
¼ teaspoon pure almond extract
• Preheat oven to 350°F.
• Spread almonds and sesame seeds on separate rimmed baking sheets and toast on center rack of oven until golden brown, about 10 minutes (almonds may take a few minutes more than sesame seeds). Let cool, then chop almonds to medium-fine.
• Combine almonds, sesame seeds, butter, flour, oats, sugar, and almond extract in the bowl of your stand mixer. Using the paddle attachment, mix on low for 2 to 3 minutes, until mixture is coarse and crumbly.
• At this point the topping is ready to use. If you are making the topping in advance and want to store it, place the topping in an airtight container and keep it in the refrigerator for up to 2 days. The topping will form a block when chilled, so I recommend grating it over the pie with a cheese grater when you’re ready to use it.
FESTIVE GINGERBREAD PEOPLE
Cookie decorating is one of the best ways I know to get into the holiday spirit, and even though we end up making hundreds of these gingerbread people at the bakery every Christmas, our pastry bakers never seem to run out of new decorating ideas. The first cookies of the season usually start out with simple frosting outlines and dots for facial features, but after a few dozen cookies have been finished, we start seeing sassy shirts with matching skirts, swim suits, or surfer shorts with tank tops. Anything goes when you’re decorating these cookies, which is what makes them so much fun. Invite your friends over, kids and grownups alike, and jump-start the season with a cookie decorating party of your own.
Makes 6 to 8 (6-inch) cookies
FOR THE COOKIES:
3⅓ cups unbleached all-purpose flour
2 teaspoons baking soda
2 teaspoons cinnamon
2 teaspoons ground allspice
¼ teaspoon cayenne pepper
1¾ cups light brown sugar
¾ cup solid vegetable shortening, at room temperature
2 eggs
¼ cup honey
⅓ cup molasses
2 tablespoons peeled and grated ginger
FOR THE FROSTING:
1 cup powdered sugar
1 tablespoon filtered water
Food coloring
● PREPARING THE COOKIES:
• Sift flour, baking soda, cinnamon, allspice, and cayenne pepper into a medium bowl. Mix with a spoon until ingredients are evenly distributed.
• Place sugar and shortening in the bowl of your stand mixer. Using the paddle attachment, mix on low for about 30 seconds to start bringing the ingredients together. Increase speed to medium and continue mixing for 5 to 8 minutes, or until the mixture is smooth and pale in color. Add eggs, one at a time, making sure the first egg is fully incorporated before adding the second. Add honey, molasses, and ginger and mix on medium for about 30 seconds. Scrape down the sides of the bowl with a rubber spatula and mix for another 30 seconds to make sure the ingredients are evenly distributed. Remove the bowl from the mixer and scrape down the sides one more time.
• Fold half of the dry ingredients into the batter with a rubber spatula. After the first batch is incorpo - rated, fold in the rest of the dry ingredients and continue folding just until all of the flour has been absorbed.
• Using a rubber spatula, scrape dough from bowl onto a large piece of plastic wrap. Dust your hands with a little flour and pat the dough into a block, then wrap it tightly in the plastic wrap and chill in the refrigerator for 1 to 2 hours.
• Preheat oven to 325°F. Line 2 rimmed baking sheets with parchment paper.
• Place chilled dough on a floured work surface and roll it out ½ inch thick. Using a 6-inch cookie cutter, make as many gingerbread people as you can and place them on the prepared baking sheets. These cookies will spread out a little bit during baking, so leave a 2-inch space between each cookie. Roll the scraps of dough into a ball and roll it out again. You should be able to cut a few more cookies from the dough.
• Bake cookies, 1 sheet at a time, on center rack of oven for 20 to 25 minutes. To help the cookies bake more evenly, rotate the baking sheet every 5 minutes or so. Let cool completely before decorating. These cookies can be made 2 or 3 days before a decorating party and stored in an airtight container.
PREPARING THE FROSTING:
• Place powdered sugar in a medium bowl and add water. Mix with a spoon until the mixture is smooth and all the sugar is dissolved. Add just a little bit of food coloring and mix well. You can always add more coloring if you need it. Cover the bowl with plastic wrap and store at room temperature for up to 1 day.
• Repeat the steps to create more colors. For white frosting, omit the food coloring.
• Fit pastry bags with fine tips. Using a rubber spatula, fill the bags with the frostings.
• After all of the cookies have been decorated, let them sit for 2 hours at room temperature so the frosting can set. These cookies will last for up to 2 weeks in an airtight container, but it’s important that they be stored in a single layer. If stacked, the frosting will soften and stick to the next cookie. I like to place individual cookies in cellophane bags and tie them with ribbons for festive holiday gifts.
THE CHRISTMAS COOKIE BOX
Every year the pastry cooks at Macrina put together a Christmas Cookie Box containing four types of holiday cookies. One of the cookie varieties changes annually, but the following three are always included. These recipes have been handed down to me through my mother’s family, and I wouldn’t dream of changing them.
SWEDISH OVERNIGHTS
Prepare this dough 1 day before baking.
Makes 3 dozen cookies
8 ounces (2 sticks) unsalted butter, at room temperature
1 cup powdered sugar, sifted
1 egg, separated
1 teaspoon pure vanilla extract
2¼ cups unbleached all-purpose flour
1 cup finely chopped walnuts
Sugar crystals in your favorite colors
• Combine butter and sugar in the bowl of your stand mixer. Using the paddle attachment, mix on low speed for about 30 seconds. Increase speed to medium and mix for another 5 to 7 minutes, or until the mixture is smooth and pale in color. Add the egg yolk and vanilla extract and mix for about 30 seconds. Scrape down the sides of the bowl with a rubber spatula and mix for another 30 seconds, making sure egg and vanilla are thoroughly incorporated. Remove bowl from mixer and scrape down the sides of the bowl again.
• Using a rubber spatula, fold half of the flour into the dough. After the first batch is fully incorporated, fold in the other half and continue folding until all of the flour has been absorbed, 1 to 2 minutes.
• Pull dough from bowl onto a floured surface and divide it in half. Roll each half into a log about I½ inches thick, and place the logs on separate pieces of parchment paper. (The parchment paper needs to be at least 4 inches longer than the logs.) Brush the logs with the egg white, then scatter half of the walnuts over each log. Roll the logs back and forth until they are completely coated in nuts. Roll each log up within its parchment paper. Finish by twisting the ends of the paper to create a seal. Chill logs in the refrigerator overnight.
• Preheat oven to 325°F. Line 2 rimmed baking sheets with parchment paper.
• Unwrap the logs and using a sharp knife, cut them into ½-inch-thick coins. Place the cookies on the prepared baking sheets, leaving 1 inch between each cookie. Brush the top of each cookie with a tiny bit of water and sprinkle festive sugar crystals on top.
• Bake on center rack of oven, 1 sheet at a time, for 20 to 25 minutes. To help the cookies bake evenly, rotate the baking sheet every 4 minutes or so. The finished cookies will be golden brown on the edges and pale in the center. Let cookies cool completely on the baking sheet. They can be stored in an airtight container for up to 1 month at room temperature.
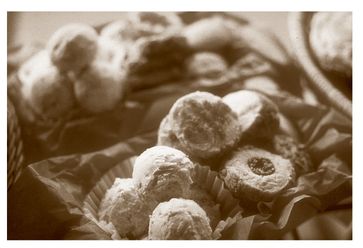
MEXICAN WEDDING BALLS
Makes 3 dozen cookies
I½ cups whole almonds
12 ounces (3 sticks) unsalted butter, at room temperature
⅓ cup granulated sugar
1 tablespoon pure vanilla extract
3¼ cups unbleached all-purpose flour
2 cups powdered sugar, sifted
• Preheat oven to 350°F.
• Scatter almonds on a rimmed baking sheet and toast on center rack of oven for approximately 10 minutes, or until golden brown. Let cool, then finely chop and set aside.
• Combine butter and sugar in the bowl of your stand mixer and using the paddle attachment, mix on low speed for about 30 seconds. Increase speed to medium and mix for another 5 to 7 minutes, or until the mixture is smooth and pale in color. Add vanilla extract and mix for about 30 seconds, making sure vanilla is fully incorporated. Remove the bowl from the mixer and scrape down the sides of the bowl.
• Place almonds and flour in a medium bowl and toss together. Using a rubber spatula, fold half of the dry ingredients into the bowl of batter. After the first batch is fully incorporated, fold in the other half and continue folding until all of the dry ingredients have been absorbed, 1 to 2 minutes. Cover bowl with plastic wrap and chill in the refrigerator for 1 hour.
• Preheat oven to 325°F. Line 2 rimmed baking sheets with parchment paper.
• Scoop small amounts of dough out of the bowl (I like to use a small ice cream scoop), and roll the dough into I½-inch balls. Place the balls on the prepared baking sheets, about 1 inch apart, pressing them down lightly to create a flat bottom on each cookie.
• Bake on center rack of oven, 1 sheet at a time, for 15 to 20 minutes, or until the cookies just start to color. To help the cookies bake evenly, rotate the baking sheet every 4 minutes or so. Let the cookies cool slightly on the baking sheet, then toss them in powdered sugar. Lay the sugar-coated cookies on a clean baking sheet to finish cooling. Finally, after the cookies are fully cooled, toss them in powdered sugar once again. They can be stored in an airtight container for up to 1 month at room temperature.
ANGEL THUMBPRINTS
Makes 4 dozen cookies
12 tablespoons (I½ sticks) unsalted butter, at room temperature
¾ cup solid vegetable shortening, at room temperature
1 cup granulated sugar
1 cup light brown sugar
3 eggs
1½ teaspoons pure vanilla extract
1½ teaspoons pure almond extract
3¼ cups unbleached all-purpose flour
¼ teaspoon salt
2 cups finely chopped pecans
¾ cup raspberry preserves
• Line 2 baking sheets with parchment paper.
• Combine butter, shortening, granulated sugar, and brown sugar in the bowl of your stand mixer. Using the paddle attachment, mix on low speed for about 30 seconds. Increase speed to medium and mix for another 5
to 7 minutes, or until the mixture is smooth and pale in color. Add the eggs, 1 at a time, making sure each egg is fully incorporated before adding another. After the last egg is added, scrape down the sides of the bowl with a rubber spatula. Add the vanilla extract and almond extract, and mix for about 30 seconds, making sure egg and extracts are thoroughly incorporated. Remove bowl from mixer and scrape down the sides of the bowl again.
• Using a rubber spatula, fold half of the flour and the salt into the dough. After the first batch is fully incorporated, fold in the other half and continue folding until all of the flour has been absorbed, 1 to 2 minutes.
• Pour pecans onto a plate or pie pan. Scoop small amounts of dough out of the bowl (I like to use a small ice cream scoop) and roll the dough into quarter-sized balls. (If the dough is too sticky to handle, cover the bowl with plastic wrap and chill the dough in the refrigerator for 15 minutes.) Roll each of the balls in the chopped pecans and place them on the prepared baking sheets, leaving about 1 inch between each cookie. Use your thumb to press down on the center of each cookie, flattening them about halfway. Place baking sheets in the refrigerator and chill for 30 minutes.
• Preheat oven to 325°F.
• Bake on center rack of oven, 1 sheet at a time, for 15 minutes. To help the cookies bake evenly, rotate the baking sheet every 4 minutes or so. Remove the cookies from the oven and using a small spoon, slightly dimple the center of each cookie to make sure the “thumbprints” are big enough to hold the preserves. Top each cookie with ½ teaspoon of raspberry preserves, then return the cookies to the oven. Bake for another 5 to 7 minutes, or until the cookies are golden brown and the jam has just set. Do not let the jam start to bubble. Let cool completely. The best way to store these cookies is to lay them flat in a single layer. If you want to stack them in a tin or cookie jar, place a small piece of parchment paper between each layer to keep the jam from sticking. The cookies can be stored in an airtight container for up to 1 month at room temperature.
 in the dough. Invert the heart onto the prepared baking sheet and cover with plastic wrap. Let proof in a warm room for about 1 hour.