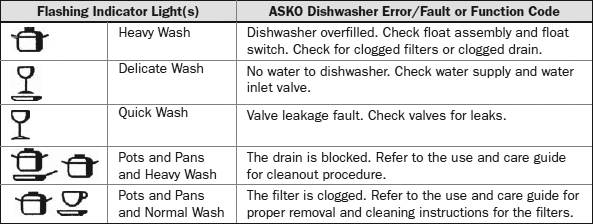
TABLE 13-1 ASKO Dishwasher Error/Fault or Function Codes
| F0 | Description One or more of the function keys are stuck.
Solution Replace the touchpad assembly. If the touchpad is part of the clock (ERC), replace the clock.
|
| F1 | Description Defective touchpad or clock.
Solution Replace the touchpad and/or clock (ERC).
|
| F2 | Description The oven temperature is too hot.
Solution If there is a relay board, replace it. Replace oven sensor (RTD). Also, check the sensor wiring harness.
|
| F3 or F4 | Description Oven sensor is open or shorted.
Solution Check the sensor harness and connector between the oven control and the oven sensor. If the wiring checks out okay, replace the oven sensor.
|
| F5 | Description Main PCB and hardware conflict.
Solution Replace the ERC (clock).
|
| F7 | Description One or more of the function keys are stuck or shorted.
Solution Replace the touchpad assembly. If the touchpad is part of the clock (ERC), replace the clock.
|
| F8 | Description Analog/digital problem.
Solution Replace the ERC (clock).
|
| F9 | Description Door latch problem
Solution Check door latch assembly.
|
| F1 | Description A problem has occurred in the water heating cycle. The water temperature in the dishwasher did not reach the predetermined temperature within 60 minutes.
Solution Check the water temperature at the sink next to the dishwasher. It should be around 120–140 degrees Fahrenheit. Check the water heater temperature also. Check the dishwasher heater and circuit components. Do not take showers or baths or run the automatic washer before running the dishwasher—this will deplete the hot water supply in the water heater.
|
| F2 | Description Dishwasher overfilled or float stuck and/or float switch failure or clogged sump or drain.
Solution Check for debris in the sump area of the tub. Check the water float and switch assembly. Check the water inlet valve.
|
| F3 | Description Thermistor malfunction.
Solution Check the thermistor and connecting wiring circuit.
|
| F4 | Description Water fill problem. Dishwasher models with level-controlled fill only. Note: If the control lights are blinking, the pump is running, and the controls are dead, the fault will indicate an overfill problem.
Solution Check for water in the base pan. The dishwasher will not operate if water is in the pan. Remove the water, reset the dishwasher, and inspect for leaks. Check float assembly.
|
| F5 | Description Valve leakage fault code.
Solution Inspect valve for leaks.
|
| F7 | Description Blocked drain fault code.
Solution The drain pump can be cleaned out. Refer to the use and care guide for the cleanout procedure.
|
| F8 | Description Clogged filter fault code. One or all three filters are clogged.
Solution Before beginning to disassemble the filters, refer to the use and care guide for proper removal and cleaning instructions for the filters.
|

| F1 | Description An overfill condition was detected.
Solution Check the water inlet valve. Replace if necessary.
|
| F3 | Description The washer has a draining problem.
Solution Check drain filter, pump, and drain hose. Replace defective part.
|
| F4 | Description A water inlet error was detected.
Solution Make sure that the water is turned on to the washer. Check water inlet valve. Replace defective part.
|
| F6 | Description The control detected a door-open condition.
Solution Check door latch assembly. Check wiring connectors and wiring.
|
| F1 | Description The condenser drain hose has detected a blockage.
Solution Clear the blockage and restart.
|
| F2 | Description Dryer takes too long to dry.
Solution Check dryer installation, dryer venting system, and heater. Replace defective part if necessary.
|
| F0 | Description The function key is stuck.
Solution Replace the touchpad assembly. If the touchpad is part of the clock (ERC), replace the clock .
|
| F1 | Description PCB or main board problems.
Solution Press the “Cancel” button to turn off the beeping sound. If the sound continues, replace the ERC.
|
| F2 | Description The temperature in the oven is too hot.
Solution Check the oven temperature sensor, wiring, and for a stuck relay. Test self-clean cycle.
|
| F3 | Description The oven temperature sensor is shorted.
Solution Check the sensor harness and connector between the oven control and the oven sensor. If the wiring checks out okay, replace the oven sensor.
|
| F4 | Description The oven temperature sensor is open.
Solution Check the sensor harness and connector between the oven control and the oven sensor. If the wiring checks out okay, replace the oven sensor.
|
| F6 | Description Main computer board (ERC) problem.
Solution Replace the ERC.
|
| F7 | Description Oven door lock enabled above temperature.
Solution Check the door lock switches and wiring.
|
| F8 | Description Door locking switch malfunction.
Solution Check and replace, if necessary, the door lock switches and wiring.
|
| F0 | Description Main board failure.
Solution Replace the main board or ERC.
|
| F1 | Description Main board failure.
Solution Replace the main board or ERC.
|
| F2 | Description Open oven temperature sensor.
Solution (1) Check the bake and broil relays on the ERC; if contacts are bad, replace the ERC.
(2) For the self-clean models, check the door lock assembly for proper operation.
(3) Check the oven temperature sensor.
|
| F3 or F4 | Description Check for open oven temperature sensor.
Solution Replace the oven temperature sensor.
|
| F5 | Description Main board failure (ERC).
Solution Replace the main board (ERC).
|
| F7 | Description Touchpad key stuck on ERC.
Solution Replace the ERC.
|
| F8 | Description Main board failure.
Solution Replace the ERC.
|
| F9 | Description There is an oven door lock failure.
Solution Check oven door lock switches, wiring harness, and connectors.
|
| E1 | Description The electronic control board detected a short-cycle malfunction.
Solution Check for conditions that caused the short-cycle situation. Check thermostat setting, air flow conditions, refrigeration cycle, and fan motor.
|
| E2 | Description The electronic control board detected a touch keypad error.
Solution Reset the air conditioner controls and test. Check for stuck keys. If error code returns, replace the touch keypad assembly.
|
| E3 | Description The electronic control detected the frost probe is open.
Solution Test the valve of the frost probe. If the probe tested bad, replace the frost probe. If good, replace the electronic control board.
|
| E4 | Description The electronic control board detected a short in the frost probe.
Solution Replace the electronic control board.
|
| E5 or E6 | Description The electronic control board detected an open or shorted indoor temperature sensor.
Solution Replace the electronic control board.
|
| CHECK FILTER INDICATOR LAMP | Description The check filter indicator lamp will come on after 250 hours of operation. It is a reminder for the consumer to clean the air conditioner filter. This code can be reset to start the countdown to the next filter cleaning. |
| * or Lo or status LEDs | Description Wetting agent level is low.
Solution Check the wetting agent level in the dispenser. After five wash cycles, the indicator light will turn off when the dispenser is not filled up.
|
| PF | Description A power failure occurred. The high-temp wash and the noheat dry/power-dry off lights will begin to flash when the power resumes.
Solution Press the start/cancel pad and reset the controls. If the code persists, turn the electricity off for five minutes. Check all electrical connections to the electronic control panel.
|
| HO | Description Delay in the water heating cycle.
Solution This is a normal condition until the water reaches the predetermined temperature. Check the water temperature at the sink next to the dishwasher—it should be around 120 to 140 degrees Fahrenheit. Check the water heater temperature also. Check dishwasher heater and circuit components. Do not take showers or baths or run the automatic washer before running the dishwasher—this will deplete the hot water supply in the water heater.
|
| CL | Description The door is open.
Solution Close and latch the dishwasher door.
|
| 01-24 | Description On some models, this is the amount of time in hours left before the dishwasher begins the cycle. |
| 01-25 or 01-10 | Description On some models, this is the amount of time in hours left before the dishwasher begins the cycle. |
| SENSING | Description On some models, a thermistor called the turbidity sensor is checking the condition of the wash/rinse water.
Solution Check thermistor and electronic control board.
|
| E11 | Description Washer taking too long to fill up.
Solution Check water inlet supply. Check the water pressure—it should be at or above 30 PSI. Check the washer fill valve, pressure switch or pressure sensor, and the control board. If the washer fills in the off mode and the electricity is turned off, replace the water inlet valve.
|
| E13 | Description The electronic control detected a water leak in the tub or an air leak in the air bell.
Solution Check for water leaks. Check the air bell system, pressure switch, or pressure sensor. Check the control board. Repair any water leaks. Replace any defective part.
|
| E21 | Description The water in the washer is not pumping out fast enough.
Solution Check washer installation. Make sure that the drain hose is not restricted. Check the drain pump for 120 volts in the drain cycle. If the voltage reading is zero, replace the control board. If the voltage is correct, check the drain pump for a restriction or blockage. If none is found, replace the pump.
|
| E23 or E24 | Description The electronic control detected that the drain pump relay malfunctioned.
Solution Test the drain pump relay on the electronic control board. If the test failed, replace the electronic control board. Check all wiring connections and wiring to the drain pump.
|
| E31 | Description A communication error was detected between the pressure sensor and the electronic control board.
Solution Check the wiring connections and wiring for the pressure sensor to the electronic control board. Test the pressure sensor valve and replace if necessary.
|
| E35 | Description The pressure sensor has detected a water overfill problem.
Solution Check to see if the water level is above the manufacturer’s recommendations. Check the water inlet valve for proper operation. Check the wiring connections and the wiring from the electronic control to the pressure sensor and to the water inlet valve. Check the electronic control board for proper operation. Replace any defective part.
|
| E36, E43, E44, E45, or E46 | Description The electronic control board has detected a malfunction.
Solution Check all the wiring connections to the electronic control board. If okay, replace the electronic control board.
|
| E41 | Description The electronic control board has detected a door-open code.
Solution Check that the door closes properly. Check the door strike and door switch assembly. Check the electronic control. Replace any defective part.
|
| E47 or E48 | Description The electronic control board detected a problem in the door thermistor circuit.
Solution Check the door lock assembly and measure the resistance of the thermistor. If you detect a short or an open, replace the door lock assembly. If your measurement of the thermistor is at least 1500 ohms, replace the electronic control board.
|
| E52 | Description The electronic control board received a bad signal from the tacho generator.
Solution Test the drive motor for 105 to 130 ohms at pins 4 and 5 on the motor only. If the readings are other than 105 to 130 ohms, replace the speed control board.
|
| E56, E57, or E58 | Description The electronic control board detected a motor problem.
Solution Check the following components: motor, tub bearings, speed control. After removing the belt from the motor, spin the motor—it should turn freely. If it does not, replace the motor. With the belt off, spin the tub—it should spin freely. If it does not, replace the tub bearings. Test the motor windings and test pins 1 and 2, pins 1 and 3, and pins 2 and 3 on the motor. It should read about 6 ohms. If this is not the case, replace the motor.
|
| E59 | Description The tacho generator lost a signal.
Solution Check the following components: motor, tub bearings, speed control. After removing the belt from the motor, spin the motor—it should turn freely. If it does not, replace the motor. With the belt off, spin the tub—it should spin freely. If it does not, replace the tub bearings. Test the motor windings and test pins 1 and 2, pins 1 and 3, and pins 2 and 3 on the motor. It should read about 6 ohms. Test the motor for 105 to 130 ohms at pins 4 and 5 on the motor only. If the readings are other than 105 to 130 ohms, replace the speed control board.
|
| E5A, E5B, or E5C | Description The heat sink overheated on high temperature.
Solution Test the heat sink. If it is bad, replace the speed control board.
|
| E5D, E5E, or E5F | Description A communication error has occurred between the electronic control board and the speed control board.
Solution Check the wiring connections and the wiring between the electronic control board and the speed control board. Check the electronic control board and the speed control board. Replace the defective part.
|
| E66 or E68 | Description The electronic control detected a heater problem.
Solution Check the wiring connections and the wiring for the heater circuit. Check the heater element for 14 ohms. Check for a grounded heater. Replace the heater if the readings are incorrect.
|
| E67 | Description The electronic control detected the wrong input voltage to the microprocessor.
Solution Check the wiring connections and wiring. Check the tub thermistor for 4.8 ohms. If incorrect, replace the heating element.
|
| E71 | Description Wash thermistor (tub heater) malfunction.
Solution Check the wiring. If okay, replace the electronic control board.
|
| E74 | Description The wash water will not heat up.
Solution Place the thermistor in the correct position.
|
| E75 | Description Water temperature sensor detection.
Solution Check the thermistor for resistance—it should be 50 ohms. If it is not, replace the water inlet valve assembly. If the resistor measured 50 ohms, replace the electronic control board.
|
| E76 | Description The thermistor temperature is off for the cold water inlet valve.
Solution The water fill hoses need to be installed correctly.
|
| E82, E83, E93, E94, E95, E97, E98, EBE, or EBF | Description The electronic control board has a communications problem.
Solution Check all wiring connections and wiring. If okay, replace the electronic control board.
|
| E91 | Description There is a communication error between the electronic control board and the UI board.
Solution Check all wiring connections and wiring.
|
| EB1 | Description Incoming voltage frequency problem.
Solution Have your local electric company come out and check the input voltage frequency to the house. If okay, replace the electronic control board.
|
| EB2 | Description Incoming voltage too high.
Solution If the voltage at the washer receptacle is below 130 volts, replace the electronic control board.
|
| EB3 | Description Incoming voltage too low.
Solution If the voltage at the washer receptacle is above 90 volts, replace the electronic control board.
|
| EF1 | Description The drain pump is clogged.
Solution Clear the blockage from the drain pump.
|
| EF2 | Description The electronic control board detected too much soap in the washer.
Solution Advise the consumer on proper soap usage.
|
| EF5 | Description The thermistor temperature is off for the hot water inlet valve.
Solution The water fill hoses need to be installed correctly.
|
| 1 beep/E10 | Description The washer is not filling up with water or water is leaking onto the floor.
Solution Make sure that the water is turned on to the washer. Check the water pressure, fill hoses for kinks, and the drain hose installation. If you found water leaking, check the household drain for a blockage, and check for too much soap usage.
|
| 2 beeps/E20 | Description The water will not drain out.
Solution Check the drain hose installation and check for a drain blockage in the household drain.
|
| 3 beeps/E30 | Description The electronic control has detected that the drum is overfilled with water.
Solution Check the water inlet valve and pressure switch for proper operation. Check the electronic control board. Replace the defective part. Drain the water from the washer and reset the controls.
|
| 4 beeps/E40 | Description The electronic control detected that the door is open.
Solution Close the door and reset the controls. The washer will not operate when the door is open.
|
| 5 beeps/E50 | Description The electronic control detected a motor overheat problem.
Solution Let the motor cool down. Check the wiring connections and wiring. Reset the controls and restart the washer.
|
| 7 beeps/E70 | Description The cold water is not entering the washer.
Solution Make sure that the cold water is turned on all the way. Check the water fill hose installation. Check the water inlet valve.
|
| 15 beeps/EF0 | Description The electronic control detected an oversudsing condition or no hot water entering the washer.
Solution Check for too much detergent added to the load. Advise the consumer on proper detergent usage. Read the use and care guide. Check for hard water conditions, water temperature, and the size of the load. Make corrections if necessary. For no hot water, check and see if the hot water is turned on all the way. Also check the water fill hose installation.
|
| E10, E11, or E12 | Description There is a communication error in the electronic control microprocessor.
Solution Cancel the cycle by pressing cancel. Reset the controls and test the cycle. If the problem persists, replace the electronic control.
|
| E24 | Description Thermistor sensor malfunction.
Solution Check the thermistor sensor for a short. Check all wiring between the thermistor and the electronic control. Test the electronic control for proper operation.
|
| E25 | Description Thermistor sensor problem.
Solution Test the thermistor sensor. Check the wiring from the thermistor to the electronic control. Test the electronic control for proper operation.
|
| E4A | Description The drying cycle was interrupted because the drying time exceeded the time that was programmed.
Solution Inspect the clothes. If they are still wet, check for proper installation of the dryer. Check vent system, blower assembly, and motor. Check the moisture sensor bars for dirt. Check and test the heater. Check all the wiring and wiring connections. Check the electronic control for proper operation.
|
| E5B | Description The thermistor is sensing no heat and the cycle is stalled.
Solution Check and test the entire heating circuitry, including the heater. Check the electronic control for proper operation. See the technical data sheet for the specific procedure for the model you are working on.
|
| E68 | Description A stuck button fault code.
Solution Inspect the buttons and run the test mode to determine which button is stuck in the active mode. Check the electronic control for proper operation.
|
| E8C | Description The high limit safety thermostat has tripped.
Solution Check for the proper installation of the dryer. Check the entire exhaust system for proper installation or blockage. Check the blower assembly and motor for proper operation. Check the drum seals. Check the lint filter. Check the door seal.
|
| EAF | Description The microprocessor in the electronic control has been reset by the watchdog timer.
Solution Clear the code and reset the controls. Test the dryer. If the problem persists, replace the electronic control.
|
| PF | Description A power failure occurred.
Solution Correct the problem by pressing the cancel button and reset the controls. If the code persists, turn the electricity off for five minutes. Check all electrical connections to the electronic control.
|
| ERR | Description When programming the control, a mistake was made.
Solution Press cancel and reprogram the controls.
|
| LOC | Description The control lock feature is activated. This is a function display code during normal operation. |
| PAU | Description The drying cycle has been interrupted.
Solution The customer might have opened the door in the middle of the cycle. If not, make repairs to the door and latch.
|
| “ad” | Description This is a function display code indicating that the dryer is in the auto-dry cycle. |
| “dn” | Description This is a function display code indicating that the dryer has completed the auto-dry cycle. |
| ALARM INDICATOR LIGHT | Description When the light is on, the alarm system is activated.
Solution This is a normal condition. If the refrigerator does not reach the set temperature setting, an alarm will sound. Check refrigeration cycle.
|
| DOOR AJAR INDICATOR LIGHT | Description The refrigerator door was left open for over five minutes. The indicator light will be flashing and the audible alarm will sound.
Solution Close the doors. Rest the alarm. If problem persists, check wiring connectors and wiring.
|
| HIGH TEMP INDICATOR LIGHT | Description The refrigerator temperature has been above the temperature setting for over an hour. The indicator light will begin to flash amber and an audible alarm will sound.
Solution Reset the alarm, and take a temperature reading to confirm. Check the refrigeration cycle, the defrost cycle, and components for proper operation.
|
| POWER FAILURE INDICATOR LIGHT | Description A power failure was detected, and the amber indicator light will begin to flash.
Solution Press the reset button and check the food storage temperature.
|
| E1 | Description The electronic control detected that the filter needs cleaning.
Solution Clean the filter.
|
| ER | Description The electronic control detected a temperature sensor malfunction.
Solution Check the value of the temperature sensor. Check for debris buildup on the probe. Check the sensor for proper positioning. Replace if necessary.
|
| PF | Description Power failure.
Solution Reset the electronic control by pressing the cleaning options and start key pad. If this does not correct the problem, press the cancel button and reset the control panel. If the code persists, turn the electricity off for five minutes. Check all electrical connections to the electronic control.
|
|
| C1 | Description The drain cycle exceeded two minutes.
Solution Check for obstruction in the drain line to the sink. If there is a garbage disposer, run it and clean it out. If clear, check the drain line valve.
|
|
| C2 | Description The motor/pump did not completely drain the water from the tub within seven minutes.
Solution Press the reset button to halt the alarm. Check the drain valve, drain hose, and garbage disposer for obstruction.
|
|
| C3 | Description The motor/pump will not drain the water from the tub.
Solution Disconnect the electricity to the dishwasher for two minutes and then reset the electronic control. Go into the test mode to run the drain cycle over and check the motor/pump assembly.
|
|
| C4 | Description Dishwasher overfilled or float stuck; float switch failure or clogged sump or drain.
Solution Reset the electronic control by touching the start key pad and then the cancel/reset key pad.
Sometimes, after a power failure, the dishwasher will fill the tub again. Check for debris in the sump area of the tub. Check the water float and switch assembly.
|
|
| C5 | Description Dishwasher drain cycle is too short.
Solution Reset the electronic control and restart the cycle. Check water supply and float/switch assembly.
|
|
| C6 | Description Low water temperature in the tub.
Solution Check the water temperature at the sink next to the dishwasher—it should be around 120 to 140 degrees Fahrenheit. Check the water heater temperature also. Check dishwasher heater and circuit components. Do not take showers or baths or run the automatic washer before running the dishwasher. This will deplete the hot water supply in the water heater.
|
|
| C7 | Description A fault has occurred in the water temperature sensor.
Solution Turn the electricity off to the dishwasher for two minutes and then reset the electronic control. Check the water temperature sensor.
|
|
| C8 | Description Detergent cup malfunction or blocked.
Solution Remove the obstruction, close the dispenser, and reset the electronic control.
|
|
| CUP OPEN | Description The detergent dispenser cup was left open.
Solution Close the detergent dispenser cup and press start.
|
|
 |
Sensing LED off | Description Clean sensor error.
Solution Check control circuit board and wiring harness. Replace sensor if necessary. The clean sensor must come on during the normal and pots and pans cycles.
|
 |
Washing LED flashing | Description The start/reset touchpad has been pressed.
Solution Let the dishwasher drain for 90 seconds before resetting it.
|
 |
Rinsing LED flashing and beeping sound | Description Control board error.
Solution To turn off the beeper, press the start/reset pad. The rinse LED will continue to flash. Turn off the power to the dishwasher to reset. If the flashing continues, check sequence switch, control circuit board, and wiring harness; replace defective part.
|
 |
Drying LED Flashing and beeping sound | Description Control board error. The sequence switch is not reaching its target within 30 seconds.
Solution Restart the dishwasher. If the beeping continues, check the sequence switch, wiring harness, and control circuit board. Replace defective part.
|
 |
Start/Reset | Description Someone has pressed the start/reset pad.
Solution Before selecting a new cycle, allow the dishwasher to drain for 90 seconds.
|
 |
Clean LED flashing and beeping sound | Description Control board error.
Solution To turn off the beeper, press the start/reset pad. The clean LED will continue to flash. Turn off the power to the dishwasher to reset. If the flashing continues, check sequence switch, control circuit board, and wiring harness; replace defective part.
|
 |
Normal LED flashing and beeping sound | Description Control board error. The sequence switch is not reaching its target within 30 seconds.
Solution Restart the dishwasher. If the beeping continues, check the sequence switch, wiring harness, and control circuit board. Replace defective part.
|
| PF or RESET | Description A power failure occurred.
Solution Correct the problem by pressing the cancel button and reset the control. If the code persists, turn the electricity off for five minutes. Check all electrical connections to the electronic control.
|
| F1 | Description Thermal sensor problem; excessive heat from within the microwave cavity.
Solution Test the thermal sensor. Check the fan motor and air circulation pattern for a blockage (dirty filter).
|
| F2 | Description Thermal sensor problem.
Solution Test the thermal sensor for a short. Check all circuits and components for proper operation.
|
| F3 | Description The touch panel may have a short.
Solution Inspect and test the touch panel and connectors.
|
| F4 | Description Humidity sensor problem.
Solution Test the humidity sensor. Check the fan motor and air circulation pattern for a blockage (dirty filter).
|
| F5 | Description Humidity sensor problem.
Solution Test the humidity sensor for a short. Check all circuits and components for proper operation.
|
| F6 or PROBE | Description Temperature probe problem.
Solution Test the temperature probe value. Check the probe receptacle wiring.
|
| F10 | Description Touch screen problem.
Solution Test touch screen for a short. Check connecting wiring harness.
|
| F0 or F1 | Description Key panel problem.
Solution Check key panel and wiring. Replace key panel.
|
| F2 | Description Oven temperature malfunction.
Solution Test the oven temperature during operation for preset temperature. Check temperature sensor.
|
| F3 or F4 | Description Oven sensor problem.
Solution Test oven sensor value and replace.
|
| F5 | Description Electronic control problem.
Solution Check the wiring connections to the electronic control. Replace the electronic control.
|
| F6 or F7 | Description Key panel problem.
Solution Check key panel and wiring. Replace key panel.
|
| F8 | Description Electronic control problem.
Solution Check the wiring connections to the electronic control. Replace the electronic control.
|
| F9 or FC | Description Door lock component malfunction.
Solution Check the door latch assembly and switches. Check wiring connections. Replace failed component.
|
| FD | Description Probe and/or receptacle malfunction.
Solution Test the probe value and replace if necessary. Check the receptacle and make repairs or replace the receptacle.
|
| FF | Description Electronic control problem.
Solution Check the wiring connections to the electronic control. Replace the electronic control.
|
| BAD LINE | Description This indicates that the main electric supply to the oven is wired incorrectly.
Solution Check the voltage supply to the product. Make sure that the product is wired correctly, and normal operation should resume.
|
| UNLOCK DOOR | Description Door lock malfunction at the end of the cleaning cycle.
Solution Check the door latch assembly and circuitry. Read the use and care guide and check the GE website for the steps necessary to open the door lock.
|
| LOC | Description A safety feature added to the programming to prevent children from turning on the product.
Solution Read the use and care guide to learn about the programming for each model.
|
| ERR | Description When programming the control, a mistake was made.
Solution Press cancel and reprogram the controls.
|
| Description A holiday program function.
Solution A backwards “C” means that your oven was programmed for the Sabbath Mode. Read the use and care guide for correction, or go to the GE website for instructions.
|
| F0 or F1 | Description A function key is stuck.
Solution Replace the touchpad. If the touchpad is part of the ERC, then replace the ERC too.
|
| F2 | Description Oven temperature is too hot.
Solution Replace the oven temperature sensor. If there is a relay board, check it and the wire harness.
|
| F3 or F4 | Description Open or shorted oven temperature sensor.
Solution Check the wiring harness and connectors; if okay, replace the sensor.
|
| F5 | Description Main computer board problems.
Solution Replace the ERC.
|
| F7 | Description The function key is stuck.
Solution Replace the touchpad. If the touchpad is part of the ERC, then replace the ERC too.
|
| F8 | Description Analog/digital problem.
Solution Replace the ERC.
|
| F9 | Description Door latch problem.
Solution Check the door latch assembly and switches.
|


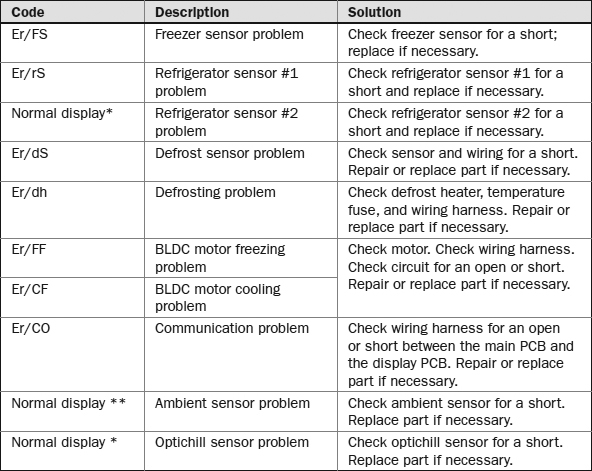
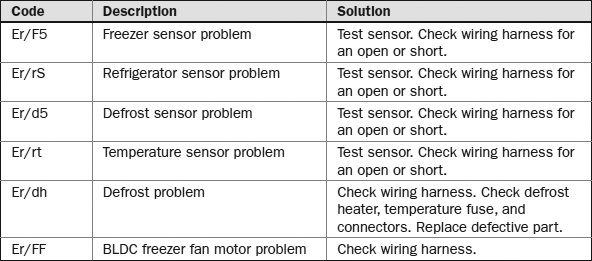
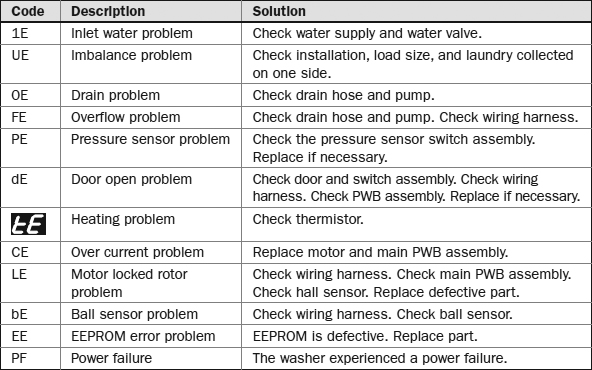


| L or 1E | Description A lid lock error was detected.
Solution Check the lock assembly for proper operation. Check all wiring connections and wiring. Check the electronic control board. Replace defective part if necessary.
|
| U | Description An unbalanced load was detected.
Solution Check the unbalance switch, wiring, and electronic control board. Advise the consumer on loading the washer. Replace defective part if necessary.
|
| 6E or 7E | Description The electronic control detected a temperature error in the dryer.
Solution Check the temperature sensor, thermostats, electronic control board, and the wiring connections and wiring. Check the installation of the appliance. Replace part if necessary.
|
| 8E | Description An error was detected in the motor and circuitry in the dryer.
Solution Check the motor, relay, electronic control board, and wiring connections and wiring. Replace defective part if necessary.
|
| 9E | Description The electronic control board detected a door switch failure in the dryer.
Solution Check the door switch, electronic control board, and the wiring connections and wiring. Replace defective part if necessary.
|
| Do | Description Door lock problem detected.
Solution Make sure that the door closes properly. Check door lock assembly.
|
| FL | Description The control detected that the washer did not lock the door.
Solution Make sure that the door closes properly. Check door lock assembly.
|
| Sd | Description The washer detected an oversudsing problem.
Solution The suds recovery cycle should correct the problem. Advise the consumer on proper detergent usage.
|
| Pf | Description A power failure has occurred.
Solution Restart the washer.
|
| Nd | Description The washer did not drain the water out of the machine.
Solution Check the drain hose for proper installation. Check the household drain for blockage. Check the pump for blockage. Replace defective part if necessary.
|
| LO | Description The door lock will not open.
Solution Make sure the door closes properly. Push the off button and wait a few minutes for the door to unlock. Disconnect the electricity to the washer for a few minutes and try to unlock the door. Check door lock assembly. Replace defective part if necessary.
|
| lr | Description The control detected a motor problem.
Solution Check the motor windings. Check the wiring connections and wiring. Replace defective part if necessary.
|
| nf | Description Water will not fill the washer.
Solution Make sure that the water is turned on all the way. Check for kinked fill hoses. Check water inlet valve. Replace defective part if necessary.
|
| od | Description This is a safety feature that will not allow the washer to start on another cycle unless the door is opened first. |
| PF | Description A power failure has occurred.
Solution Reset the control.
|
| Hp or hl | Description The temperature sensor has detected an error.
Solution Check all the components in the heat circuit. Replace defective part if necessary.
|
| hll | Description The hanging rod in the dryer cabinet has a problem.
Solution Check all the components in the dryer cabinet for proper operation.
|
| F0, F1, or F7 | Description The electronic control detected a stuck or shorted key on the touch panel.
Solution Check the touch key pad for proper operation. Check all wiring connections and wiring. Replace touch pad.
|
| F2 | Description The electronic control has detected a temperature problem.
Solution Check the sensor, relay board, and wiring connections and wiring. Replace defective part if necessary.
|
| F3 or F4 | Description The electronic control has detected a sensor problem.
Solution Check the value of the sensor. Check the wiring connections and wiring. Replace the sensor.
|
| F5 | Description A communication error was detected.
Solution Replace the clock.
|
| F6 | Description A voltage problem has been detected in the oven.
Solution Check the voltage to the oven.
|
| F8 | Description An analog/digital error occurred.
Solution Replace the clock.
|
| F9 | Description The electronic control detected a door lock problem.
Solution Check the door latch assembly. Check the wiring connections and wiring. Replace the clock if necessary.
|
| F0/E0, F1/E0, or E0 or F1 | Description The microprocessor EEPROM on the PCB received a communication error and the heating LED will begin flashing.
Solution Turn off the electricity to the appliance and wait for two minutes before turning it back on. If the code reappears, replace the electronic control.
|
| F1/E1, F1/E2, F1/E4, or F1 | Description An electronic control error occurred and the heating LED will begin flashing.
Solution Turn off the electricity to the appliance and wait for two minutes before turning it back on. If the code reappears, replace the electronic control.
|
| F1/E5 | Description The electronic control detected a calibration error.
Solution Check operating temperatures. Turn off the electricity to the appliance and wait for two minutes before turning it back on. If the code reappears, replace the electronic control.
|
| F1/E9 | Description A stack overflow error was detected by the electronic control.
Solution Turn off the electricity to the appliance and wait for two minutes before turning it back on. If the code reappears, replace the electronic control.
|
| F1/E6 | Description The electronic control received a latch error.
Solution Turn off the electricity to the appliance and wait for two minutes before turning it back on. If the code reappears, replace the electronic control.
|
| F2/E0, F2/E1, F2/E5, or F1 | Description The touch key pad has possibly shorted out.
Solution Turn off the electricity to the appliance and wait for two minutes before turning it back on. If the code reappears, replace the touch key pad. Check the touch pad connector to the electronic control PCB.
|
| F3/E0 or F3 | Description The oven sensor might be open in the top oven. The oven will be on and the heating LEDs will begin to flash continually.
Solution Test the oven sensor valve. Turn off the electricity to the appliance and wait for two minutes before turning it back on. If the code reappears, replace the oven sensor.
|
| F3/E1 or F3 | Description The oven sensor might be shorted out in the top oven. The oven will be on and the heating LEDs will begin to flash continually.
Solution Test the oven sensor valve. Turn off the electricity to the appliance and wait for two minutes before turning it back on. If the code reappears, replace the oven sensor.
|
| F3/E2 or F3 | Description The oven sensor will not maintain temperature in the bake cycle. The oven will be on and the heating LEDs will begin to flash continually.
Solution Test the oven sensor valve. Turn off the electricity to the appliance and wait for two minutes before turning it back on. If the code reappears, replace the oven sensor.
|
| F3/E3 or F3 | Description The oven sensor will not maintain temperature in the clean cycle. The oven will be on and the heating LEDs will begin to flash continually.
Solution Test the oven sensor valve. Turn off the electricity to the appliance and wait for two minutes before turning it back on. If the code reappears, replace the oven sensor.
|
| F3/E4 | Description The oven sensor might be defective in the bottom oven.
Solution Test the oven sensor valve. Turn off the electricity to the appliance and wait for two minutes before turning it back on. If the code reappears, replace the oven sensor.
|
| F3/E5 | Description The oven sensor might be shorted out in the bottom oven.
Solution Test the oven sensor valve. Turn off the electricity to the appliance and wait for two minutes before turning it back on. If the code reappears, replace the oven sensor.
|
| F3, E6, or E7 | Description The warming drawer sensor might be defective or shorted out.
Solution Check and test the warming drawer sensor and switches. Check the door alignment.
Turn off the electricity to the appliance and wait for two minutes before turning it back on. If the code reappears, replace the control.
|
| F5/E0, F5/E1, F5/E2, or F5 | Description In the clean cycle, an error occurred in the door latch assembly. The door will be locked and cleaning LEDs will begin to flash.
Solution Test the electronic control. Check the oven latch assembly, switch actuation, and the clearance between the latch and door. Check the wiring and connectors. Check the door alignment. Turn off the electricity to the appliance and wait for two minutes before turning it back on. If the code reappears, test and/or replace the control.
|
| F5/E5 | Description The electronic control detected the self-clean temperature was not reached in time.
Solution Check oven temperatures, thermostat, latch assembly, and latch switch actuation. Turn off the electricity to the appliance and wait for two minutes before turning it back on. If the code reappears, test and/or replace the control.
|
| F5/E7 | Description The electronic control detected that the door latch will not unlock.
Solution Test the electronic control. Check the oven latch assembly, switch actuation, and the clearance between the latch and door. Check the wiring and connectors. Check the door alignment. Turn off the electricity to the appliance and wait for two minutes before turning it back on. If the code reappears, test and/or replace the control.
|
| F8/E0 | Description A refrigeration problem was detected.
Solution Check all wiring connectors and wiring. Check electronic control. Check the refrigeration unit.
|
| PF | Description A power failure occurred.
Solution Reset the controls and test. Check wiring connections.
|
| OVEN LED ON AND FLASHING | Description The oven knob was not in the “off “ position when the oven went into cycle.
Solution Turn the knob to the “off” position and then reset the temperature.
|
| DOOR LOCKED/CLEANING AND HEATING LEDs FLASHING | Description There is a voltage failure.
Solution Check voltages and all connectors and wiring. Turn off the electricity to the appliance and wait for two minutes before turning it back on. If the code reappears, replace the control.
|
| LED Display segment number |
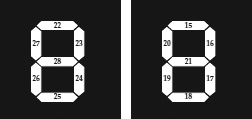 *Refer to the LED segments above for the correct segment number location on the refrigerator LED display.
|
| 15 | Description Ambient temperature sensor problem.
Solution Check wiring harness. Check for shorted circuit. Check for contact failure. Test the sensor.
|
| 16 | Description Freezer sensor problem.
Solution Check wiring harness. Check for shorted circuit. Check for contact failure. Test the sensor.
|
| 17 | Description Freezer room defrost sensor problem.
Solution Check wiring harness. Check for shorted circuit. Check for contact failure. Test the sensor.
|
| 18 | Description Freezer fan motor problem.
Solution The fan motor is not spinning at the correct RPM. Check the fan feedback line; it might be open.
|
| 19 | Description Condenser fan motor problem.
Solution The fan motor is not spinning at the correct RPM. Check the fan feedback line; it might be open.
|
| 20 | Description CF sensor problem.
Solution Check wiring harness. Check for shorted circuit. Check for contact failure. Test the sensor.
|
| 20 | Description French door ice room sensor problem.
Solution Check wiring harness. Check for shorted circuit. Check for contact failure. Test the sensor.
|
| 21 | Description Defrost heater problem.
Solution Check wiring harness. Check for contact failure. Check for a shorted circuit. Check freezer sensor for correct readings.
|
| 22 | Description Evaporator fan motor problem. CF-compartment fan four-door.
Solution The fan motor is not spinning at the correct RPM. Check the fan feedback line; it might be open.
|
| 23 | Description Evaporator fan motor problem. CR-compartment fan four-door.
Solution The fan motor is not spinning at the correct RPM. Check the fan feedback line; it might be open.
|
| 23 | Description Evaporator fan motor problem. French door model.
Solution The fan motor is not spinning at the correct RPM. Check the fan feedback line; it might be open.
|
| 25 | Description Ice maker fill pipe problem.
Solution Check the ice maker fill pipe heater for an open or short.
|
| 26 | Description Communication error.
Solution Ignore during diagnostic testing.
|
| 27 | Description Communication error.
Solution Check wiring harness. Replace main PCB board if necessary.
|
| 28 | Description Lost communication between touchpad and PCB.
Solution Check wiring harness. Replace defective board if necessary.
|
| LED display segment number |
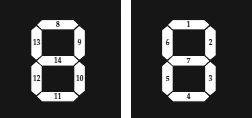 *Refer to the LED segments above for the correct segment number location on the refrigerator LED display.
|
| 1 | Description Ice maker sensor problem.
Solution Check wiring harness. Check for contact failure. Check sensor for correct readings.
|
| 2 | Description Refrigerator sensor problem.
Solution Check wiring harness. Check for contact failure. Check for a shorted circuit. Check sensor for correct readings.
|
| 3 | Description Refrigerator defrost sensor problem.
Solution Check wiring harness. Check for contact failure. Check for a shorted circuit. Check refrigerator sensor for correct readings.
|
| 4 | Description Refrigerator fan motor problem.
Solution The fan motor is not spinning at the correct RPM. Check the fan feedback line; it might be open.
|
| 5 | Description Ice maker problem.
Solution The ice maker tray did not return to its level position after the third attempt. Check ice maker assembly and wiring harness. Check for external factors.
|
| 6 | Description Cool select zone sensor problem.
Solution Check wiring harness. Check for a shorted circuit. Check zone sensor for correct readings.
|
| 7 | Description Refrigerator defrost problem.
Solution Check wiring harness. Check for a short circuit. Check for contact failure. Check for correct temperature readings.
|
| 8 | Description Pantry-damper problem.
Solution Check sensor and wiring harness.
|
| 9 | Description CR-sensor four-door problem.
Solution Check wiring harness. Check for a short circuit. Check for contact failure. Test the sensor.
|
| 9 | Description Pantry sensor problem.
Solution Check wiring harness. Check for a short circuit. Check for contact failure. Test the sensor.
|
| 10 | Description Defrost sensor problem of CR room, four-door.
Solution Check wiring harness. Check for a short circuit. Check for contact failure. Test the sensor.
|
| 11 | Description Defrost sensor problem of CF room, four-door.
Solution Check wiring harness. Check for a short circuit. Check for contact failure. Test the sensor.
|
| 12 | Description Defrost heater problem. CR room, four-door. Defrost over 80 minutes.
Solution Check for shorted circuit. Check for contact failure. Check sensor. Check defrost bimetal.
|
| 13 | Description Defrost heater problem. CF room, four-door. Defrost over 80 minutes.
Solution Check for shorted circuit. Check for contact failure. Check sensor. Check defrost bimetal.
|
| 14 | Description Water heater tank problem.
Solution Check for an open or shorted heater and test the circuit.
|
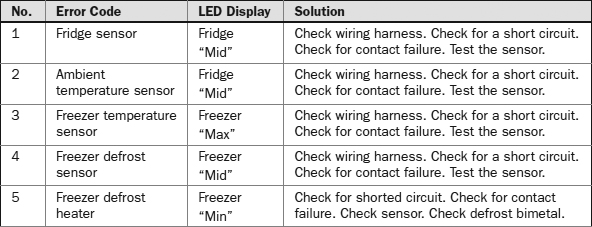

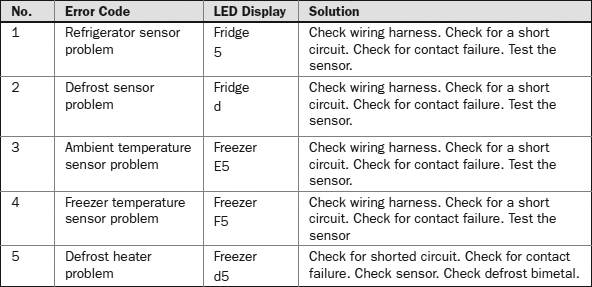
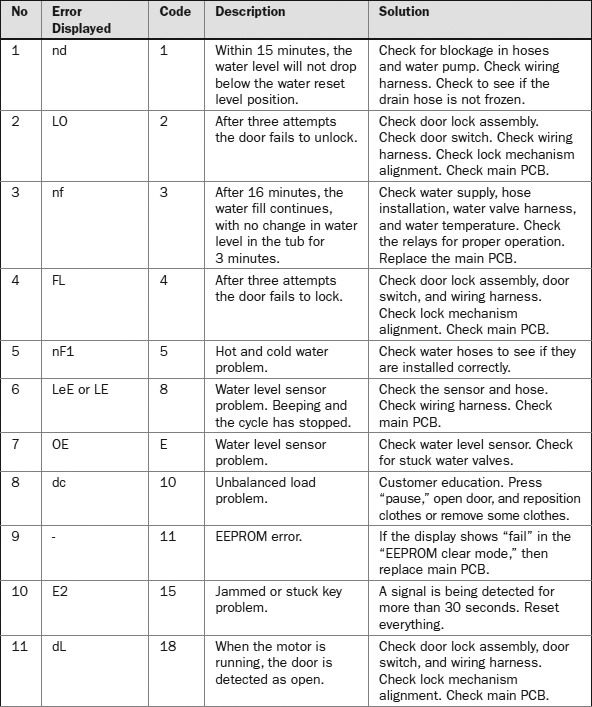
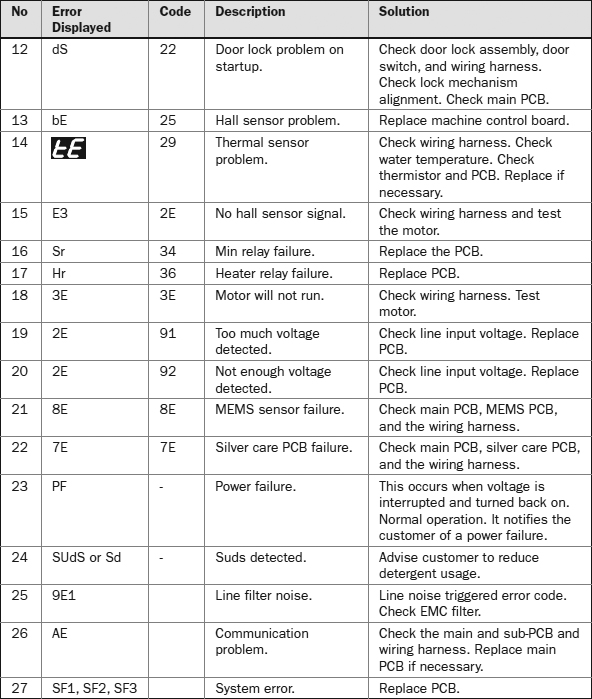
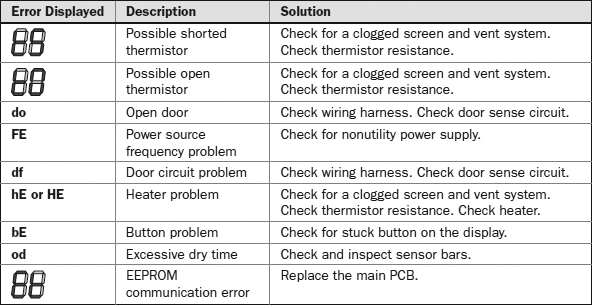


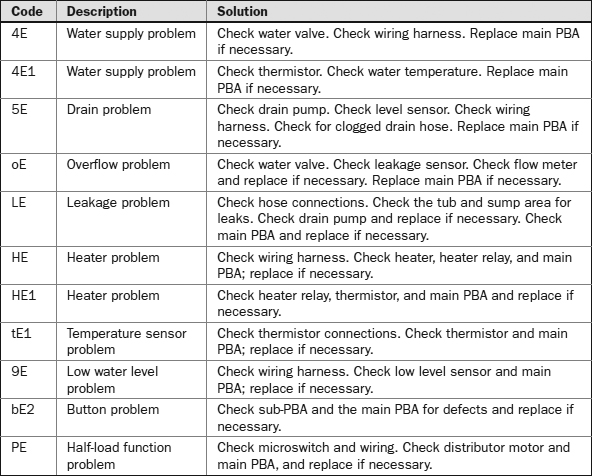
| F0 or F1 | Description Electronic oven control failure (ERC).
Solution Replace ERC.
|
| F2 | Description Oven temperature hot.
Solution Replace oven temperature sensor. Check and replace relay board if necessary. Replace ERC.
|
| F3 | Description Oven temperature sensor (RTD) problem.
Solution Check the wiring and connectors between the oven temperature sensor and the ERC. Replace ERC if necessary.
|
| F4 | Description Oven temperature shorted.
Solution Check wiring and connectors; replace RTD if necessary.
|
| F7 | Description Function key stuck.
Solution Check touchpad keys. Replace ERC if other components check okay.
|
| F8 | Description ERC problems.
Solution Check wiring between oven temperature sensor and ERC. Replace oven temperature sensor and ERC if wiring checks okay.
|
| F9 | Description ERC problems.
Solution Check the door latch assembly and switches; replace if necessary. Replace ERC if everything else checks okay.
|
| Fd | Description Bake/broil relay board problems.
Solution Test the relay board and replace if necessary. Replace the ERC if defective.
|
| E1 | Description ERC problem.
Solution Replace ERC.
|
| E2 | Description Oven temperature problem.
Solution Check the oven temperature sensor and replace if necessary. Replace ERC if necessary.
|
| E3 | Description Oven temperature problem.
Solution Check for open oven temperature sensor and replace if necessary.
|
| E4 | Description Oven temperature problem.
Solution Check for a shorted oven temperature sensor and replace if necessary.
|
| E5, E6, E7, E8, | Description ERC problems.
Solution Replace ERC.
|
| E9 | Description Problems with the latch switch assembly.
Solution Check the latch assembly and switches, and replace if necessary.
|
| E10 | Description ERC problems.
Solution Replace ERC if necessary.
|
| E11 or E12 | Description Problems with the latch switch assembly.
Solution Check the latch assembly and switches, and replace if necessary.
|
| E13 | Description Latch assembly problems or ERC problems.
Solution Check for voltage to the latch motor. ERC not converted.
|
| E14 | Description Latch switch assembly problem.
Solution Check the latch assembly and switches, and replace if necessary.
|
| E15 | Description ERC problems.
Solution Replace ERC.
|
| FF | Description The electronic control has detected an open thermistor or a temperature above 140 degrees Fahrenheit.
Solution Test the thermistor for an open circuit. Also check the wiring connections and wiring and the location of the thermistor-sensing bulb. Replace if necessary.
|
| 00 | Description The electronic control has detected a shorted thermistor or a temperature below 32 degrees Fahrenheit.
Solution Test the thermistor for a short. Also check the wiring connections and wiring and the location of the thermistor-sensing bulb. Replace if necessary.
|
| F1/E1 | Description The relay control board is faulty.
Solution Replace the relay control board and test the microwave.
|
| F2 | Description The electronic control detected a touch pad error.
Solution Test the touch pad assembly and the electronic control board.
|
| F2/H1 or F2/H2 | Description A problem occurred in the hood light switch and keys.
Solution Test the hood light switch and replace if necessary.
|
| F2/Q1 | Description A problem occurred in the touch control key pad.
Solution Check the user interface board and the door control assembly for a malfunction. Turn off the electricity to the microwave and wait for two minutes before turning it back on. If the code reappears, replace the defective part.
|
| F3/H1 or F3H | Description There is a problem with the humidity sensor.
Solution Test the value of the humidity sensor. Check all connections from the humidity sensor to the relay control board. Test the relay control board. Turn off the electricity to the microwave and wait for two minutes before turning it back on. If the code reappears, replace the defective part.
|
| F3T | Description The electronic control detected a temperature sensor failure.
Solution Test the microwave oven cavity temperature. The sensor will not operate below 41 degrees Fahrenheit or above 140 degrees Fahrenheit. If tests are okay, replace the electronic control board.
|
| F3/T1 | Description A user interface board thermistor error occurred.
Solution Check all wiring connections and wiring from the user interface board, relay control board, and relay board. Test the user interface board and thermistor. Turn off the electricity to the microwave and wait for two minutes before turning it back on. If the code reappears, replace the defective part.
|
| F3/T2 | Description The FC thermistor detected a problem.
Solution Check the wiring connections and wiring from the FC thermistor to the relay control board. Test the value of the FC thermistor. Test the relay control board. Turn off the electricity to the microwave and wait for two minutes before turning it back on. If the code reappears, replace the defective part.
|
| F3/T4 | Description The magnetron thermistor detected a problem.
Solution Check the wiring connections and wiring from the magnetron to the relay control board. Turn off the electricity to the microwave and wait for two minutes before turning it back on. If the code reappears, replace the magnetron thermistor.
|
| F6 | Description The electronic control detected a microwave relay problem.
Solution Check all wiring connections and wiring to the inverter and the relay control board. Test the relay board. Turn off the electricity to the microwave and wait for two minutes before turning it back on. If the code reappears, replace the relay control board.
|
| F7 | Description The magnetron stopped operating due to voltage interruption.
Solution Check the cooling fans, magnetron, inverter, relay control board, and interlock switches. Check all wiring connections and wiring between these components. Replace the defective component and retest the microwave.
|
| F9 | Description The electronic control received a communication error from the relay control board.
Solution Check all wiring connections and wiring between the relay control board and the relay board. Turn off the electricity to the microwave and wait for two minutes before turning it back on. If the code reappears, replace the relay board and the relay control board.
|
| F9/Q | Description A communication error was detected at the touch panel.
Solution Check all wiring connections and wiring from the user interface board to the touch panel. Turn off the electricity to the microwave and wait for two minutes before turning it back on. If the code reappears, replace the door control assembly.
|
| F/H | Description The electronic control detected no water entering the washer, or the pressure switch did not detect the water.
Solution Verify if the washer has water in the tub. If it does, check the following components for proper operation: drain pump, pressure switch and hose connection, flow meter, and electronic control board. In addition, check the washer installation, drain hose installation, and all wiring connections and wiring. If the tub has no water in it, check the water inlet valve and screen, make sure that the water is turned on, and check the inlet hoses for kinks. To clear the error code, press the pause/cancel button two times.
|
| F/02 | Description The drain time exceeded the eight-minute time limit.
Solution Check the drain hose and the drain pump filter for obstructions. Check the electrical connections and wiring from the drain pump to the electronic control board. If no problems were found, then replace the drain pump.
|
| F/05 | Description The electronic control has detected a water temperature fault.
Solution Check the heating element, relay, and the water temperature sensor. Check the wiring connections and wiring.
|
| F/06 | Description The drive motor tachometer, which is mounted on the motor, has detected a problem with the speed of the motor.
Solution Check all of the wiring connections and wiring between the motor, motor control board, and the electronic control board. Test the drive motor for proper operation. Check the electronic control board and the motor control board.
|
| F/07 | Description The electronic control board has detected a possible short in the circuitry with the motor control board.
Solution Check the wiring connections and wiring between the motor control board, drive motor, and the electronic control board. Check the following components for proper operation: drive motor, drive motor control board, and electronic control board.
|
| F/09 | Description A water overflow error has been detected.
Solution Check the wiring connections and wiring between the electronic control board, drain pump, and the pressure switch. Check the drain hose installation for blockages or a kinked hose. Clean the drain pump filter and check the drain pump for proper operation. Check the water inlet valve for proper operation. Check the pressure switch for proper operation. Replace any defective part found.
|
| F/10 | Description The electronic control board received a signal from the motor control board that the thermal heat sink has tripped.
Solution Check washer installation for proper ventilation. Check the wiring connections and wiring between the electronic control board and the motor control board. Check for worn or failed components in the drive mechanism. Check the electronic control board and the drive motor for proper operation.
|
| F/11 | Description A communication error has been detected between the electronic control board and the motor control board.
Solution Check all wiring connections and wiring. Check for worn or failed components in the drive mechanism. Check the electronic control board, motor control board, and the motor for proper operation.
|
| F/13 | Description The electronic control board has detected a problem in the dispenser circuitry.
Solution Check the dispenser motor and the mechanical linkage from the motor to the dispenser. Check the electronic control board for proper operation.
|
| F/14 | Description The electronic control board has detected an EEPROM error from the microprocessor chip on the board.
Solution Disconnect the electricity to the washer for a few minutes and try to reprogram the electronic control. There might have been a power surge to the washer. Check the electronic control board for proper operation if the error code returns.
|
| F/15 | Description The electronic control board detected a problem with the motor control board.
Solution Check the wiring connections and wiring from the electronic control board, motor control board, and the motor. Check the following components: drive belt, motor control board, electronic control board, and motor for proper operation.
|
| Sud | Description A suds lock error was detected.
Solution The motor control board has detected a suds lock condition by analyzing the current draw on the motor. Check the pump operation. In addition, check for a heavy wash load, too much detergent, or over-sudsing condition.
|
| F/dt | Description A door lock error occurred after six attempts to lock the door.
Solution Check the door lock switch and assembly. Check the wiring connections and wiring. Check the electronic control board. Repair or replace the defective part.
|
| F/du | Description The electronic control board has detected a door unlock error after six attempts to open the door lock.
Solution Check the door switch/lock assembly for proper operation and for foreign objects. Check the wiring connections and wiring from the door lock assembly to the electronic control board. Check the electronic control board.
|
| PF | Description The electronic control board has detected a power failure.
Solution Press start and the dryer will continue with the cycle, or press cancel to reprogram the dryer.
|
| E1 | Description The electronic control has detected a faulty thermistor.
Solution Test the thermistor and the electronic control board, and check the wiring connections and wiring.
|
| E2 | Description The electronic control has detected a short in the thermistor.
Solution Test the thermistor and the electronic control board, and check the wiring connections and wiring.
|
| E3 | Description The electronic control has detected a communication or software error, a defective electronic control board, or a defective component in the control panel.
Solution Check the electronic control board and check all of the components in the control panel. Check all wiring connections and wiring.
|
