You know how opening theory churns constantly. But you may not appreciate that middlegame theory changes, too, and no more so than in defense. The story of the evolution of defense begins with Wilhelm Steinitz.
Steinitz was the first great player to make the transition from a young attacking player to a mature defensive master, who asked himself what made an attack succeed.
It couldn’t just be the genius of the player marshaling the attack, he concluded. Or the lack of skill of the defender. Some great attackers fail to beat weaker players and some weaker players mate great opponents.
Steinitz reasoned that one of the players must have some form of superiority in the position before he could begin a successful initiative. For example, if he can deliver superior force at the point of the attack – that is, at a target – his attack will work. But if you realize there is no such advantage, the attack can be refuted.
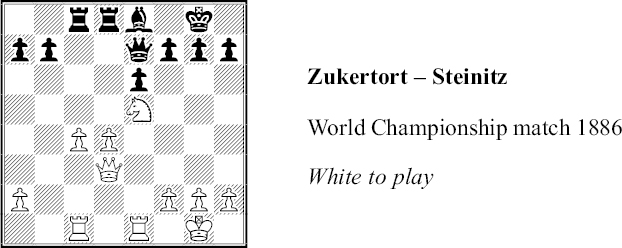
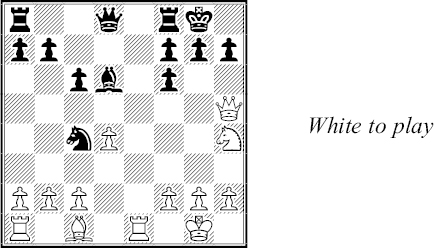
Steinitz’s opponent controls a bit more space. But that is not enough to justify the bid for mate White began with 1 ♖e3?.
Steinitz felt that the attack should fail. He countered with 1 ... ♕d6, attacking the most vulnerable White weakness, the d4-pawn. He saw that he could meet 2 ♖h3 with 2 ... h6 and push White back after 3 ♖d1 f6!.
White chose 2 ♖d1 but 2 ... f6! again exposed the flaw in his optimism. If the attacked knight retreats to f3, Black would seize the initiative with 3 ... ♕a6! (4 ♘d2 e5).
White continued with his anti-h7 plan, 3 ♖h3. Black had a major choice.

He could take the knight, 3 ... fxe5 4 ♕xh7+ ♔f8. But White’s initiative is not easily halted after 5 ♖f3+ ♗f7 6 ♕h8+ ♔e7 7 ♕xg7 ♖f8 8 ♖b1. Or 5 ♖g3 ♗f7 6 ♖xg7 ♖c7 7 c5.
Steinitz opted for the low-risk approach, 3 ... h6!. This transposes into the position he considered after 2 ♖h3 h6 3 ♖d1 f6 and gives him excellent winning chances with little risk of losing.
White saw that 4 ♘g6 fails to 4 ... ♗xg6 5 ♕xg6 ♖xc4 and then 6 ♖xh6 ♕xd4!, e.g. 7 ♖xd4?? ♖c1+ or 7 ♕h7+ ♔f8 8 ♕h8+ ♔f7 9 ♕xd8 ♕xd8.
Instead he played 4 ♘g4. But his pieces were not coordinated well and Black was able to confuse them further with 4 ... ♕f4! 5 ♘e3 ♗a4 6 ♖f3 ♕d6 7 ♖d2 ♗c6 8 ♖g3 f5! 9 ♖g6 ♗e4 10 ♕b3 ♔h7.
Black pieces then ran all over the board: 11 c5 ♖xc5 12 ♖xe6 ♖c1+ 13 ♘d1 ♕f4 14 ♕b2 ♖b1 15 ♕c3 ♖c8 16 ♖xe4 ♕xe4 and White resigned.
But Steinitz was much too rigid. He often accepted sacrifices on principle and grossly underestimated his opponent’s potential pressure.
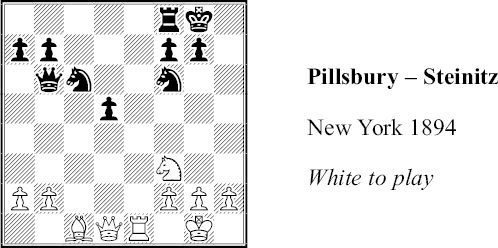
White wants to develop his bishop but 1 ♗e3? ♕xb2 just drops a pawn. He chose 1 ♗g5, perhaps counting on 1 ... ♘e4, which attacks as well as defends. Then he could do the same with 2 ♗e3 and threaten ♕xd5 as well as ♗xb6.
But Steinitz felt confident in his king’s ability to defend itself and met 1 ♗g5 with 1 ... ♕xb2?!. He likely concluded that he would have winning chances after 2 ♗xf6 ♕xf6 3 ♕xd5 and 3 ... ♖d8.
More problematic is 2 ♖e2!. Then 2 ... ♕c3 3 ♖e3 ♕b2 allows 4 ♖b3 ♕xa2 5 ♗xf6 gxf6 6 ♖xb7 when White’s chances are no worse than Black’s.
So instead of 2 ... ♕c3 the game went 2 ... ♕b5 3 ♗xf6 gxf6 4 ♖d2 ♖d8.
A modern master would appreciate, as Steinitz did, that Black’s kingside is hard to exploit. But he would also know what Steinitz discounted, that a slow buildup, say with 5 ♘d4 ♘xd4 6 ♖xd4, would give White excellent practical chances – especially because it is easier to play White than Black.
Steinitz was vindicated after White went for direct mate, 5 ♘h4? d4! 6 ♖d3? ♘e5 7 ♖b3 ♕c6 8 ♖g3+ ♔f8 9 ♕d2?, and was lost after 9 ... ♖c8! 10 ♕h6+ ♔e7 11 ♘f5+ ♔d7.
Steinitz’s successors refined his approach. For Siegbert Tarrasch, piece activity and mobility were very high priorities when attacking, maneuvering positionally or defending.
Tarrasch was willing to accept a sacrifice – but not if it meant accepting a passive position. When defending, his goal was to get his pieces quickly into play. He assumed that they would then be able to meet threats and, eventually, seize the initiative.
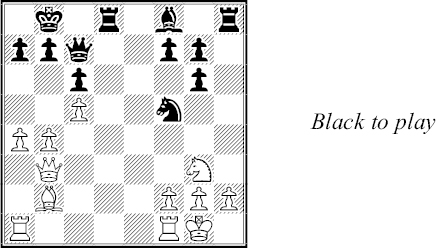
White’s compensation for a sacrificed piece lies in two strong center pawns, his fine bishop and the pawn at h5, which prevents ... ♘g6 and makes doubling rooks on the g-file a long-term threat.
Tarrasch’s characteristically active defense began with 1 ... ♖ad8!, intending ... ♘c5 and ... ♘xb3!. After 2 ♕e3 he still played 2 ... ♘c5 because the pinning 3 ... ♗d4 was threatened.
Play went 3 c3 ♘xb3 4 axb3 a6 5 ♖h2. The instinctive response to White’s plan of ♔h1/♖g1/♖hg2 would be 5 ... ♔h8.
But Tarrasch continued to seek play for his under-used pieces with 5 ... ♖fe8!. The point of this wasn’t clear until 6 ♘e2 ♘d5 7 ♕f2:
With 7 ... ♘c7! 8 ♘g3 ♘e6 the knight is headed to the great blockade square at g5 and threatened 9 ... ♘xd4! along the way. Play went 9 ♘f5 ♘g5 10 ♔h1 ♔h8 11 ♖g2 ♗f6 12 ♘e3.
White was preparing 13 e5 followed by f3-f4. Tarrasch foiled that by reorganizing his minor pieces, 12 ... ♘e6! and 13 ... ♗g5. On 13 d5 cxd5 14 ♘xd5 he intended to seize the initiative with 14 ... ♖xd5! 15 exd5 ♘f4 and ... ♕f5.
White played 13 ♖g4 and still had powerful compensation after 13 ... ♗g5 14 ♘f5 ♖g8 15 f4 ♗f6. Even after a trade of all four rooks, 16 ♖ag1 ♖xg4 17 ♖xg4 ♖g8 18 ♖xg8+ ♕xg8 19 ♕f3, he would have had good chances.
But White preferred 15 ♕h2 with the idea of ♕e5+.
Play continued 15 ... ♗f6 16 ♖ag1 ♖g5!.
The rook is the third defensive piece to occupy the g5 stronghold. Now an ♖xg5/... hxg5 exchange would render the g-file harmless and allow ... ♘f4!.
White’s last bullet was 17 f4 and it gives Black a chance to give up material for the initiative: 17 ... ♖xf5! 18 exf5 ♕xf5 19 ♖1g2 ♘g7. After a repetition of moves, 20 ♖4g3 ♕b1+ 21 ♖g1 ♕e4+ 22 ♖1g2 ♕b1+ 23 ♖g1 ♕e4+, he was ready for 24 ♖1g2 ♘f5 and ... ♘e3.
Instead, White played 24 ♖3g2 and resigned soon after 24 ... ♖d5 25 f5 ♖xf5 26 ♕b8+ ♔h7.
While mobility was Tarrasch’s goal in all middlegames, Emanuel Lasker’s emphasis was more practical. Chess is a struggle, Lasker said, and the defender had as much right to win the struggle as his opponent.
No matter how bad a position is, Lasker felt, the defender should try to find a way to make threats. He should hold out hope of winning, not just surviving. Here is Lasker, lost after a dozen moves as White, in a world championship match:
Lasker – Janowsky, Berlin 1910
1 d4 d5 2 c4 e6 3 ♘c3 c5 4 cxd5 exd5 5 ♘f3 ♗e6 6 e4? dxe4 7 ♘xe4 ♘c6! 8 ♗e3 cxd4 9 ♘xd4? ♕a5+! 10 ♘c3 0-0-0 11 a3 ♘h6 12 b4 ♕e5
White faces disaster on the d-file where his knight is pinned (13 ♘xc6 ♖xd1 with check) and threatened by 13 ... ♘xd4 and 13 ... ♘f5. If Steinitz were sitting in White’s chair he would have chosen 13 ♘ce2.
But Lasker hated to play purely passive moves. White may be alive after 13 ♘ce2 ♘f5 14 ♖c1 but it’s just barely that following 14 ... ♘xe3 15 fxe3 ♕xe3. He would be a pawn down and several moves away from castling.
Lasker chose the audacious 13 ♘cb5!. Objectively it is inferior to 13 ♘ce2 but it adds a powerful, new element. After 14 ♖c1 White will begin to make threats of his own, such as ♘xa7+.
On 13 ... a6 White also has 14 ♕c1! with the idea of 14 ... axb5 15 ♘xc6 bxc6 16 ♕xc6+ ♕c7 17 ♕a6+ and 18 ♖c1(+).
Play went 13 ... ♘f5 14 ♖c1!.
White is beginning to coordinate his pieces (15 ♖c3). There are immense complications after 14 ... ♖xd4 15 ♘xd4 ♘xe3 but White emerges on top. Play went 14 ... ♘xe3! 15 fxe3 ♕xe3+ 16 ♗e2.
Black seemed ready to deliver a knockout with 16 ... ♗b3 since 17 ♕xb3? ♕xc1+ and 17 ♕d2 ♕xd2+ 18 ♔xd2 ♔b8! win.
But there was another point to White’s aggressive 13th move. He can answer 16 ... ♗b3? with 17 ♘xa7+! ♔c7 18 ♘db5+! since 18 ... ♔b6 allows 19 ♕xd8+! ♘xd8 20 ♘c8+ and mates.
Black found the best move, 16 ... ♗e7!. This tempts White to try 17 ♘xa7+ ♔b8! 18 ♘axc6+ bxc6 19 ♘xc6+ ♔b7. Black would win after 20 ♘xd8+ ♖xd8 21 ♕c2 ♖c8 but the immediate 20 ♕c2! would have left chances unclear.
Lasker went with the common-sense move, 17 ♖c3.
He wanted to drive the Black queen back and make ♘xa7+ more dangerous. It also prepares to get out of the d-file pin with 18 ♖d3.
A third benefit of 17 ♖c3 is that it offers Black a variety of unclear variations to calculate and evaluate, such as 17 ... ♕xc3+!? 18 ♘xc3 ♘xd4 and 18 ... ♗f6.
In the end Black chose 17 ... ♗h4+ 18 g3 ♕e4? 19 0-0! ♗f6 and White took over the initiative with 20 ♖xf6! gxf6 21 ♗f3. White won swiftly after 21 ... ♕e5? (21 ... ♖xd4 lasts longer) 22 ♘xa7+ ♔c7 23 ♘axc6 bxc6 24 ♖xc6+.
By the late 20th century, traditional defensive principles were being overthrown. Consider this position, from a Caro-Kann Defense variation we’ll be examining later.
Traditional defense thinking held that ... h6 had compromised Black’s kingside so much that he doesn’t dare castle there. He usually played 1 ... 0-0-0 even though it was clear that he would be worse after 2 ♗a6! because he would have virtually no counterplay.
Conventional wisdom said what mattered most was that Black had few weaknesses. Play often went 2 ... ♗xa6 3 ♕xa6+ ♔b8 with a solid, if unpromising position. Black can rarely afford ... c5 when he castles long like this.
But Anatoly Karpov introduced 1 ... 0-0! and that became a main line. Yes, White can open lines with 2 g4 and 3 g5. But Black’s king position is more solid than was thought, and his counterplay from ... c5 is strong.
Another illustration from a Caro-Kann:

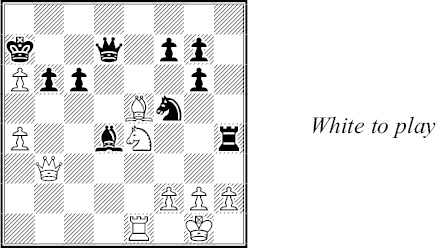
White has liquidated part of the center with f2-f4-f5xe6 but failed to expose a weakness. For example, 1 ♘f5 can be met by 1 ... cxd4, which prepares a strong 2 ... ♕d5.
White rejected the equal and toothless 1 dxc5 ♗xc5 2 ♕xd8+ ♖xd8 3 ♘d3 and opted for 1 ♘xf7 ♔xf7 2 ♖xe6 ♔xe6 3 ♕g6! instead.
Wasn’t this a violation of Steinitz’s law? Yes, there was no obvious White advantage that justified attack, let alone a piece sacrifice. But defenders who had relied on Steinitz’s law had been mated over and over by more daring opponents in the last half of the 20th century.
Black’s king has been forced into the open and faces dangers after dxc5 and ♗f4/♘f5.
It’s tempting to play 3 ... cxd4 and try to escape with ... ♔d7. But 4 ♘f5 ♔d7 5 ♗f4 or 5 ♘xg7 (5 ... ♗xg7 6 ♕xg7+ ♕e7?! 7 ♗xh6) would give White dangerous compensation for his knight.
Instead, Black chose 3 ... ♕d5 4 dxc5 ♕xa2!. The threat of ... ♕a1 mate prevents White from a slow buildup of his forces. After 5 ♖e1+ ♔d7 6 ♕f5+ ♔d8 7 ♗c3 ♘bd5, for example, Black is remarkably safe.
Instead, White tried 6 ♗c3 and Black replied 6 ... ♕a1+ 7 ♔d2 ♘c4+ 8 ♔e2 ♕a6!.
White has to meet 9 ... ♘e5+ and can’t afford 9 ♔f2 ♗xc5+. Black’s king proved to be relatively safe on c6 after play went 9 ♕f7+ ♔c6 10 ♔f3 ♗xc5.
Then 11 ♕xg7 ♘d5 12 ♖e6+ ♘d6 would offer White little. He preferred 11 ♘f5 ♖f8.
But neither 12 ♕xg7 ♔b5! 13 ♘d4+ ♗xd4 14 ♕xf8 ♕c6+ 15 ♔g3 ♗xc3 16 bxc3 ♘e4+ 17 ♔h2 ♕d6+ nor the game continuation, 12 ♘d4+ ♔b6 13 ♕e6+ ♗d6 14 ♘f5 ♖e8 could save him. Active defense trumped solid but passive defense.
Another traditional defensive principle was: “There must be some weakness in the opponent’s position” for an attack to succeed, as Tibor Florian wrote in Defense and Counterattack (1984). But well before that, masters began to suspect that even a solid king position could be breached if there are enough attacking pieces:
Ragozin – Boleslavsky, Sverdlovsk 1942
1 e4 c6 2 d4 d5 3 ♘c3 dxe4 4 ♘xe4 ♘f6 5 ♘xf6+ exf6 6 ♗c4 ♗d6 7 ♕e2+ ♗e7 8 ♘f3 0-0 9 0-0 ♗d6 10 ♖e1 ♗g4 11 ♕e4 ♗h5 12 ♘h4 ♘d7 13 ♕f5! ♘b6 14 ♕xh5 ♘xc4
Before this game, the chief drawback to 5 ... exf6 was believed to be that it gave White a queenside pawn majority. White should play to create a passed queenside pawn, opening theory said.
But here White played 15 ♗h6! and the attack based on ♗xg7 and/or ♘f5 proved decisive. For example, 15 ... gxh6 16 b3 ♘b6 17 ♘f5 ♔h8 18 ♕xh6 ♖g8 and now 19 ♖e8! (19 ... ♕xe8 20 ♕xf6+ mates).
The game went 15 ... ♕d7 16 ♗xg7! ♔xg7 17 ♘f5+ ♔h8 18 ♖e4! ♗xh2+ 19 ♔h1!. Black resigned because he had no defense to ♖h4/♕xh7 mate.
Of course, you can call the doubled f-pawns a weakness. But since Black’s f7, g7 and h7 pawns remained on their original squares, there were no holes and therefore his kingside should have been solid.
It wasn’t. Superior force – four White pieces – defeated Black’s solid-but-passive defense setup.
Another problem with solid-but-passive defense is this:
If your pieces are well-placed for the protection of your weaknesses, they are probably incapable of exploiting your opponent’s weaknesses. In the long run, if you can’t make threats of your own, your opponent may be able to concentrate his forces at the weakest chain in your link of defense and win. Just protecting yourself doesn’t always save games – and it rarely wins games.
This is why New Defense places the highest priority on counterplay. In general, counterplay outranks pawn structure, development and even material. Only king safety rivals it – and doesn’t necessarily exceed it – in importance.
Duckstein – Petrosian, Varna 1962
1 e4 c6 2 d4 d5 3 ♘c3 dxe4 4 ♘xe4 ♗f5 5 ♘g3 ♗g6 6 ♘f3 ♘d7 7 ♗d3 e6 8 0-0 ♕c7 9 c4 0-0-0 10 ♗xg6 hxg6 11 ♕a4 ♔b8 12 b4 ♘h6 13 ♕b3 ♘f5 14 a4 e5 15 dxe5 ♘xe5 16 ♘xe5 ♕xe5 17 ♗b2 ♕c7 18 c5
Black liquidated White’s superior center at moves 14-16. But White’s pieces remain a bit more active. He may obtain an initiative after ♖fe1, threatening ♗e5.
Black chose the stunning 18 ... a5!. Yes, he invited the destruction of the pawn protection around his king. But Black can prevent a file from being opened, e.g. 19 bxa5 ♗xc5 20 a6 b6! 21 a5 b5!.
In other words, Black is willing to trade some king safety for substantial piece play. White answered by seeking exchanges, 19 ♖ad1 ♖xd1 20 ♖xd1. But Black would have had an edge after 20 ... axb4!.
However, he was so sure of his king that he tried the more ambitious 20 ... ♖h4?! 21 bxa5 ♗xc5. Then came 22 a6 b6! 23 ♖e1! ♔a7 24 ♗e5 ♕d7 25 ♘e4 ♗d4.
White could have exploited this with 26 a5 so that 26 ... ♗xe5? 26 axb6+ and 27 ♘c5 is a strong attack.
But he chose 26 g3? and invited a powerful sacrifice, 26 ... ♗xe5! 27 gxh4 ♘d4 28 ♕d1 ♕d5, that eventually won.
Another illustration of balancing king safety and counterplay was:
Short – Harikrishna, Gibraltar 2004
1 e4 e5 2 ♘f3 ♘c6 3 ♗b5 ♘f6 4 d3 ♗c5 5 0-0 d6 6 ♘c3 ♗g4 7 ♘a4 ♘d7 8 ♘xc5 ♘xc5 9 ♗e3 ♕f6 10 ♗xc6+! bxc6 11 ♗xc5 dxc5 12 ♕e2
White wants his queen on e3 where it will eye the c5-pawn and allow him to get out of the pin. Black shouldn’t permit 13 ♕e3 and 14 ♘d2, so he chose 12 ... ♗xf3.
White replied 13 gxf3! rather than play an endgame (13 ♕xf3 ♕xf3 14 gxf3). He believed that his king would be safe at h1. This appeared so strong that Black didn’t even try to test White with 13 ... g5 or 13 ... 0-0 14 ♔h1 ♕d6 and ... f5. Instead, he preferred 13 ... 0-0 14 ♔h1 ♖ad8.
But after 15 ♖g1 it was easy to see that White could make progress with ♕e3, ♖g4, b2-b3, ♖ag1 and eventually f3-f4. Play went 15 ... ♕h6 16 ♕e3!.
Black saw nothing better than 16 ... ♕xe3 17 fxe3, and White’s 13 gxf3! had been vindicated. In the endgame the pawn structure is so lost for Black that he should have bid for counterplay with 17 ... c4! 18 dxc4 ♖d2. But he opted for 17 ... f5 18 exf5 ♖xf5 and was slowly ground down after 19 ♖af1 ♖b8 20 b3 ♖bf8 21 ♖g3.
Traditional defensive theory was created to meet the demands of traditional attacking theory. It said that a defender could expect his opponent to stay within certain reasonable, recognized limits.
For example, a defender would not have to worry about an attacker offering purely speculative sacrifices. “To sacrifice a piece one should be absolutely sure that one will quickly gain compensation,” Jose Capablanca wrote.
But when Mikhail Tal began to win with outrageous sacrifices, he challenged traditional defense. Defenders needed a new approach.
Yefim Geller, best known as an attacking player, offered this Laskerian advice: In a bad position, when there is no real counterplay, the defender should ‘clutch’ at enemy pieces and pawns. The idea is to inflict maximum annoyance until the opponent begins to err.
Three pawns down, White is quite lost. Trying to construct a defensive wall to stop the extra enemy pawns from advancing is bound to fail.
But White can ‘clutch’ and harass, 1 ♕f8+ ♔c7 2 ♕f4 ♖f7 3 ♕g5 ♕f5 4 ♕d2. This wasn’t progress, of course. But the defender doesn’t need progress. His opponent does.
White kept finding annoying resources such as 5 ♕a5+, e.g. 5 ... ♔b8? 6 ♕d8+ ♔a7 7 e6!.
After 4 ... ♖e7 5 ♕a5+ ♔c8 6 ♕c3 ♖e6 7 a4 ♕f2 8 ♖h1, annotator Mikhail Savinov said White was following the classic Geller recipe: attacking pawns, giving checks and sometimes defending his own material.
Black found himself off-balance and blundered with 8 ... ♔d7?. That allowed White to regain one pawn with 9 ♕b4!.
He was still lost. But even though Black was not in time trouble, he soon fell apart: 9 ... b5 10 ♕xg4 ♕f7 11 ♕d4! ♔c8 12 ♕b6! ♕c7 13 ♕xa6+.
He lost his queen and resigned after 13 ... ♕b7?? 14 ♖h8+ ♔c7 15 ♕a5+ ♕b6 16 ♖c8+!. And White went on to win the tournament with nearly a 2900 performance rating.
This was an extreme example, of course. White had no right to even draw. Whenever a defender escapes from a bad position, the post-mortem is bound to reveal improvements for his opponent. But it is also likely to demonstrate the superiority of clutching over passive defense.
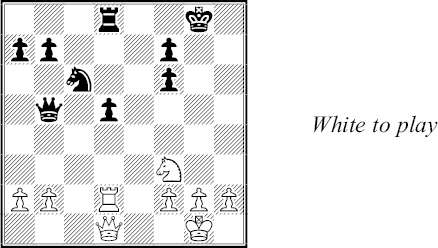
White has a substantial positional edge which she can enlarge with ♘d4/f4-f5, or h4-h5xg6 or a well-prepared e4-e5.
Traditional defensive theory held that Black could delay a crisis for many moves with solid play. New Defense argues that given time, White will win this kind of position nine times out of ten.
That’s why Black needed to activate his dormant pieces, particularly his g7-bishop. He began with 1 ... f5!, even though it invited 2 e5! and granted White a powerful passed e-pawn.
The benefit of this was 2 ... ♕c4! because the d5-pawn had become a target. There followed 3 ♖ad1 ♗a4! 4 ♖d2.
Black exposed e6 to an invasion from ♘g5-e6. But he moved the bishop from d7 because he needed another piece to clutch with. He continued with 4 ... ♗c2!. He wanted to plug the e-file with ... ♗e4 and didn’t fear 5 ♖c1 b3 6 exd6 ♗xb2, for example.
Post-mortem analysis showed that White missed a strong 5 ♘g5 (since 5 ... ♗e4 6 exd6! ♗xd5 7 ♖ed1 ♗c6 8 d7 would create a monster d-pawn).
Clutching paid off after 5 h4 ♗e4! 6 ♖d4 ♕b3 7 ♘g5 ♕xb2 led to a liquidation and a draw (8 ♘xe4 fxe4 9 ♖dxe4 dxe5).
Attackers win with pretty moves, such as queen sacrifices. The defender has to overcome the feeling of awe that he can get when an attacker dazzles him with tactical explosions.
White has the Exchange for two Pawns. But the pawns are passed and, what’s worse, his bishop is trapped at f8. It will be lost after ... ♘d7 or ... ♘c6.
White came up with an inspired combination beginning with 1 ♖xb5!. Of course, 1 ... ♕xb5?? allows mate on g7.
Black took 1 ... ♗xb5. Then 2 ♖c8 ♕a1+ 3 ♖c1 would not lead to a repetition of moves (3 ... ♕e5?) but to a win (3 ... ♕d4! 4 ♖c8 ♕d1 mate).
But White had another dazzler, 2 ♗g7!.
White threatens 3 ♗xe5 as well as 3 ♖c8+. A pretty additional point is that 2 ... ♕e6?? loses to 3 ♗h8! and ♕g7 mate (or 3... ♔xh8 4 ♕f8 mate).
But the game is not over. In such positions the defender must recover his composure and look for a resource. The only possibility is 2 ... f6 and it works because of 3 ♗h8 ♔f7! and 4 ♕xh7+ ♔e6! (not 4 ... ♔e8?? 5 ♕g8+ ♔d7 6 ♕c8+ ♔d6 7 ♖d1+) .
Now it was White’s turn to dodge a trap. After 5 ♕g8+ ♔d6 6 ♖d1+? ♔c7 Black is escaping. White had to settle for 6 ♕d8+! ♔e6 7 ♕g8+ ♔d6, draw.
There are few defensive moves that could be called aesthetic. Instead of pretty moves, the careful defender – the New Defender – often has to rely on ‘ugly moves,’ that is, moves that don’t look right. They seem to violate traditional defensive canon if not common sense.
White has made substantial inroads on the queenside. Conventional strategy calls for him to castle followed by (a) going after the a5-pawn with ♗e1 and ♘b5/♘xa5, or (b) bringing heavy pieces to the b- and c-files and crashing through with c4-c5.
But 1 0-0 gives Black a target for ... ♘f6, ... ♘f7, ... h5 and ... g4!. White realized that his king would be safest on the side of the board where he is strongest. He played 1 ♔d2! and 1 ... ♗d7 2 ♔c2 ♘f7 3 c5!.
Black didn’t like allowing 4 c6 so the game continued 3 ... dxc5 4 ♘xc5 ♘d6 5 ♘xd7 ♕xd7 6 ♗b5 ♘xb5 7 axb5.
Now the a5-pawn is all but lost because White can double rooks on the a-file. But it’s the absence of Black counterplay – no target! – that cost him the game, 7 ... ♖fb8 8 ♕d3 ♗f8 9 ♕c4 ♕d6 10 ♖a4 ♘f6 11 ♖ha1.
White won after 11 ... ♘d7 12 ♕c6! ♘b6 (or 12... ♕xc6 13 bxc6 ♗c5!? 14 cxd7 ♗xf2 15 ♖c4 ♗b6 16 ♘b5) 13 ♖xa5 ♖xa5 14 ♖xa5.
Viktor Korchnoi was one of the fathers of New Defense. He popularized a confrontational style designed to throw an attacker off balance. He sought to deny opponents the opportunity to make aggressive moves with confidence.
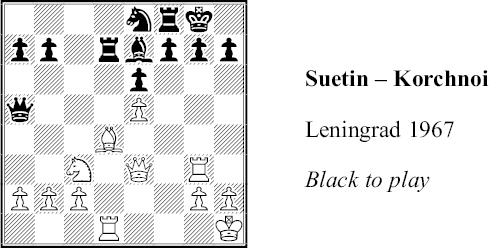
Here that doesn’t seem possible. White has built up a nice positional edge and has ‘easy’ attacking moves, such as ♘e4-f6+ and ♖f1-f4-g4.
Black would like to put his knight to better work, with ... g6 and ... ♘g7-f5. But that weakens both f6 and h6, e.g. 1 ... g6 2 ♕h6 ♘g7 3 ♖h3 ♘h5 4 ♖dd3, threatening 5 ♖xh5 gxh5 6 ♖g3+.
Traditional defensive thinking said pawns around a castled king should not be moved (1 ... g6?). New Defense adds “... unless there is a very good reason.” That explains Korchnoi’s 1 ... h5!. It averted a rook lift to g4 and threatened to disrupt White’s coordination with ... h4.
After 2 ♖f1 ♕b4! 3 ♘e2 ♕c4! 4 c3 White counted on his attack growing with 4 ... ♕xa2 5 ♘f4. But 5 ... h4! keeps Black solid.
He preferred to get his knight in the game, 4 ... g6! 5 ♖gf3 ♘g7.
The knight will have a terrific defensive post at f5, from where it watches the key g3, e3 and d4 squares. Lacking a way to better use his rooks, White tried 6 b3 ♕a6! 7 ♘g3 and was met by 7 ... h4! 8 ♘e4 ♘f5.
Now we see why the queen retreated to a6. White can’t win with 9 ♖xf5 and 10 ♘f6+ because Black would be threatening ... ♕xf1+.
White played 9 ♕f4, perhaps hoping for 9 ... ♘xd4? 10 cxd4 ♕xa2? 11 ♘f6+ and wins. But Black calmly played 9 ... ♕xa2!.
The outcome was still unclear as play went 10 ♗c5 ♕e2 and White repeated moves, 11 ♖3f2 ♕d3 12 ♖f3 ♕e2 13 ♖3f2 ♕d3.
Instead of taking the draw White chose 14 ♖d2?! and was surprised by 14 ... ♕xd2! 15 ♘xd2 ♗xc5.

This changed the nature of the position. Material is roughly even. But Black owns the only open file and his knight is worth a rook.
Moreover, White had no targets. It was harder for the (former) attacker to find easy moves. No wonder that after one more error, 16 ♘e4 ♗e3 17 ♘f6+ ♔g7 18 ♕c4 ♖7d8 19 ♘g4 ♗b6 20 ♘f2? ♗xf2 21 ♖xf2 ♘e3!, he had to resign.
And now it’s your turn to see how you can apply what the world has learned in more than a century of evolving defensive thinking. Once again the solutions can be found at the end of this book.
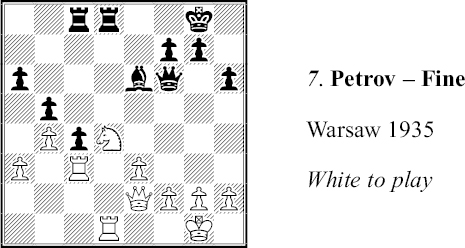
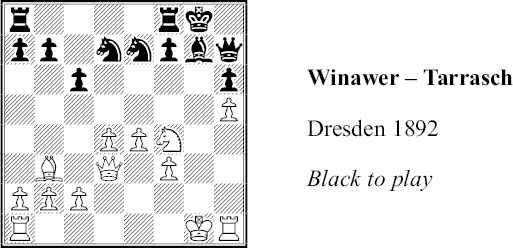
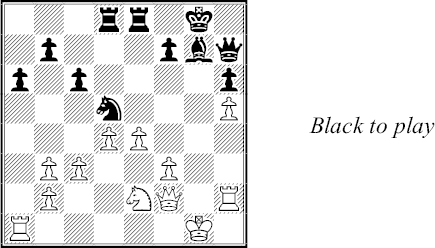
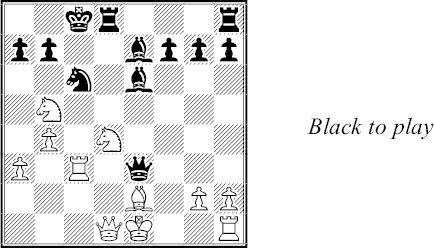
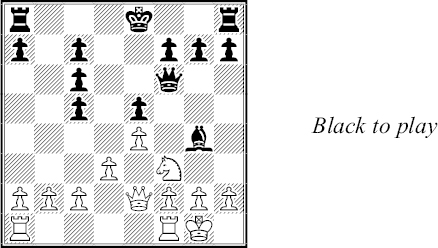
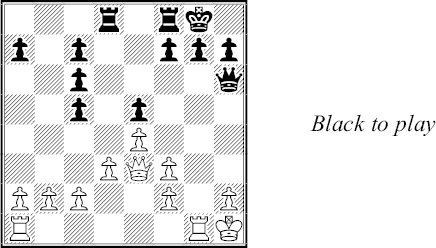
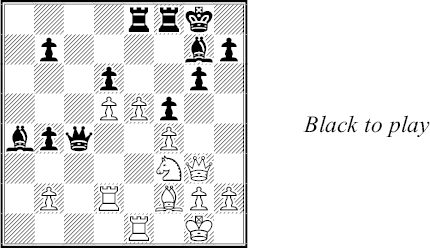
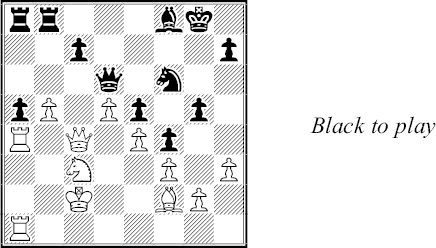
White played 1 f4. How should Black react?
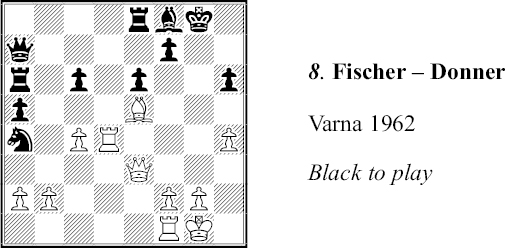
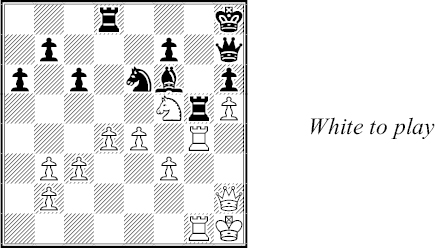
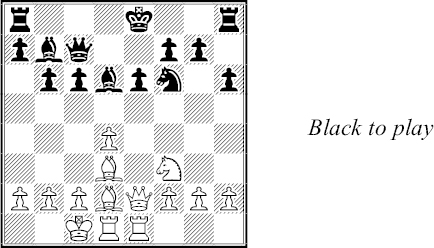
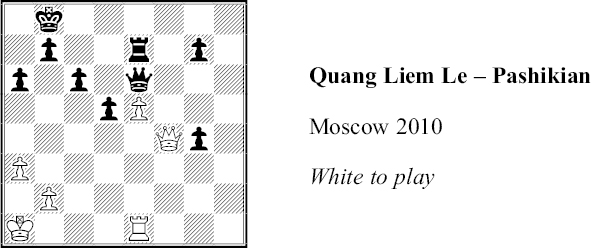
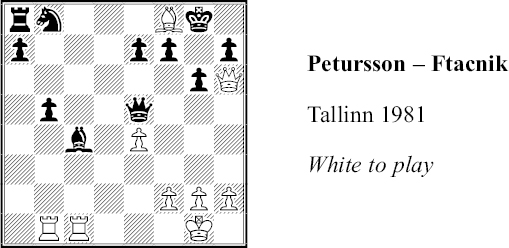
White had sacrificed a piece on h6 in expectation of a knockout blow from ♖g4+. What can Black do?
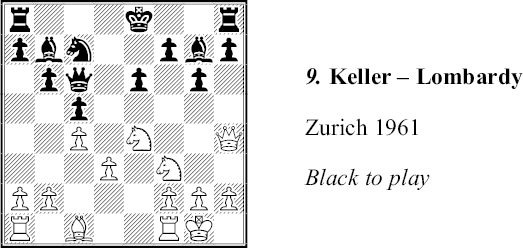
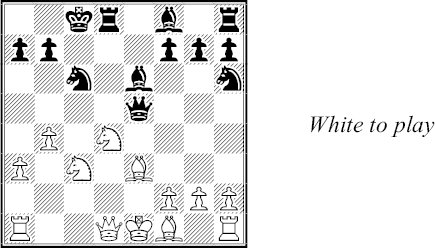
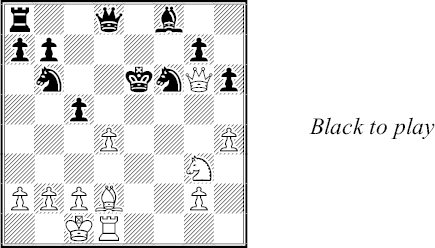
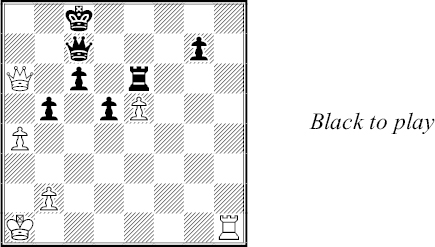
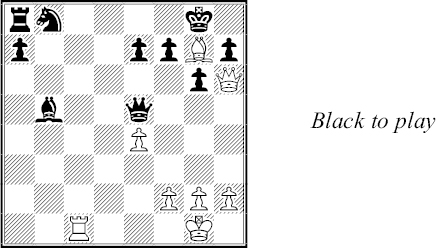
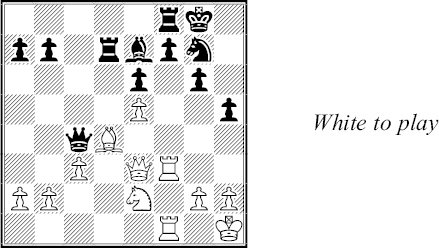
White has an annoying ♘f6+ coming up. Is there anything better than 1 ... 0-0 or 1 ... f5 ?
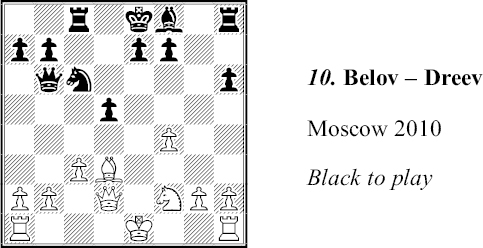
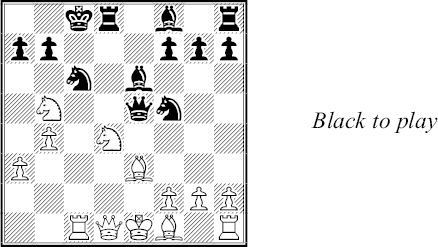
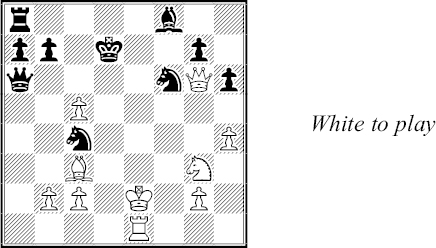
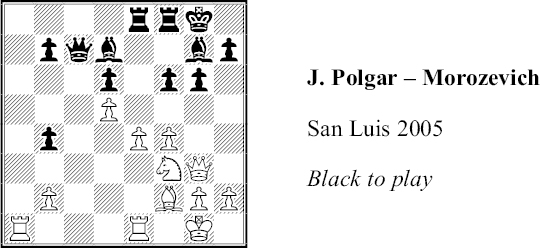
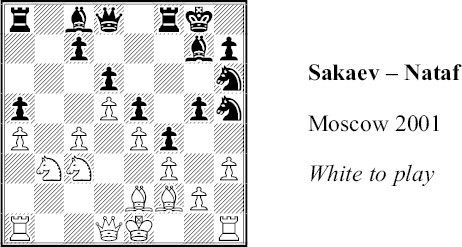
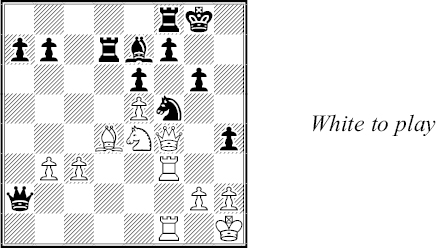
A natural move is 1 ... e6. What else should Black consider?