Pedals are not only the means of applying your muscle power to the drivetrain of your bicycle. They also serve an important function as a control surface. By moving the pedals to different positions and shifting your weight on them, it is possible to steer your bike more quickly and more accurately, increase the rear tire's traction on climbs, and stabilize the bike on descents and technical trails.
All of these abilities come with their own specific demands. Pedals must be strong, have smooth bearings, and complement your footwear. No, this last point isn't vanity. Simply put, if your choice of shoes can't maintain contact with your pedals, the rest becomes difficult, if not impossible.
Bicycle pedals come in many different types and levels of quality. Some types, the ones most serious cyclists use, are made to work with special shoes that have cleats screwed onto the bottoms. These attach to the pedal, improving your pedaling efficiency immensely. Other pedals cannot be used with cleats, such as nylon models found on entry-level bikes, and wide-platform pedals used for technical off-road and stunt riding.
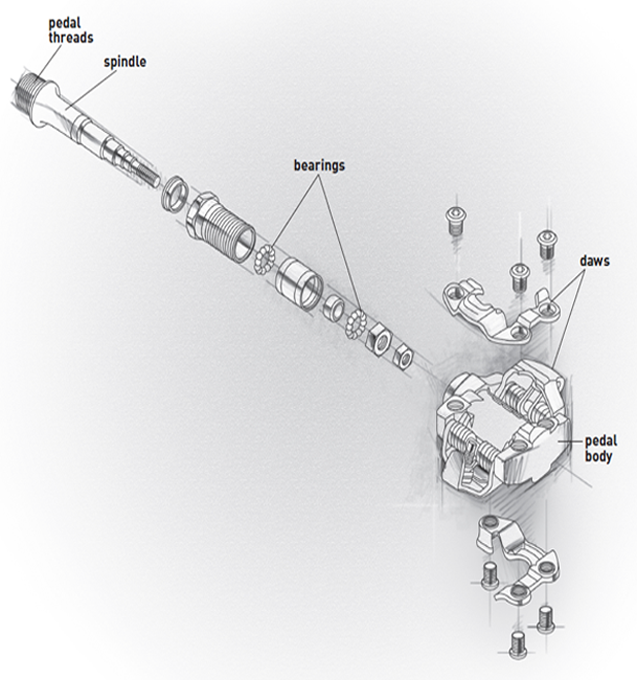
Although pedals come in many different shapes, almost all pedals share several common characteristics. At the heart of a pedal is a spindle that threads into the end of a crankarm. The inner races of two sets of bearings are located on this spindle: one at the inside end of the spindle next to the crankarm and the other at the spindle's outer end. The body of the pedal is where you put your foot. This is made sometimes of steel, nylon plastic, or carbon composite but often of aluminum. The body also contains the outer races of the pedal's bearings, allowing the spindle to rotate inside as you turn the crank, while maintaining the position of the pedal body relative to your foot.
Many of the apparent differences between pedals are just that, cosmetic differences. Their internal parts are usually strikingly similar. As you'll see later, that also means that servicing is usually the same procedure for different types and even different brands of pedals.
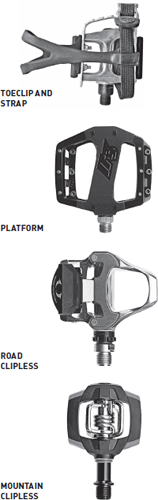
Pedals come in four basic styles.
When shopping for pedals, it helps to have a good idea of how you ride your bike. For instance, if you're a road rider who seldom stops, you probably aren't concerned with a pedal system that includes a shoe geared to “walkability.” A tourist, mountain biker, or commuter finds walking quite important, so a shoe that has a sole with decent tread and a little flexibility is desirable, and your choice of pedal will need to take that into account. A casual cyclist may simply want a pedal that can be used with any sort of everyday footwear.
Pedals can be divided into two basic types—platform and clipless. There are many variations within these basic types, as well as new pedals that come along every year. In terms of the century-long history of the bicycle, the clipless pedal is a relatively new design. It utilizes a clamping mechanism that grips special hardware attached to cycling shoes. It renders toeclips and straps unnecessary. Clipless pedals are easier to use and more comfortable than pedals using clips and straps. Once you get used to them, the best ones almost instantaneously release your foot in a crash or emergency. Clipless pedals are now widely used by all types of cyclists because of the many advantages they offer.
Platform pedals are the most basic style and what we are all familiar with from our kid's bike growing up. The shape, size, material, and texture vary, but all platforms are essentially just a place for your foot to apply power to the crank, giving you forward motion each time you push down.
There are platform pedals built for mountain biking that are made with large, rugged bodies and aggressive teeth or pins to keep your foot from sliding off when the going gets rough or muddy. There are rubber-surfaced platforms ideal for around-town bikes and casual commuters who might sometimes ride in leather-soled shoes. There are inexpensive models made of nylon plastic that can handle the knocks of day-to-day trips and tumbles, and there are pared-down, lightweight types for those who want to keep their bikes svelte.
Among both mountain and road enthusiasts, there's been a long-standing movement away from the traditional pedal, toeclip, and toe strap trio toward a system that invariably involves a pedal/cleat combination, which locks the rider's foot onto the pedal. This integrated locking feature makes clips and straps, and their adjustment, obsolete—hence the term “clipless.” It's fast and easy to lock and unlock cleats into and out of these pedals, which makes them safer and more convenient than other contemporary pedals. The Look pedal, produced by the makers of Look ski bindings in 1983, was the first successful clipless pedal.
Currently there are more than a dozen different clipless pedal systems. Some of the more popular ones include Look, Shimano, Speedplay, and Time. The primary difference between systems is in the way that the pedal grips the cleat. It's always important to purchase shoes that are compatible with the cleat system used by the clipless pedals you plan to purchase.
These days you'll typically find toeclips and straps only on older models and entry- to medium-level bikes. There is a misconception that the purpose of toeclips is to prevent your feet from slipping forward on the pedals; in reality their primary function is to hold up the toe strap loops so you can easily place your feet through them. The strap's function is to prevent your feet from slipping off the pedals, particularly if you wear cleated shoes that permit you to pull up slightly on the back side of your pedaling circle. Under normal conditions, most people don't keep their straps tight, just without much slack. That way, the straps provide a measure of security without preventing you from being able to quickly remove your feet from the pedals. With a little practice, the technique of lifting your foot up before you pull it back out of the strap becomes automatic.
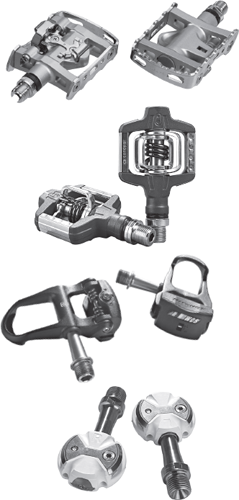
Clipless pedals are available to handle many riding styles for road and off-road cyclists. Here are just a handful of possibilities.
Toeclips should be just long enough to give a little clearance for your toes when the balls of your feet are centered over the pedal spindle. The correct length clip will have a little clearance for your toes. Your toes should never be jammed against the clip. Toeclips come in different sizes. If you have really large feet, you may need to add spacers between the toeclips and pedals, which can give you the needed clearance.
Sealed bearings are just as popular a feature in pedals as they are in other components. Some models require special tools to remove the bearings for service, and it is often best to leave the work to someone at a well-equipped shop.
In line with today's emphasis on serviceability, most recent “sealed” designs can be disassembled with regular tools. The seals in question are actually shields that are incorporated around regular pedal bearing construction. These pedals can be serviced in the same manner as any “nonsealed” type.
Designs of clipless pedals can vary widely, but all of them engage to cleats (fitted to the bottom of your cycling shoes) with a click; you simply step on the mechanism. The positive connection improves control and pedaling efficiency. Twisting your foot a few degrees releases the mechanism, making clipless pedals easier and safer to use than old-fashioned toeclips and straps.
A clipless pedal must hold the cleat tightly to keep the rider's foot secure and prevent accidental release. Reduce cleat wear by minimizing walking in them. Except for walkable cleat designs, which are recessed, most roadtype clipless cleats wear quickly if you walk on them; they're not surrounded by a rubber sole like those on mountain and touring types. Carry a pair of cleat covers in your jersey pocket if you anticipate getting on and off your bike. The covers will not only save your cleats, but they aren't as slippery on hard surfaces, so you won't have to worry about sliding and spilling your coffee during your stop at the cafe. If you find yourself without a pair of covers, it's better to remove your shoes and ruin your socks if you have to walk any distance.
You can tell that the cleats are worn if you have excessive foot movement on the pedals. Some clipless models allow your foot to swivel slightly, but when a cleat becomes worn, the shoe begins to move in several directions and can rattle around on the pedal. When a Shimano SPD cleat wears enough, it becomes difficult to get your feet out of the pedals. You can also identify a worn cleat by comparing it to a new one. Worn cleats should be replaced before they get so bad that they release prematurely or, in the case of SPDs, stick.
The other part of the release mechanism is the cleat-gripping pedal hardware. The parts can be made of plastic, carbon, or steel, but constant use will grind any of them down. The parts may also become loose and vibrate. If the mechanism loosens, the fit between the cleat and pedal is not secure enough, and engagement and release suffer. Additionally, you may develop an annoying squeak that's most noticeable when climbing. The noise is made by two pieces of plastic or steel—the cleat and the pedal backplate—rubbing against each other. You can temporarily quiet plastic parts by applying oil or ArmorAll to the pedal and cleat, but if the noise is chronic, a more lasting solution is to replace the hardware. Keep your cleats clean and dry, at least as much as is reasonably practical—bicycles are, after all, outdoor equipment. If you have steel pedal and cleat components, as on Shimano SPD pedals, rub the surfaces with an oily rag on occasion to prevent corrosion.
In wet and cold conditions, the small cleats and retention mechanisms common on mountain biking shoes and pedals can become clogged with mud and snow, and they then resist engaging. Manufacturers have recognized this and improved cleat and pedal shapes, but some riders still experience difficulty in extreme conditions. A trick to alleviate clogging is to spray your cleats and pedals with Pam cooking spray or some similar lubricant. Just as it can help keep your eggs from sticking to the frying pan, it can keep mud and ice off your cleats and pedals during your sloppy rides.
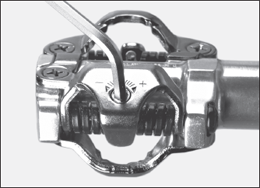
Designs of clipless pedals can vary widely, but all of them engage to cleats (fitted to the bottom of your cycling shoes) with a click; you simply step on the mechanism. The positive connection improves control and pedaling efficiency. Twisting your foot a few degrees releases the mechanism, making clipless pedals easier and safer to use than old-fashioned toeclips and straps.On most clipless pedals, there's a provision for adjusting how hard it is to get out of the pedal. Cyclists need to get in easily, but even more important is getting out in a hurry when the road or trail turns dangerous. Look for a small bolt on each end of the pedal or inside the pedal body. These are usually marked in some way, but they're almost always turned counterclockwise to loosen the tension setting and clockwise to tighten the tension.
Another consideration is float, a feature that allows your foot to swivel slightly to protect your knee. Certain pedal designs rely on the cleat to provide the float, so it's possible to simply switch to these other cleats to make the pedals fixed or floating. Some pedals have set screws that are adjusted to reduce or increase the amount of float on the pedals.
With new clipless pedal systems coming out all the time, the best bet is to study your owner's manual to understand all the adjustments that are offered by your type of clipless pedals and how to dial them in.
While cleat adjustment is not really bicycle maintenance, it's an important consideration when setting up cleated shoes. Cleats hold your feet on the pedals in a certain position. The problem is, it's possible to get the cleat in the wrong position. Everyone has a natural gait or position where his or her foot sits on a pedal. When the cleat is adjusted incorrectly, it forces you to pedal with your foot in an unnatural position, which puts stress on the knee and often leads to injury. Additionally, if the cleat is not adjusted properly, it's more difficult to click into clipless pedals.
These days, many pedal systems include a float feature, meaning that the cleats move slightly on the pedals, allowing the feet to pivot laterally. This float is designed to allow the feet to find their natural position throughout the pedal circle. It's a mistake to assume that because there's some float in the cleat, it's okay to set the cleat position any which way. The proper cleat position will be at the center of the cleat float. That way, your feet can move either way, as necessary, while you're riding.
The best way to adjust cleats is to have it done by a shop that uses an accredited fitting system, particularly one that specializes in cleat alignment such as the Fit Kit (bikefitkit.com). You may have to call a few shops to locate one with this service. The Fit Kit's bicycle-sizing system includes Rotational Adjustment Devices, which are actually two special pedals that gauge cleat position and allow the mechanic to adjust your cleats to a position that's biomechanically correct for your knees. This greatly reduces the chance of knee injury and ensures easy entry into the pedals.
There are four general pedal conditions that indicate it's time for service. The first is simply the passage of time. In the absence of any other condition, mountain bike pedals ought to be serviced every 6 months, and road models should be serviced yearly as preventive maintenance. Open up the pedal and make sure that you don't have water or other contaminants trapped inside. (Those seals can work both ways.) These problems are difficult to detect from the outside.
The second condition is when you hear or feel a maddening click with every complete revolution of the pedal or crank. This could result from a loose bottom bracket cup, crankarm, or toeclip bolt, so check those easily fixed problems first. If those parts are all tight and the click continues, it's probably something within the pedal bearings. If you've recently overhauled your pedals, try to isolate the offending side and service only that one. If it's been a while since their last servicing, you may as well do both of your pedals now. Ironically, you'll most likely never find the small bit of dirt that causes the problem, which almost always goes away after cleaning and regreasing.
The last two conditions are easily detected with a simple inspection that you should perform regularly, either before or after every few rides. Hold each pedal body with your fingertips while you rotate it around the crankarm. A slight roughness to the touch suggests that there may be dirt in the pedal bearings or they may be slightly out of adjustment. If the pedal binds, you have a very dirty or a badly adjusted set of bearings. If the pedal works okay to this point, try to rock it back and forth. An adjustment is called for if you discover any play in the bearings.
Keep in mind that it's not worth the effort to overhaul cheap pedals. Parts are rarely available, so it's best to upgrade to a better model.
Pedal removal is something you don't do frequently. You might need to remove pedals to fit your bike into a shipping box so you can take it on vacation with you or to an event. Removing the pedals makes servicing them easier. And you'll definitely have to remove them to upgrade to better or different models.
Many people have difficulty removing pedals. It's usually because they don't know one fact: The left pedal is reverse-threaded. This means that you must turn it clockwise to loosen it. The right pedal is regular-thread; it's turned counterclockwise to loosen. The left is the opposite because if it were regular-thread, the action of pedaling would cause the pedal to loosen on the crankarm. Since it is reverse-threaded, the pedaling action turns it in the direction that will tighten it.
It can take considerable force to loosen a pedal that's been adequately tightened or one that's been on a bike for some time. There are some sharp things down there, too, such as the chainrings, which can cause injury. When you're removing the right pedal, it's a good idea to shift onto the largest chainring. The chain will prevent you from slipping and getting jabbed by the chainring teeth.
Sometimes pedals seem stuck. If you're sure that you're turning them the right way but they won't budge, the first thing to try is a bit of penetrating oil like Liquid Wrench. If penetrant fails to free the pedal, the task may require some old-fashioned brute force. Add a cheater bar to your pedal wrench. A short section of heavy pipe from the hardware store will usually do the trick. Removing the entire crankarm and clamping it in a vise can help you gain the leverage you need. Pad the jaws of the vise with a pair of wood blocks or something similarly soft so the crankarm won't get marred, then use the wrench and cheater bar. As a last resort, heating the crankarm slightly with a propane torch can also break up the corrosion that is binding the pedal and crankarm together. Warnings: Heat can discolor the crankarm permanently or even destroy the anodizing that protects the arm from corrosion. Also, if you go this route, be especially careful if you've applied any penetrating oil—it could ignite. Finally, and this might seem obvious but bears mentioning: You should never apply flame to a carbon fiber crankarm—you could do damage that might not be immediately visible but could cause a catastrophic failure of the carbon structure.
You can perform certain adjustments on some pedals while they're still screwed onto the crankarm, but don't try to disassemble a pedal without first removing it from the bike. You'll probably need a thin 15-millimeter wrench like that found at the small end of the fixed cup wrench in most bottom bracket tool sets. Remember that the direction in which each pedal is threaded is the same as the side of the bike that it's on. That means that as you straddle the bike, the pedal on your right side unscrews counterclockwise, while the pedal on your left side unscrews clockwise. In each case, turn the wrench toward the rear of the bike to remove the pedals.
To disassemble a standard loose- or sealed-bearing pedal after taking it off the crankarm, hold its threaded end down in a vise with soft jaws or between two pieces of wood. Remove the dustcap with the appropriate tool. Underneath the dustcap, you'll find the locknut and cone for the outboard bearings.
At this point, determine whether the pedal you are working on is one you can easily disassemble or whether you might prefer to take it to a shop. Some pedals have precision-sealed cartridge bearings that can require bearing extractors and presses for service. Sealed bearings require less maintenance than loose bearings because it's more difficult for dirt and water to enter. However, they can wear and develop play. When they need to be replaced or serviced, you might prefer to have shop personnel do the job. All that's visible of cartridge bearings is the seal (the bearings are underneath it), which is a black plastic ring that often has writing on it. Regular bearings, however, are easy to spot when you remove the dustcap. They are small, shiny steel balls.
If the pedal has regular bearings, hold the cone in place with one wrench while you loosen the locknut with another. In an emergency, if you don't have a wrench for the cone, you can sometimes hold it steady by wedging a screwdriver between it and the inside of the pedal body. Unscrew the locknut and cone.
Pick the ball bearings out of their race with a pair of tweezers or, holding the spindle firmly within the pedal body, turn the pedal upside down and dump the bearings into a container. Before you go any further, count the ball bearings—if you drop any during disassembly and the inside bearing has a different number of balls, you may not know if you found all of the ones you dropped. Don't lift the pedal body off the spindle or all the inboard bearings may drop on the floor. Turn the pedal upside down if it isn't already, and lift the spindle out of the pedal body. If the pedal has a rubber seal, gently pry it out of the body to make it easy to remove the inboard ball bearings. Count them before any get lost.
Replace your ball bearings with new ones. The old ones are invariably slightly out of round, which will make adjusting them difficult when they're reassembled into the pedal. Most loose-ball pedals use 1/8-inch bearings, but take a sample to the bike shop to make sure you get a good match.
Use a rag to clean everything well. Clean all metal parts with solvent, but keep the solvent away from plastic parts and rubber seals. Use something mild, such as alcohol, to clean those parts. Make sure to remove all the old grease from the inside of the pedal body. If the inner end of the pedal body has a rubber seal that you didn't remove and you can't get the area behind it clean, gently pry it out of the body.
If any of the bearing races have pitted areas or more than a slight groove, check into replacement parts. Availability varies considerably among manufacturers.
Apply a layer of medium-weight grease to the races in the pedal body. Hold the inside end up and place the required number of ball bearings in the layer of grease. Repeat for the outer end. Carefully place the spindle halfway back into the body, then apply additional grease to the ball bearings either directly or by loading up the area next to the inside cone. Seat the spindle and turn it to make sure it isn't binding. Grease that oozes out of the inboard bearings indicates that the bearings are fully packed and will resist contamination.
Holding the spindle tightly in the pedal body, turn the assembly over and turn the cone onto the spindle just a couple of turns. Hold the cone still and turn the spindle. This will draw the cone onto the bearings without scrambling them. Add the lockwasher and locknut. Now you're ready to do a pedal adjustment.
The spindle should turn smoothly with no play in the bearing adjustment. Snug the locknut and feel the adjustment. If it's tight (binding), loosen the locknut, back off the cone, tighten the locknut, and recheck the adjustment. For play, back off the locknut and tighten the cone, then tighten the locknut. Continue the process until the pedal turns smoothly on the spindle without any rough feel.
Replace the dustcap and you're done. Take it easy when you tighten it; most dustcaps are made of plastic.
Pedals may seem like an insignificant part of a bicycle, something you should be able to take for granted. While it is true that proper pedal adjustment is less critical to the safe operation of a bike than proper adjustment of its brakes and headset, there is still no point in neglecting this process. Smooth-turning pedals add a lot to the joy and efficiency of cycling. All it takes is a little time and proper maintenance.
PROBLEM: The pedal makes squeaking sounds when you're pedaling.
SOLUTION: Spray the cleats with ArmorAll or lube (just don't walk in the house in your now-oily shoes).
PROBLEM: The cleats won't engage when mountain biking in wet or cold weather.
SOLUTION: Spray Pam cooking spray on the cleats and pedals before a ride so mud and ice won't stick.
PROBLEM: You're having trouble getting out of your SPD-style clipless pedals.
SOLUTION: The cleats have probably worn enough that they can no longer spread the pedal jaws to release. Install new cleats.
PROBLEM: You have huge feet and can't find any toeclips to fit.
SOLUTION: Put washers between the pedals and toeclips for additional clearance, or try different pedals with wider cages.
PROBLEM: With each pedal stroke, you hear a click coming from one side.
SOLUTION: The pedal may have loosened. Tighten it.
PROBLEM: You're having trouble getting into clipless pedals.
SOLUTION: Make sure that the cleat is installed correctly on the shoe. Reread the directions or ask a shop for help. If they're Look-type plastic road cleats and you have small feet, you may have curved the cleat too much when tightening it to your shoes. The cleats must be fairly flat to engage correctly. Shim the edges with plastic to flatten the cleat.
PROBLEM: Even though you're using a good pedal wrench, you can't get the pedal off.
SOLUTION: Make sure you're turning the pedal the right way. The right pedal is turned counterclockwise to loosen it, but the left pedal is turned clockwise. It's still not coming off? Add a cheater bar to the pedal wrench. Still stuck? Try penetrating oil such as Liquid Wrench, or use a long cheater bar on your wrench for enhanced leverage.
PROBLEM: It's hard to get in and out of your clipless pedals.
SOLUTION: The parts that make up the jaws on top of the pedals may have come loose. Tighten the screws. No problem with the pedals? Check the cleats on the bottom of your shoes. If they are worn or have broken, replace them.
PROBLEM: You need to replace your clipless pedal cleats, but the bolt heads are full of crud or damaged.
SOLUTION: Clean them out with an awl, then force a hex key in by tapping on it with a hammer. If you can get the hex key to reform the hole in the bolt, you should be able to loosen the screws.
PROBLEM: You installed the pedals in the wrong sides before you realized it. Now the left pedal is in the right crankarm and the right is in the left.
SOLUTION: Next time, look at the pedals right at the threaded portion of the spindle. Usually pedals are marked with an R or an L designating right or left. (The R pedal is for the right crankarm and the L is for the left.) All you can do to fix pedals threaded into the wrong sides is to remove the pedals and hope for the best. Threading them into the wrong sides will usually destroy the threads in the crankarms. If that's the case, you'll need to replace the crankarms. You can try to have a shop repair the crankarms with something called a helicoil kit, though this doesn't always work. The good news is that the pedals should be reusable, as the crankarm threads are soft and shouldn't damage the pedal threads.
PROBLEM: Your clipless pedal cleats will not come off because the bolts are damaged or frozen.
SOLUTION: Apply a penetrating lubricant, then use a punch and hammer to loosen the screws. Use a pointed punch and strike the bolt to make a small divot. Put the point of the punch into the divot and strike the punch so that the force pushes the screw counterclockwise and loosens it.
PROBLEM: You stripped the threaded plate inside your shoe.
SOLUTION: In some shoes, it's possible to lift up the liner inside the shoe and replace the threaded insert. If not, it's usually possible to cut a hole in the shoe that's just large enough to allow you to perform surgery and replace the threaded insert. Then you can glue or tape the liner back in place or replace with an aftermarket footbed.
PROBLEM: You need to remove the pedal but can't find a place to fit your pedal wrench.
SOLUTION: The pedal may be a type that's installed and removed with a hex key only. Look at the back of the crankarm to see if there is a hex-shaped hole in the pedal spindle. If so, get the appropriate 6- or 8-millimeter hex key and use it to loosen and remove the pedals.
PROBLEM: You crashed, and now it feels like the pedal wobbles when you're riding.
SOLUTION: You probably bent the pedal spindle when you crashed, which will cause a wobbly feeling when you're pedaling. This can also lead to ankle problems if you ride on it a lot. You might be able to get a replacement spindle, or replace the pedal or set of pedals.
PROBLEM: You're trying to thread a toe strap through the pedal cage, but it's too thick to fit.
SOLUTION: Trim the end of the strap so that it's pointed, then poke it into the side of the cage as far as you can get it. Clamp a small vise grip on the end and pull with the vise grip to get the strap through the pedal.
1 Most pedals have a spring tension adjustment. Look for a single bolt on the front and back of the pedal (or just a rearone on single-sided pedals). Each screw will have a directional arrow, showing which way to turn the screw to increase retention (usually described with a “+”) or to ease entry and release (“-”). If cleat tension isn't the issue, check that the cleat engages the pedal completely and properly.
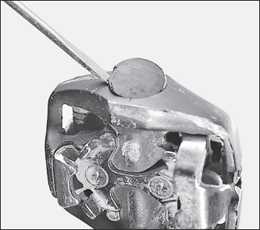
Begin to familiarize yourself with some of the maintenance points of your pedals. A pair of screws secure the front and base of the cleat-retaining jaws atop the pedals. The pivot for each rear portion of the cleat retaining jaws is sometimes a press fit pin, but sometimes a screw with its head facing inward, toward the crankarm. Every one of these screws should be checked periodically because they can loosen. Additionally, the pivot points for the movable jaw parts should get a drop of chain lubricant every month or so—more frequently if they regularly get wet.
2 Lubricating the cleats is not always recommended, but pedals with steel cleats can become squeaky if they're ridden completely dry. A very light coating of chain oil on each of the points where the cleat and jaws make contact should be all you need. Don't overdo it, because too much oil can just become a trap for sand and grit that can accelerate wear of the cleat.
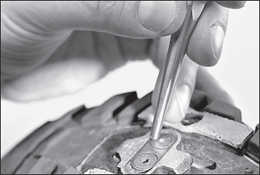
All cleats wear with enough use, and it begins to get difficult to escape the pedals. At the first signs of unreliable release, replace the cleats for safety's sake. Mark the position by using a permanent marker to draw indicator lines or outline the cleats entirely on the soles.
If the cleat bolts won't budge, use a hammer and punch to drive the screws counterclockwise. Grease the bolts, align, and install the new cleats.
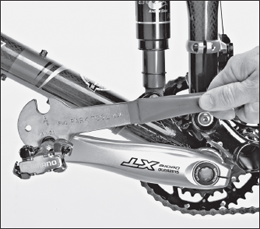
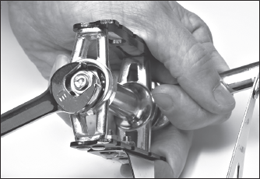
3 To remove the pedals, shift onto the large chainring, place the pedal in the 3-o'clock (right side) and 9-o'clock (left side) positions, attach the pedal wrench so that it's nearly in line with the crankarm, and push down to loosen and remove the pedals (see photo). If they won't turn, ask a strong friend to help, try penetrating oil such as Liquid Wrench, or use a cheater bar on the wrench for added leverage (remember that the left pedal turns clockwise to loosen). When the pedals are off, spin the spindles between your fingers. If they turn with resistance or feel dry, tight, loose, or rough, regrease the bearings. If there's a smooth hydraulic resistance while turning the spindle, the grease is still fine.
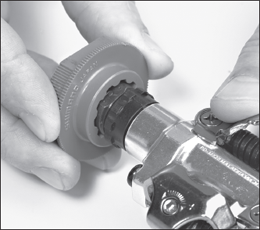
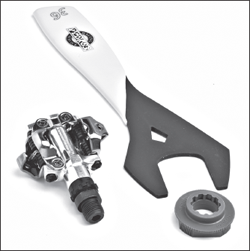
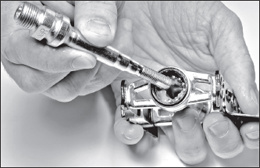
4 Many of Shimano's pedals, as well as some other brands, come apart by unscrewing and removing the spindle and bearings as a unit. Use the pedal spindle tool (see photo) or appropriate wrench to unscrew the spindle/bearing assembly. Hold the right pedal in the vise with the spindle upright, and turn the tool clockwise to unscrew the spindle. To unscrew the left pedal spindle, turn the tool counterclockwise.
5 Some clipless pedals have a dustcap that you must remove to access the bearings. The cap can be pried out or may require the use of a hex key or flat-blade screwdriver. In most cases, it's relatively obvious how the cap is removed. With the number of different designs in current use, it's best to consult the owner's manual before delving too deep.
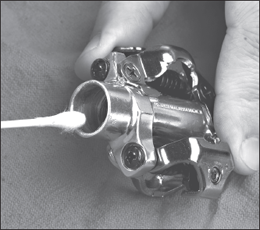
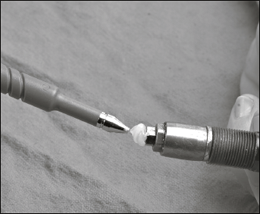
6 If you add grease every few months, the pedals may never need new parts. For pedals with cartridge spindle/bearings, put about ½ ounce of grease inside the pedal body and reinstall the spindle assembly, which will regrease all the bearings (see photo). Lube Speedplay pedals by removing the tiny bolts in the ends and pumping grease in with a needle-nose grease gun. For Shimano pedals with a plastic dustcap, remove the cap and push grease into the exposed bearings. Pull back the rubber seal on the spindle, and push fresh grease into the inside bearings.

1 Pedals with cartridge-type spindles are nicely sealed and should resist penetration by water and dirt under most conditions. Check the pedals by removing them from the crankarm, turning the spindles slowly in your fingers, and pushing sideways to feel for play. If the spindles turn with a hydraulic smoothness and there is no play when you push and pull the spindles, the pedals are in fine shape and don't need service. If the spindles turn roughly or you feel play, take the following steps to refurbish them.
You'll need a spindle removal tool for many pedals of this type (including Look, Mavic, and some Shimano models), as well as a bench vise to hold the tool as you turn the pedal body. If you have a strong grip, you can sometimes get away with holding the pedal in your hand and using a large adjustable wrench or 32-millimeter cone wrench to turn the tool.
Most Shimano pedals have 17-millimeter flats that look like any old adjustable wrench can do the job, and you'd be right to think so. Be careful, though, because these flats are soft aluminum. If you're not afraid of a bit of marring, go ahead with your adjustable wrench, but the better solution is to use Shimano's TL-PD77 tool or a good quality 17-millimeter cone wrench.
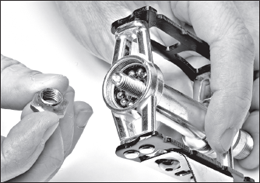
2 For pedals that require a spline-fit tool, such as this Shimano model, clamp the tool in the bench vise with the spline socket facing upward, and fit the splines of the pedal into it. Turn the pedal to unscrew and remove the spindle (see photo). If you look closely at the face of the tool, you'll see that it's marked to show which way to turn the tool for both the right and left pedals. Turn the pedal clockwise to loosen the right spindle and counterclockwise to remove the left.
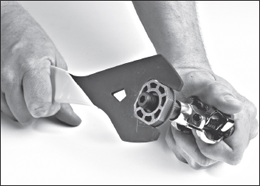
3 Don't force the tool. If it doesn't turn with a little pressure, you may be turning it the wrong way. If it doesn't turn, apply pressure in the other direction. After a few turns, you should be able to pull the spindle out of the pedal.
4 Clean off any dirt that's on the end of the spindle, which is where one of the bearing cartridges resides. Clean off any contaminated grease or dirt that you find on the rest of the spindle. Use a swab to wipe any dirt, contaminated grease, or water from inside the pedal body.
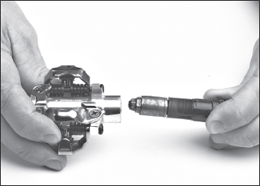
5 Place a dollop of grease on the end of the spindle assembly (see photo). Place a small dollop (about the size of a marble) inside the pedal body. Turning it by hand only, screw the spindle into the pedal a few turns. Extract it and repeat. This will push the fresh grease into the spindle body and work it through the bearings.
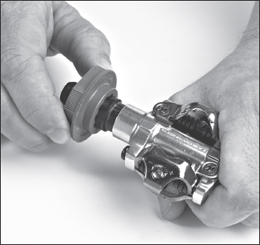
6 To finish the job, install the tool on the spindle and thread the spindle back into the pedal body fully by hand (see photo). Sometimes the new grease will cause a hydraulic resistance that can damage plastic parts inside the pedal if you force the spindle. If the spindle resists at any point, extract it and start again. When you have hand-turned the spindle all the way into the pedal, use the wrench to hold the tool and tighten the spindle. Don't overtighten—it needs little effort to remain tight. The pedal spindle should now turn smoothly and without play. Rotate the spindle with your fingers to work the grease around inside, and wipe away any excess grease from the spindle that forced its way out of the seal. Apply a light coating of grease to the spindle threads, wipe the threads in the crankarm clean, and reinstall the pedal.
1 Pedals are always easiest to maintain when they are removed from the crankarms. Keep in mind that a left-hand pedal threads in the opposite direction from a right-hand pedal.
To loosen a pedal for removal, rotate its crankarm forward (toward the front of the bike), put the pedal wrench on the pedal, then push the wrench down toward the ground. This procedure will work for both pedals.
To disassemble a pedal, remove the dustcap from the end of the spindle opposite the threaded end. On many models, you pry off the dustcap with a flat-blade screwdriver or similar tool (see photo).
If you have a bench vise, use it to hold the pedal in an upright position while you disassemble it. If you don't have a vise, hold the pedal with locking pliers or by hand. It won't make the job that much more difficult.

2 Once the dustcap is off, you'll see a locknut on the end of the spindle. It holds the spindle and bearings inside the body of the pedal.
Hold the spindle with a 15-millimeter wrench while you use an appropriately sized wrench to loosen the locknut inside the pedal body. A keyed washer usually separates the cone and locknut, making it possible to loosen the locknut without holding the cone directly.
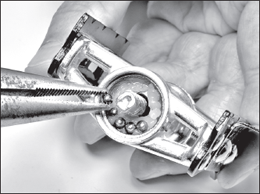
3 Remove the locknut and the lockwasher behind it. Thread off the cone. Be careful as you remove the cone because there are bearings behind it that can easily fall out and become lost.
To remove the bearings, either turn the pedal upside down and shake the bearings into a container or use a pair of tweezers to pick them out one by one. Make sure the spindle remains inside the pedal body while the first set of bearings is being removed. As soon as the outer bearings are out, record the number so you'll know how many replacements to put back in.
4 Turn the pedal over and pull the spindle out. If the spindle has a rubber seal, this may take some effort. Once it's out, remove the second set of bearings and count them. Take a sample with you to buy replacements of the same size. Clean all metal parts with solvent. For plastic parts and rubber seals, use something mild, such as alcohol. Get all of the old grease out of the inside of the pedal body. Inspect the bearing races. If they are pitted, check with a bike shop to see if replacement parts are available.
5 Reassemble the pedal. Pack medium-weight grease into the bearing race, and install new sets of bearings.
As you insert the spindle, it's important that you don't turn it because that can dislodge the bearings.
Turn the pedal over. If you just screw on the cone, you'll scramble the bearings in the top race, forcing you to reposition them and try again. Hold the bottom of the pedal spindle and push up to keep the spindle fully inserted in the pedal. Holding the pedal spindle like this, screw the cone only a couple of turns. To seat the cone on the bearings, turn the bottom of the spindle while you hold the cone. Don't
turn the cone or the pedal, just the spindle. This will draw the cone onto the bearings without unseating them in their race. Put the lockwasher back in place, and thread the locknut back on the end of the spindle.
Make sure that the locknut is loose enough to give you some working room, then back the cone off until you know it's too loose. Slowly turn the cone down. Once you reach the point where most of the play is out of the adjustment, hold the spindle with a 15-millimeter wrench and use a second wrench to tighten the locknut.
Spin the pedal. If you feel any binding, your adjustment is too tight. If you feel play in the bearings when you wiggle the spindle up and down, loosen the locknut and turn the cone down a little more.
Work in small increments in this way until you reach the point where there is neither binding nor looseness in the adjustment. Then make sure that the locknut is firmly fastened, and replace the dustcap.
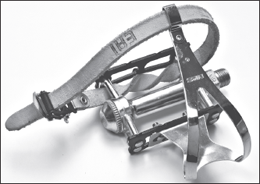
6 When installing a toe strap, put a single twist in it as you run it between the two sides of the pedal. This prevents it from shifting position. Lace the strap through the upper end of the toeclip, then press the buckle open and run the end of the strap straight through both the inner and outer plates of the buckle (see photo). When you release the buckle, the end of the strap should be caught between the cylinder of the inner plate and the teeth in the outer plate of the buckle.
 MORE ONLINE! FOR TODD'S STEP-BY-STEP VIDEO OF ADJUSTING CLEAT TENSION, GO TO BICYCLING.COM/FIXIT.