There are all sorts of ways for an amateur to beat a master – by hokum, by trickery, and even by outplaying him. In this book we shall study only the third method, but to satisfy your curiosity, I’ll illustrate the first two methods for you.
The story is told of Emanuel Lasker – and just about every other world champion – that he once found himself stranded in a small town between trains. To while away the time he sat down to play a game of chess with a local yokel. After a mere twenty moves Lasker had to resign.
“Nice work,” the world champion commented grudgingly. “But tell me, why don’t you move your knights. “My knights? said the yokel. “Oh, you mean those funny ones with the horses’ heads? As a matter of fact I still don’t know how to move them!”
It’s a good story, even if it’s not true. The odds in favor of this method are about one in a hundred quadrillion. To illustrate the use of trickery there’s this story, which may well be a true one.
When Steinitz was a young man in Vienna he was very poor. (Later on, when he became world champion, he was even poorer.) To have enough to live on he would play amateurs for trifling side bets. One of his opponents, an amateur, was a dependable loser for a long time. But then, after another player began to sit at their table, the steady loser improved to a startling degree.
Steinitz was baffled. There seemed to be no communication between the two, and yet, when the steady loser reached out his hand to play a palpable blunder, he would suddenly stop in mid-air, see the error of his ways, and play a different move. It was uncanny. Steinitz was sure the third man was offering advice – but how?
One day, during the course of a game, Steinitz happened to look under the table and saw that the method of communication was a slight pressure of the third man’s foot on the “customer” foot. That was all that Steinitz needed. He set a cunning trap and sure enough, when the customer was about to fall into it, he paused. Steinitz pressed his own foot down heavily on the customer’s foot. At this the customer was completely rattled. He was getting more “information” than he needed or wanted. The “system” was smashed, and Steinitz continued to win game after game.
I can’t offer odds on this method, nor do I recommend it. The wear and tear on the shinbones is too great. There are, however, a number of legitimate ways to beat a master. Let’s see what they are.
In this type of play the master removes one of his units from the board before play starts. By conceding the weaker player a handicap of this sort, he helps to make the fight a fairer and harder one.
At least that’s the theory of odds play. In practice it doesn’t work out too well – as you can gather from the Tarrasch-Schroeder game (page 62). The better player is still the better player, and after a blunder or two by his opponent the master asserts his superior strength and goes right on to win the game.
There are other drawbacks to odds play. It is an affront to the weaker player’s pride to be publically treated like a baby and have his inferiority paraded openly by receiving a handicap.
The final objection to odds play is that by disturbing the basic equality of forces it is really a sin against the spirit of chess. A player might be able to beat a master by receiving really substantial odds, but this would prove nothing and would still leave him in the position of losing constantly when starting off on an even basis.
It’s true that about a century ago odds play was very popular. In those days there was hardly any chess literature to speak of, and the only way for a poor player to improve was to match himself against top-notch masters. But, since the games were generally slaughters, it seemed an unavoidable necessity for the master to give odds.
The great Paul Morphy was very skillful in this department. He regularly scored elegant wins in games where he conceded odds of the queen knight, or even queen rook, to players well above the duffer class. It is an art requiring sublime self-confidence and an unruffled spirit. Judging by the results Morphy achieved, the odds were about 40 to 1 in his favor.
One of his most frequent opponents was Charles Maurian, a close friend from boyhood. Maurian was a gifted player, but Morphy had the Indian sign on him. Yet one day Maurian played that elusive masterpiece of a lifetime of which we all dream.
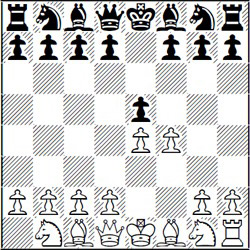
1.e4 e5 2.f4 ... (D)

Morphy plays the famous King’s Gambit – a sign that he means to mow Maurian down with a brilliant attack.
2...e×f4 3.Bc4 Qh4+ 4.Kf1 b5!? (D)
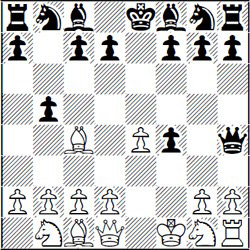
Black’s last move is just a gesture. It doesn’t matter much whether White takes the offered pawn or not.
Actually the move has a much more subtle meaning. Morphy is the great master who’s supposed to be doing the sacrificing in this game. To make up for the enormous odds he’s giving he must maintain the initiative. Instead we find Black stealing the initiative at this very early stage. If the odds-receiver can manage to play aggressively, he must win, as his material is so considerable.
5.Bd5 Nc6! (D)
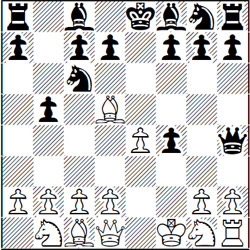
Here again Maurian is stealing Morphy’s thunder. Most players would react automatically with 5...c6, but Maurian copies Morphy’s tactic of always seeking to develop pieces.
6.Nf3 Qh5 7.d4 Nf6 8.Bb3 Ba6 (D)
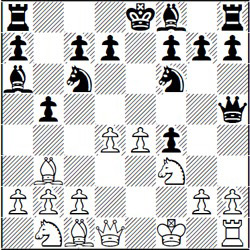
Think of it! Black is a rook ahead – in perfect safety – and is bringing out his pieces so efficiently that he is even ahead in development. With his last move Black contemplates ...b4+, driving White’s king to g1 and making it virtually impossible for White to ever develop his king rook.
Morphy is desperate, as well he might be, and he now plays unwittingly into a magnificent combination.
9.Qe2 ...
To stop ...b4+ But Black has an extraordinarily brilliant reply. What follows is chess of a very high order.
9...N×d4!! (D)
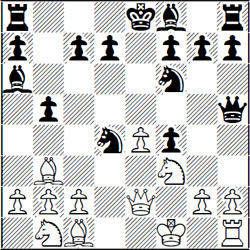
Very fine. This move is so deep that at first sight it looks like a blunder. But it isn’t – as the master discovers soon to his sorrow.
10.N×d4 b4!! (D)
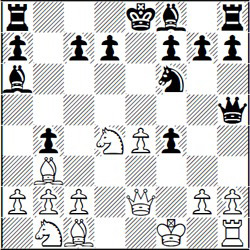
And this beautiful move, which looks even more foolhardy, really tops off Black’s plan. His subtle idea is to draw White’s queen away from the defense.
11.Q×a6 ...
Poor Morphy! If he doesn’t capture the bishop he loses his pinned queen. The whole combination is based on the power of Black’s (unprotected) bishop pinning the white queen.
11...Qd1+
Now that he’s removed White’s queen from the main theater of action, Black can wind up the game as planned.
12.Kf2 Ng4 mate! (D)
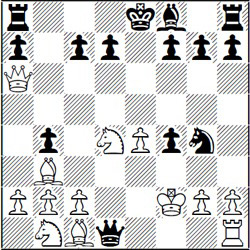
And there you have it: the most beautiful odds game ever won by an amateur against a master! It’s a beautiful game by any standard – one that any master would be proud of.
As I pointed out earlier, simultaneous play no longer has the vogue it once had. However, opportunities for meeting the master in simultaneous exhibitions still exist. For the ambitious amateur they are the thrill of a lifetime.
When you stop to consider it, the master plays his twenty or forty or so simultaneous games surprisingly well. At the most he can devote an average of a minute to each move. The scene shifts continually and new problems face him at every board. His technique, his memory, his quick sight of the board, and even his feet, are subjected to a grueling test.
So, under the circumstances, the master does surprisingly well. Even when he blunders at one board or another, he nurses the position along patiently and eventually makes a good recovery, finally scoring another victory after a dubious beginning. As in the case of odds play one might figure the odds in favor of the master as about 40 to 1.
Once in a great while, however, it happens that the master catches a Tartar. The element of surprise plays a role, of course. All or most of his opponents in an exhibition are strangers to the master. Here and there an unknown may turn out to be an unexpectedly powerful player. When that happens, the result may be catastrophe, as in the following game:
1.e4 e6 2.d4 d5 3.Nc3 Bb4 (D)
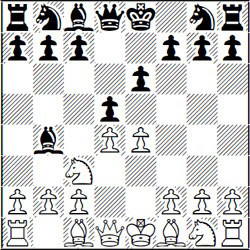
The pin on the knight is a favorite motif in the French Defense.
4.Nge2 ...
A “temporary” pawn sacrifice which turns out to be permanent.
4...d×e4 (D)
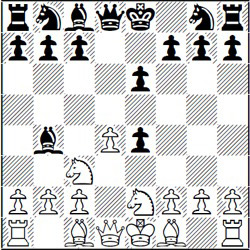
5.a3 B×c3+ 6.N×c3 Nc6
Black strives for counterattack. (D)
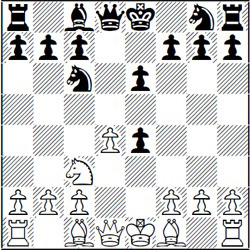
If White captures the king pawn, Black remains a pawn ahead by capturing the queen pawn.
White’s proper course is now 7.Bb5, pinning Black’s queen knight and thus putting it out of commission. Instead, he decides to “mix it” with Black. This policy of going in for technically dubious complications is usually good policy, as experience shows that the amateur is bound to stumble in a maze of possibilities. However, in this particular game we have the proverbial exception that proves the rule.
7.Qg4? N×d4! 8.Q×g7?? ... (D)
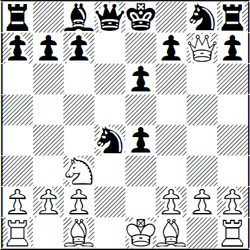
He sees the coming check but he thinks he can endure it because he has Black’s rook under attack. In his haste he overlooks that Black has a forced mate. In justice to the masters, it must be emphasized that despite the rapidity of their simultaneous play they rarely succumb in this way.
When they do lose a game, it is after forty, fifty moves or so. But to play over such a game would be a dreary business. For our purpose it is much more entertaining to see a quick, dramatic finish.
8...N×c2+ 9.Ke2 ...
Forced.
9...Qd3 mate! (D)
A game in a million.
But, you may say, this game is something of a freak. White’s grievous oversight cost him the game before he was really started. Let’s see a game where the master does his best and gets beaten just the same.
1.e4 e5 2.Nf3 Nc6 3.d4 e×d4 4.N×d4 Nf6 (D)
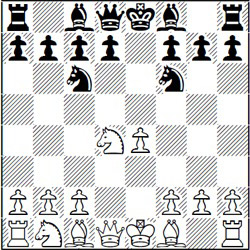
Even at this early stage Black plays for counterattack. The question is: can he keep it up?
5.N×c6 b×c6 6.Bd3 d5 5.e5 Ng4 6.Bf4 Bc5 7.0-0 g5! (D)
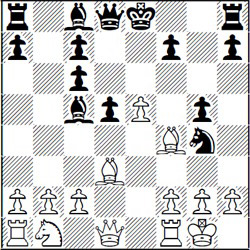
One attacking move after another. The experienced master soon recognizes such an opponent as dangerous. There’s no telling what wild combination may turn up when you have an enterprising opponent.
10.Bd2 Qe7 11.Bc3 Be6 12.h3? ... (D)
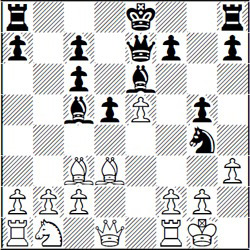
Here the master badly underestimates his opponent. The right way is 12.Nd2, getting more development for his pieces. The comparatively weak next move is a challenge which Black readily accepts.
12...h5! (D)
A move which plainly says: “I dare you to capture my knight!”
The master feels he must accept the challenge if he’s not to “lose face.”
However, this is a case where discretion is the better part of valor.
13.h×g4? h×g4
Now we see the point of Black’s sacrifice: he intends to menace White’s castled king along the newly opened h-file.
14.g3 ...
Mieses takes the usual precautionary measures with a practiced hand, but he misses a fine point.
14...Qf8!
Black has eye on the open h-file. He threatens ...Qh6 followed by checkmate.
15.Kg2 ... (D)
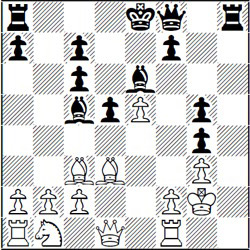
Mieses is not afraid of 15...Qh6, which he will answer satisfactorily with 16.Rh1. Now it’s all over, he thinks, with a sardonic glance at his opponent.
15...Rh2+!!
A magnificent inspiration! And what fun to play such a move against a great master!
16.K×h2 Qh6+ 17.Kg1 Qh3 (D)
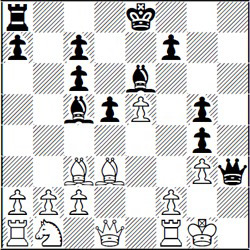
As we look at the diagram position we have to ask ourselves: what’s it all about? What does Black have to show for sacrificing a whole rook?
The answer is this: Black has sacrificed a rook in order to gain time to get this position. The important point is that the white f2-pawn is pinned by Black’s bishop at c5. Black is therefore able to threaten 18...Q×g3+ 19.Kh1 Qh3+ 20.Kg1 g3 followed by ...Qh2 mate.
And Black has still another threat: simply to castle, followed by ...Rh8 and ...Qh2 mate or ...Qh1 mate. Mieses finds a tricky resource which he hopes will give him a fighting chance.
18.Bd4!? ...
Hoping for 18...B×d4 when 19.Be4! offers defensive chances. For example, 19...d×e4 20.Q×d4. Or 19...Q×g3+ 20.Bg2. But Black has a staggering reply:
18...0-0-0!! (D)
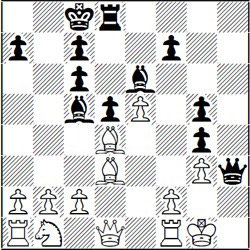
Black’s idea is that after 19.B×c5 he simply plays 19...Rh8 forcing checkmate. Now Mieses knows he’s been had by a very fine player, but he tries a last resource.
19.Bh7 ...
A vain attempt to block the terrible h-file.
19...Rh8 20.Qd3 B×d4 (D)
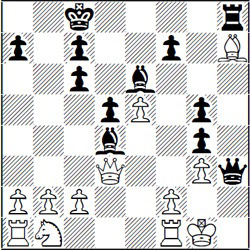
Calmly picking up the bishop at a moment when White cannot possibly retake (21.Q×d4? R×h7 and Black forces mate).
21.Nd2 R×h7 (D)
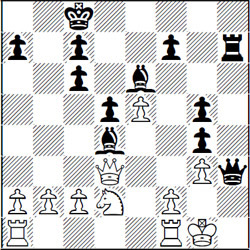
Forcing White to give up his queen to stop mate.
22.Q×h7 Q×h7 23.c3 Bb6 24.Nb3 Bf5 Resigns
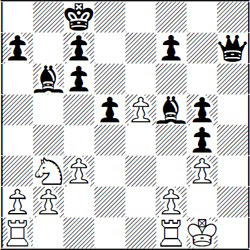
Further resistance is useless, as Black has a queen and bishop for only two rooks. In addition he threatens ...Be4 followed by ...Qh1 mate.
In skittles games, “chess for fun,” the amateur’s prospects against the master are meager indeed. For here the play is on even terms, and the amateur lacks even the opening consolation of receiving odds.
There is just one thin wedge of hope for him. Since the game is being played for fun, the master may relax his usual vigilance. Or he may seek dubious complications just for the sheer fun of it. Once in a great while this happens, and then the amateur has an opportunity to secure an inspired win. But – and this must be emphasized – such games are rare indeed.
To illustrate the type of play, I’ve selected what is undoubtedly the finest game in the field – a game won from the Mexican master Carlos Torre. The career of this young master was strange in a number of respects. He played in master tournaments for only two years – when he was 21 and 22 – and then returned to his native village, never to play again.
This was perhaps the only case in the history of chess in which a first-class master imitated Paul Morphy’s example by retiring voluntarily while at the height of his powers. Torre was a disciple of Capablanca and a great believer in the older man’s doctrine of forceful simplicity. When the present game was played, Torre was no more than sixteen. However, the game cannot be dismissed as a fluke, for Torre was even at that time a player of master strength.
1.e4 e5 2.Nf3 d6 3.d4 e×d4 4.Q×d4 Nc6 5.Bb5 Bd7 6.B×c6 B×c6 (D)
Torre is taking liberties by playing a cramped defense which makes it difficult for him to free his game later on. This often happens in games between masters and amateurs – the master feels that he “can get away with it.” In effect he’s giving the odds of a bad opening. Whether or not he can allow himself this luxury will depend on White’s further play.
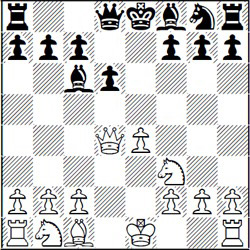
From a theoretical point of view, the master (Black) has made a serious mistake in giving White’s queen so much powerful centralized scope. Black reasons that his opponent doesn’t have the know-how to make use of this formidable position. As a rule this reasoning would be sound. But here we have the exceptional situation where the master is sadly in error.
7.Nc3 Nf6 8.0-0 Be7 9.Nd5 B×d5 10.e×d5 0-0 11.Bg5 c6 (D)
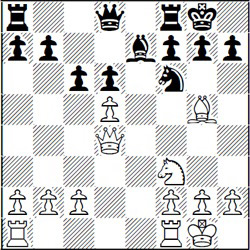
Black must try to obtain some freedom for his forces. As a result of his faulty opening, his position is very constricted. Passive defense is the best he can hope for from this point on.
12.c4 c×d5 13.c×d5 Re8 14.Rfe1 a5
In order to play ...Ra8-c8 without loosing the a-pawn.
15.Re2 Rc8 16.Rae1 ... (D)
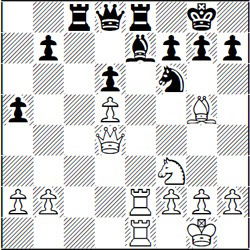
White is playing for control of the e-file – with results that will be spectacular.
16...Qd7 17.B×f6 B×f6 (D)
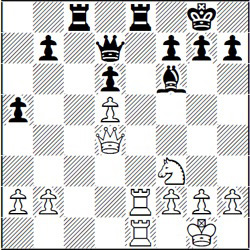
Black thinks the worst is over. His imprisoned bishop has been turned into a far-cruising piece with lots of scope. Who could foresee that the bishop’s splendid diagonal will be of no use whatever? If it comes to that, who could foresee that White now proceeds to win by force by one of the finest combinative sequences ever seen in the history of chess?
18.Qg4!! .... (D)
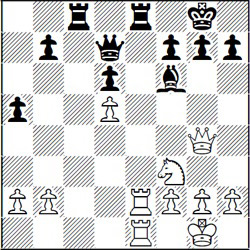
The first step of the grand plan. If 18...Q×g4 there follows 19. R×e8+ R×e8 20. R×e8 mate.
The queen sacrifice sets the theme for the following play. White keeps threatening a checkmate on the last rank by offering his queen. Black must decline the queen of course, but he must do it in such a way that he retains contact with his menaced rook.
White’s object all sublime is to cut the contact between the black queen and the black rooks.
18...Qb5 19.Qc4!! .... (D)
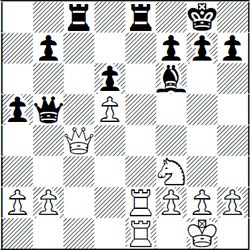
Again White offers the queen, and this time it’s a double offer, even a triple offer. Here are the possibilities: (a) If 19...R×c4 20. R×e8† Q×e8 21. R×e8 mate; (b) If 19...Q×c4 20. R×e8+ R×e8 21. R×e8 mate; (c) Or if 19...R×e2 20. Q×c8+ Qe8 21. Q×e8+ R×e8 22. R×e8 mate.
Always the same deadly combination of themes—mate on the back rank together with deflection of the black queen from the defense. Black worms his way out of this one and even looks reasonably safe after:
19...Qd7 (D)
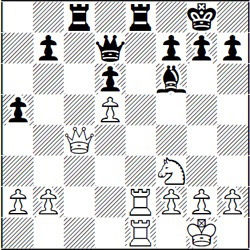
But White follows up even more fantastically with an even more amazing queen sacrifice:
20.Qc7!! ... (D)
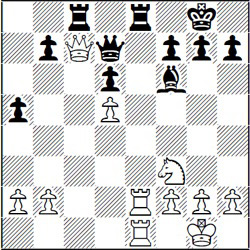
The situation is getting curiouser and curiouser. Black can’t play (a) 20...Q×c7 for then White winds up with 21.R×e8+ R×e8 22.R×e8 mate. And if (b) 20...R×c7 21.R×e8+ Q×e8 22.R×e8#. Finally, if (c) 20...R×e2, White replies 21.Q×d7 winning easily with the enormous material advantage of queen for rook.
20...Qb5 (D)
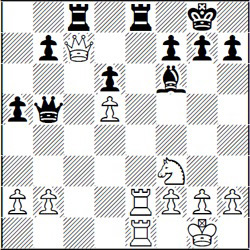
Black’s queen runs away. And at the same time Black shows the hand of the master by setting a devilish trap. Suppose White plays 21.Q×b7? hoping for 21...Q×b7? 22.R×e8+ R×e8 23.R×e8 mate. Black turns the tables by answering 21.Q×b7 with 21...Q×e2! Then if 22.R×e2 Black forces checkmate beginning with 22...Rc1+
In many a game a master has pulled a lost game out of the fire with such last-minute “swindles.” But not here! White is too alert for that. Instead of blundering with 21.Q×b7? he plays a strong and subtle move:
21.a4!! ... (D)
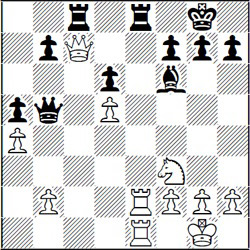
White’s queen is still immune from attack. The vicious pawn thrust is played to gain time to bring the white rook from e2 to e4 – a finesse of the most delicate subtlety and one that would do credit to the greatest masters. Just why this is so you will see in a move or two.
21...Q×a4 (D)
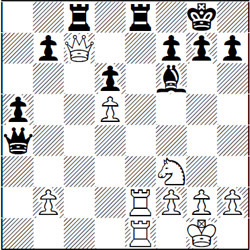
22.Re4!! ... (D)
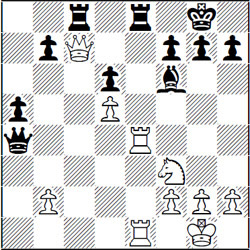
An exquisite tableau. If 22...R×c7 23.R×e8+ forces checkmate. And if 32...Q×e4 23.R×e4 and neither black rook can make a capture.
22...Qb5 23.Q×b7!! Resigns (D)
Now that White has played Re4, Black no longer has the resource of ...Q×e2. Another point is that Black cannot run way with ...Qa4 (now that White has his rook on e4). And of course 23...Q×b7 will not do because of 24.R×e8+ R×e8 25.R×e8 mate. Thus Black is left without a move and must resign.
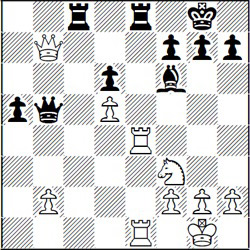
This is the finest game ever won by an amateur against a master. Undoubtedly the feat will be repeated in time to come, but it’s safe to say that no one will ever improve on it for smooth artistry and pitiless logic.
Offhand we might say that the amateur’s chance of winning a tournament game from the master is just about nil. For tournament play – chess for blood – is the master’s special domain. It is here that all the differences in ability, experience, technique, and concentration tell most heavily.
The amateur as we know, lacks the concentration and ambition that are required for successful tournament play. And the prospect of playing a tough opponent one round after another is enough to turn our favorite game into a dreary series of stumbles. As for the master, he flourishes on this kind of brutal competition.
And yet every now and then, maybe twenty times in a century some lucky amateur administers a sharp, stinging defeat to a master. Such games are so rare that they really make history. They deserve to be better known, especially when they are as rich in comic point as the following game.
The black pieces are played by a cocksure young master. He is phenomenally gifted, so much so that he has very little respect for the amateur he’s facing. So the rather disdainful master decides on an exotic experiment – only to meet with a drastic refutation from the lowly amateur!
1.e4 Nf6 (D)
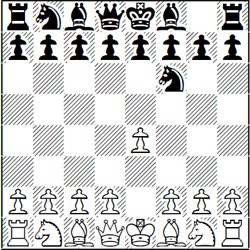
A tricky defense. Black deliberately provokes the advance of White’s pawns. If they run ahead far enough he reasons, they will be stranded at a distance from their supporting forces. Very crafty – but it doesn’t work.
2.e5 Nd5 3.c4 Nb6 4.d4 ...
The regulation move is now 4...d6. Black varies, to his regret.
4...Nc6? (D)
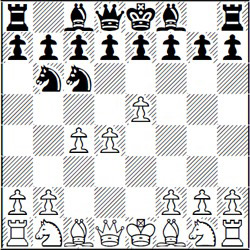
Incredible as it may seem, Black must lose a pieces by force after his last move. White’s winning move is:
5.d5!! ...
Black is left without a good move.
5...N×e5 6.c5! Nbc4 7.f4 ... (D)
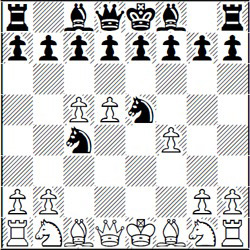
And Black loses a piece by force. After struggling for a few more moves, Black resigned.
This is the most remarkable tournament game – certainly the shortest – ever won by an amateur against a first-class master. The chances are slight indeed that such a feat could ever be equaled.
For a fitting conclusion to this chapter let’s look at the memorable win scored by an amateur against an outstanding modern master, O’Kelly de Galway. (Despite his exotic-sounding name, this noted player is a Belgian and not an Irishman. His remote ancestors came to Belgium from Ireland a long time ago.) (D)
Willaert – O’Kelly
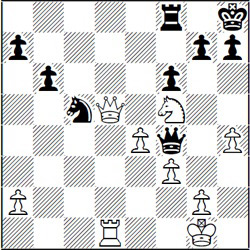
Black to move
In the position of the diagram material is equal, and in other respects there seems to be no outstandingly important characteristic.
As O’Kelly sees it, the most troublesome factor is the aggressive post of the white knight at f5. Actually this is only part of the story. And if Black had realized the real danger confronting him, he would have played 1...Qc7! To prevent White’s next move.
1...g6? (D)
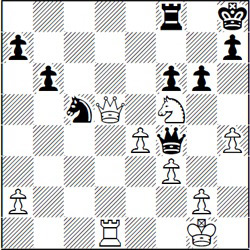
Plausible, altogether too plausible. Unfortunately for him, White has a murderous reply, instead of the anticipated move with the knight. With our legitimate respect for the master, we more or less take it for granted that he will seize on the most important problem in any given position. Yet in this particular case the master has missed the most pressing need of his position.
2.Qf7!! ... (D)
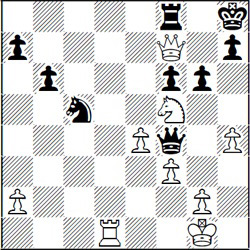
A brutal response with a brutal threat. Black cannot play 2...R×f7 as 3.Rd8+ forces mate next move. (White’s threat against the last rank reminds us of the forcing play in the Adams-Torre game, page 101).
O’Kelly manages to find what looks like the best defense, but it just isn’t good enough.
2...Ne6 (D)
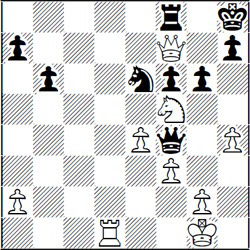
Black has defended himself against both threats, and in the event of 3.Q×e6 he can play 3...g×f5. But now White produces the most dazzling stroke of all:
3.Rd8!! ... (D)
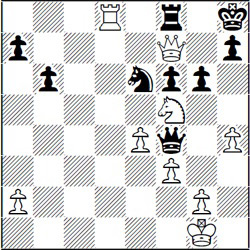
Beautiful play which squeezes the last ounce of advantage from his mating threats.
If now 3...N×d8 4.Q×f8 mate or 4.Qg7 mate. Or if 3...R×d8 4.Q×f6+ Kg8 5.Ne7 mate.
3...Qc1+
Black gives a spite check or two before resigning.
4.Kh2 Qf4+ 5.Kh3 Resigns (D)
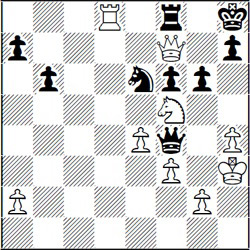
There is no defense to White’s threats.
So there you have it. Amateurs have beaten masters and will continue to do so until the end of time. But it isn’t easy and it doesn’t happen often. And yet such a victory is well worth aiming for – it is the thrill of a lifetime.