Copyright © 2006 by International Marine. Click here for terms of use.
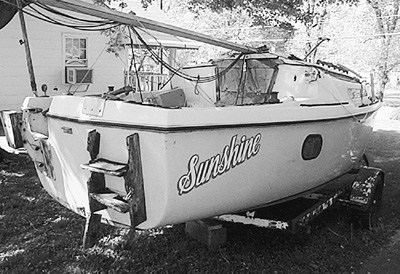
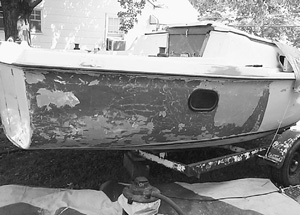
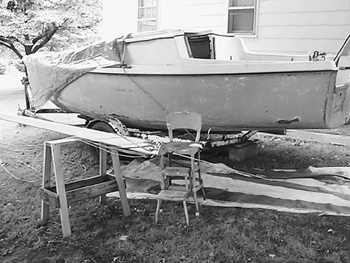
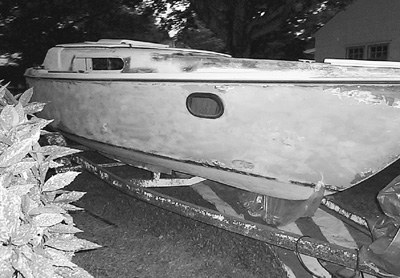
So back to my boat. Our side yard was now decorated with a 22-foot wreck on a trailer.
I needed a strategy for the most effective way to handle the thousand or so jobs that needed to be done. Don Casey addresses this subject in his book, This Old Boat, and for some of you, his method of organizing your restoration will be more useful. (He breaks projects down into structure, feature, and finish, and further divides those jobs into immediate, less urgent, and someday.) I organized my project somewhat differently, though, because I'm a very right-brained sort of person. I'm not very organized, and I'm sometimes unable to stay on a single project for a long period of time. Instead, I focus intently on a job for a while, but then I find myself involved in another, whether the first job is finished or not. Though this might not be the best way to do things, it's the way I am. So I needed a planning method that maximized flexibility.
At the heart of it all was a simple spiral-bound composition book. This became my restoration log. The first thing I did was to formulate a loose order of work to be done on the boat—in other words, what gets done in which order. Generally, I decided that it would be best to first paint the exterior during the
Our new yard decoration, the day after it arrived at our house.
summer, then do the interior over the winter months, and then re-rig and assemble in the spring and go sailing. (This was about how it happened, though I ended up taking much longer than I expected.) I recorded these thoughts at the beginning of my comp book and made lists of materials and equipment that I thought I would need. These lists were continually revised as I found I would need more of some things and could do without others.
One section of the book became my expense record, where I recorded exactly how much money I spent on the boat. Another section became my work record. I recorded just about every job that I did on the boat and how long it took, rounded to the nearest fifteen minutes. I discovered that even the simplest job could take much longer than I expected. As I completed jobs, I discovered other areas that needed attention, so my plan was continually under revision. The general plan (fix the boat as best you can, and then go sailing) never changed, but the fine points of my plan (the best time to do a certain job, the scope of the rebuild, the list of salvageable parts, and so on) did. My log became filled with side notes, like the location of original hardware and design ideas that might work.
I also took lots of pictures, both digital and film. I very rarely found myself saying, "Gee, I wish I'd shot fewer pictures." Usually the opposite was true. I especially wish I'd shot more of the boat as it was originally found.
The first thing that I did on my boat was strip it down to the bare hull. There was much on the boat that needed to be removed and discarded, especially all the custom exterior woodwork. Almost all of this was rotten to the point that it came off with a gentle tug. Since I wasn't planning on copying any of this for replacement, most of it went directly into the trash. But before it was tossed, each piece was examined for reusable hardware. Any hardware that was stainless or bronze—even small fender washers and screws—was removed and tossed into a box set aside for this purpose. Later, as I was assembling the boat, there were countless times when I needed just one small screw or washer. The "stainless hell box," as I like to call it, saved me several trips to the hardware store for one little screw or bolt. As it was, I'm sure I tossed out quite a bit of useful hardware that I wish I'd taken the time to save. Be anal and save those screws.
If there is even the slightest chance that you might recondition and reuse a part, a different strategy is required. The best method for keeping those bolts and screws where you need them is to remove the part, put the hardware back into the holes (on the part, not in the boat), and loosely spin on the nuts. This is less secure if you've removed a wood screw, but a piece of tape will keep the hardware in place.
Most boat restorers develop the habit of thinking out loud (otherwise known as talking to themselves). If you find yourself saying, "There's no way I'll be reusing this thing," and you're heading to the trash, stop for a moment. If the part's problems are cosmetic, don't throw the part away! Put it in a box, squirrel it away in the corner of the
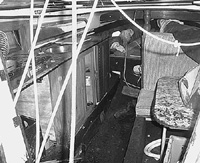
The interior as the boat was found—it's the picture of neglect. I wish that I'd taken more "before" shots, but I think I subconsciously wanted to deny that I'd actually paid money for this mess.
garage, or stick it under the bushes behind the house. It could come in handy later as a pattern, or you could use it as a hole-drilling template. You could very possibly run out of money and have to refinish the piece and replace it a few seasons down the road. The economics of small boat restoration demand that you restore and reuse anything that you can. A quick look through a boating catalog will show you that the cost of the parts can easily exceed the value of the boat, so, when you're talking to yourself, be sure to ask, "Do I have to buy a new one, or can I fix this?"
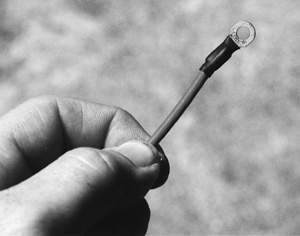
On my boat, there were many situations in which I obviously had no choice: many parts simply had to be either removed or replaced. All of the exterior woodwork was made of walnut, and it turned to compost in my hands. The boat had eyebrows—thin battens of wood screwed to the deckhouse just below its upper edge. (The deckhouse is the part of the boat that's above deck level, sometimes called the doghouse on old wooden boats, or just plain house.) Eyebrows are designed to visually lower the appearance of the topsides, and to channel drips of water away from the portholes. I removed these and tossed them (they're a bear to properly varnish). All of the sailing hardware was marked for location (PORT or STARBOARD, FWD, STERN, and so on) on the underside with a permanent marker and kept in a crate. I also did a detailed drawing of original hardware locations in my restoration log. Even so, I still ended up with a few pieces of mystery hardware. I had no idea where they went.
Although I knew that I was jumping ahead of myself, I started doing the same thing down below—dismantling, assessing, cataloging, and cleaning. (As I mentioned before, you'll have more success if you can stick to one or two specific projects; parts will have less time to get lost, and the way things come apart and go back together will be fresh in your mind. But I'm not like that, so I went for it.)
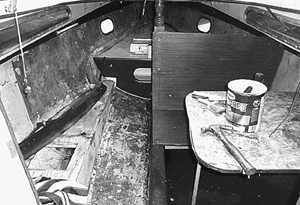
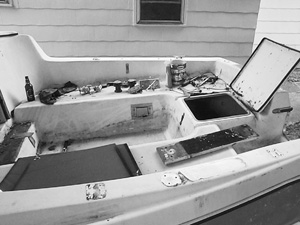
Stripping of the interior. Most of the water-soaked fabrics have been discarded, revealing a difficult surface beneath. It smells a little better, though.
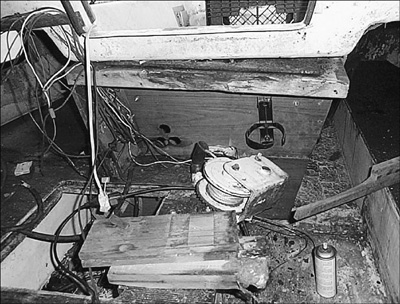
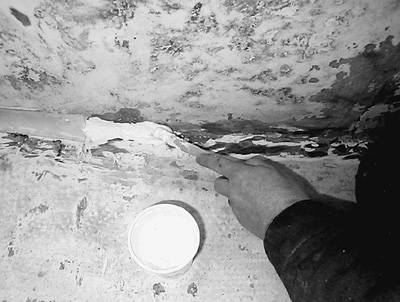
Removing a covering panel revealed this view of the keel winch. Here are a host of problems, including rot, faulty repairs to the winch support, and a concealed "electrical system" that was humorous at best, dangerous at worst. Note the location of the fire extinguisher bracket—totally inaccessible in an emergency.
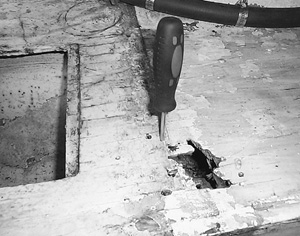
Rot in a plywood berth top. This was a result of a poorly located front-opening icebox. It also shows how an ice pick or small screwdriver can easily locate rotten sections.
As I removed interior parts, a bit less found its way into the trash can. The front-loading icebox went, as did the (hopelessly rusted, and subsequently dangerous) propane camping stove. Other parts, especially plywood panels, were saved for patterns.
One of the particularly disgusting aspects of my boat was the overuse of fabrics onboard. Practically everything was covered in some sort of fabric—indoor/outdoor carpeting on the cabin sole, some sort of canvas-like material glued to the ceiling (see Sailing Terms on page 9), and vinyl backed by foam rubber
|
ABOUT ICEBOXES |
|
Front-loading iceboxes are not a good idea. Cold air sinks, and every time the door opens, you lose precious cold air. Top loaders, though less convenient to organize, keep ice better. Insulation is paramount, and on stock boats, always inadequate. Four inches of space on all sides isn't too much. A conventional cooler can be modified by adding extra foam, but if it's not carefully sealed you'll grow a mildew farm. Dropping a soft cooler inside a larger rigid one might be a workable solution, if you can find a tightfitting pair. |
on the overhead. Once mildew grows on these surfaces—and they nearly always do on a boat—it is difficult, if not impossible, to eradicate. In my case, I had to contend with mildew and rot. I ripped out and threw away nearly all of this stuff, with no attempt to make patterns. I didn't want that much cloth on my boat anyway. The exceptions, of course, are the cabin cushion covers. They were the original cushions that were sold with the boat nearly 30 years ago. Considering their age, these weren't all that bad, and I placed them low on my priority list. I did eventually replace them all, though, since some were missing. This is a good job to tackle in the winter months, when it's freezing cold in the boat.
Hopefully, your boat won't have interior problems that are this extensive, especially if you can find a boat with an interior liner that's in fairly good shape. Being protected from the elements, the gelcoat on the liner is usually in much better condition than the exterior gel-coat and will respond very well to hard scrubbing and waxing. The drawback is that the liner can hide structural defects, and often sections must be cut away in order to make an effective repair.
Sometimes this situation can be used to your advantage. Depending on where you need to cut the liner, you might be able to conceal the hole with a nice teak covering board, hinged to provide access to stowage. Net or canvas bags can be used to restrain items in irregularly shaped areas. Move the bags out of the way, and you can inspect critical areas of your hull, gain access to wiring, and so on. It isn't always possible, but it isn't a bad idea. Of course, you can always use the commonly available plastic inspection port covers. Beckson Marine makes several different shapes and sizes.
The 1972 Venture didn't have a liner. Older boats such as mine had an interior that was pieced together from individual plywood panels and bonded to the hull. This method of construction can result in a stronger structure, but more plywood means more chances for rot. Fortunately, it appeared that MacGregor had used either some form of marine-grade plywood or at least a good grade of exterior plywood, since I found remarkably little rot in the basic structure of the boat. The front-loading icebox that the previous owner installed had leaked over the years, and the constant
More stripping of the exterior. Notice the mud line that formed when the cockpit was left full of rainwater. Note also the evidence of minor alcohol consumption, a necessary by-product of the work's magnitude.
cycle of dampness and drying (and dripping condensation) had rotted out the panel directly beneath it, with the worst areas near the bolt holes. (This area was repaired later by enlarging a locker lid; a discussion of this process is under Structural Woodworking in Chapter 5.)
The goal was to get the boat down to a nearly bare hull and deck. Since the boat obviously leaked badly, all the fittings needed to be rebedded. I planned to strip off all the old paint, apply new paint, and then reattach all the parts with new bedding compound. This always looks better than trying to paint around fittings and wooden parts, and most of the fittings needed reconditioning anyway.
Once everything was removed, what remained was still pretty ugly. The exterior had been repainted by an auto-body shop. The paint finish was good and hard in some places, but in others it was lifting up in large bubbles. Even though I didn't care for the color, I considered trying to patch the bad areas of the paint. Unfortunately, this option had little chance of success. The paint was some kind of three-part automotive paint that isn't available to consumers; plus, an exact color match would have been difficult. Finally, there was no guarantee that, once repaired, the paint wouldn't lift up in some other area, requiring the job to be done again.
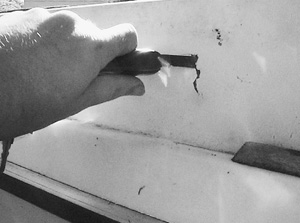
So I decided to strip everything down to bare fiberglass and repaint using a marine-grade polyurethane. Stripping it down took a long time. I tried chemical strippers but, while they did work, the results were lukewarm. I tried several different types of scrapers, but what finally worked best was a razor-type scraper with a replaceable blade. It's kind of like a little single-edged window scraper on steroids. Some of the hull scraped easily, but some of the paint was stuck tight. I
Starting to scrape the hull. The yellow automotive paint came up easily in some places, but stuck tight in others. The green layer was probably an earlier paint job, and the original factory gelcoat was probably a thin layer of light blue that was underneath the green.
discovered later that the easy places had a brown spray primer underneath. Places that weren't primed were still well-bonded to the hull and took a lot of work to remove. I'd even speculate that, had this brown stuff not been used, the hull would still be yellow today.
One of the concerns with scraping the hull was how to keep up with the paint chips. Since this was automotive paint, I was fairly sure that there was some amount of lead in it, and contaminating my yard wasn't something I wanted to do. The problem was compounded by the fact that I had to work over a dirt space instead of concrete, so I couldn't just vacuum up stray chips. I put an old canvas awning under the hull and taped sheets of plastic to the hull. One end was taped to the sheer, and the other end was taped to the waterline. The ends were left open, and I reached inside to scrape. I was able to catch the majority of the chips this way. Escapees that made it to the canvas were vacuumed up with a shop-vac.
There were still a few that got into the ground, but I used the shop-vac to get these, along with some dirt. In the end, the site stayed relatively clean. Cleanliness was the main reason that I didn't remove the old finish with a sander; the resulting dust is nearly impossible to control. I tried using the shop-vac connected to the sander, but it didn't work. After the scraping was complete, I finish-sanded the hull with a ¼-sheet pad sander. Scraping and sanding the entire exterior took about three months of part-time work.
Now that I had the paint off, I could better assess the repairs that were needed. In some places, auto-body filler

Collecting the chips. I reached into the folds of the plastic to scrape, and this kept the chips from flying into my face and hair. If I were working over a solid surface, I could have vacuumed them up later.
had been used to fill gouges and scrapes. After all these years, it was still relatively soft—you could dig it out easily with a pocketknife, and dent it with a fingernail. A wire brush mounted on an angle grinder removed this pretty easily while leaving the base fiberglass nicely roughened and prepared for a proper repair.
The scraped hull.
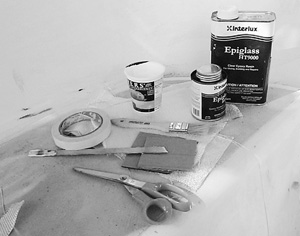
The only way to properly repair fiberglass laminate that's fully cured is to use epoxy. This stuff is nothing less than a modern chemical miracle, and it's saved countless old boats. Epoxy is somewhat more expensive than polyester, but its adhesive strength is far greater—so much so that repairs made with epoxy and fiberglass can be considered an integral part of the boat's structure. Epoxy's weakness is its sensitivity to heat. Some epoxies begin to lose their bonding strength at temperatures as low as 120 degrees F.
If you've never used epoxy before, you'll have to learn. Fortunately, it isn't very difficult to become quite skilled in epoxy and fiberglass, with a little practice. It's a good idea to do your first repairs in an area that isn't too conspicuous.
There are a number of good resources available from the epoxy manufacturers that you should read up on before you start mixing up these chemicals. Try the West System (Fiberglass Boat Repair and Maintenance, $3; West System User's Manual, free) or MAS (MAS Technical Manual, free). Interlux also has a line of epoxies available. All of these manufacturers produce a fine product, and it's best to pick one and stick with it. (Insert Popeye-the-Sailor laugh here. Arg, arg, arg. Boatwork somehow lends itself to bad puns.) I used epoxy from a small distributor in Florida called Raka, and they gave me a fine product, great service, and an excellent price. That's why I often recommend seeking out and supporting small businesses as you buy your supplies. Other good sources of epoxy and fiberglassing information are Ken Hankinson's Fiberglass Boatbuilding for Amateurs, and Allan Vaitses's The Fiberglass Boat Repair Manual. My favorite general work, though, is Upgrading and Repairing your Small Sailboat for Cruising, by Paul and Myra Butler. They use a lot of epoxy in their work.
It's important to be aware of the dangers associated with epoxy and polyester fumes. Some people have developed a sensitivity to epoxy by using it without
Some of the tools used to work with epoxy can be quite simple. I bought a quart to get myself started, then moved up to a full gallon kit once it ran out.
protection, and they report being unable to be anywhere near the stuff. Avoid contact with your skin, and be sure to wear a vapor mask when mixing epoxy in an enclosed space, like a sailboat hull. Epoxy vapors aren't nearly as strong as the styrene vapors given off polyester resins. These vapors can cause brain damage and, in high enough concentrations, can be lethal. The MEK catalyst can cause blindness—of course, any of these chemical in the eyes is very bad news. Wear safety glasses.
One of the properties of epoxy work that you'll read about is called "amine blush." As the epoxy cures, a by-product of the chemical reaction is an amine acid that forms on the cured surface of the epoxy. It needs to be wiped off with soap and water, because it will prevent other layers of epoxy from bonding to the first surface. Certain formulations are more prone to blushing than others, though, and I had very little blushing with the epoxy that I used—a low-blushing formula from Raka Epoxy.
When you buy epoxy, you'll save yourself hours of grief and frustration if you buy the pumps to go with it. Accurate mixing is essential with epoxy, and the pumps make it a snap. Epoxy doesn't work like polyester, and too much hardener will cause the batch to not harden at all. Pumps prevent this from happening, and they're quite inexpensive—I paid about $3 each. Besides, you'll kick yourself for days if you have to scrape off an uncured batch because you were too cheap to spring for pumps.
The thing to remember about epoxy (and polyester, too) is that it cures through an "exothermic" reaction. In other words, when resin and hardener combine, they give off heat as they cure. If you're working on a hot day, the ambient temperature can cause overheating problems or reduced "pot time." In other words, it hardens in the pot, before you get a chance to put the stuff where you want it. If the forecast is for temperatures in the nineties, then it might be best to do your epoxy work in the early morning or late afternoon.
The epoxy resin is only part of the story, though. It's much more useful and cost-effective when used with the proper materials and additives. These are most
|
EASY EPOXY? |
|
While I had no problems with my epoxy batches, this experience isn't universal. A friend of mine, Bill Van Allen, mixed up a batch of epoxy that overreacted—it actually began boiling and smoking in the mixing pot. |
|
Epoxy and polyester cure through an exothermic reaction. In other words, when resin and hardener combine, they give off heat as they cure. In fact, the reaction can even start fires, so be careful! Mix small batches whenever possible, and use the manufacturer's metered pumps to ensure proper resin-to-hardener ratios. If you must mix a larger batch, do it in a shallow pan: the larger surface area will minimize the heat buildup, compared to mixing in a deep can or cup. |
|
FIBERGLASS CLOTH |
|
A wide variety of fiberglass cloth is available, but for the work we're talking about, you don't need anything fancy. Regular E-glass from a resin supplier will work best. Three to five yards of anything from 6- to 10-ounce cloth should do it. Be sure to shop around—fiberglass cloth from marine stores tends to be overpriced. Buy it off the roll and you'll save a ton. It can be cut with scissors into strips, or you can get fiberglass tape, available in 4- to 6-inch widths. It's very handy, but a little more expensive. And remember that fiberglass cloth and roving are measured by weight per square yard, while fiberglass mat is measured by weight per square foot. So 1½-ounce mat will weigh the same as 13½- ounce cloth. |
commonly fiberglass cloth, roving, mat, and filler powders.
Fiberglass cloth is most often used for repair jobs; 7- to 10-ounce cloth is most common (it's sized by weight per square yard). Lots of different types of weaves are available—such as high-strength, bi-axial, or tri-axial weaves—but these aren't as useful as plain old E-glass. (The E stands for "electrical.") I got a good deal on some high-strength 6-ounce glass cloth through eBay, but while it was a high-quality product, it was very tightly woven, difficult to properly saturate, and stiff—it didn't want to lay into curves. It worked, but not nearly as well as standard cloth would have.
Woven roving, weighing 14 to 36 ounces per yard, is most commonly used to lay up hulls. You won't have much need for roving, unless you're trying to repair a big hole in the hull and need a thick laminate. It leaves a fairly coarse and unfinished-looking surface, and it's commonly alternated with fiberglass mat.
Fiberglass mat is made of lengths of chopped glass fibers going in random directions and held in place by a binder. It's sized by weight per square foot rather than weight per square yard; weights commonly range from ¾ ounce to 3 ounces. It's a little more useful than roving for adding bulk to repairs, but I never needed to use it to do my repairs. (Once I decide to fill in the ports in the hull, though, I'll use mat and cloth.) It's important to remember that if you do use mat, you should alternate the layers of mat with layers of cloth. If two layers of mat are laminated together, they tend to separate, especially when used with polyester.
Epoxy's inherent strength gives it another advantage. Fillers or, more appropriately, additives can be used to make it more effective in certain applications. These usually are various powders that serve to make the epoxy thicker—more like a paste, glue, or foam. There are lots of different powders that you can use. They're readily available from epoxy suppliers. I ended up using two different types of additives: fumed silica, and white-glass microballoons. Fumed silica, when mixed with epoxy, makes a strong, sticky, glue-like compound that cures very hard. Microballoons make a light, almost foamlike compound that is easy to sand, but not very strong. I'll talk more about using each later in this chapter.
My boat's previous owner wasn't aware of the benefits of epoxy. Several repairs and modifications were done with polyester resin and fiberglass over a plywood core. In almost all cases, these repairs were failing and had to either be replaced completely, or patched. The biggest example was the boat's fore-deck. On the original 72 Venture, the foredeck had a ridge around the edge that followed the sheerline of the boat. (The "sheer" is the very highest edge of the hull.) The deck was lower than the sheer by a few inches, giving it an integral toe rail that might keep you from sliding off the deck. These boats had a reputation for decks that flexed as well. Someone thought that the forepeak would be better with a few inches of headroom and cut the entire thing up with a circular saw. A network of wooden stringers was laid into place, a plywood subfloor was laid down, and the deck was laid on top of that. Everything was wrapped in polyester and glass, sanded fair, and painted.
A bad repair. Gently probing a bubble with a pocketknife, it sank all the way to the hilt. This was an area that was repaired with polyester and painted over. The paint held up, but the repair didn't.
This "improvement" probably worked well for a few years, but after some time and neglect, the polyester lost its bond to the wood. Moisture worked in through the tiniest void or crack, followed by more expansion and contraction of the wood, which led to larger cracks. Rot followed. And then along came a sucker with $500.
To rip the whole thing out and start over was obviously more work than the boat was worth. If it was a Flicka or a Bristol Channel Cutter, maybe, but not a
|
EPOXY VS. POLYESTER |
|
Working with epoxy is similar to working with polyester, but there are significant differences. With polyester, you add drops of MEK (methyl-ethyl ketone) peroxide hardener to a batch of resin. More hardener makes a faster-curing, brittle batch of resin. Epoxy doesn't work this way, and the mixing ratios are much more critical for proper curing. It's often mixed 1:1 or 2:1. If you add too much hardener, the batch might not cure at all. You can thin epoxy with acetone, toluene, or MEK, but this can screw up the hardener ratios. See the West System User Manual and Product Guide for more-specific information. (The only time I had a batch go bad is when I tried to thin it with acetone.) |
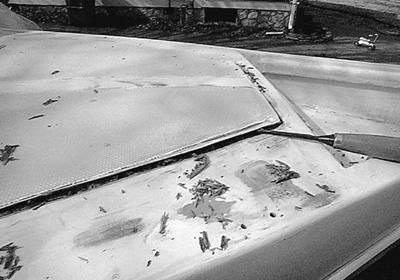
Picking out a rotten core. The area wasn't completely rotted, but the seams where the deck was raised were cracked. This left a band of rot that went nearly around the entire foredeck.
Mac. I decided to effect a repair rather than replace the deck.
The first thing I did was identify the weakest areas. This was done by removing the interior covering panel. This was a sheet of plywood, covered with (mildewed) fabric, which was screwed to the underside of the deck. This panel helped to pretty up the boat, and probably added some insulation and prevented condensation on the overhead—but it also hid the damage as it progressed. I probed the entire area with a pocketknife, both inside and outside. Damage on the exterior was obvious in the form of a network of gaps and cracks where the old deck was raised and filled in. These areas were marked with chalk, to be dug out later. I found two places on the sheer that looked a little odd, and with a few cursory pokes managed to sink my knife in to the hilt. I marked these spots, too. On the inside, some of the fiberglass sheathing was peeling away from the framework as well.
I attacked the damaged areas with a "boat eater" (4½-inch angle grinder) and ground a deep groove where the cracks were. Underneath I found rotten plywood, which was dug out as much as possible. In some areas, it extended under the old deck, and I couldn't get it all. I saturated the whole area with acetone.
Acetone is a solvent that is stronger than paint thinner, evaporates very quickly (and as such, has very strong vapors), and mixes easily with water. It accelerates the evaporation of water on damp surfaces and provides a better bonding surface for epoxy. But it's dangerous stuff to use on a boat's interior, where the ventilation is poor. The vapors can cause dizziness, nausea, vomiting, narcosis, and unconsciousness, and it's highly flammable. Before you fool around with this stuff (or any solvent or compound that you're not familiar with), do yourself a favor, and read the back of the can. Or even better, read the MSDS (Materials Safety Data Sheet). You can get the MSDS from your supplier, or type "Acetone MSDS" into a Web search engine to get this information. Please be careful!
Inside, I ground away all the flaking fiberglass that I could.
After the area had a week or so to dry, I stuffed the groove topsides with fiberglass, trying to make sure the glass went well under the old deck. Then I mixed some epoxy and poured it into the groove. It wicked into the plywood, which was what I wanted. I weighted down the deck with concrete blocks, pressing the old deck into the new epoxy and glass. After three applications, the groove was filled. I sanded this flush and
(from top) After I dug out as much rotten wood as possible, I flooded the gap with acetone and then stuffed the gap with narrow strips of fiberglass. Several batches of epoxy were poured into the groove, and then the old foredeck skin was pressed into the epoxy with concrete blocks for weight.
primed the whole area with a sandable undercoater that was compatible with the polyurethane paint that I would be using to paint the deck. There is a commercial product called Git-Rot that is basically a thinned epoxy resin; it would have worked well here, but since I didn't have any and it was about 75 miles to the nearest chandlery, I went with what I had.
Three years later, the repairs I made worked fine, but a whole new series of cracks appeared nearby. All I could do was repair the new cracks, just as I did the old ones. Eventually, all of the polyester that the previous owner used will be ground away and the repairs will be solid epoxy, but it will probably require several years and repair sessions to get to this point. It's an irritation that illustrates the importance of starting with a good, unmodified boat.
Another common exterior repair that I made was filling old holes left by hardware. Lots of these were plugged with silicone caulk or God-knows-what-else, and if they weren't leaking then, they would have been shortly. I assumed that every hole drilled through the boat was a leak, and decided to fill them all and re-drill as necessary. This was easily done by taping the underside with masking tape and pouring epoxy into the little well. A two-part hardware-store variety works well for this application; it cures quickly, and it's a little thicker, too.
When the holes were horizontal, a different strategy was required. A thicker-than-normal epoxy is essential, so I would either use a filled epoxy product that is already thick (JB Weld is a good example), or I would mix each batch with a little silica powder until it was thick enough.
When applied to a hole on a vertical surface—an unwanted hole through an interior bulkhead, for example—the epoxy would creep out of the hole before it was cured. To hold it in place, I taped one side, troweled in the epoxy with a putty knife, and covered the other side with another piece of masking tape.
I used a variation to fill holes in my mast, which in places was peppered with old hardware holes. Since I couldn't reach very far into the mast, many of
(top) Holes in the mast left by old hardware. Not exactly pretty, and a potential weak spot, but replacing the entire spar is an expensive proposition. (middle) Using masking tape to bridge a large hole. The masking tape will keep the epoxy from running out of the hole until it cures. (bottom) The repaired holes. Still looks pretty ugly, though maybe not quite as bad. The epoxy probably doesn't make any difference in strength, but you never know.
these holes weren't backed by masking tape. Some holes were quite large—about the size of a quarter. And to further complicate things, I wanted to avoid sanding the mast to prevent removing the layer of anodizing. The technique I developed that worked fairly well was to mix up a batch of JB Weld (which was a close, but not perfect, color match) and using a popsicle stick, form a small "button" of epoxy on the sticky side of a piece of masking tape. Then I carefully placed the epoxy over the center of the hole, making sure that the epoxy button touched the edges of the hole. Then I smoothed the surface of the masking tape and let the epoxy cure. The result looks pretty good—about the best that can be expected with this type of repair.
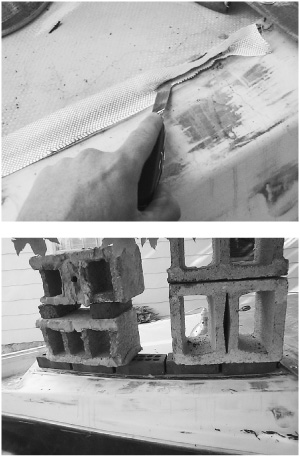
Without a doubt, the most difficult and stressful part of the entire restoration (apart from paying for it) was restoring the keel. Early Ventures had a keel that was made from three layers of ½-inch steel, set into a female mold that was poured full of resin. Only a little fiberglass was used. Over time, water found its way into my keel's core, and it started to rust. Rust expands. A lot. It expanded enough to push the keel tight against the keel trunk, wedging it into place. Since repairing it properly takes a lot of work, some misguided boat owner had the idea that the fiberglass was the culprit, and he sawed it away with a circular saw. The keel had to be repaired properly, and in order to do that, it had to come out.
The keel was resting on the trailer's crossbar, so there was no way to get it out without lifting the boat. On a completely flat, concrete driveway, this
|
WHY CAN'T I SAND MY MAST? |
|
Aluminum is a very useful metal aboard boats, especially in marine-grade, high-strength alloys. Aluminum can corrode, though; a layer of white powder forms on the surface (aluminum oxide). It protects the base metal from further corrosion, but it looks pretty awful. To prevent this from happening, masts are anodized by passing a current through the mast in a chemical solution, leaving a harder, more corrosion-resistant surface. But the surface is thin, and the anodizing is easily removed by sanding. If you sand it, more corrosion will shortly follow. |
|
If you want to paint your mast, it can be done. Remove all fittings and sand with a medium emery cloth. Wipe the spar with a special wash. Interlux makes a two-part primewash for aluminum (#353 zinc chromate, vinyl butyral self-etching primer) for painting aluminum. Follow up with two coats of two-part polyurethane. |
|
Stainless steel fastenings aren't completely compatible with aluminum, and will corrode over time. Using LocTite on the threads of self-tapping screws will help minimize corrosion, as well as keep them from vibrating loose. You can find more about this is in the Marine Metalwork chapter, starting on page 96. |
wouldn't be so bad, but my boat was on dirt with a gentle slope. I used a half-sheet of ¾-inch plywood under the blocks so that they wouldn't sink unevenly into the soft soil. I lifted the boat a little at a time, using a scissors jack, supporting it with concrete blocks and timbers. It worked. I eventually got the boat high enough to clear the width of the keel, but it was very unstable and wobbly. I clamped legs to the side to support it, put up extra jackstands, but it still was precarious. (In fact, when I was lowering it back down, it started to fall sideways, and I saved it by bracing it with two-by-fours. Generally, going up was more straightforward, but each time I lowered it, the boat started to
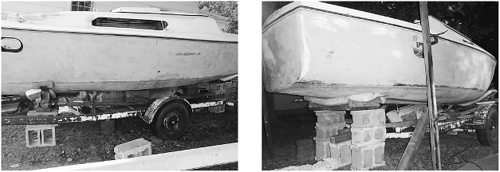
(left) The boat going up. You can just start to see the keel underneath. (right) This is as high as I had to lift the boat to remove the swing keel.
drift to the side. The whole process took years off my life.)
The keel was lowered with the boat's keel winch until the bottom edge was resting on the trailer and secured there. Whatever you do, don't disconnect the keel winch cable until the end. (You'll need a properly functioning keel winch to lower your keel. If yours needs work, fix it before you attempt to lower the keel out of the boat.) I lifted the forward end of the keel with a jack—just enough to take the pressure off the keel pivot bolt—and removed the keel bolt, which I discovered was bent nearly 45 degrees. I had to drive it out with a hammer. Once it was removed, I lowered the jack, but nothing happened. The keel was wedged tightly into the trunk. I went inside the boat, drilled a hole in the top of the trunk (actually I enlarged an existing hole), and started to drive the forward end of the keel out by hammering on a steel rod that passed through the hole. I lowered the jack by about ½ inch, went inside and hammered for a while, and then came out and checked the jack. After a few trips back and forth, the keel was touching the jack, so I lowered it another ½ inch. This time, the keel went down a little easier. After lowering the jack a third time, the keel slid free of the trunk
|
HOSE BARBS FOR DRAINAGE PROBLEMS |
|
Most sailboats are designed so that they will drain well. Puddles that don't drain overboard on the boat will lead to stains, poor footing, and wet sneakers. On wooden boats, they cause rot, so designers and builders of wooden boats take great pains to avoid them. Some fiberglass designs are less carefully executed, and puddles will need to be dealt with. |
|
Fortunately, a solution is as close as your hardware store. It's called a "hose barb," and it's a small piece of brass with threads on one end and a fluted nipple on the other for attaching a piece of hose. You want large hose barbs, with an inside diameter of 3/8" or bigger. Smaller ones will easily clog with dirt. Mark the spot where the puddle is deepest, and drill a hole, slightly smaller than the threaded end of the hose barb. Coat the threads well with thickened epoxy, and screw the hose barb into place from the inside, until its surface is just flush with the deck or cockpit sole (or whatever surface needs drainage). If you drilled the right size hole, the threads should grip the fiberglass well. Build up the area around the hose barb with thickened epoxy and glass to give it plenty of support. Using the same procedures, install another hose barb on the boat's "topsides" (the sides of the hull above the waterline). It should be fairly high above the waterline but lower than the first one, and the two should be lined up so that a clean run of hose will connect them. Press on the hose, and use two hose clamps on each end to make sure the hose stays put. Note that since hose barbs are commonly brass, they should never be used near or below the waterline. The zinc in the brass will rapidly corrode, causing the fitting to fail and quite possibly sink your boat. |
|
IMPORTANT SAFETY NOTE |
|
While I lifted my boat off of the trailer myself, I don't recommend that you do this with your boat. I got away with it, but despite taking what I thought was every precaution, I took a significant risk, and the boat nearly fell. I'll never do it again. The slightest mistake or miscalculation could easily kill you if you happen to be between the boat and the ground. If you're lucky, a mistake will only cause massive amounts of damage. If you need to do keel work, please, spend the extra money and get a professional to help you. Haul the boat to a yard and ask them to quote a price for removing and replacing the keel. Do this early in your restoration, while the boat looks cruddy, and the yard manager might feel sorry enough for you to discount the price. |
and could be lowered by its own weight. Once clear of the hull, the keel cable held the keel upright and prevented it from falling over. Since the keel weight is about 400 pounds, this wouldn't be an insignificant event. I went back into the boat and gently lowered the winch cable, and the keel slowly laid over.
Some of the old Ventures reportedly had solid cast iron keels, and I wish I had been able to find one. Repairing a cast iron keel involves sandblasting and painting, while composite keels, like mine, must be re-laminated with fiberglass.
Maneuvering the keel to work on it was extremely difficult, but I was able to do it with a "keel fork" that I welded together out of scrap rebar (concrete reinforcing steel). I kept the keel on a wooden loading pallet so that I could get the fork under it to turn it or work on its edge. I had endless visions of this thing falling on my leg and breaking it, since it was about this time that I fell getting into the boat and broke my wrist. It wasn't fun. If you need to do this with your boat, I suggest you seek professional help if at all possible. When you get back from the psychiatrist, maybe you can find someone with an engine hoist to help you move this thing around while you work on it.
The first thing I did was to strip off the old fiberglass. Since much of it was already cut away, this was easy. I did save the leading and trailing edge pieces for a while—just long enough to make sure I had the correct profile for the part of the keel that extended beyond the core.
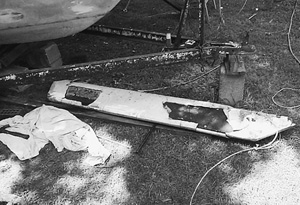
The keel after it was removed from the boat. Large sections of fiberglass had been cut away, exposing the core.
|
LIFTING OPTIONS |
|
You will likely need to get the boat off the trailer at some point for keel work or painting the hull. If not done carefully, this can be disastrous, resulting in a wrecked boat and/or serious injury. One option is to pony up the bucks and take the boat to a boatyard with a Travelift. They'll raise and block the boat and return it to the trailer when the work is done. Expect to pay about $200 plus a daily yard fee. |
|
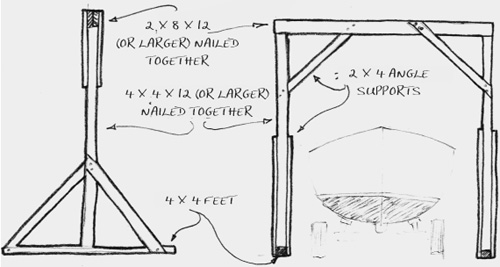
Another option is lifting from above. An example of this can be seen at http://jeffrey.denard.staff.noctrl.edu/boatpage/. To build his lifting gallows, Jeff used a pair of two-by-fours nailed together for the uprights, and a pair of 12-foot 2x8 boards for the horizontal piece that connects the two uprights. If the uprights are well-braced and strong, this would be an easier and safer way to lift the boat—it's a method I'll employ next time. Assembled with bolts, a gallows can be disassembled and stored for later use. Whatever you do, make sure everything is doubly strong and well-braced. Make sure you completely support the boat from below before you work under it. To say this can be dangerous is an understatement—sloppy work here can be fatal. If you have any reservations about removing your keel, hire a professional. |
|
|
|
A second alternative is lifting from below, as I did. It requires a less elaborate setup, but it's much less stable and requires you to be too close to the underside of the boat as it is raised. (There is another description of this process at http://home.usaa.net/~spiritof sailing. Click the link for "Restoration Project.") |
|
Lifting from below is complicated by the fact that the Mac sits low on the trailer, and once you get the boat up, you can't remove the trailer. |
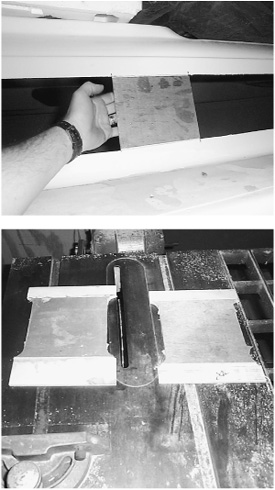
Since the center keel core plate was 1 inch thick, I welded on a 1½-by-¼-inch strip along the trailing edge to support the filler that I'd be adding. Here's where the chunk of keel skin that I'd saved came in handy, since I could check the keel for the correct profile.
If you aren't fortunate enough to have access to a welder, or you lack the ability, you could have the job welded for you by a shop. Getting the strip welded on would be simple, but transporting it to and from the shop would not be so easy. Alternatively, you could try to epoxy a thin wedge of shaped foam to the back edge of the keel, but you'd need to support it with many layers of fiberglass cloth for strength. If you can swing it, welding is the better choice.
Next, the keel was sandblasted and primed. I used a high-zinc spray primer and hoped it wouldn't react with the resin I was about to put on.
Here's where I made a big mistake: I filled one side of the keel using polyester resin, thinking that since this was basically a new construction, I wouldn't need to use the expensive epoxy. I mixed up some filler, troweled it and sanded it to shape, and laminated with three layers of glass. That's when I noticed the tiniest gaps near the core and filler, where the polyester must have slightly shrunk. I had already used up a good amount of my materials that I'd bought for the keel, and I was essentially committed, so I gave the cracks a coat of epoxy, and then laminated another layer of glass with epoxy and turned it over. The other side was done in all epoxy. So far, it appears that the epoxy has sealed it up, but I wish I hadn't used any polyester at all. I ended up throwing away half a gallon.
While I was working on the keel, I started some of the work inside. I had a fairly empty, but still gross-looking shell. All the rotten fabric had been torn out, and it left a horrible surface—a mix of peeling paint and some sort of adhesive. Worse, in some areas, the paint was holding solid; in others it was peeling. In some places, the adhesive was thick and sticky; in others, dried and flaking. The surface would need lots of preparation if the paint had a prayer of holding up.
After experiments with various chemical removers were unsuccessful, I had to resort to mechanical methods. The 4½-inch
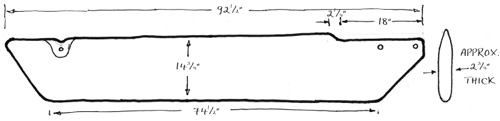
Dimensions for a 1972 Venture keel.
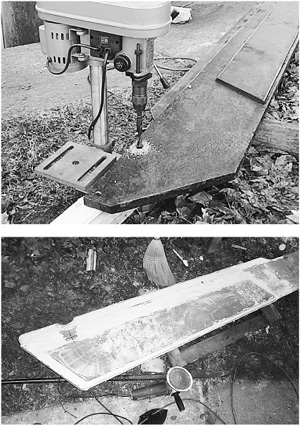
(top) Drilling out the pivot hole for a larger-size bolt. (bottom) Here I've applied filler (resin and microballoons); sanding is next.
angle grinder with a very coarse sanding disc worked about as well as anything, so I sanded everything I could get to. It was tedious, dirty work. Ear, eye, and lung protection was absolutely essential, and I set up a box fan over one of the hatches to pull as much fresh air into the cabin as possible.
But after more hours at this than I care to recall, the job still wasn't done. While the angle grinder worked great on broad, flat surfaces, it was too big and bulky to get into some places—namely, the overhead, the areas around the companionway opening, and the quarter berths. After a good deal of thinking about the problem, I decided that this job required a heavy industrial-strength tool—like a sandblaster.
I had used a sandblaster while I was working during college, and I was familiar with what they can do. They'll clean the most complex surface and leave a nicely roughened surface for painting. The big sandblaster that I used, though, required a huge tow-behind diesel compressor and could easily blow a hole through a wooden surface if not kept moving. Smaller pressurized sandblasters are available from companies like Harbor Freight, and I went ahead and bought one. It cost around $110. Still smaller suction-type sandblasters are much cheaper, but in general they don't have nearly enough power to do the job that I needed.
After I learned that my sandblaster would clog on anything other than fine, screened sandblasting sand, I hit the hull. The sandblasting took about two days, though it would have gone much faster and worked better with a larger compressor. I had a small one, which I hooked together with a larger borrowed compressor. Even together, these couldn't keep up with the demand of the sand-blaster, and I was constantly waiting around while the compressors built up enough pressure. Renting a big unit would have been more expensive, but it also would have been better in terms of performance. In the end, I had made a huge mess, but the interior was finally clear of most of the loose flakes and ready for a coat of paint.
(top) Hard to believe, but to get to this point took quite a bit of work. Simply painting this surface wouldn't work. Sanding with an angle grinder helped a great deal, but a sandblaster was needed for the corners and overhead. (bottom) Sandblasting the interior. The pop-top was removed, which made access a good bit easier. A waterblaster, which mixes sand with water and works like a pressure washer, might be another alternative. I tried a plain pressure washer, which did remove some of the loose flakes but didn't go far enough.
Once it was clean, I could do some more work on the interior with the epoxy. I mentioned the elevated foredeck earlier, and this area needed some attention from the underside as well. The previous owner had built a web of stringers to strengthen the deck, since Ventures are known to flex a bit as you walk on them. These stringers were made from wood that was sheathed in fiberglass cloth, but as usual, the polyester couldn't stick to the expanding and contracting wood. It did do a nice job of holding the dampness next to the wood so it could rot.
I probed the stringers with a pocketknife to find areas that had the worst rot. These were heavily sanded with an angle grinder, which was, as usual, a difficult chore. Complex curves and tight spaces combined with itchy fiberglass dust sprinkling all over me left an impression of a job that I don't want to repeat anytime soon. And that was just the beginning. Trying to epoxy upside-down was lots of fun—manipulating strips of sticky glass cloth that didn't want to stay up, thanks to gravity. In the end, I gave some of the stringers new glass, but some just received a coat or two of epoxy resin.
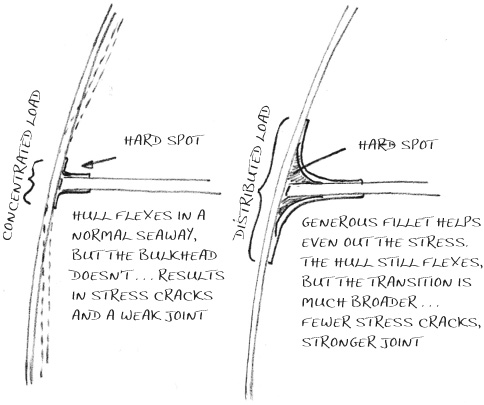
This was when I started experimenting with one of epoxy's niftiest tricks: fillets. One of the basic tenets of building with fiberglass-reinforced plastics is that the gentler the curves, the stronger the laminate. Fiberglass doesn't like to be forced around sharp corners. Sharp corners concentrate stresses, and these areas are much more likely to fracture. If an inside corner (for example, where a bulkhead joins a hull) is radiused rather than simply butted to the hull, then the resulting joint is much stronger. Stresses from the hull are more broadly distributed, and the bulkhead is less likely to form hard spots on the exterior of the hull.
This little detail is time-consuming, and it's often neglected in cheaper yachts. It was certainly the case in mine, where the solution to most problems seemed to be to "slap an extra layer of glass on it and get it out of here." I think the basic laminate is strong enough on my boat, but it could have been better.
That's where the epoxy fillet comes in. You can apply fillets anywhere on the boat where two surfaces come together. The epoxy's adhesive strength is so great that the fillet becomes a permanent part of the boat's structure. I put fillets in the joints of the stringers above the V-berth, where it strengthened and supported the stringers, as well as helped the job look a little more professional.
Making a fillet.
To make a fillet, you need some epoxy and some fillers. Fumed silica, sometimes known by the trade name Cab-O-Sil, is an epoxy additive that makes epoxy thick and very sticky. It's sold by Interlux as an "epoxy glue powder." When you mix epoxy with silica, you get a compound that looks and handles very much like Vaseline. It cures rock-hard, and it's almost impossible to sand.
Glass microballoons are the other epoxy additive that you need to know about. It's a very fine white or red powder that, when mixed with epoxy, gives an almost foam-like compound. There is a slightly coarser grade available that's red, and it cures to a burgundy color. It's easy to sand when cured, but it will run off of vertical surfaces when wet.
I used these two additives for my entire boat. What works best is a blend—microballoons for lightness and ease of sanding, and silica for strength. It also makes your epoxy compound sticky, and it will cling to vertical and overhead surfaces.
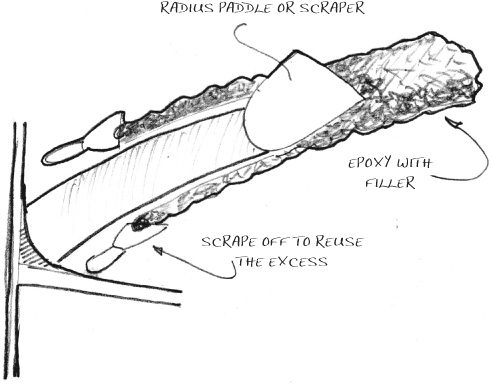
So how do you make a fillet? First, grind the joint back to clean, sound fiberglass (or plywood—whatever you're joining). Hand-sanding probably won't be enough unless your boat is very clean and sound to start with. Neglect this step and you might as well be using polyester, because you'll be doing it over later. Next, get your tools ready. You'll need a radius paddle that's shaped to the desired curve. Flexible plastic is best and can be reused, but cardboard will do if you don't mind making new ones each time. It needs to be able to bend a little, so don't use corrugated. Also popular are tongue depressors or light bulbs, but my very favorite radius paddles are credit cards. Most Americans have a pile of them in their wallets. While they may seem useful for buying boat supplies, they'll only get you in trouble in the long run, so use them for epoxy work. OK, I'm only kidding here—you should carefully guard your credit cards and their numbers. But I do use all those little sample cards that say "Your Name Here" that I keep getting in the mail. Fill out one application, and you'll soon receive enough solicitations to do a dozen boats.
You'll also need putty knives—a narrow one to spread the thickened epoxy into the joint, and a wider one to scrape up the excess left by the radius paddle. Get an empty yogurt cup and some mixing sticks. Wear surgical gloves, a respirator, and eye protection (especially if you're working overhead—this stuff will bond to your sclera as well as the bulkhead).
Mix up a batch of 50-50 silica and microballoons and set aside. Then catalyze the epoxy, mixing well. Then add a spoonful of filler until the consistency seems right. You'll know when you've added enough silica if the mix whips into stiff peaks, like a good lemon meringue pie.
Apply epoxy compound with a stirring stick after sanding away the loose paint and crud from the corner.
Trowel the concoction into the joint you want to fillet with a narrow putty knife. Make sure there is plenty of compound in your joint, and don't worry about using too much; you'll scrape off the excess and use it further on down the joint. Then follow up by dragging the
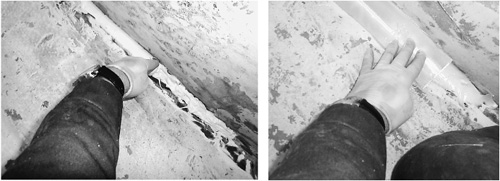
(left) Smooth the area with a radius paddle. You can't see it well, but I'm using a piece of cardboard. (right) Before the compound cures, gently place a strip of fiberglass over the joint.
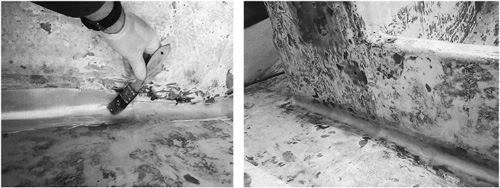
(left) After the compound cures, brush on a coat of epoxy to saturate the fiberglass. (right) The finished fillet before painting. The joint is much stronger and easier to clean.
radius paddle, holding it at an angle to both press the compound into the joint and scrape the surface of the joint. Don't worry—you'll quickly develop a feel for it. Scrape off the excess compound that squeezes past the radius paddle onto the hull, then leave it alone! Extra passes with the paddle will almost always make it worse.
When I put fillets in my hull, I added one extra step. I gently pressed strips of fiberglass into the sticky surface of the fillet. You have to use the lightest of touches, and fingers (protected by surgical gloves) are the best tools for this. When the epoxy in the fillet "kicked" (in other words, when it reacted and began to harden), part of the fiberglass was nicely saturated, and part was not. I brushed on a topcoat of epoxy to bond the fiberglass to the boat and to fill the weave of the glass. The finished result is super-strong, looks good, and was easy to achieve. Using fiberglass strips has the added benefit of holding the compound in place in case you didn't get enough silica into your mix.
I used fillets all over the boat—around the transom, around the motor well, around both sides of the keel trunk, and along the lower edges of the seat/hull joints. I was hesitant to use them too much up high in the cabin, but down low the weight wouldn't be a problem. And the smooth curves would make the surfaces much easier to keep clean, too.
The other main application for the epoxy in my boat was repairing the keel lockdown hole, which had somehow been transformed from a hole to an arc-shaped slot. I've theorized that someone routed the keel lockdown bolt hole into an arc—but why someone would do this is a mystery. Maybe it occurred during a very hard grounding, but the edges of the slot were cut clean. The slot was filled with epoxy compound, several layers of fiberglass were laminated over, and a new hole was drilled in the approximate location of the old hole. Several layers were added to the keel pivot bolt area for good measure.
The original ports for the boat were pretty badly crazed and brittle, and they needed replacing. I decided to make a small change for vanity's sake, and divide the long portlight opening into two smaller ones. If this had been done at the factory, it would have made the cabin stronger, but since this was an after-the-fact modification, it probably isn't a great improvement in anything other than looks. The ports were pieces of Plexiglas offcuts from a plastics supplier. They were surface mounted, bedded in silicone, and through-bolted. Lexan is a much stronger alternative, though it's more expensive and not readily available in tints. When mounting ports this way, it's important to remember to drill the holes through the Plexiglas oversize. The Plexiglas and cabin side will expand and contract at different rates in the heat of the summer. If the holes are too closely matched, each will develop a small crack in a short period of time.
In order to divide the single long opening into two smaller ones, I needed to install a filler piece. The very best way to do this would be to use a solid fiberglass laminate, well-bonded and feathered into the original cabin side. I did it the second-best way: I found a few small pieces of very-high-quality thin plywood in the trash pile of a furniture store. It was part of some kind of crate. I'm embarrassed to admit this, but I regularly prowl these places looking for crates, because they're sometimes made from furniture scraps. I've found several small pieces of ash and walnut this way. Anyway, I grabbed this piece of plywood thinking it would be good for something. It was a touch less than ¼ inch, 100 percent clear on both sides, and had no voids in the edges. Still, I wasn't sure it was waterproof, so I subjected a small sample to the same testing that marine plywood undergoes: I boiled it in water for an hour or so. When the sample showed no delaminating whatsoever, I concluded that it was good enough to use on my boat.
The plywood was shaped into what resembled a short, thick, capital I. It was just a bit thicker than the cabin sides, so
(top) The plywood filler piece. It's been routed to lay flush with the outside surface. (bottom) Next, I shaped the sides of the fillers, so that the inside edge of the ports would be rounded.
the top and bottom were dadoed off with the table saw until the piece laid perfectly flush with the outside of the cabin. The rest of the edges were shaved off with a jointer so that the fiberglass cloth could lay against it smoothly. Then it was sanded and the whole thing was coated with two coats of epoxy. This would become the core of the modification.
Next, I ground into the fiberglass of cabin sides, both inside and outside, for several inches beyond the filler piece. This was to give the surface a good, rough base for the epoxy to adhere to. The filler piece was glued in place with thickened epoxy, and once it cured, the clamps were removed and the cracks and joints were given a generous application of epoxy fairing compound. I then gave the whole thing a day to cure.
Next, I sanded and smoothed everything in. Just to be safe, another coat of epoxy was brushed onto the wood and allowed to cure, and then I began to laminate with fiberglass. I built up four layers on the inside of the hull, and three layers on the outside of 6.5-ounce high-strength glass cloth (an eBay special that was a good buy, but hard to wet out—it didn't want to conform to curves, either; regular E-glass would have worked better). This was sanded, filled, and sanded again, until it was perfectly smooth on the exterior and the interior was blended in well. All the edges were well-sealed. When it was painted, it looked as if it had always been that way. I was pleased. The whole job took maybe four days to do, working about three to four hours each day, so it wasn't as time-consuming as it sounds.
Once I had made all the structural modifications, reinforcements, and repairs with the epoxy, I was ready to paint. The interior of a boat is a much less severe environment than the exterior. As long as standing water is kept out, you can use regular hardware store variety paint instead of marine paint. It's a good bit cheaper—and remember that saving money is an important goal in a small sailboat.
We can't use just anything, though. I found a gloss polyurethane for $8 a
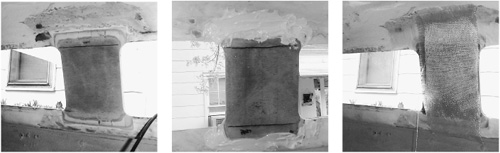
(from left) The filler piece bonded in place with epoxy. Note that the plywood edges are well feathered. The edges of the filler piece will be compounded with epoxy. After the compound was sanded fair, it got three laminations of fiberglass that extended well onto the hull. Laminating the exterior. Note the fiberglass overlap.

(clockwise from top left) Once the interior was sandblasted, I primed with Kilz . . . then rolled on a coat of polyurethane. A view of the interior paint. Needless to say, it was a fairly dramatic improvement.
quart that was a very strong, tough paint. (I even bought some dented close-out cans for $2 each!) It took about 3½ quarts to do all the surfaces, including the insides of the lockers and the underside of the cockpit. The glossy surface makes it much easier to wipe off mildew, and, unless you live in Nevada, it will mildew at some point—I promise.
You need to use some sort of primer, though. The polyurethane is so hard that its adhesive strength is sometimes less than ideal. I used 2 gallons of Kilz oil-based primer. Kilz has a reducer in it that softens cured paint ever so slightly, allowing a very strong grip over old paint. So far, the Kilz-polyurethane combination is holding up very well.
One of the dangers with polyurethane is that it can't be sprayed without elaborate breathing protection. Spraying is fast, and it results in a super-smooth glossy finish, but it's not necessary for the rough interior surface. (If you're painting a liner, that's another story—but liners rarely need painting.) A roller works fine. I found several inexpensive short-nap rollers that worked fairly well, though some began to dissolve after a while and leave fibers in my surface. This paint contains some aggressive solvents, and it's also very sticky when it starts to dry. I tossed them when they started to go, and I put on a new cover. The expensive covers seemed to hold up better than the cheap ones. I also saved a bit by buying special solvent-resistant covers from BoatU.S., and cut them in half on the table saw. The smaller size made it easier to get into corners.
Painting the interior took about two weeks, not including the preparation time. The improvement is dramatic, and apart from new cushions, probably the most noticeable improvement to the boat's interior. Though it's certainly a major project, I wouldn't hesitate to paint the interior of a boat that doesn't have a liner.
Of course, the most reliable electrical system in a boat this size is none at all. That would have been far better than the rat's nest of lamp cord, corroded switches, and wire nuts that I found. I knew from the very first survey that every bit of the electrical system had to be replaced.
Remember: boat wiring is totally different than residential wiring. Techniques that work fine in the nice, dry, still environment of the average home interior will not fly onboard your boat. Using approved marine wiring techniques is no more difficult than residential work, but it requires a little learning, planning, and attention to detail.
In the learning department, you can make use of a few books. I found a copy of Nigel Calder's Boatowner's Mechanical and Electrical Manual at the library. In it, he recommends THWN stranded wire, though others will say to only use fully tinned, marine-grade wire. The thinking is that tinned wire won't wick water in through the ends. I went with the stranded wire for reasons of cost. I was careful in sealing the ends, didn't have any terminals that would be exposed to standing water (hopefully), and wouldn't be running wires through the bilge. To completely replace all the wires, I used about 150 feet each of red and black 12 gauge, and about 15 feet each of red and black 10 gauge for the battery supply wires.
The bible of electrical marine installations is the American Boat and Yacht Council's (ABYC) Standards and Recommended Practices, section E-9, which covers DC installations in boats. I finally found excerpts from the ABYC spec on the Blue Sea Systems website, at www.bluesea.com/abyc.htm.
The U.S. Coast Guard (USCG) also has mandatory requirements for electrical systems in Title 33, CFR 183 subpart 1, section 183. You can look at these at www.access.gpo.gov/nara/cfr/waisidx_99/33cfr183_99.html.
In general, the USCG requirements are much less stringent and detailed than the ABYC standards. When I wired my boat, I followed the ABYC spec as closely as possible, though it's hard to say with complete authority. The ABYC electrical specification is directed primarily at manufacturers (their Standards and Technical Information Reports for Small Craft is $219 for members only) and there isn't a consumer version available. Much more affordable is Charlie Wing's Boatowner's Illustrated Handbook of Wiring, available for $30 from the ABYC and regular bookstores.
The heart of your boat's wiring, and the logical place to start, is the electrical panel. You can buy one or make one yourself from scratch. They can get quite expensive, especially if you use marine breakers instead of fuses. It's an extremely simple thing, consisting of six fuse holders connected to six rocker switches. One side of the fuse holders are all connected together, which is where the positive connection of the battery goes. There's also a negative connection on this panel, but that's primarily for illuminating the rocker switches (they have neon indicator lamps in them).
When I planned my electrical layout, I added a bus bar and a terminal strip. The bus bar is just a strip of thick copper with several screws tapped into it. The bus bar serves as the main grounding point for everything electrical on the boat.
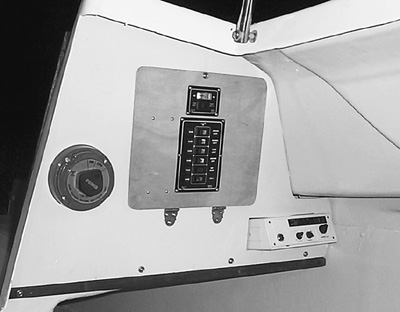
The panel and new battery switch in place. Since the battery isn't used to start an engine, the big battery switch is overkill, but it didn't cost much.
The terminal strip is to help distribute the positive end of the circuit, and avoids the common problem of several wires branching off of each switch in the electrical panel. A single wire goes from each switch to the terminal strip, where small jumpers further distribute the power. Each bulb or electrical circuit has its own spot on the terminal strip, where a single wire is anchored. This further helps to avoid the rat's nest syndrome, where snarls of wire branch off in all directions. The rat's nest makes troubleshooting difficult or, in extreme cases, impossible. Trust me, you'll have trouble at some point—electricity mixed with corrosion and the damp environment of a boat means problems are almost a given. You'll thank yourself later if you take the time to do it right now.
You should label everything neatly for the same reason. I printed out labels on the computer and taped them to the board on which the panel was mounted. I also used a fine-point Sharpie to identify the wires. I wrote the name of the circuit—bow bicolor lt, masthead anchor lt, steaming lt, and so on—on a small piece of an Avery label, cut it out with scissors, and wrapped it to the wire. Then I covered that with a small piece of clear packing tape. (If you can find it, clear heat-shrink tubing is a better choice—more about heat-shrink later in this chapter.)
There has been some debate about the best way to attach wire terminals. The ABYC says that you should use captive terminals (ring or bent-fork type) that can't slip off the screw on terminal strips. It goes on to say that solder connections can't be used alone to hold a terminal to a wire, but some type of me-
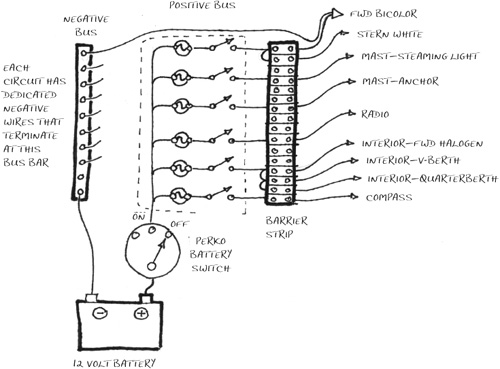
My 12-volt distribution schematic.
chanical fastening must be used. They're talking about crimp-on connectors here, and they go on to say that crimp-on connectors must be installed with a crimper. I attached my terminals by crimping on the ring terminal and soldering the crimp, and then covering the joint with heat-shrink tubing.
Heat shrink tubing is great stuff. You slip the tubing over a connection, apply heat from a match or a heat gun, and it contracts to about half its diameter, forming a neat, permanent cover. Forget that black, stretchy electrician's tape—it makes everything a sticky mess and doesn't hold up well in a marine environment. If you can find it, they even make a clear heat-shrink that's great for labeling the wires. I found heat-shrink tubing at a hardware store, but it was only available in black.
The ABYC spec also says that wires must be supported every 18 inches. I found a kit at an automotive store that contained a couple sizes of zip ties and several different sizes of nylon binding straps for about $2. I bought three packs and used just about all of it. The wiring straps were mostly too small, since the 12-gauge wires made a fairly large package when bundled together. The zip ties help to keep things neat. I've also seen zip ties with lugs for screws molded into the ends. These would be ideal, but I've only found them at specialty electronics suppliers, and they're pricey if I remember correctly.
Once the panel was installed, the wiring went along smoothly. I used an old 12-volt plug-in "wall wart" transformer—one of those big, black, ugly transformers—to test each leg as it was installed, and each circuit worked the first time. The mast wiring was replaced as well, and I used a pair of two-conductor trailer plugs for the disconnect. Since this connector is exposed to the weather, I'll certainly have problems in the future, but this is a common trouble spot.
If you've never done anything like this before, don't panic. Just read as much as you can, start on something small, and approach the problem one step at a time. It's really one of the easier projects on a small boat, as long as you keep the total system simple.
Heat-shrink tubing at work. First, crimp and solder the ends, and then slide the heat-shrink over the terminal and apply heat. Neat, permanent, and not sticky!
After all the prep work, painting, and sanding of the hull and topsides, it was finally time to paint the exterior. There are several paint manufacturers to choose from, but I went with Petit because it was readily available from catalog suppliers and slightly cheaper than the competition. The exterior of a sailboat is a punishing environment for a coat of paint to endure, so I don't recommend scrimping on paint. Buy a good, marine-grade paint, and stick with one manufacturer for everything. Interlux thinner might do some strange things when used to thin Petit's paint. Maybe it'll work fine, but if I were you, I'd confine my experiments to the doghouse (the doghouse in your yard, not the doghouse on the boat). Don't experiment on something as large as your hull unless you really know what you're doing.
For painting the hull, polyurethane is the only way to go. Standard oil-based enamels, even the best marine grades, will have a life expectancy of about two years. It isn't unusual for polyurethane finishes to last five to ten years.
The very best finish is a two-part, sprayed-on finish. The only problem with this is that spraying polyurethane is so toxic that the fumes can kill you. Some two-part spray coatings are only available to professional refinishers, who use full-body protective suits and positive-pressure ventilation systems. Since we're talking about relatively small boats here, the cost to have a hull sprayed might be worth considering, es-
|
PAINT CHOICES |
|
As I was completing the section on polyurethane paints, I read an article comparing different paint types for above-the-waterline use ("Topside Paint Kick-Off," Practical Sailor, Vol 28, #4, February 15, 2002). They applied different one-part and two-part polys, as well as other industrial and standard enamel coatings, to the side of an old Boston Whaler. |
|
The initial results were that most two-part polys had excellent to good gloss, while most one-part polys had fair or poor gloss. The exception among the one-part polyurethanes was Interlux Brightside, rated excellent for gloss in red and white, fair in blue. My choice, Petit's Easypoxy, was rated as poor for all three colors. |
|
Even though Practical Sailor didn't rate the paint very highly, I'm extremely satisfied with Easypoxy's performance and gloss. Maybe I'll try Interlux next time, but if the difference is as dramatic as they indicate, I'll need sunglasses to look at my hull. |
pecially if you can work out a deal where you do all the stripping, scraping, and sanding. A sprayed poly finish is beautiful—really. It can look as if the hull popped from the mold hours, rather than decades, ago.
If you decide that $200 per foot (a common rate to refinish just the deck; hulls are often less—around $100 per foot) is a bit too dear, there is an alternative. The major paint manufacturers have developed polyurethanes that are designed to be applied by roller and smoothed out with a dry brush. This technique is called drybrushing, and if you're careful, it can produce a finish that's nearly as glossy as a sprayed-on paint job (see the sidebar, Paint Choices, above). This technique is especially suited to amateur boat restorers who may not have access to all the necessary safety equipment.
One of the more recent developments in boat paints is one-part polyurethane paints. They're much easier to use than two-part paints because they don't need to be catalyzed before application, but they do need to be thinned a bit. They're less expensive as well. I used Petit's Easypoxy one-part polyurethane, Jade Green.
Painting works best if you have a helper or two, but it can be done by one person. Here's how:
Using the paint manufacturer's special brushing thinner, a batch of paint is thinned to a consistency of heavy cream. This is rolled onto the hull with a foam roller cover (not a household roller cover that you can get from a paint store—the household roller covers fall apart and ruin the job). At this point, the paint will slightly resemble the surface of an orange peel. While the paint is still wet, the finish is tipped off by gently stroking it with a good brush. This smoothes the finish considerably. I started by sanding the entire hull with a ¼ sheet electric pad sander. I had a few areas where the scraping had taken small chips from the
The exterior paint job at the start of the project. A little more scraping and sanding remains to be done around the bow.
hull, so I spot-primed these and sanded them in. (As I later discovered, this was a mistake. I should have primed the entire hull.) I removed the dust by wiping the hull down with a damp cloth.
If you have access to some help, it's great if you can get one person to mix paint and fetch rags, another person to roll, and a third person to tip it out. When I painted my hull, I did all three jobs myself. It isn't too bad if you do small sections of the hull at a time—roll out about 5 feet of hull, then brush, then mix more paint and start again.
As the paint dries, the brush marks seem to flow together. It also brings out even the slightest imperfection of the surface beneath, as I found out. My paint job still looks super, and I'm quite pleased with the way it turned out. But if you examine the hull closely, you can tell it's been painted. Next time, I'll prime and sand the entire hull.
There are some considerations regarding bottom paint that I had to think about. Since my boat will be primarily sailed in an inland lake, I had several options. I could go without bottom paint at all, and haul out on the trailer to scrub off the slime every once in a while. Or I could use a hard paint finish with no antifouling properties, like the racers use. In the end, I chose a low-cost house-brand bottom paint from BoatU.S. My reasoning was that the cheaper paint would be somewhat less toxic, yet still protect the hull. The fresh coat of paint looks good on the trailer, too.
The bootstripe, which is the stripe of (usually) contrasting color at the water-line, deserves special mention. Part of the time it's dry; part of the time it's under water. And it needs a bit of antifouling chemicals to prevent grass and slime growth. There is a special boot-stripe paint available that I used—though it's expensive, I felt it was worth the cost.
To prepare the deck, nearly all the hardware was removed, and nearly all the holes were filled. A few things—like the winches, for instance—remained in their original location, although they bothered me. The line from the jibsheet blocks to the winches should ideally be an unobstructed, straight line, and mine wasn't. As it was originally installed, the jib-sheet would have rubbed against the cabin as it went to the winches. That would easily rub straight through my nice new paint job, as well as increase friction and wear on the sheet. My options were to install a small wooden or brass chafe strip on the cabin side, or move the winches outboard. In the end, I removed the winches, fabricated a pair of custom stainless steel brackets to mount the winches on, and reinstalled the whole thing. The new location works fine on the starboard side, but since winches turn clockwise, the port jibsheet still just touches the edge of the cabin. It's much better than the original arrangement, though.
The topsides were painted with Petit's Off-White polyurethane, and I used Sandstone for the nonskid areas. The molded-in nonskid pattern, like most older boats, needed special attention. On most production boats, the non-skid is an area of tiny diamond-shaped patterns molded into the deck. Even when it was brand-new, it didn't grip terribly well. Now most of the recesses were filled with old paint, so it's even
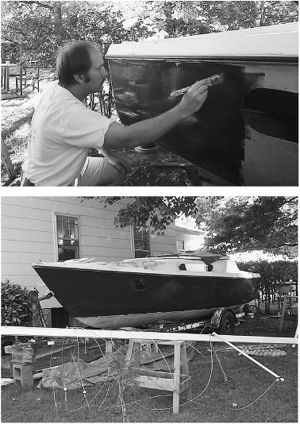
(top) Drybrushing the hull. The paint has been rolled on, leaving a very bubbly and rough surface. Lightly stroking with the brush pops the bubbles and smoothes the surface greatly. I was very pleased with the performance of the Petit one-part poly, though I've heard that two-part poly gives even greater gloss. (bottom) The hull after the first coat of green polyurethane.
less effective. And since this boat has no lifelines on it, the nonskid areas are especially important.
To renew my nonskid, I used a modern adaptation of an old method for treating wood decks. They were commonly painted, and then a coating of fine sand was sprinkled into the paint. When the paint dried, the excess was brushed away, leaving a surface that gripped well. Sometimes another coat of paint was added to increase the surface's durability. Although sand can work well, I've heard it can be hard on bare feet. (I've also heard that model railroad ballast, available in hobby stores, makes a great nonskid.) Instead, I used a polymer product from Interlux that is made of microscopic spheres. The rounded surface of the grit is said to grip well, yet not hold dirt as much as sand. First, I sprinkled the polymer, which is a very fine, lightweight powder, onto the wet paint. I discovered that I could get equally good results by mixing the compound directly into a batch of paint. I tried adding a second coat of paint over the nonskid, thinking that this would make the coating more durable, but that didn't work. The Interlux polymer is so fine that the paint made the surface too smooth. I used a brush to apply the paint, but a roller would probably work well, too. This nonskid is comfortable on bare feet and grips well, but it always looks dirty and is impossible to clean.
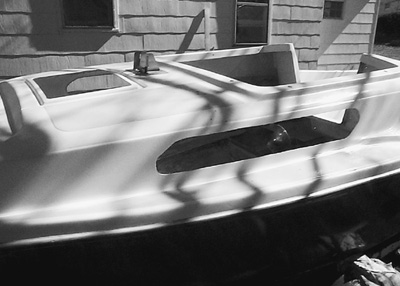
The same technique applied to the deck. The color match for the deck and non-skid areas was particularly nice, and probably a side effect of sticking with the same manufacturer for the entire project.
Locating the hardware is always a difficult choice while you're restoring, especially if, like me, you couldn't sail the boat before you bought it. Now you're forced to use your imagination to find the ideal locations for halyard cleats, fairleads, and so on. No matter how good your imagination is, there is nothing like a day on the water to point out the obvious. I was quite certain that once I got my boat launched, I'd be saying to myself, "What was I thinking when I put that there?"
This is why you should avoid bedding hardware in 5200, which is made by 3M and is legendary among the boatyard set. It's an adhesive polyurethane bedding compound that people swear by—and at. It forms a permanent bond, nearly impossible to remove once used. (I've heard, though, that a heat gun can work wonders to help remove the stuff.)
In addition to 5200, 3M also makes 4200—a polyurethane caulk that reportedly doesn't stick like grim death. This is what I used to re-bed all the hardware that was mounted on the deck.
The old standby is polysulphide. This is good stuff and could be used to bed everything above or below the waterline except plastics. A commonly available brand is Life Caulk from Boatlife. It's available everywhere (except Tennessee, that is, which is why I used the 4200).
If you're wondering why I haven't talked about silicone, it's because it isn't nearly as useful as the other two compounds. You'll probably discover why, as you work on the leaky fitting that was bedded in silicone on your old boat. It seems that people who are less than knowledgeable about boatwork commonly reach for silicone, attempting to stop leaks by surrounding the offending fitting with a big bead of the rubbery goo. To quote Rocky the Flying Squirrel, "That trick never works!" You have to remove and clean the underside of a fitting before setting it in compound, and if you use silicone improperly, you'll get plenty of practice removing, scraping, and re-bedding fittings. The problem with silicone is that it doesn't have much adhesive strength. It's strong and very chemical-resistant, though, and works well on plastic parts, like my portlights. These require a soft, rubbery seal to prevent stress cracks, and I used silicone to bed my new portlights when I installed them. Silicone should never be used below the waterline, though.
If you've ever had the extreme displeasure of having to sleep in a berth that's directly under a leaky fitting, you'll understand why I'm a little anal about properly bedding deck hardware. Leaks can travel a long way in the overhead from their original source, and they can be maddening to track down. It makes sense to stop them before they start.
To properly bed a fitting, both mating surfaces must be perfectly clean and dry. Since I repainted my boat, this wasn't a problem, but make sure there isn't a trace of old compound anywhere. A little light sanding followed by an acetone wipe isn't a bad idea. Next, apply sealant to the fitting. Make sure there's a little sealant donut around each bolt hole. Set the fitting in place, and put a ring of sealant just under the head of each bolt before you insert them into the fitting.
|
SAVING ON SEALANTS |
|
Most hardware-store-variety sealants aren't up to marine use, which is a shame because things can be so much less expensive when bought outside the typical boat chandlery. I bought my silicone from the hardware store, and so far it's holding up as well as any marine variety would. I also found polyurethane roof caulk (not polyurethane construction adhesive) that was almost identical to 5200, both while wet and when cured. Still, I'd never use this in a critical or below-the-waterline application. But it worked well under the rubrail at the hull-deck joint, where it seemed that some kind of thin wood was used to fill gaps. I dug out the rotten wood, and filled the resulting gaps with poly roof caulk. For this application, it worked great. The entire job took three tubes, costing $7.50 instead of $45. |
Snug the bolts enough for the sealant to make good contact with the fitting surfaces, but wait until the sealant cures before tightening. Otherwise, most of the sealant will squeeze out onto the deck where it won't help stop leaks. Don't try to wipe away the excess sealant while it's wet; trim it with a razor blade after it cures. (How well the razor blade trim works varies with the type of compound you use, though. It didn't work too well with silicone; the soft compound seemed to roll under the blade. You may have different results than I did.)
When a fiberglass boat is built at the factory, its hull and deck are often made differently to handle the different stresses placed upon it. Solid fiberglass is somewhat flexible unless it's really thick and heavy. Since the hull is supported, in a sense, by an even force (the water), it can be a little flexible. The deck, on the other hand, is subjected to "point-loading stress," meaning when a 250-pound deck ape jumps up and down because he's dropped a winch handle on his foot, it places a high load in a relatively small area. Fiberglass boatbuilders discovered early on that people prefer a boat that feels "solid" underfoot, and a boat with a deck that flexed greatly was perceived as cheap. (This is a particular problem with the MacGregors, and it explains why the previous owner went to so much trouble to rebuild the foredeck.) As a result, decks are commonly built with some kind of stiffening core in them, usually plywood panels surrounded by fiberglass. Sometimes a special balsa core or polyurethane foam was used on expensive boats, but mostly you'll find boats with plywood. As long as the plywood remains sealed, this is fine.
The trouble starts when the builder drills into the deck to mount a cleat. The bedding fails after ten years or so, and your boat's previous owner didn't notice. Water started to slowly creep into the core, and once it gets in, it's hard to get out. Rot follows, and a big repair job is required because of a lack of attention to a small detail. I imagine the builders
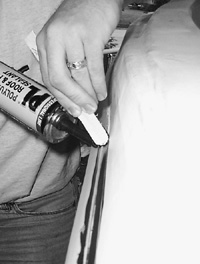
Caulking the rubrail. For this job, I found a black polyurethane roof and flashing sealant at a builders' supply store. It looks, handles, and smells exactly like 5200, except this product was $2 per tube, as opposed to about $12 per tube for the genuine article. I tested it first by squeezing a bead and letting it cure; it hardened into a very strong, flexible blob. By smoothing the bead with a paint stirrer that I'd sanded round, I got a good-looking, watertight seal.
thought that this would get boat owners back to the dealer to buy a new boat, which is one way to deal with the problem. Another way is to bed the fittings right in the first place and make the boat last.
The proper way to mount hardware is to seal the hole with epoxy. It isn't hard, but you should take the time to do it right. You start by locating the hardware—a cleat, let's say—and drilling the holes to mount it. Same as the original builder did, but don't bolt down the cleat yet. Next get a larger drill bit, and carefully enlarge the smaller holes, but don't drill all the way through. Only drill through the top layer of fiberglass and the plywood, but stop before you go through the plywood core. (If you do make a mistake and go all the way through, don't despair. It's just going to be a little harder to find the correct location of the hole, because we're going to use the small hole on the inside of the boat as a drilling guide later.)
Now go down below and tape over the little hole with masking tape. Mix up a small batch of epoxy. I used one of those dual syringe-type packages of epoxy glue that you can get at the hardware store for this job. Fill up the little well that you've drilled with the epoxy, and let it cure. If some soaks into the core, that's even better. The next day, peel off the tape, and run your drill with the correct sized bit through the hardened epoxy from the underside of the deck, and install your fitting. Not only have you sealed the core from water migration, you've created a fine little compression sleeve through the deck, and it won't crush the core when you tighten down the bolts.
But wait, before you tighten up that cleat, let's further suppose it's a mooring cleat—a mooring cleat that happens to be holding your one remaining anchor—and it's howling 50 knots in a summer squall outside, and there's a lee shore 50 feet away. The last thing you would want to hear is the crunching sound that fiberglass makes when a bolt head is being pulled through it.
The proper way to mount high-load hardware—like mooring cleats or lifeline stanchions—is to make a backing pad. Backing pads can be made of stainless steel or plastic, but the best is probably epoxy-soaked plywood. Get a piece of marine-grade plywood, and cut a piece that's a few inches larger than the mounting holes all around. Drill it to match the cleat. If the cleat is mounted on a curved surface, shape the underside of the backing pad to match the curvature of the fiberglass. Chamfer or taper the edges a little, and then coat all sides with a layer of epoxy. When it's cured, bed this well in a layer of compound, and then attach the fitting, using only stainless steel bolts and oversized washers (sometimes called "fender washers"). With any luck, you'll never need this kind of strength, but little details like this make a strong, safe boat, no matter what size she is.