
Copyright © 2006 by International Marine. Click here for terms of use.
After the first season of sailing the boat, I did a very stupid thing. While hauling the boat for its winter repairs, I removed the rudder at the dock so I wouldn't drag it across the parking lot as I pulled the boat up the ramp. It was late and quite dark, and my little Nissan Frontier could barely pull the boat up the ramp—I thought I may have ruined my transmission—and I busied myself with lowering and stowing the mast. When I launched again in the spring, it dawned on me where I last saw my rudder: lying on the public dock five months ago.
So one of my first jobs that season was to build a new rudder. Fortunately, I had an excellent resource for replacing a rudder blade: my friend Tom Stockwell has written an article about making a MacGregor rudder using a stitch-and-glue boat-building technique. This article can be found at www.geocities.com/thomas_m_stockwell/rudder.html.
Tom's article was the starting point for fabricating an entirely new rudder assembly. I built the blade of the rudder mostly as he described, except that the leading edge was reduced from 3 inches forward of the rudder post to 2 inches. In other words, the whole rudder was shifted aft 1 inch. This meant a slight alteration in the plywood core pattern. Tom calls this part a "key." My blade is 40 inches long by 12 inches wide. This may be a touch oversized for a Venture 222, since Tom's design is for a MacGregor 25, but in use, this rudder gave me excellent performance—better than the stock rudder, I think. Rudder area can be an important design parameter on a sailboat. If it's not correct, the boat will not balance well, either constantly trying to point into the wind or run off downwind. Sometimes balance issues can be addressed by shaving an inch or two off the bottom of the blade, or raking the mast, but neither was required on my boat.
But before we go any further, a caveat. Tom has had this design fail on him twice, where the rudder blade twisted and broke at the core. Others have experienced similar failures, but my rudder has worked like a charm. This could be because I sail in relatively protected waters, in usually calm conditions. The point to remember is that this is a relatively experimental design, and if you sail in rough waters it may not be suitable. In fact, as a condition of publishing his design, Tom has asked that I include the following disclaimer:
Dimensions for the new rudder.
Notice: By using this design, you are acknowledging that you bear full responsibility for any liability that may be incurred in the use of the resulting rudder. This includes accidental injury, death, or hardship that may result from the use of this rudder. By using these plans, you and your passengers relinquish all legal and financial claims against Thomas M. Stockwell. You acknowledge that should harm or injury result from the construction or use of this design, you will be liable for all damages, including (but not limited to) legal fees, medical fees, hospitalization costs, and so on. Authorized or unauthorized modifications to this design will not alter this agreement. This design is copyrighted by Thomas M. Stockwell, all rights reserved.
Building the rudder blade was a fairly straightforward process, thanks to the help that Tom's article provides. The core, or "key," is cut from a half sheet of ½-inch exterior plywood. Three layers are laminated together to create a 1½-inch-thick core. The keel is glued with a special woodworking glue called Gorilla Glue, which foams and expands as it cures. It's a strong, waterproof, gap-filling adhesive that is very well suited to this application. The core was completed by coating all surfaces with epoxy resin.
The blade was formed by wrapping the core with a piece of ¼ -inch plywood. Exterior fir is recommended, though I had to use luan, as it was all that I could find locally. The two halves are secured by nylon zip ties until the glue cures, then the entire thing is coated with epoxy. I took the additional step of laminating the entire surface of the rudder with a layer of fiberglass. The rudder shell is open at the top and bottom of the blade, allowing water to fill the cavity. It results in a lightweight yet neutrally buoyant rudder.
Where I had to be inventive was the upper part of the blade, where the rudder attaches to the transom. The piece I ended up making was designed primarily to accommodate my very last piece of ipe hardwood, which was 5½ inches wide and 54 inches long. The assembly can be thought of as a kind of sandwich—1½ inches of plywood is captured by two ipe sides, which support both the rudder and the tiller, allowing them to pivot. The illustration explains it best.
The kick-up system is simply several wraps of bungee a few inches below the pivot point of the blade. If the pressure against the blade causes it to kick up too easily, it's a simple matter to increase the tension or number of wraps on the bungee cord.
This rudder design has several advantages over the stock MacGregor rudder. The foil shape causes less turbulence through the water as well as decreases the likelihood of stalling in sharp turns. The original rudder was just a slab-sided board with rounded leading and trailing edges, which is a hydrodynamically poor performer. It's lighter than the stock rudder as well. The hollow construction might make it more fragile, but I don't really think so. The entire thing is coated with epoxy resin inside and out, and the outside is laminated with fiberglass. It's as likely to pull the pintles and gudgeons from the transom before the blade itself breaks.
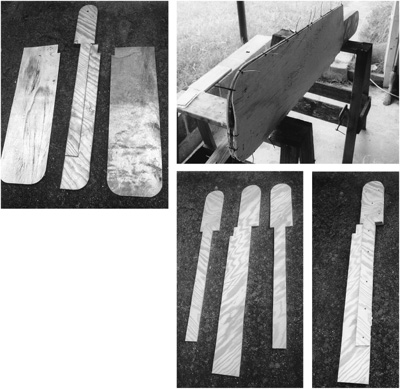
(clockwise from top) The parts for the lower half of the rudder—the plywood "skins" and a "key." Everything assembled with zip ties. When glued and screwed together, the "key" forms a very strong, rigid structure.½ -inch plywood cut to shape a rudder core, or "key."
One mistake that I made on my first blade was trusting a salesperson who said this was exterior plywood—it wasn't, and the trailing edge of my rudder began to separate after about a month in the water. It was fairly easy to correct with a little more Gorilla Glue and some epoxy and glass over the trailing edge. When I built my second rudder, I used ¼ -inch BCX plywood. This one is heavier and should hold up better than luan plywood.