 Bearing lubrication and replacement
Copyright © 2006 by International Marine. Click here for terms of use.
Trailers are often neglected and in need of restoration, just like your boat. Your trailer is very important; a failure of the trailer can often bring about disastrous results. For this reason, I recommend seeking professional help if you're at all uncomfortable with working on things mechanical.
On the other hand, trailers are relatively simple affairs, especially those for smaller boats. After doing all this boatwork, there's no reason why most folks can't tackle a trailer as well. Parts are readily available, and all but the most rotten and rusted trailer can be re-welded and repaired.
There are several areas of trailer restoration that you should consider. These are:
Bearing lubrication and replacement
Axles
Tires
Lights
Coupling and safety chains
Bunks and chocks
Winches and straps
Let's start with the most commonly needed job: bearing lube and replacement. If your trailer has been sitting around for a few years, the grease in the bearings is probably dried out and no longer able to do its job. The bearings will need re-greasing. The only proper way to do this is to take apart the hub, clean off the old grease with solvent, massage new grease into the bearings by hand, and reassemble the hub. It's messy and somewhat intimidating the first time you do it, but you'll learn quickly. The job can be completed in an afternoon. Doing it right allows you to visually inspect the bearings and races. When the trailer is jacked and the wheels are free to turn, give them a spin. You shouldn't feel any roughness or play in the bearings, but they should turn smoothly. If they don't, plan on replacing the bearings. This is not a good place to take chances, as a bearing failure often causes the wheel to become separated from the trailer. The faster the bearing is going at the time, and the heavier its load, the more likely it is to fail. Thus, bearings most often fail when going down the freeway at high speed, with the boat on the trailer—an exciting event, to say the least.
Standard bearing sets often come with installation instructions, and you should follow these carefully. Bearings must be installed with both inner and outer races. The outer races are press-fit into the hubs. Of course, my old factory MacGregor trailer (from American Trailer Company, one of several vendors MacGregor used over the years) didn't use anything close to a standard bearing set. After removing a bad bearing, I set off in search of a new one. I tried three trailer supply dealers and one auto parts store, and I finally determined that an industrial bearing house was my only chance. One supplier had the bearing, a second had the race, but my hubs are unusual. One of the races seats against an internal snap ring. Of course, I didn't know this, and I broke the snap ring while driving out the bearing with a punch. The bearing dealer suggested another supplier that I'd never heard of for odd-size snap rings, and they had one. (It cost so little that the dealers gave it to me, no charge. A little embarrassing, but I finally had the parts I needed.)
The procedure for replacing bearings varies slightly with different hubs, but it's generally similar for all trailers. Block and jack the trailer so that the wheels are off the ground, and the trailer is stable. First, remove the grease cap. It's usually a friction fit and can be pried off with a flat-bladed screwdriver. Under the grease cap you'll find a large castle nut that is secured with a cotter pin. Remove the pin, then un-screw the large nut. This is the big nut that essentially keeps the wheel on the axle, via the bearings. It shouldn't be on too terribly tight; you may be able to free it with a large crescent wrench, but the preferred method is with a correctly-sized socket and a breaker bar. It helps keep things straight if you place the parts in a row, on a clean rag, in the order that they're removed. Once the nut is off, there should be a large washer, followed by the front bearing and cage. (There are two sets of bearings on each wheel—a front or outer set, which is on the outside edge of the wheel, and a rear or inner set, which is on the inside. Each set of bearings has a pair of races which the bearings roll against: an inner and an outer race. The inner race contacts the axle, while the outer race is press-fit into the hub.) You can get these off easily by pulling on the entire wheel, which should leave the inner bearing, washer, and grease seal (it looks like a cup-shaped washer with a rubber inner edge) on the hub. The grease seals are usually a friction fit and can be a little tight if they're correctly sized. I destroyed mine in the process of removing them, but the new ones went on and off by hand.
Getting the bearings and inner races off is relatively easy, but removing the outer races is more difficult because they need to be driven out with a punch or mild
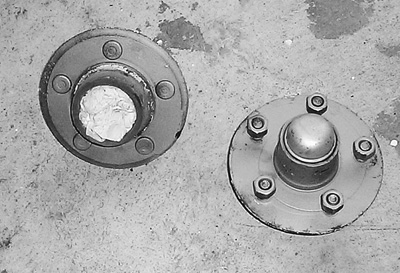
The hubs after sandblasting. Take care not to get sand on the bearing surfaces.
steel bar. If you have one, use a brass punch. Before you can remove the races, you'll need to remove the grease seal. Carefully pry it out, then remove the rear bearing set. You should be left with a hub containing two races. Clean the old grease out of the inside of the hub and take a good look. If one of your bearing races rests against a snap ring, like mine did, then you should be able to see it. Be careful when you drive out the race, making sure you're driving the race and not the ring; otherwise you'll break it and spend an afternoon driving around town searching for a replacement.
Drive the bearings out carefully, so that you don't damage the hubs. Place the hubs flat on a piece of wood, and go around the edge of the race, driving a little at a time. Mine required some aggressive negotiation to get them out, but don't get too rough with them if you can help it. Of course, a hydraulic press is the professional way to get these out, but if you have one of those, you probably know more about bearings and press fitting than I do, and you can skip this section altogether.
Once the races are out, clean the surfaces of the hubs with fine emery paper to remove any scratches or corrosion. This will make installing the races slightly easier. The new races can be carefully driven in, or they can be pressed in by a trailer shop.
Once the outer races are installed in the hubs, the rest is easy. Just reverse the removal procedure, but stop when you get to the rollers—you need to grease them before you install them. Place a blob of grease in the palm of your hands, and then massage the grease into the rollers with your palms. It's messy, but it works. Complete the installation, greasing everything as you go. (Since you'll get grease all over your hands, you'll grease everything as you go whether you want to or not.)
After the bearings are greased and in the hubs, there's one additional step to take, and that's preloading the bearings. This is a fancy name for the way you should tighten the large castle nut in the center of the axle. Tighten the nut with your hands, as tight as you can. Then add another one-quarter turn with a wrench. Spin the hub a few times to distribute the grease. Then loosen the nut, retighten as far as you can by hand only, and then reinsert a new cotter pin. Replace the grease cap, and you're done.
If you have bad bearings and your hubs look nasty, you can replace the entire axle as a unit. For about $180, you can buy a new axle that allows you to grease the bearings without disassembly. These are available from Champion Trailer Supply, and probably other suppliers as well (see Appendix 7). They have a grease fitting in the center of the axle, and you just give each wheel a couple of pumps with a grease gun every now and again. It seems like it would be a very nice upgrade. Had I known of the difficulty I would experience finding replacement bearings for my trailer, I'd have done this at the outset and avoided the hassles.
There are two schools of thought about trailer tires. One school says that you must use special trailer tires, and the other says that, basically, any old tire will work as long as it isn't rotten. In truth, regular car tires will work, but they aren't the best choice if you need new tires on your trailer. Car tires, especially radials, are designed to maintain maximum traction on the road when you're turning, swerving, accelerating, or braking. To do this, they use flexible sidewalls. Trailer tires need rigid side-walls to prevent sway. The only time they need traction is when braking, if the trailer is equipped with brakes. So the upshot is that while regular car tires will work in a pinch, real trailer tires are better. If you decide to pinch pennies and use car tires, be sure you have sufficient tongue weight to prevent sway (usually about ten percent of gross trailer weight). Hook up the boat, and put all the heavy stuff forward. Actually, this is good practice no matter what type of tires you use.
When I purchased my boat, there were no lights at all on my trailer. Lights are often neglected and nonfunctional on used trailers, but they're simple to fix. Most auto-supply stores carry submersible trailer light sets for around $25, but there are a few things you can do to extend the life of these systems.
One is to mount them up high. (Check your state trailering laws before you do this; there may be specific requirements about exactly where lights must be located on a trailer.) I bolted a pair of bent steel fence posts to the aft end of my trailer to make a pair of uprights. They serve two purposes: they make it easier to center the boat on the trailer when pulling the boat from the water, and they're a handy place to mount the lights where they won't be submerged. They also increase visibility a bit, because your brake lights will be at the eye level of drivers behind you.
The second improvement is to change the wiring a bit. Most manufacturers of aftermarket trailer lights will tell you to bolt the ground wire of your trailer to the trailer frame, which is standard practice in a car. A car isn't regularly submerged in water, though, so these ground connections in cars are rarely a problem. Many intermittent failures on boat trailers, however, can be traced to bad grounds, due to corrosion. Go to the hardware store and buy 50 feet of green wire and run a separate, isolated ground from your trailer electrical connector to each light. Solder and heat-shrink all connections, just as you did onboard. And support your wires well with a nylon cable clamp every 18 inches or so. This should greatly increase the reliability of your trailer lights.
Take a very close look at the trailer coupling. A little rust is OK, but make sure the bolt that secures the ball cap screws down tightly without binding. Chasing the threads with a tap and die set might clean things up enough to get a secure connection, but if it doesn't, you'll need a new coupling welded on. In other words, if you attach the trailer and it clunks when you tug up and down on the trailer tongue, there are problems. You shouldn't take it on the road until everything is tight and secure. Check your connection by pulling up and down as hard as you can once the trailer is connected to your hitch. If your ball cap screw is too loose, you'll be able to pop the trailer off the ball. This is especially bad at 55 mph.
Also examine the safety chains. Contrary to popular belief, these aren't cosmetic. They're your last chance if the hitch or coupling fails. If they have those silly little S-hooks on the end, go to the hardware store and buy a pair of screw-type chain couplers. Look over every link for thin spots. If the safety chains have been dragged, one of the links will probably be ground down to the thickness of a wire. Don't trust it. Buy a few feet of new chain and shackle it on. It's a simple and inexpensive fix that might prevent you from killing someone. And while you're at it, get a short length of chain and two screw shackles for the bow eye. Chain the bow eye to the trailer frame so that if the winch pawl fails, the boat will stay attached to the trailer.
The bunks are those long, carpeted wooden boards that support the bottom of your hull on the trailer. Better trailers have roller bunks, which can make launching and retrieving easier. Board bunks often come pre-rotted for you, so you can replace them with a trip to a building-supply house and a carpet store. I don't like using pressure-treated lumber because of the high amount of toxins involved, but it may be your only practical choice here unless you can get a pair of untreated yellow pine boards. (In my area of the country, the only commonly available yellow pine goes straight to the pressure-treating plant. Yellow pine is more rot-resistant than white pine, which is the other common choice.) You'll also need a long strip of indoor-outdoor carpet to cover the bunks. Using one continuous piece is better than patching together several scraps. There's some debate about carpet for your bunks; one camp says that you must use special "bunk carpet," which is available at marine chandleries. Your other option is plain-old indoor-outdoor carpet. I'm not sure that the difference is great enough to warrant any loss of sleep on your part. There is also a spray product called Liquid Rollers, which is a friction-reducing compound that's sprayed on the carpet. It's supposed to make launching and loading easier. I haven't tried it, but you might look into it if you plan on doing a lot of highway sailing. Your bunks might last longer with a coat of linseed oil applied before installing the carpet.
The chocks are big gray rubber blocks. My trailer has two—one for the bow and one for the keel. They can be replaced for about $7 each from a trailer-supply store.
If you have a questionable winch, it's usually best to replace the whole thing rather than attempting a fix. These are most commonly bolted on, which makes the job easier. If someone has welded on the winch, you'll have to grind the welds away.
When I bought my boat, I was amazed to find the original owner hadn't bothered to use a tie-down strap. The only thing keeping the boat on the trailer was gravity and hope. Ratcheting tie-down straps aren't too expensive, though they are prone to rusting and need replacing every few years. Don't leave home without them.
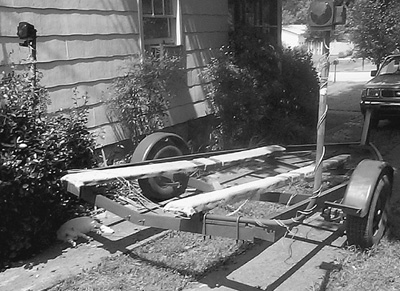
My trailer after sandblasting and painting. I'm still not entirely satisfied with the way the "uprights" turned out. Since I plan to replace those, they weren't painted. It still needs new carpet, a new winch, and new tires.
Just about all that's left to do to your trailer is sandblast and paint. You can try a chemical rust treatment that's phosphoric-acid-based, but sandblasting does a better job of preparing a surface. I'd use a cold-galvanizing primer and an epoxy-based top-coat. I've heard of people spraying trailers with pickup bedliner material, but I can't imagine that would work too well.